Files copied from the old site; see the list below for each file's source.
90 files (31.8 MB), 0 folders · README.txt · Catalog · Project Rapunzel v3.1
| Name | Size | Sheet | Title | Source |
|---|---|---|---|---|
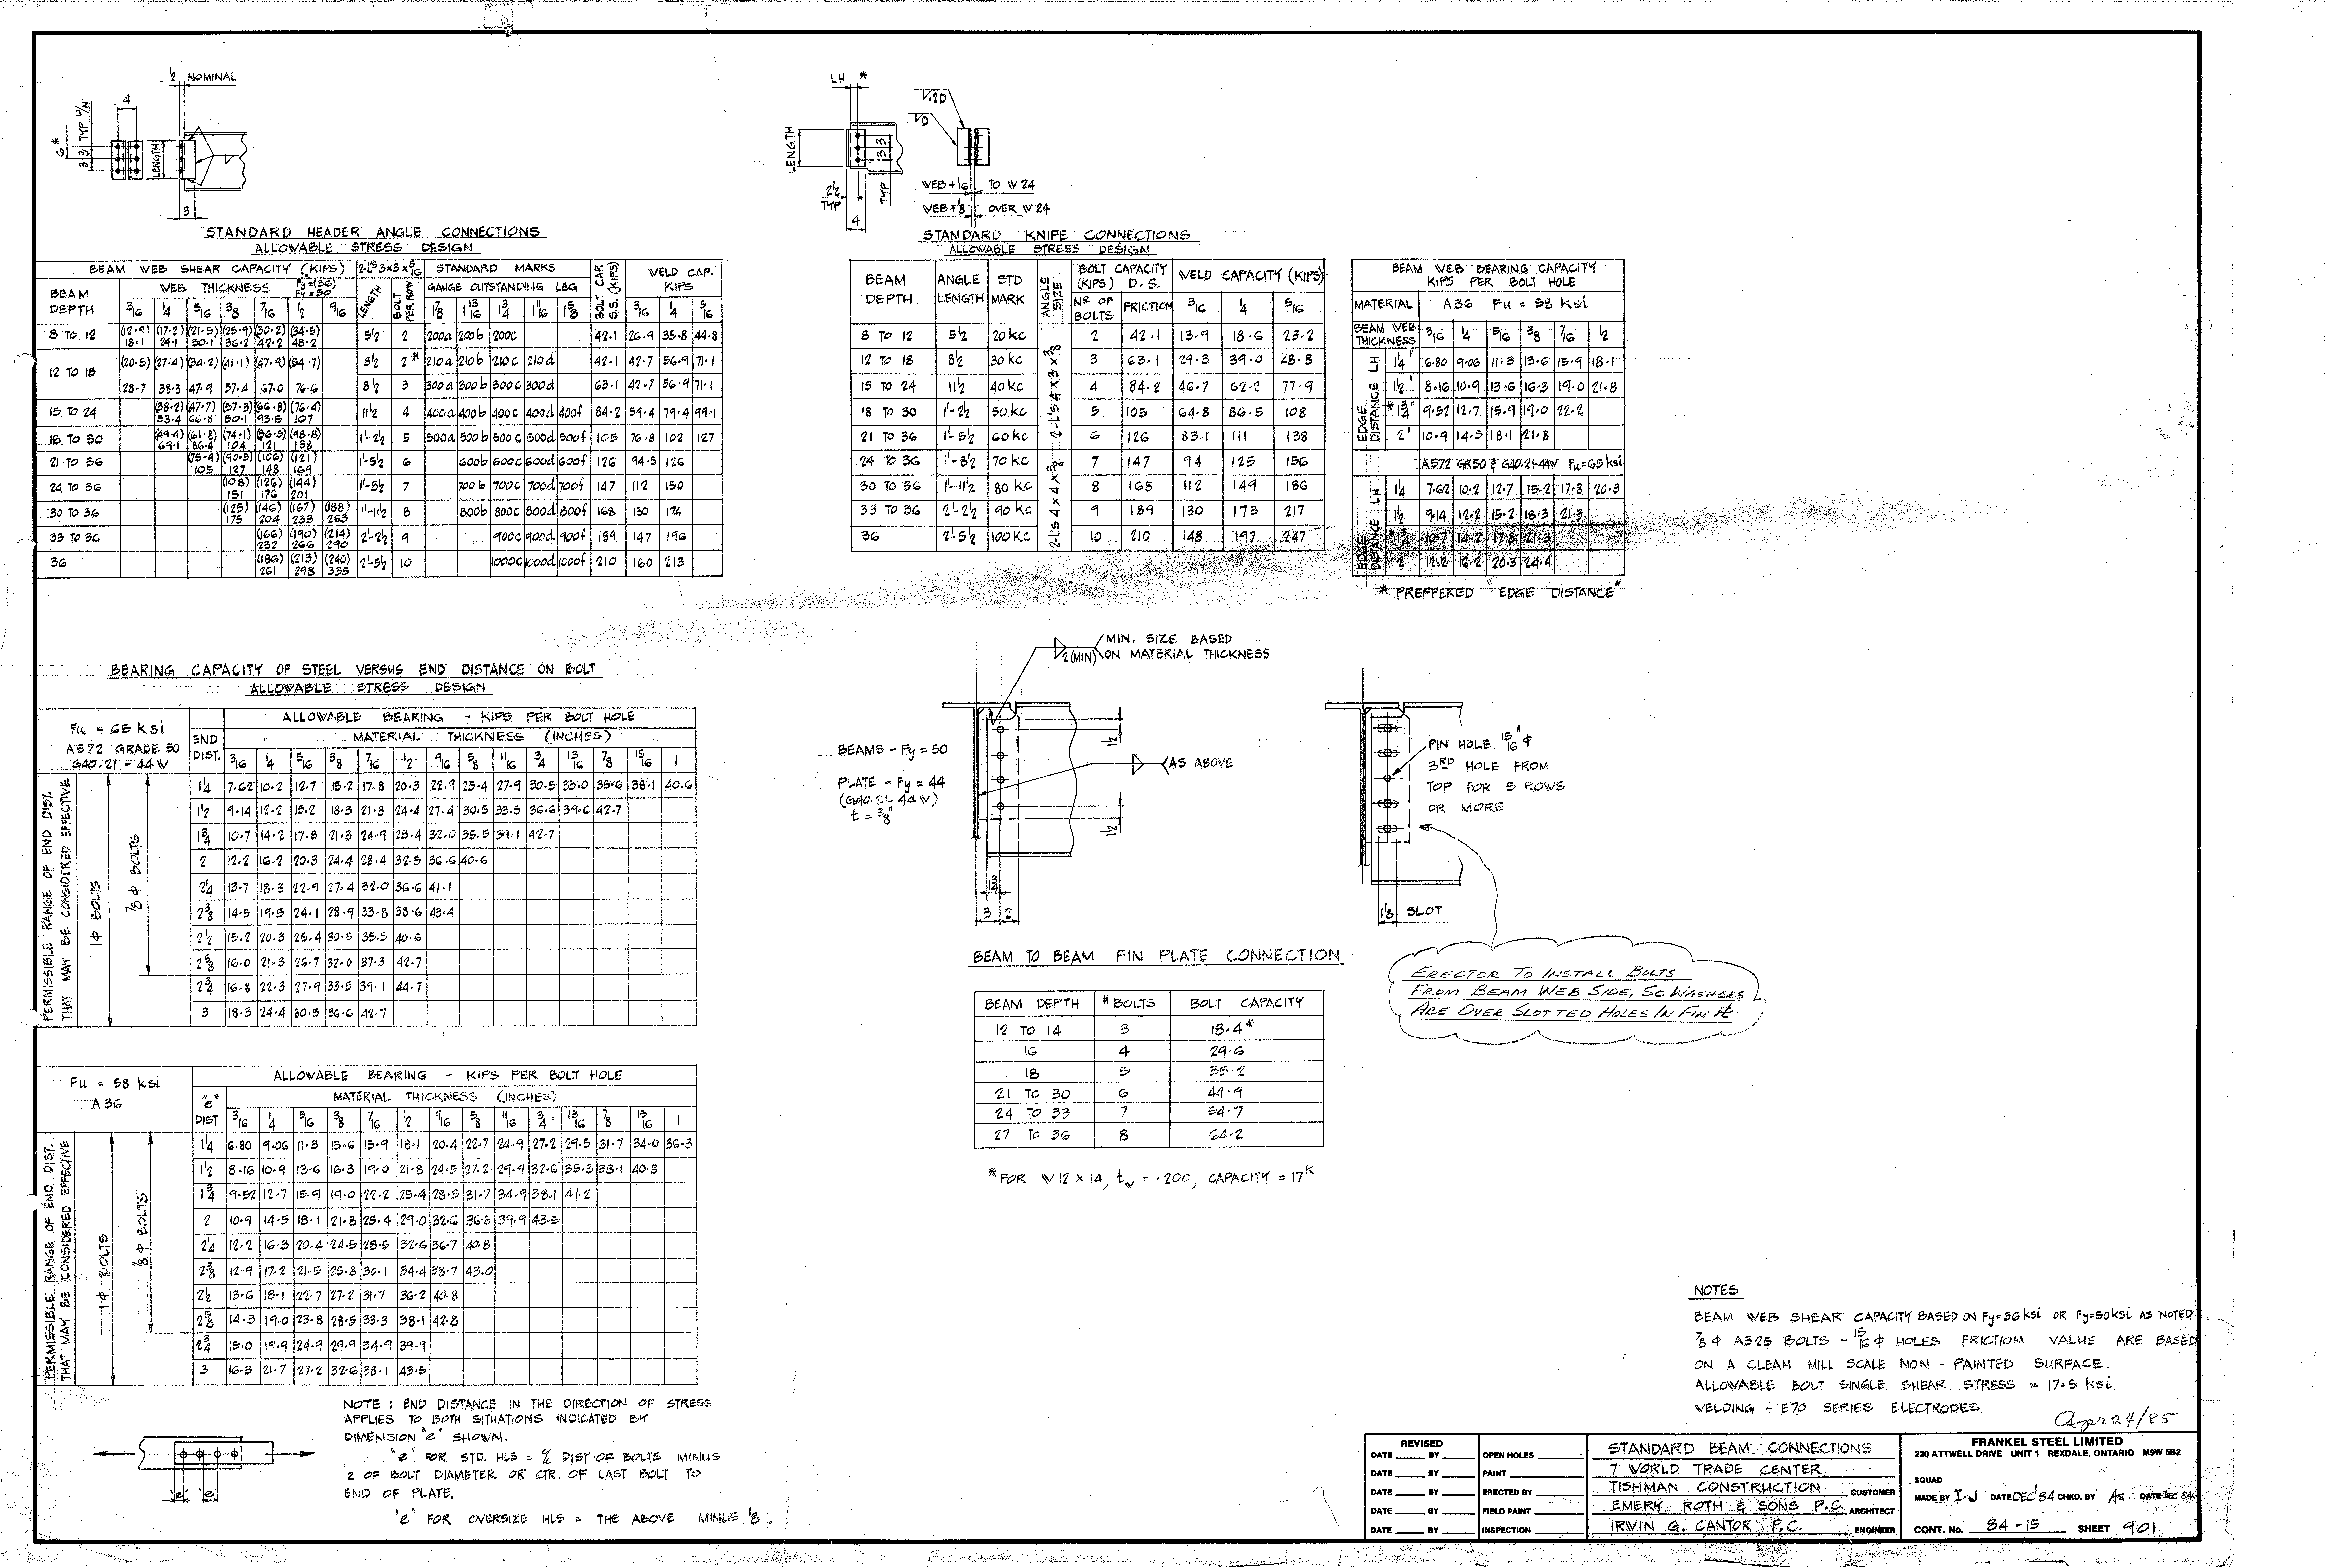
| 0901.png | 492.2 KB | 0901 | STANDARD BEAM CONNECTIONS | https://911warroom.com/model/files/WTC7/DRAWINGS/STRUCTURAL/DETAILS-PNG/0901.png |
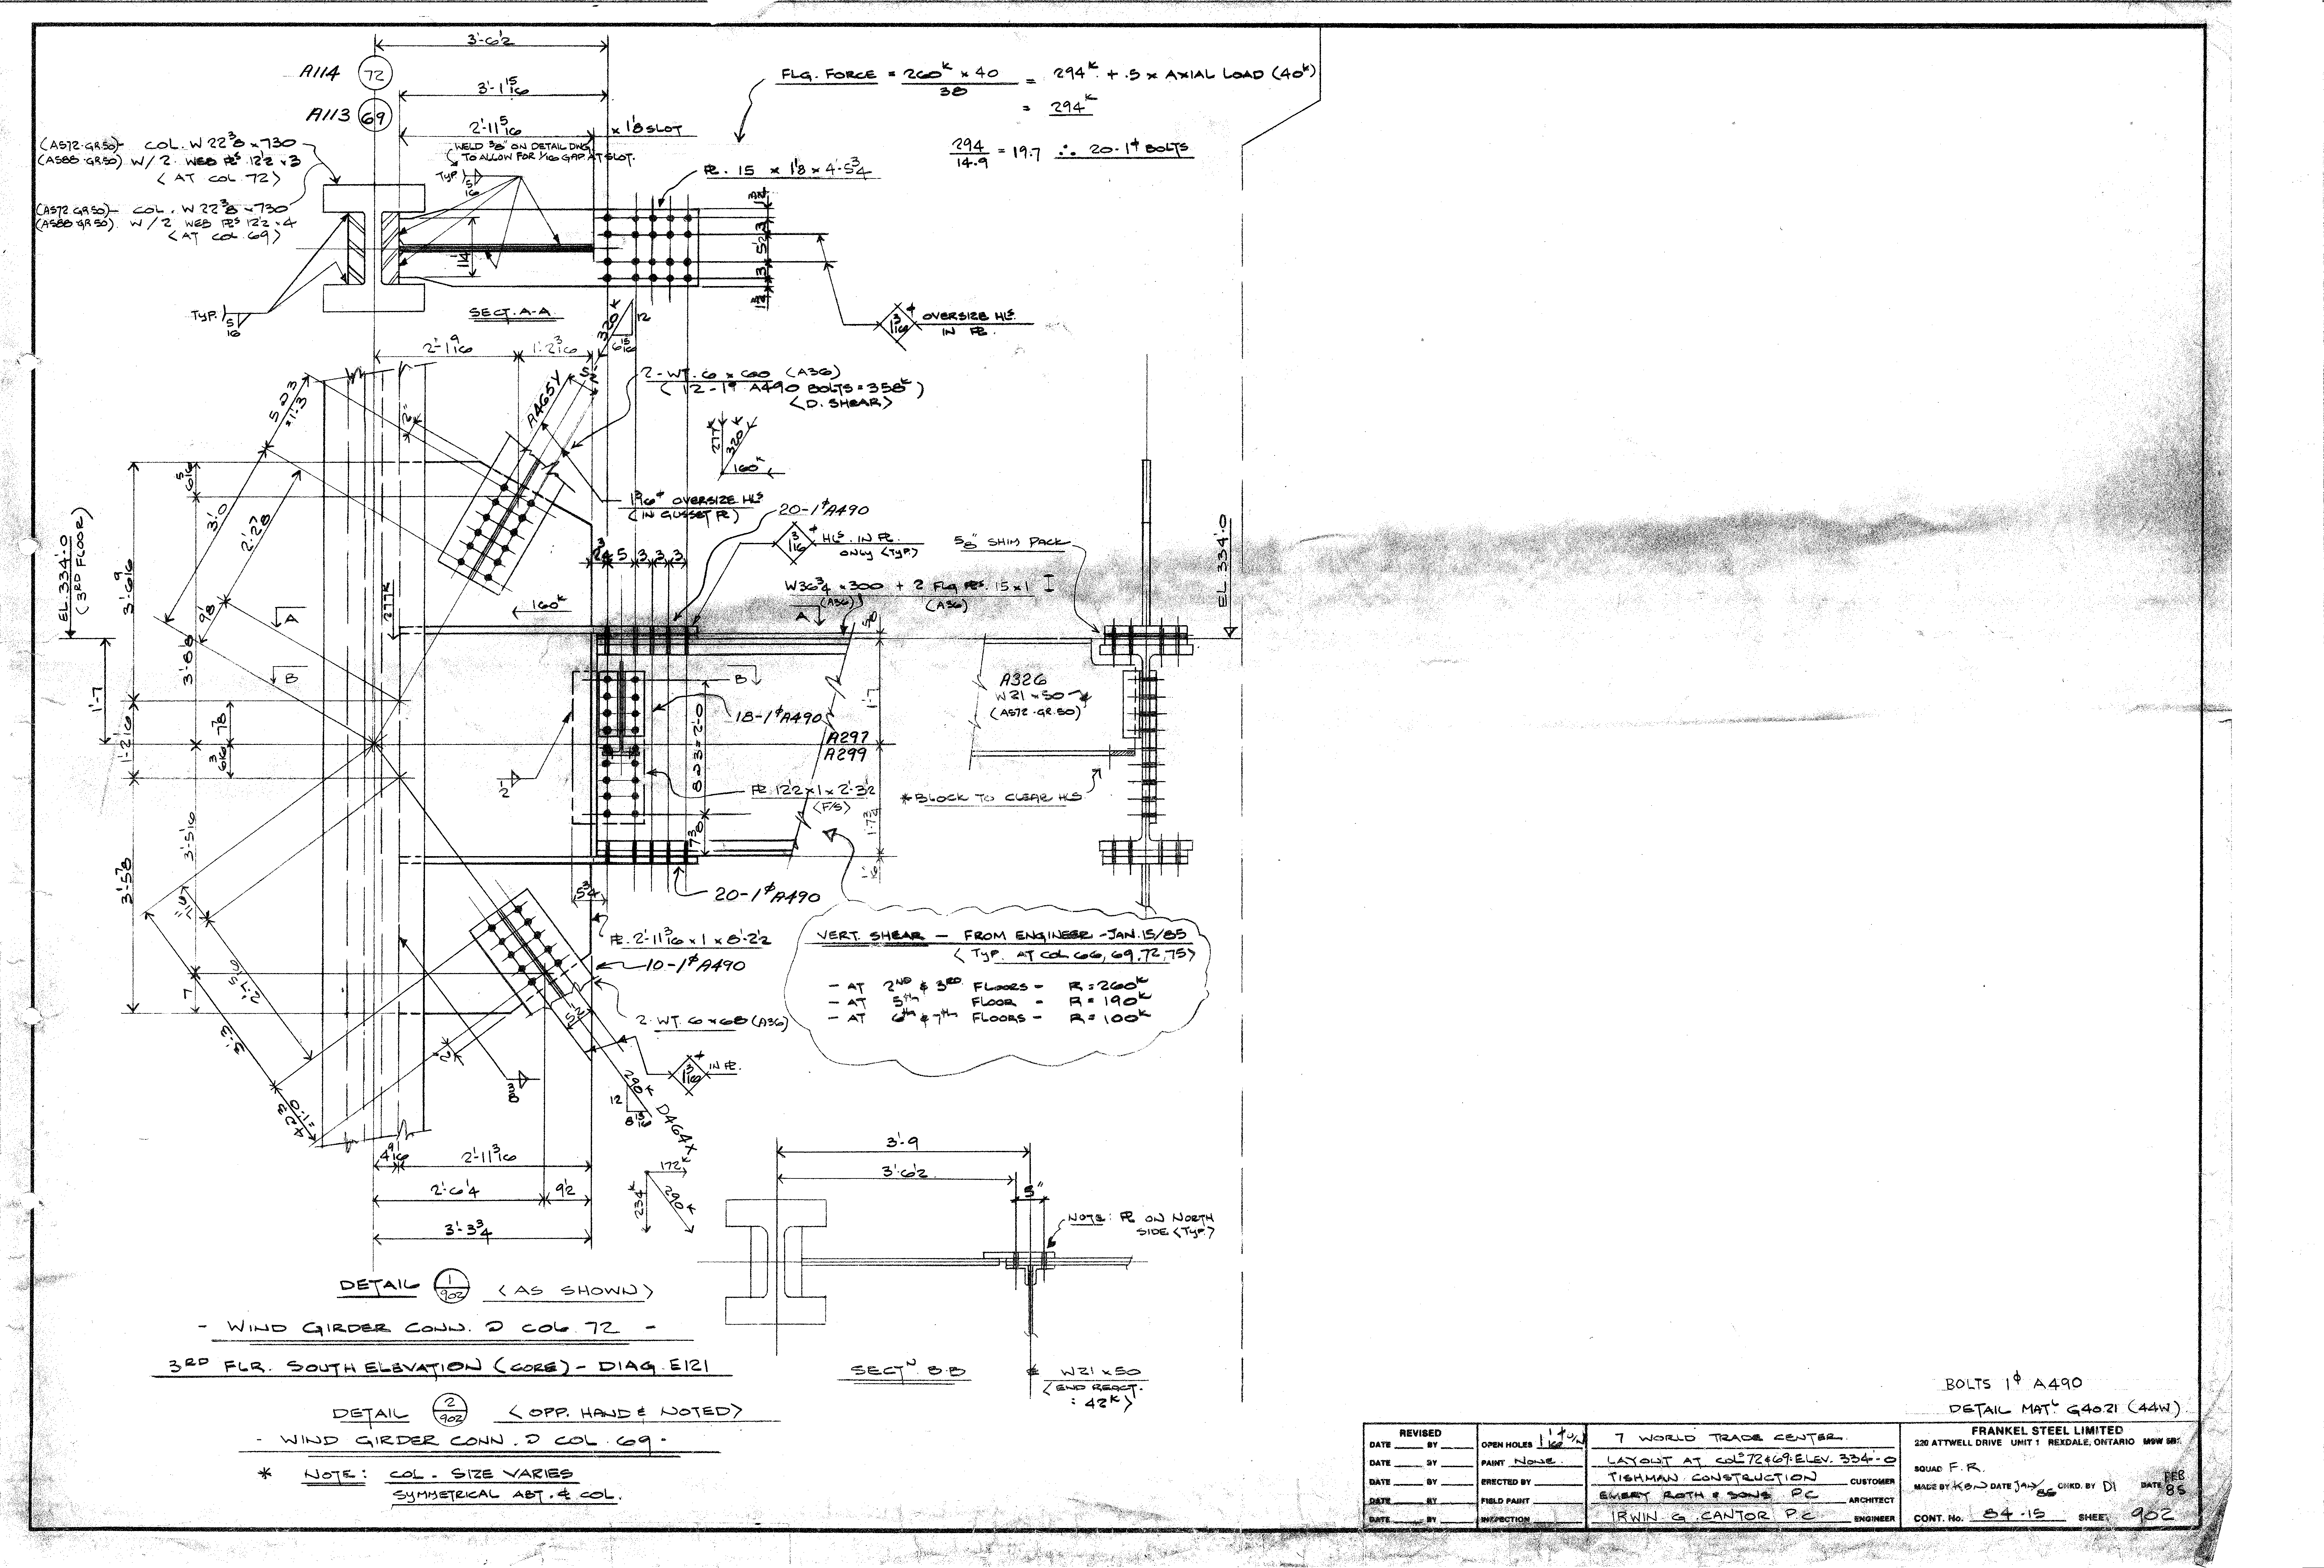
| 0902.png | 546.4 KB | 0902 | LAYOUT AT COL. 72 & 69: ELEV. 334'-0 | https://911warroom.com/model/files/WTC7/DRAWINGS/STRUCTURAL/DETAILS-PNG/0902.png |
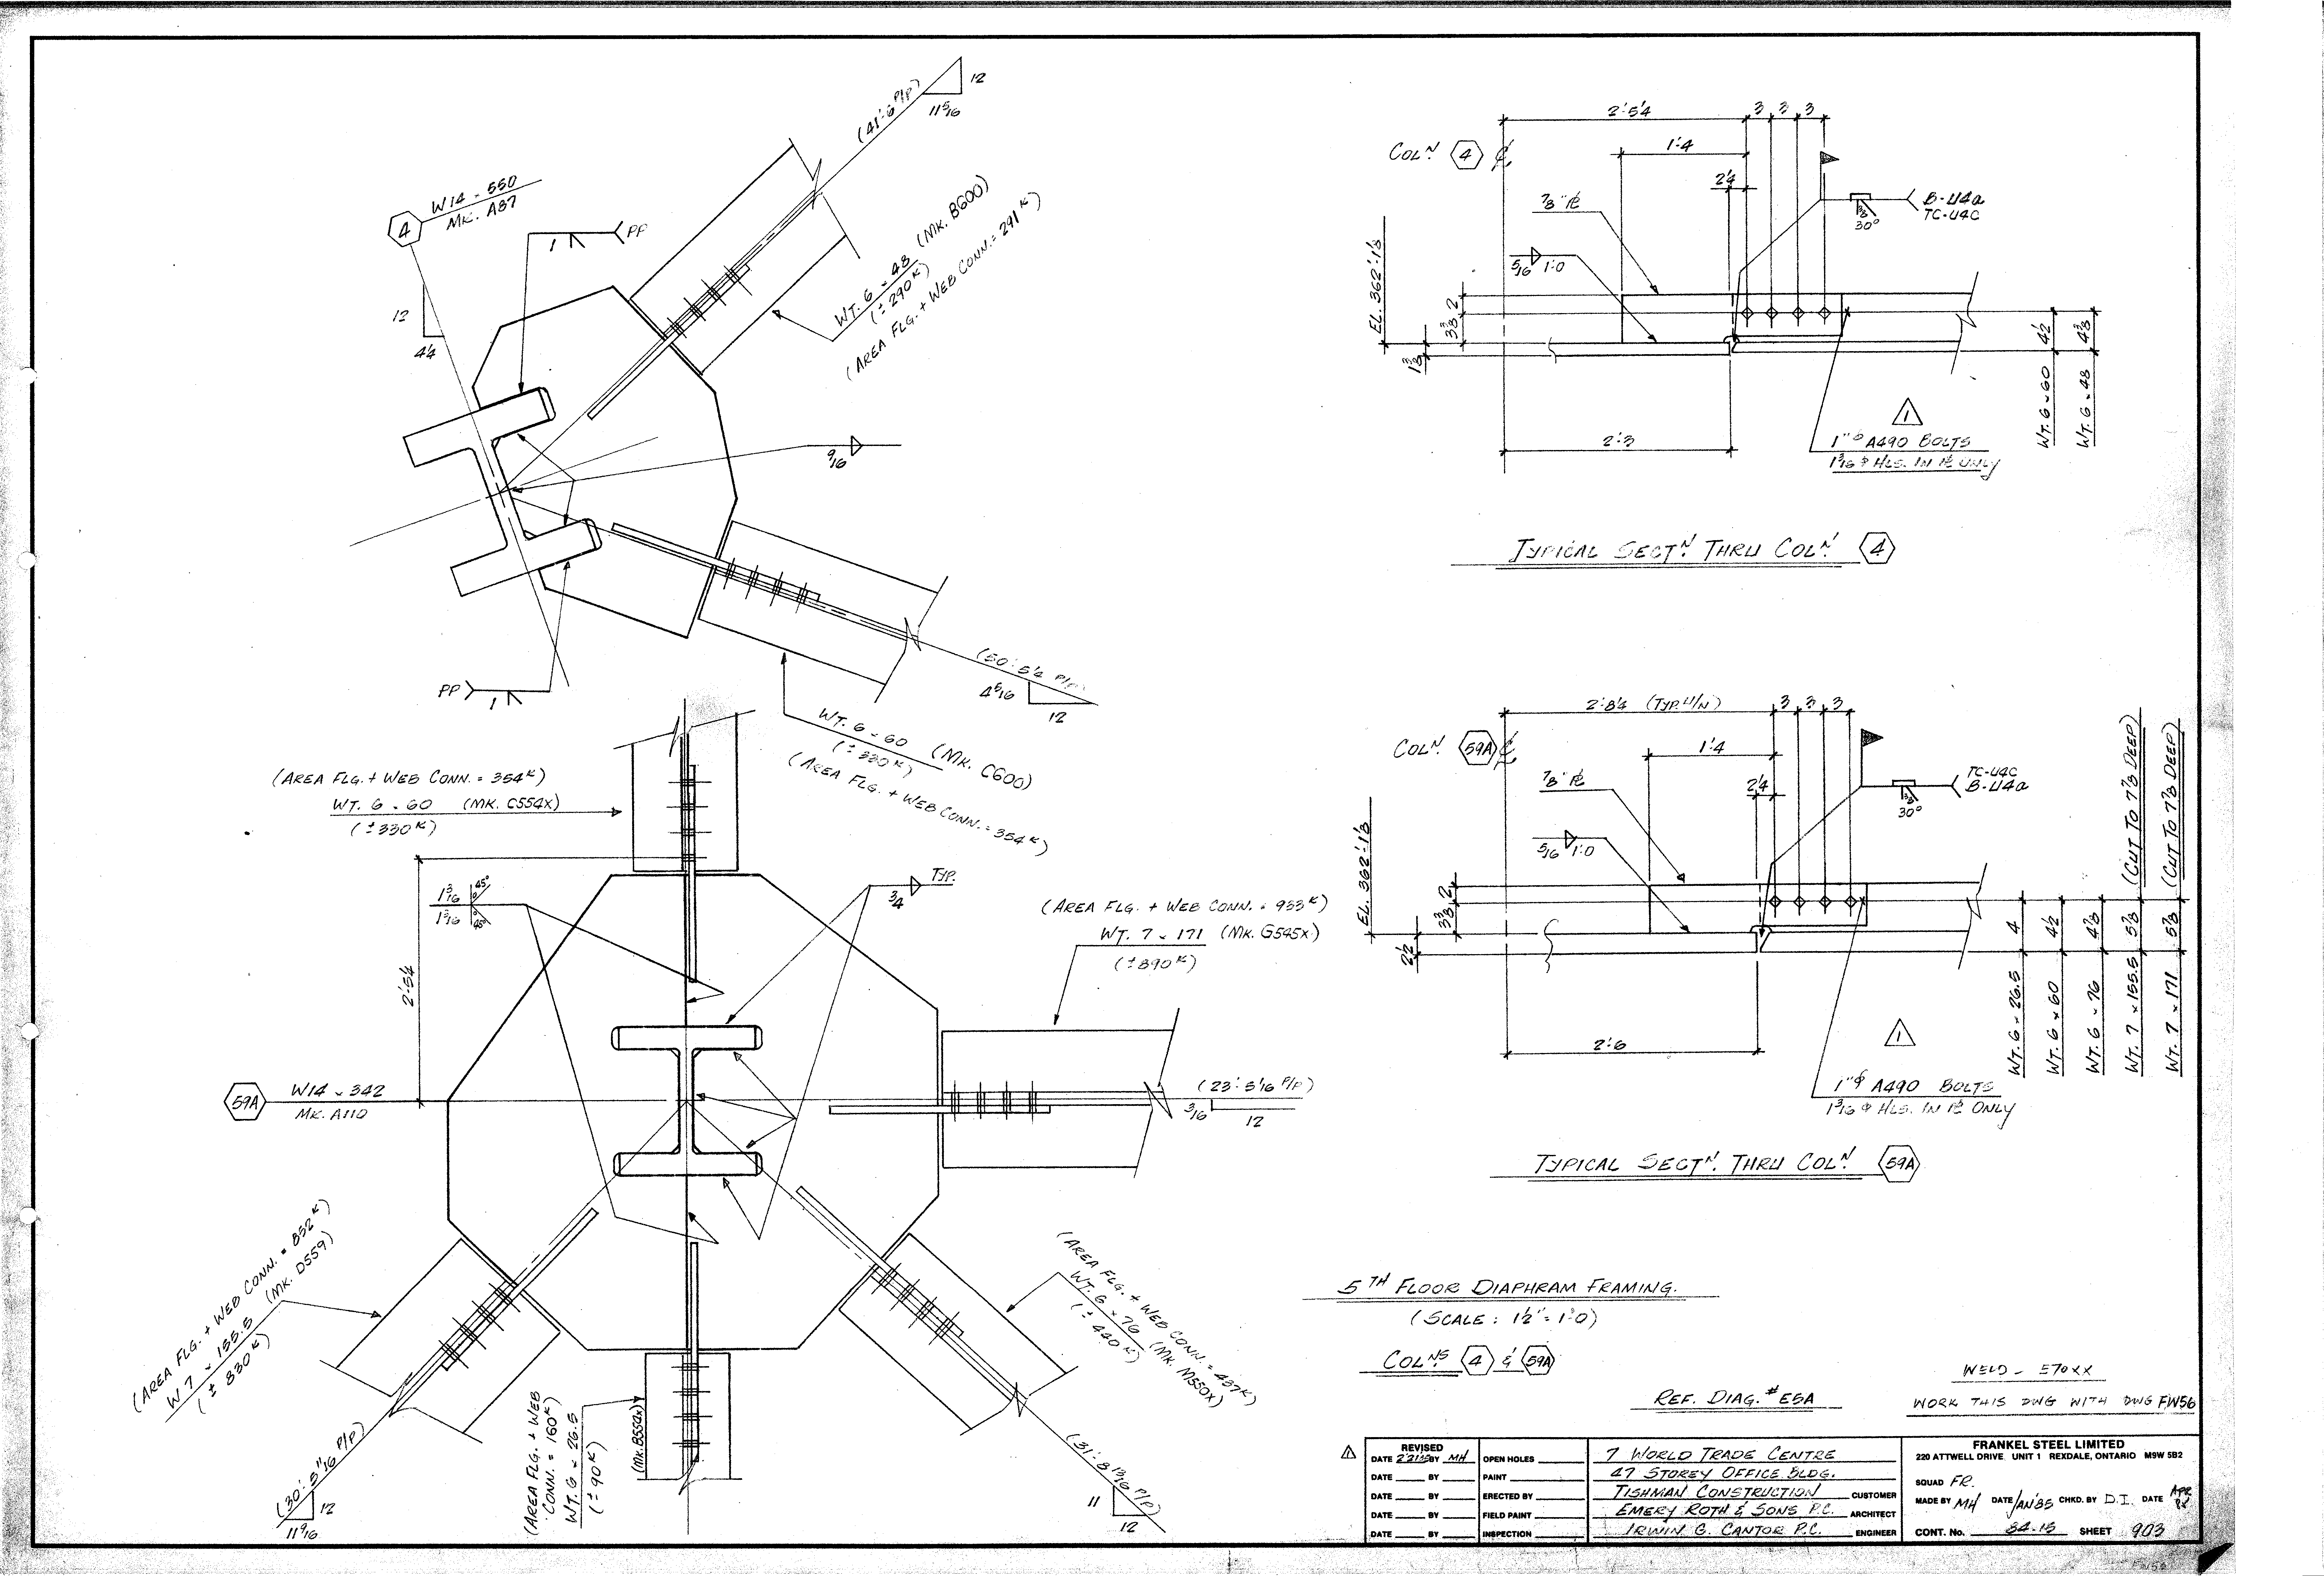
| 0903.png | 398.7 KB | 0903 | 5TH FLOOR DIAPHRAM FRAMING - COLS. 4 & 59A | https://911warroom.com/model/files/WTC7/DRAWINGS/STRUCTURAL/DETAILS-PNG/0903.png |
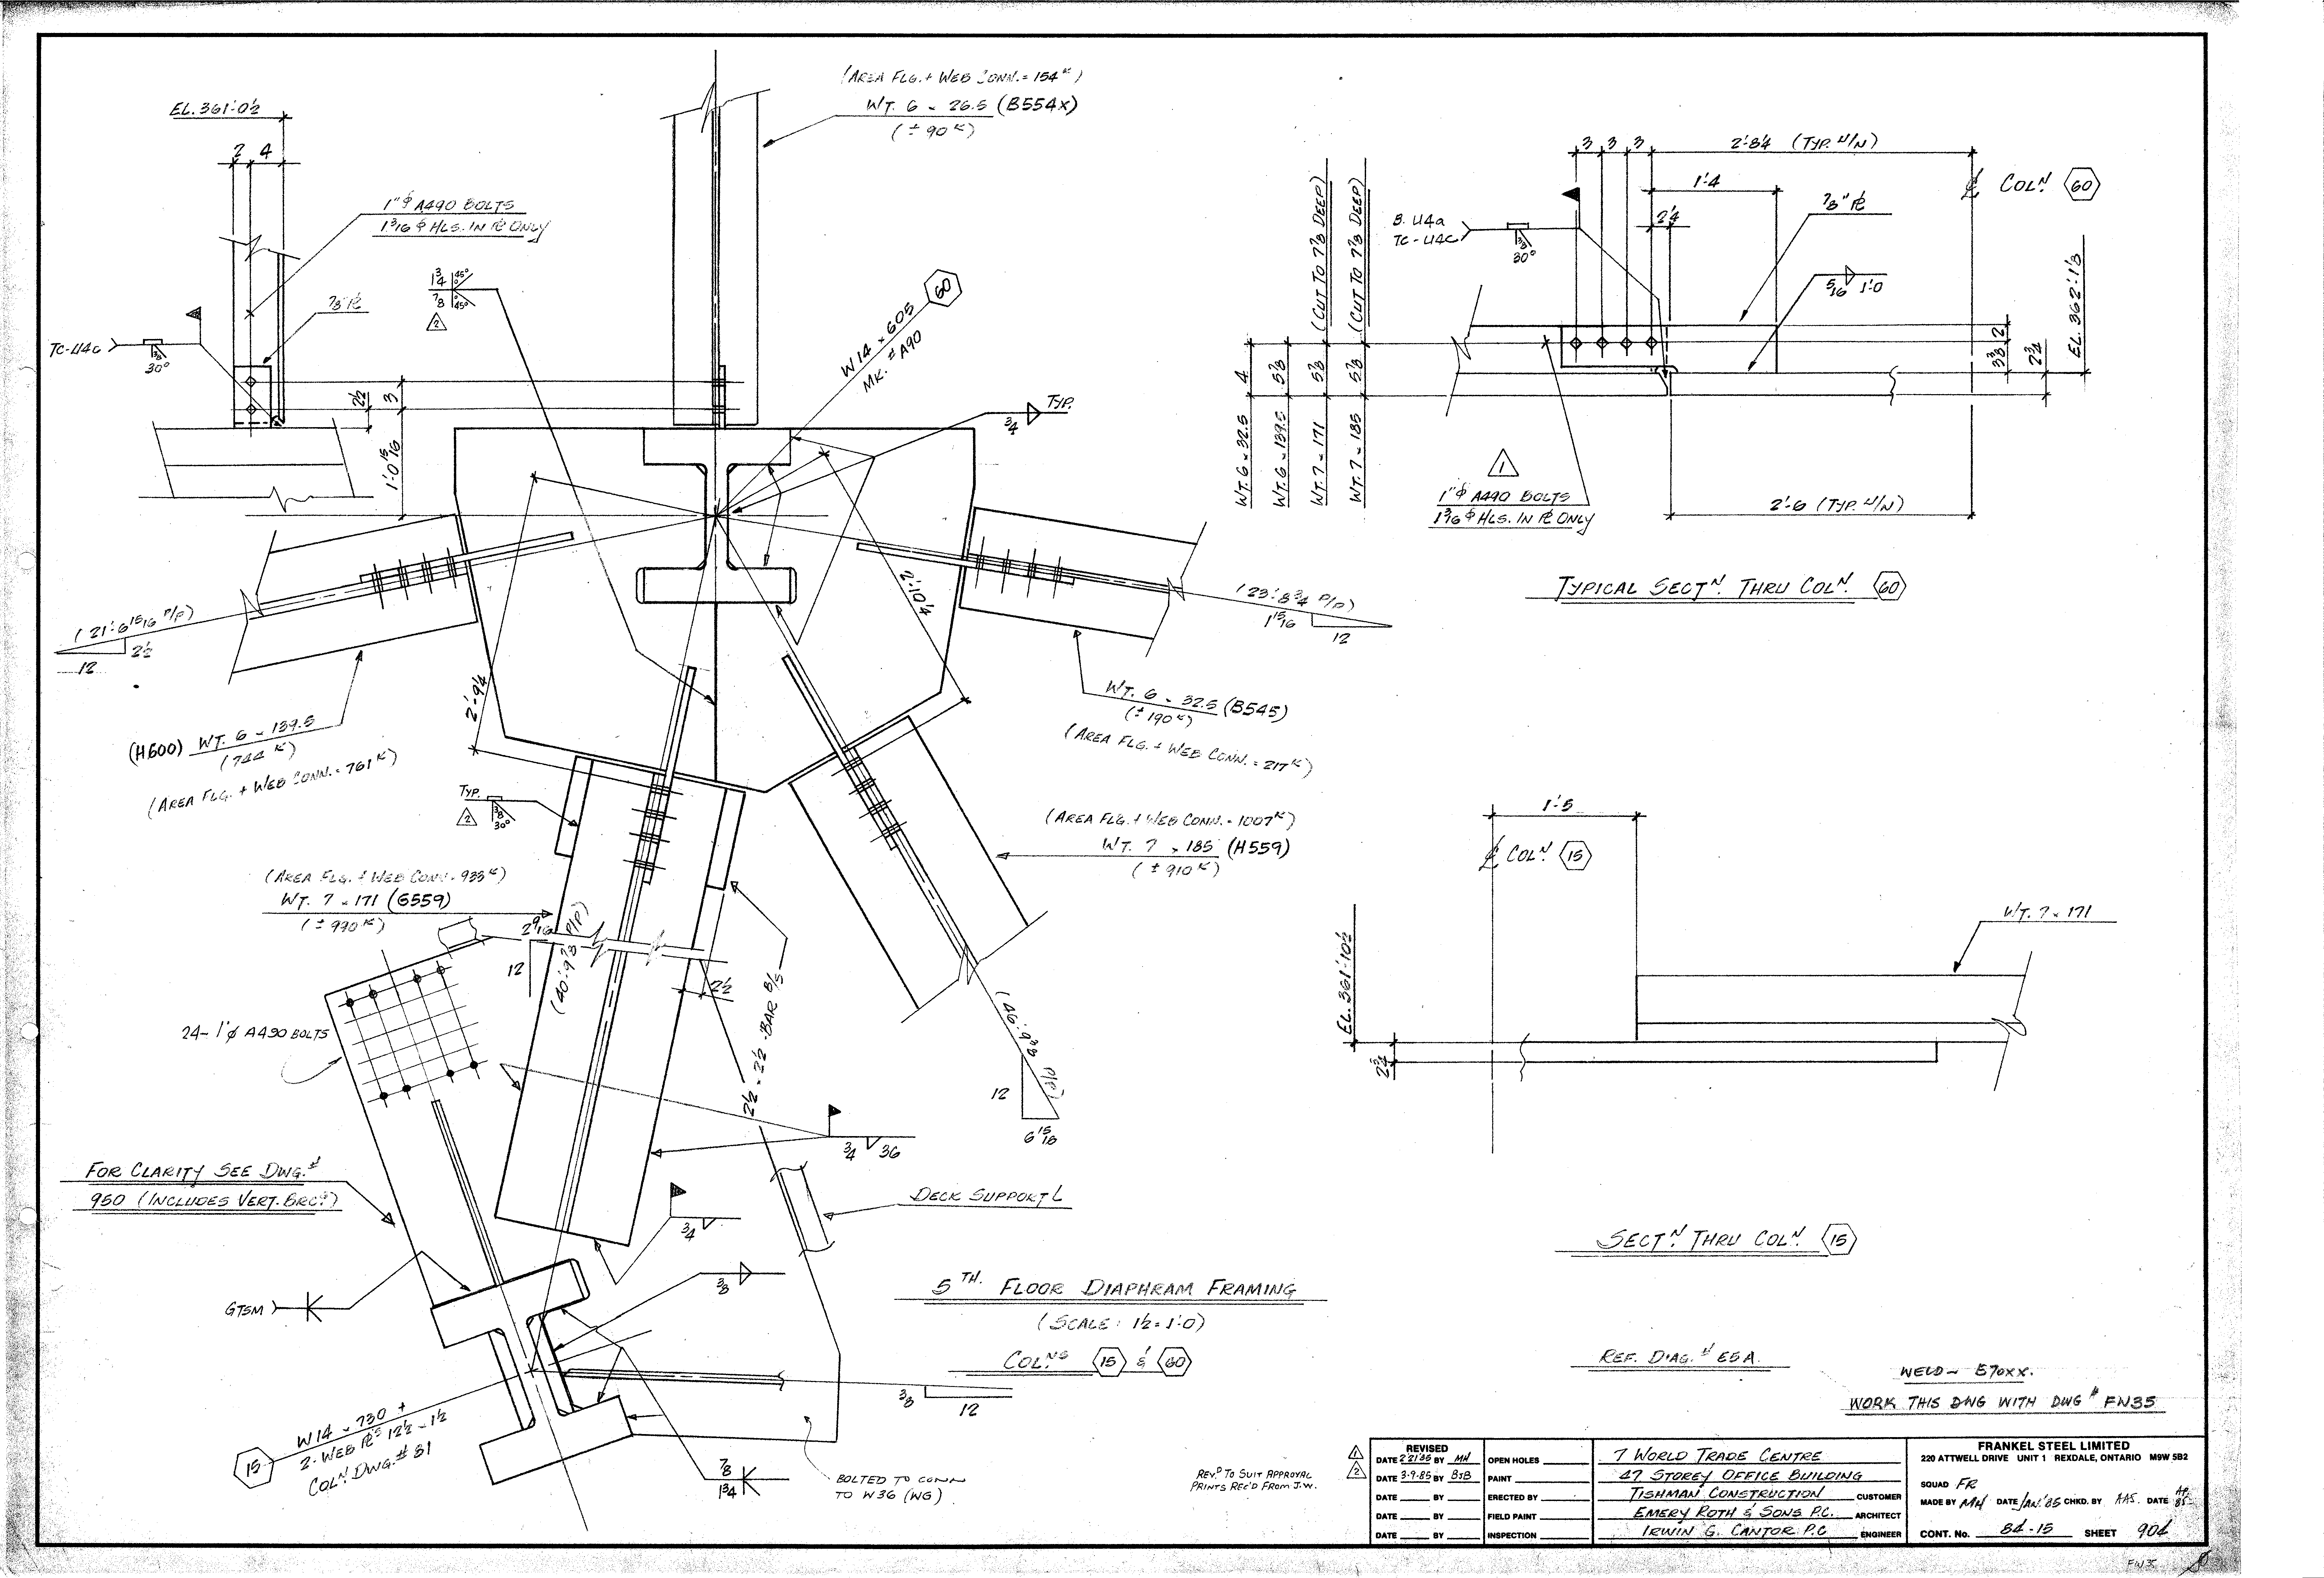
| 0904.png | 414.7 KB | 0904 | 5TH FLOOR DIAPHRAM FRAMING - COLS. 15 & 60 | https://911warroom.com/model/files/WTC7/DRAWINGS/STRUCTURAL/DETAILS-PNG/0904.png |
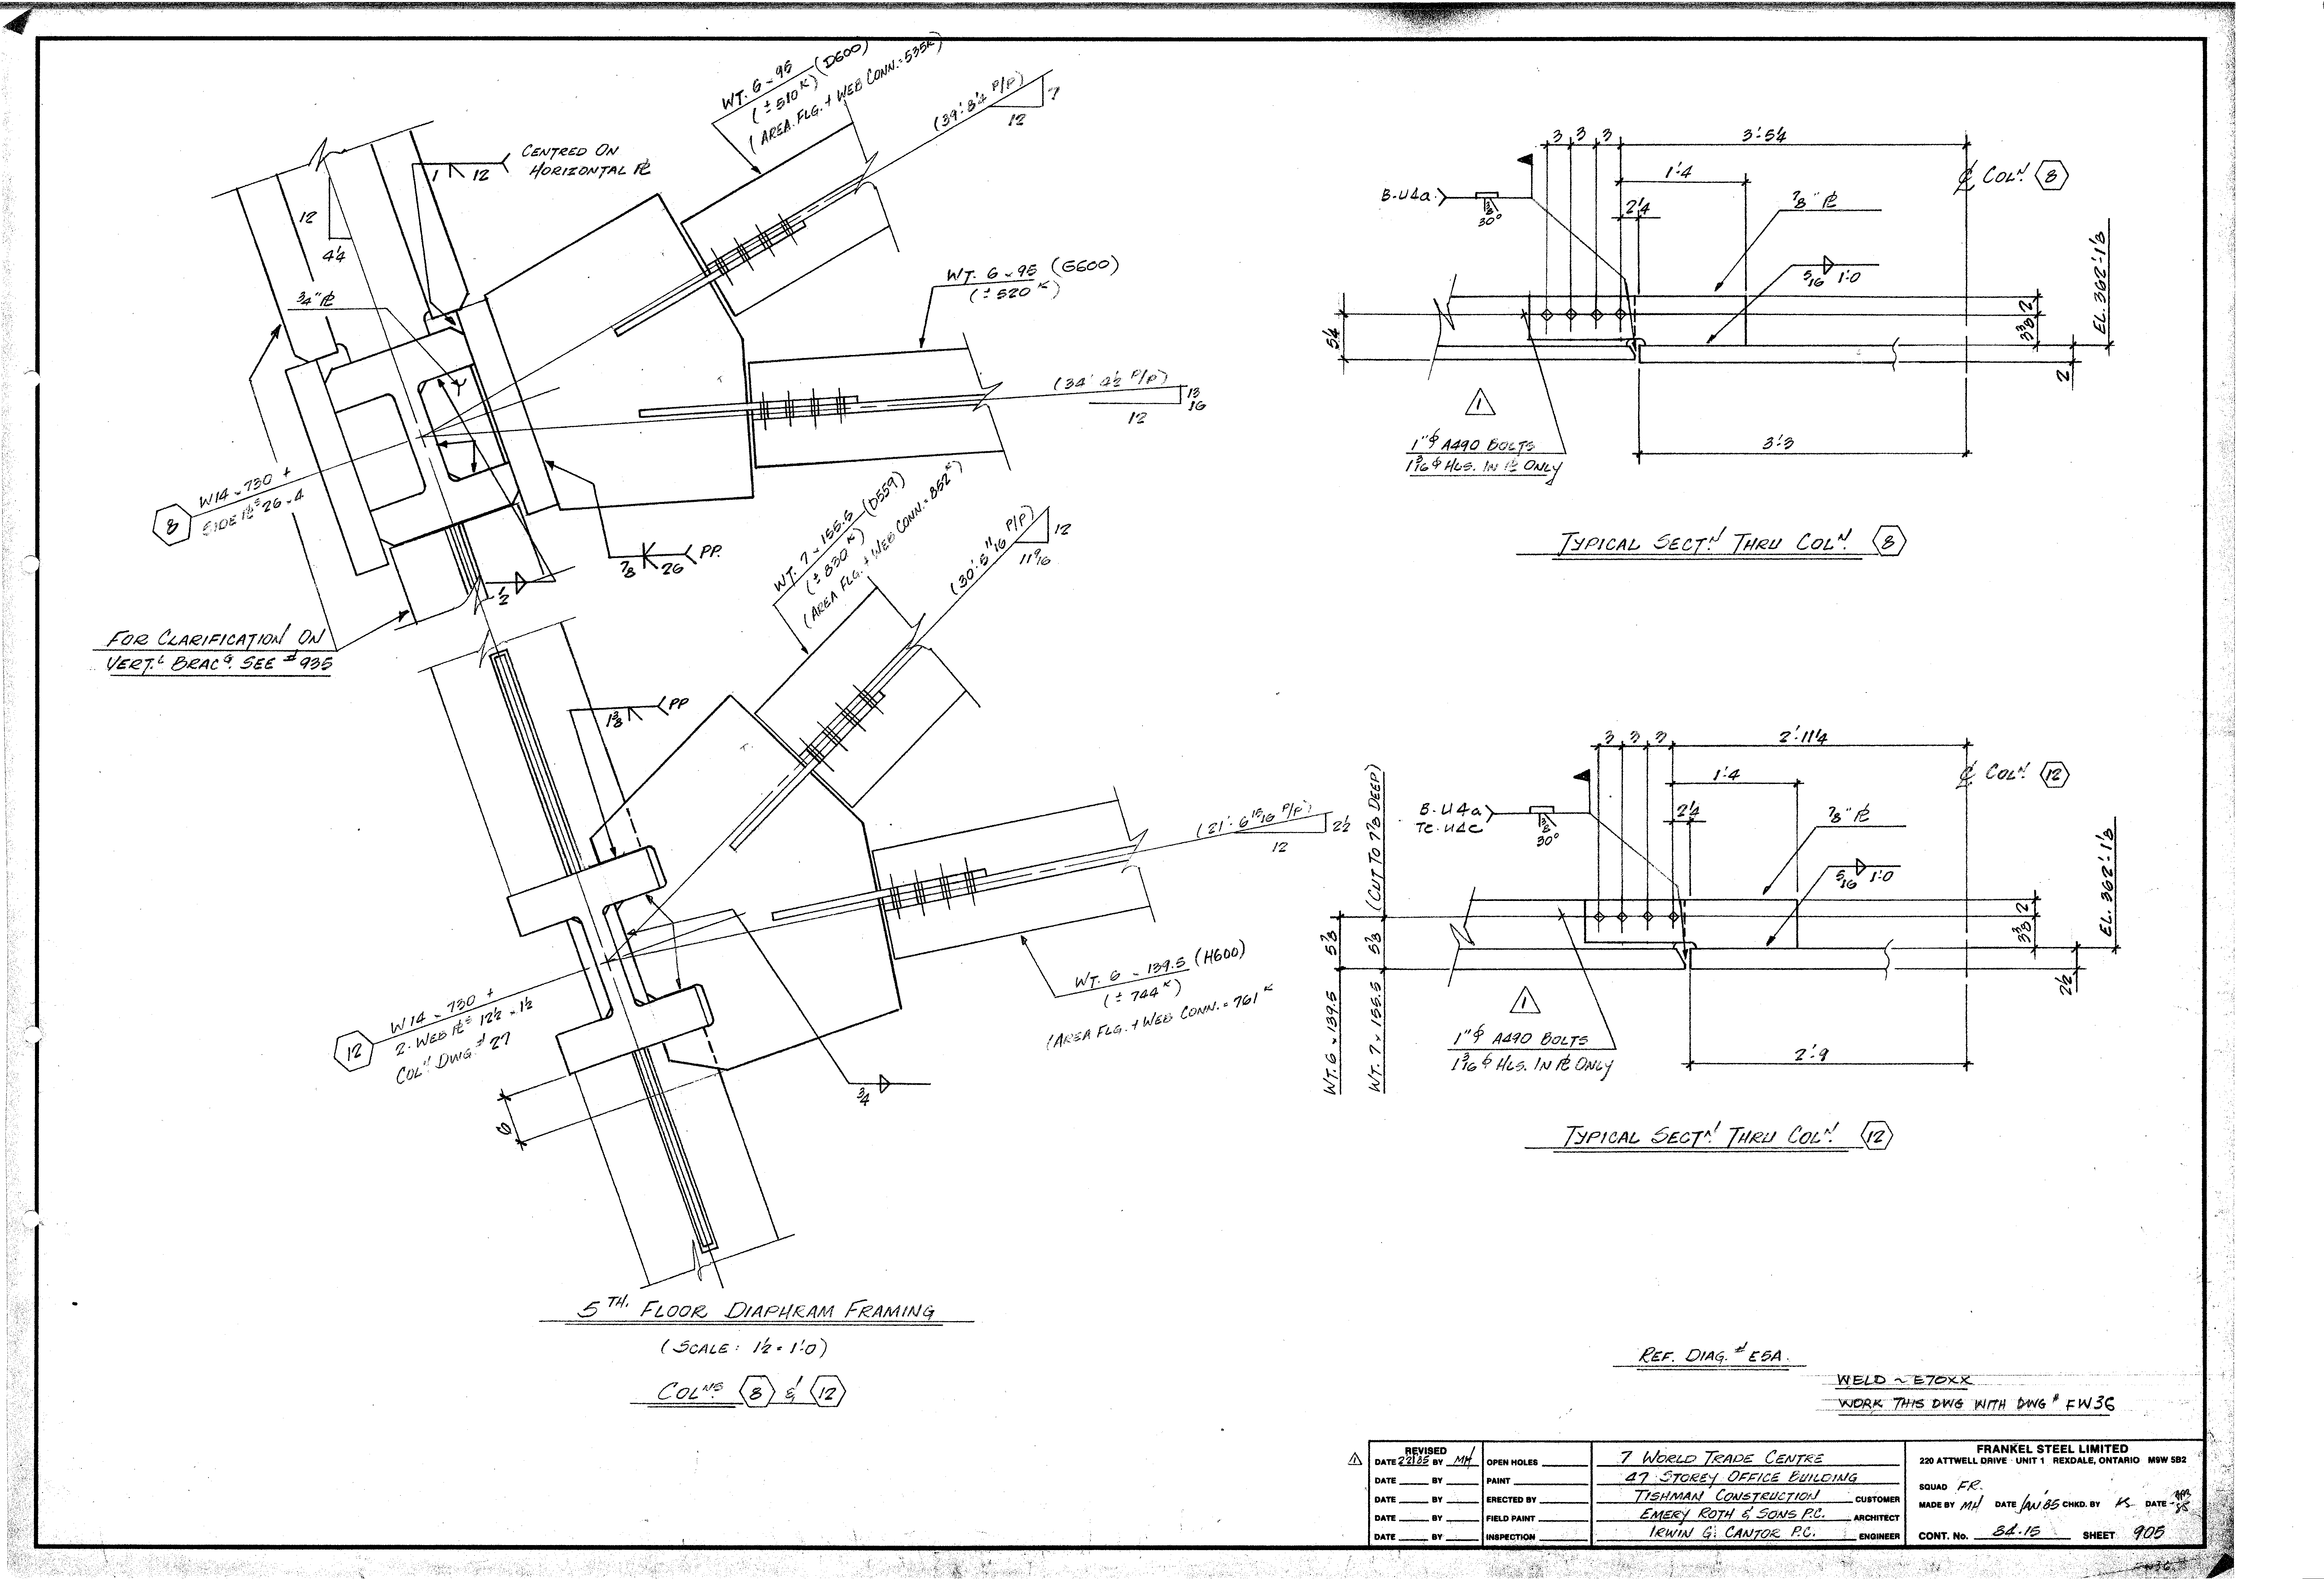
| 0905.png | 360.8 KB | 0905 | 5TH FLOOR DIAPHRAM FRAMING - COLS. 8 & 12 | https://911warroom.com/model/files/WTC7/DRAWINGS/STRUCTURAL/DETAILS-PNG/0905.png |
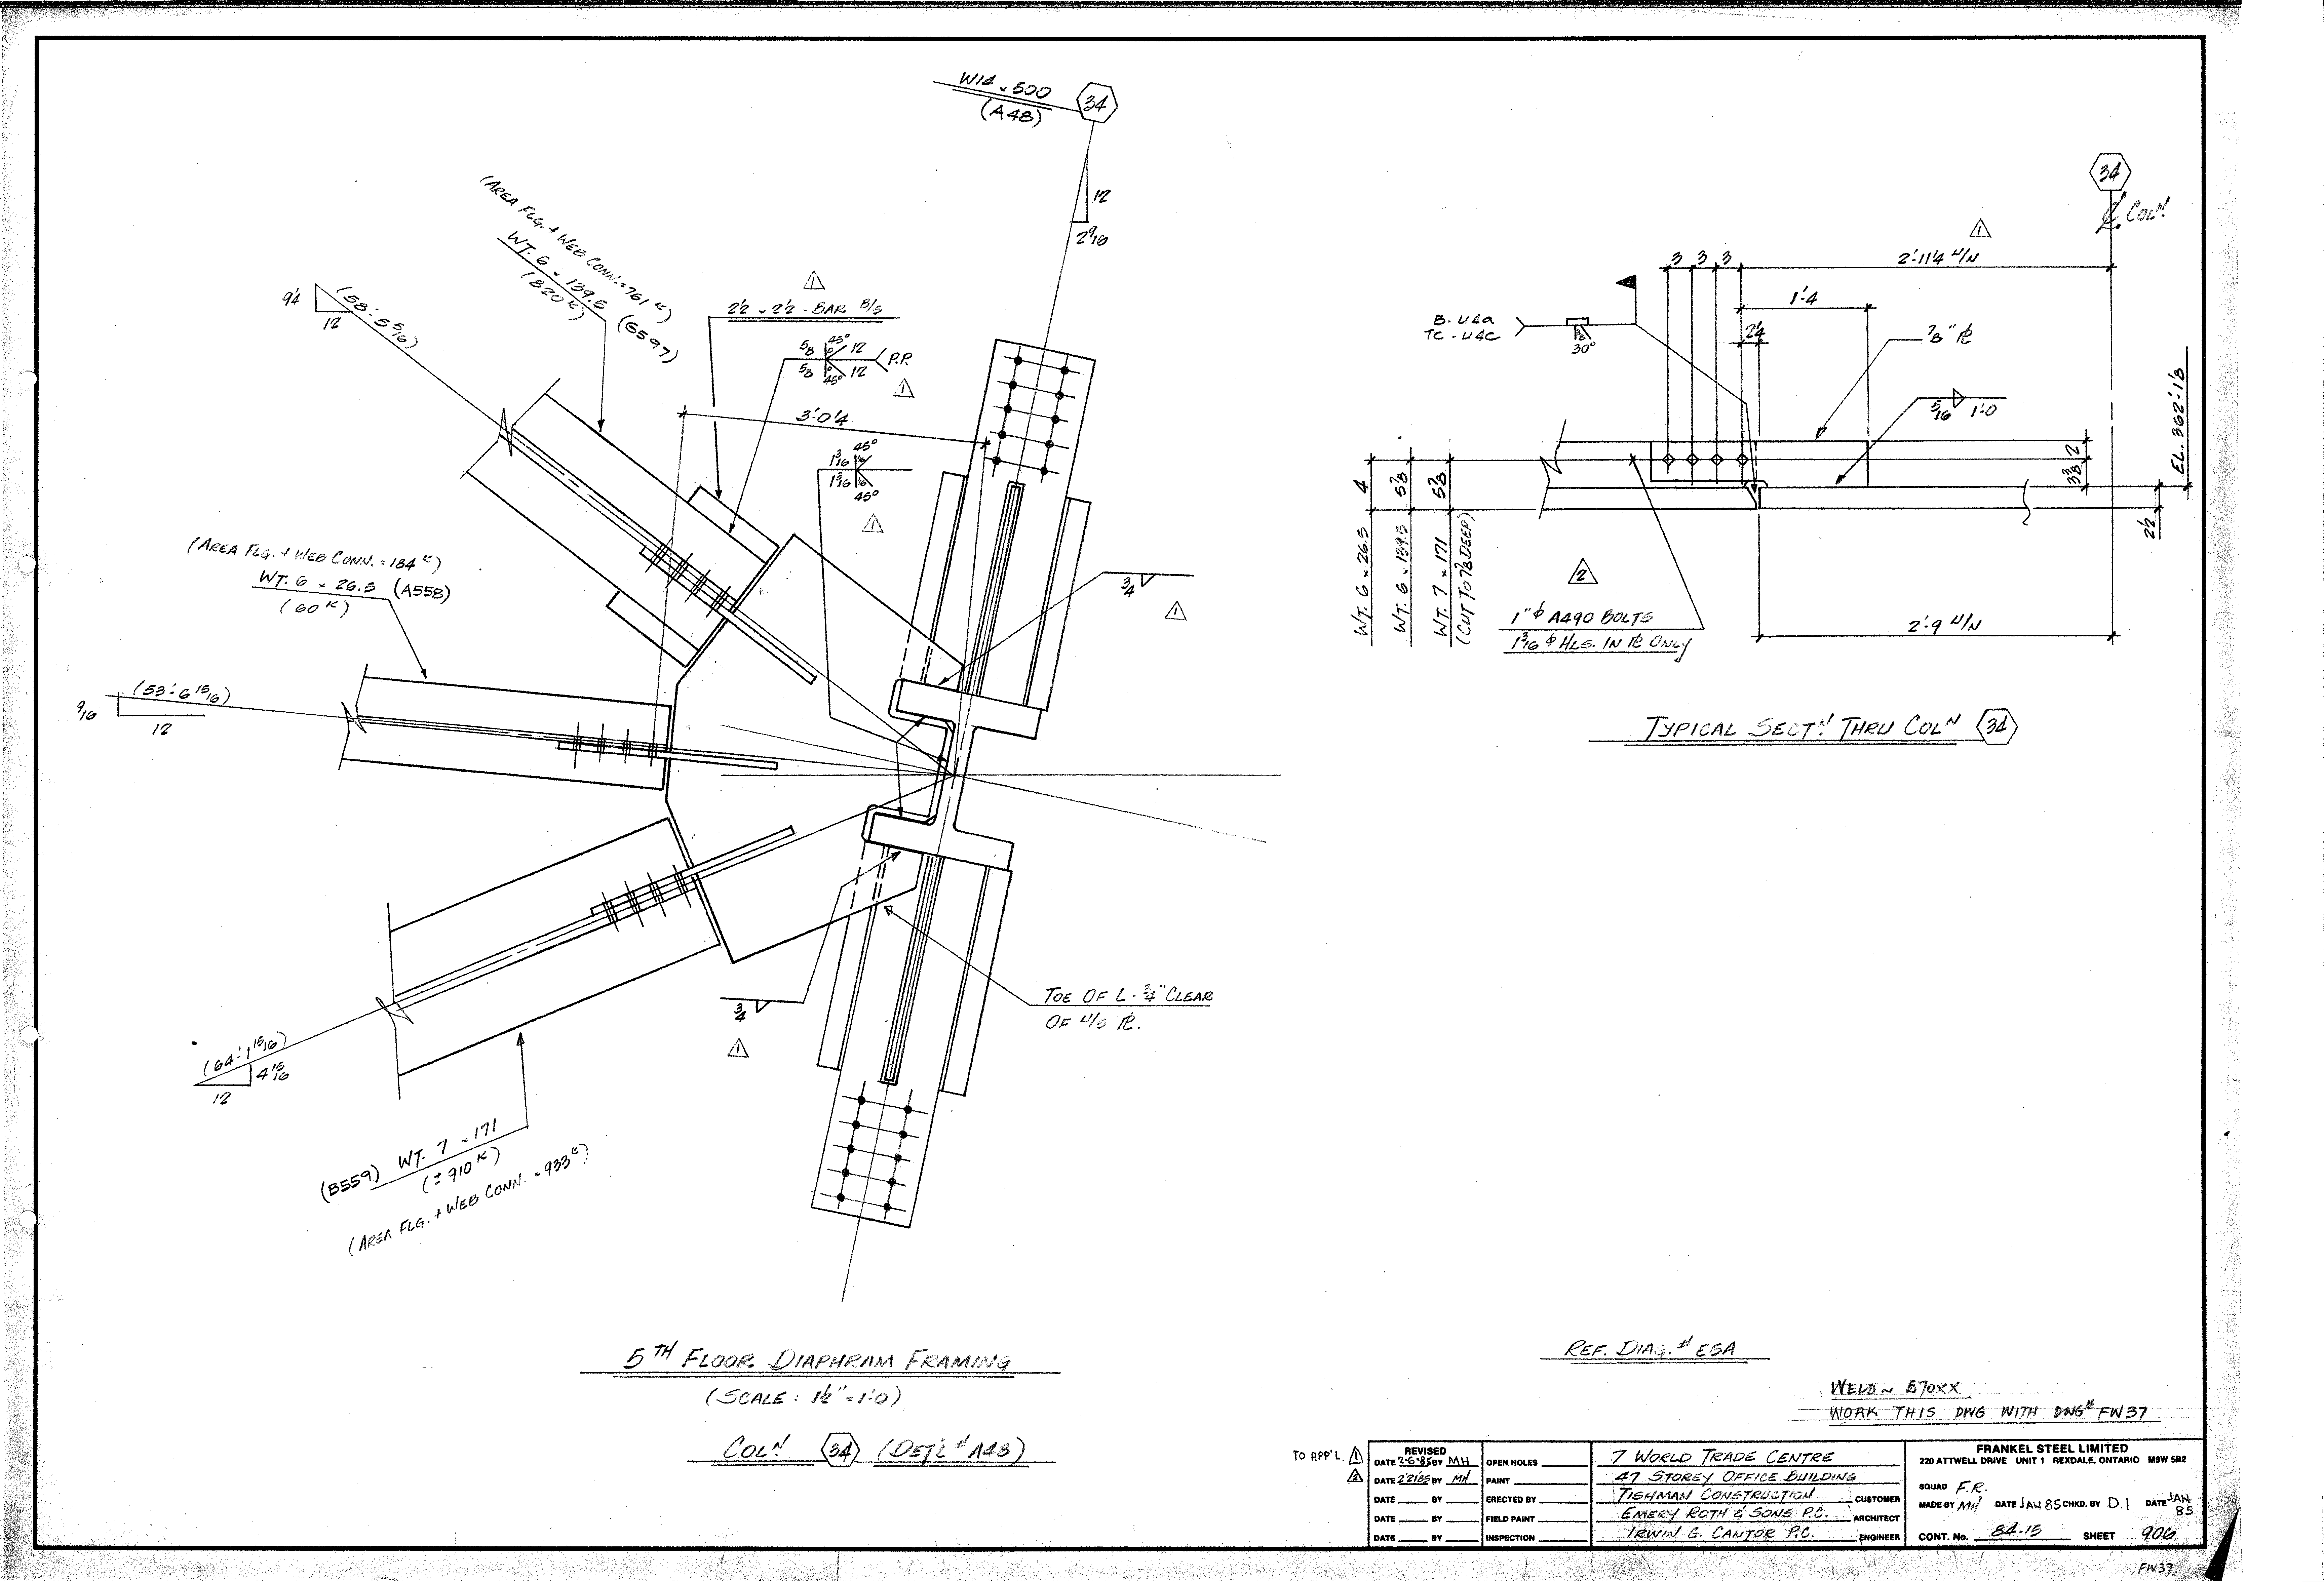
| 0906.png | 342.2 KB | 0906 | 5TH FLOOR DIAPHRAM FRAMING - COL. 34 (DET'L #A43) | https://911warroom.com/model/files/WTC7/DRAWINGS/STRUCTURAL/DETAILS-PNG/0906.png |
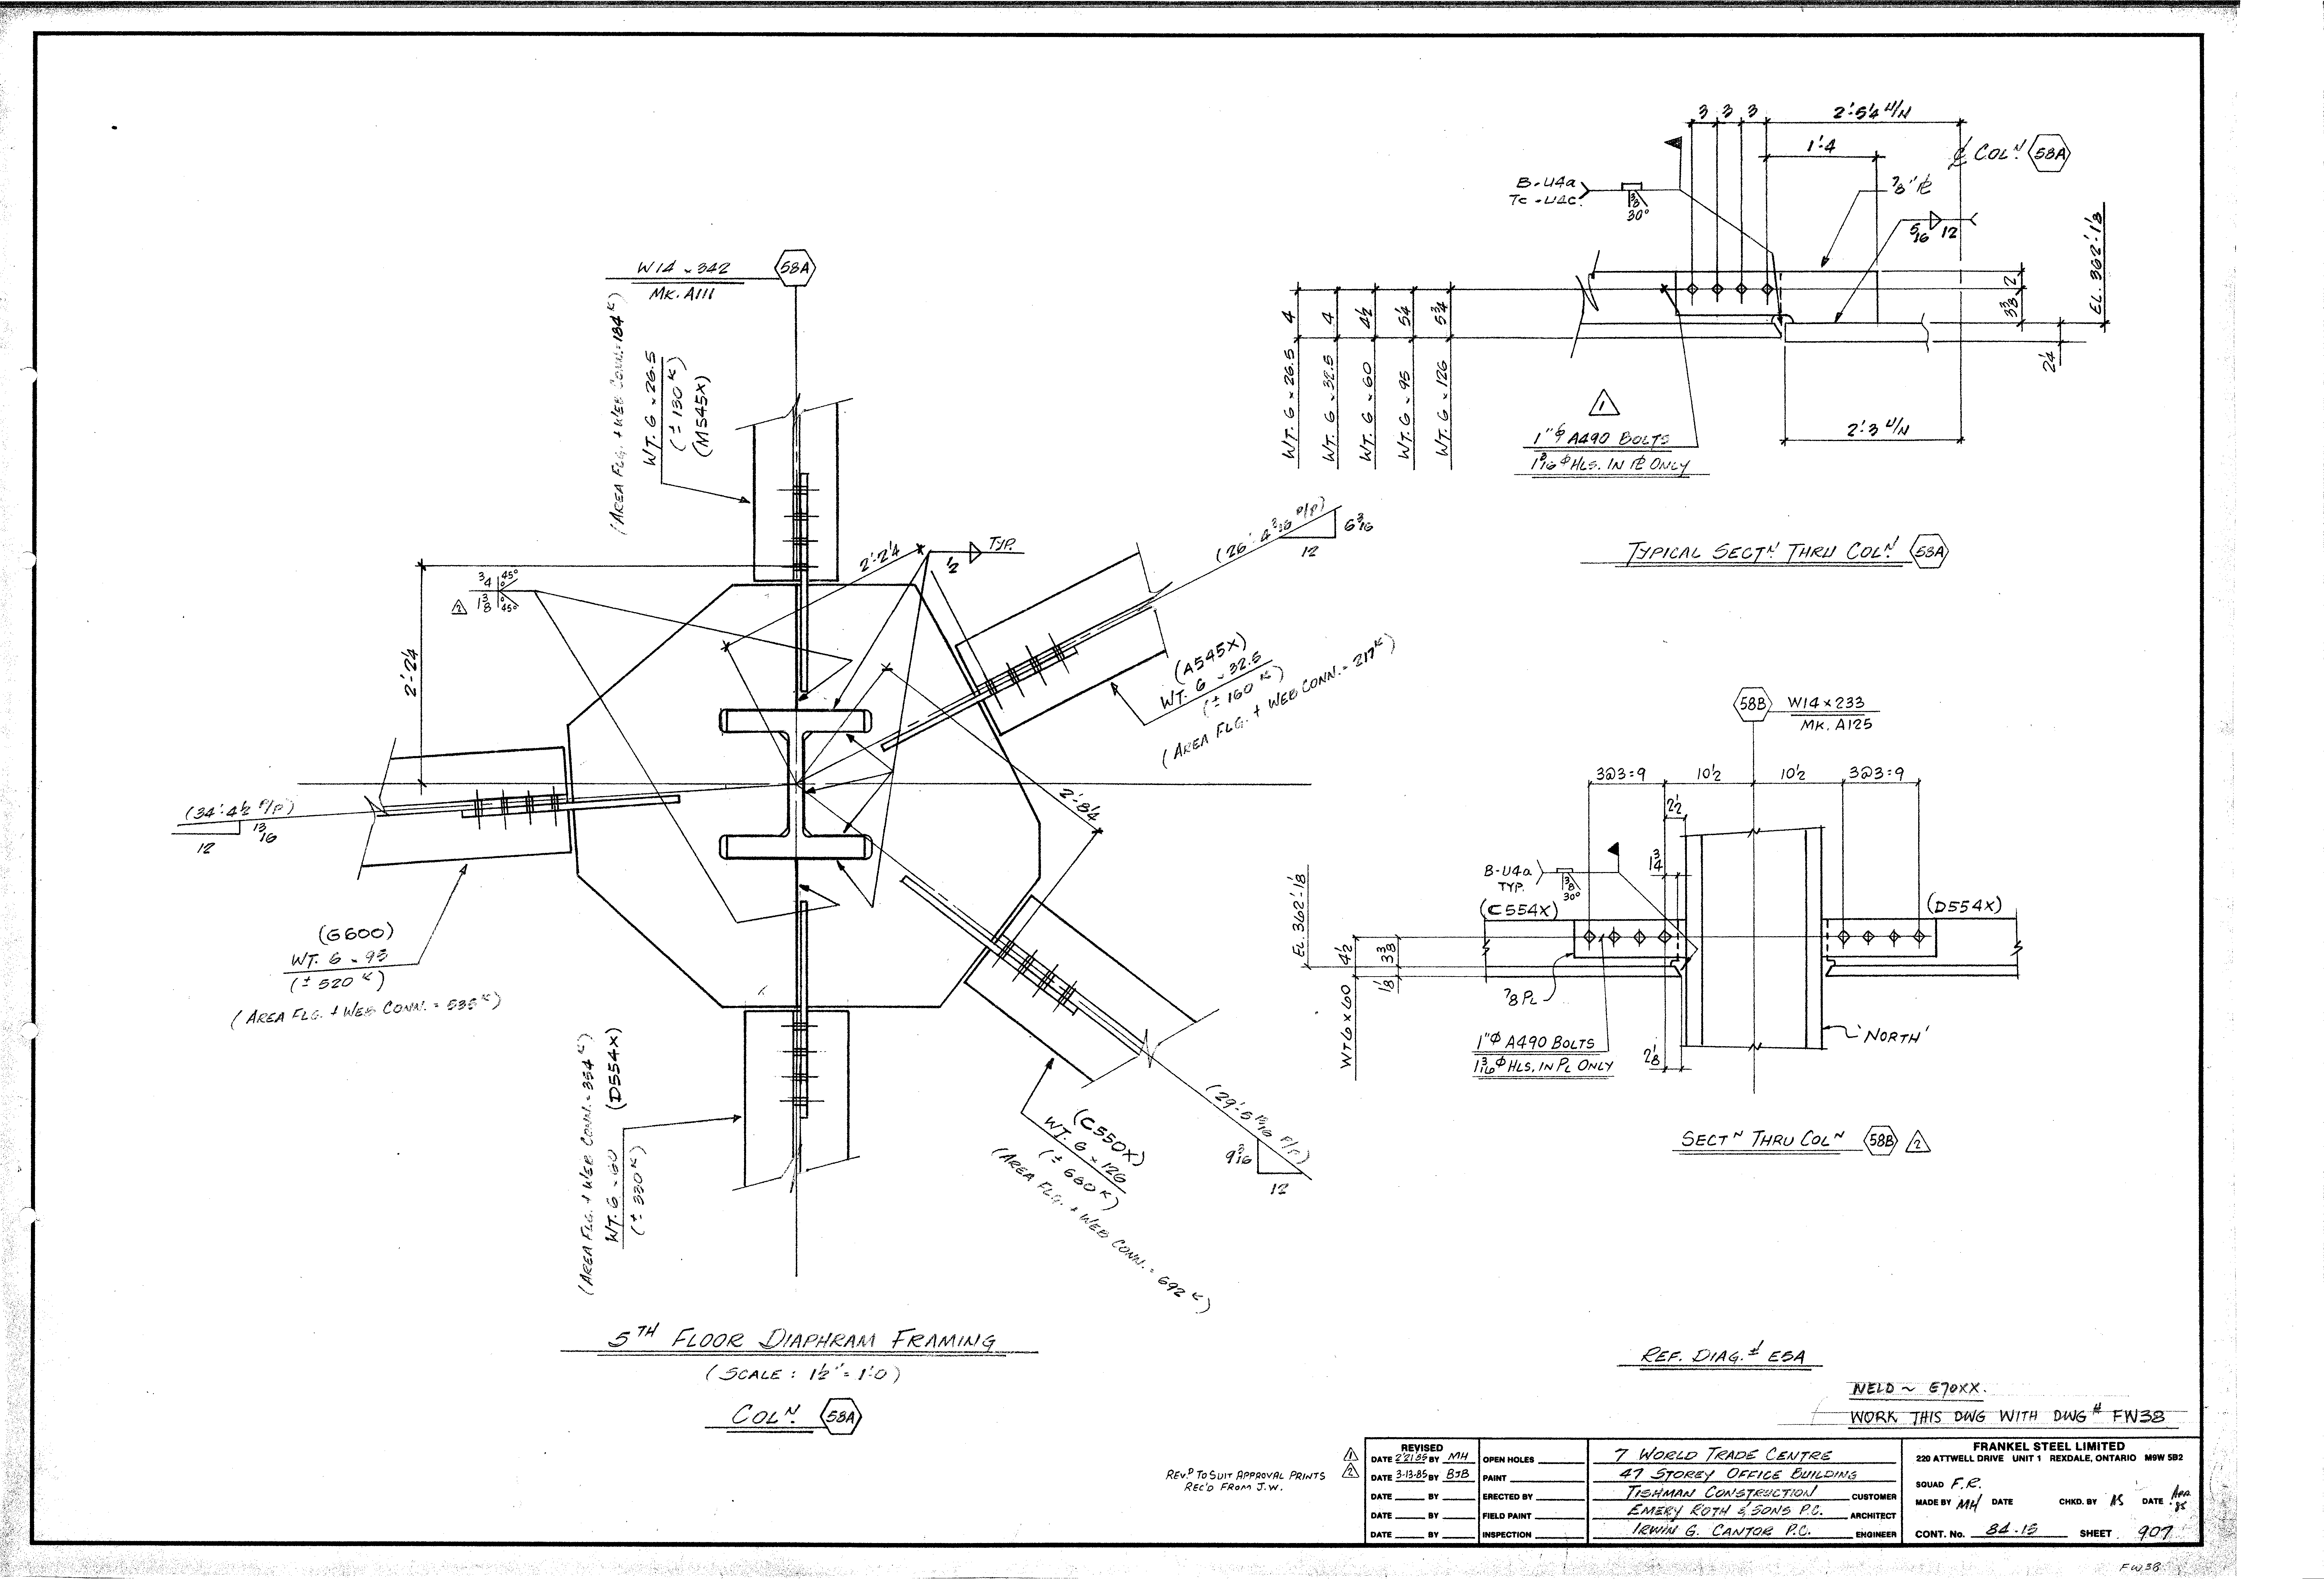
| 0907.png | 300.0 KB | 0907 | 5TH FLOOR DIAPHRAM FRAMING - COL. 58A | https://911warroom.com/model/files/WTC7/DRAWINGS/STRUCTURAL/DETAILS-PNG/0907.png |
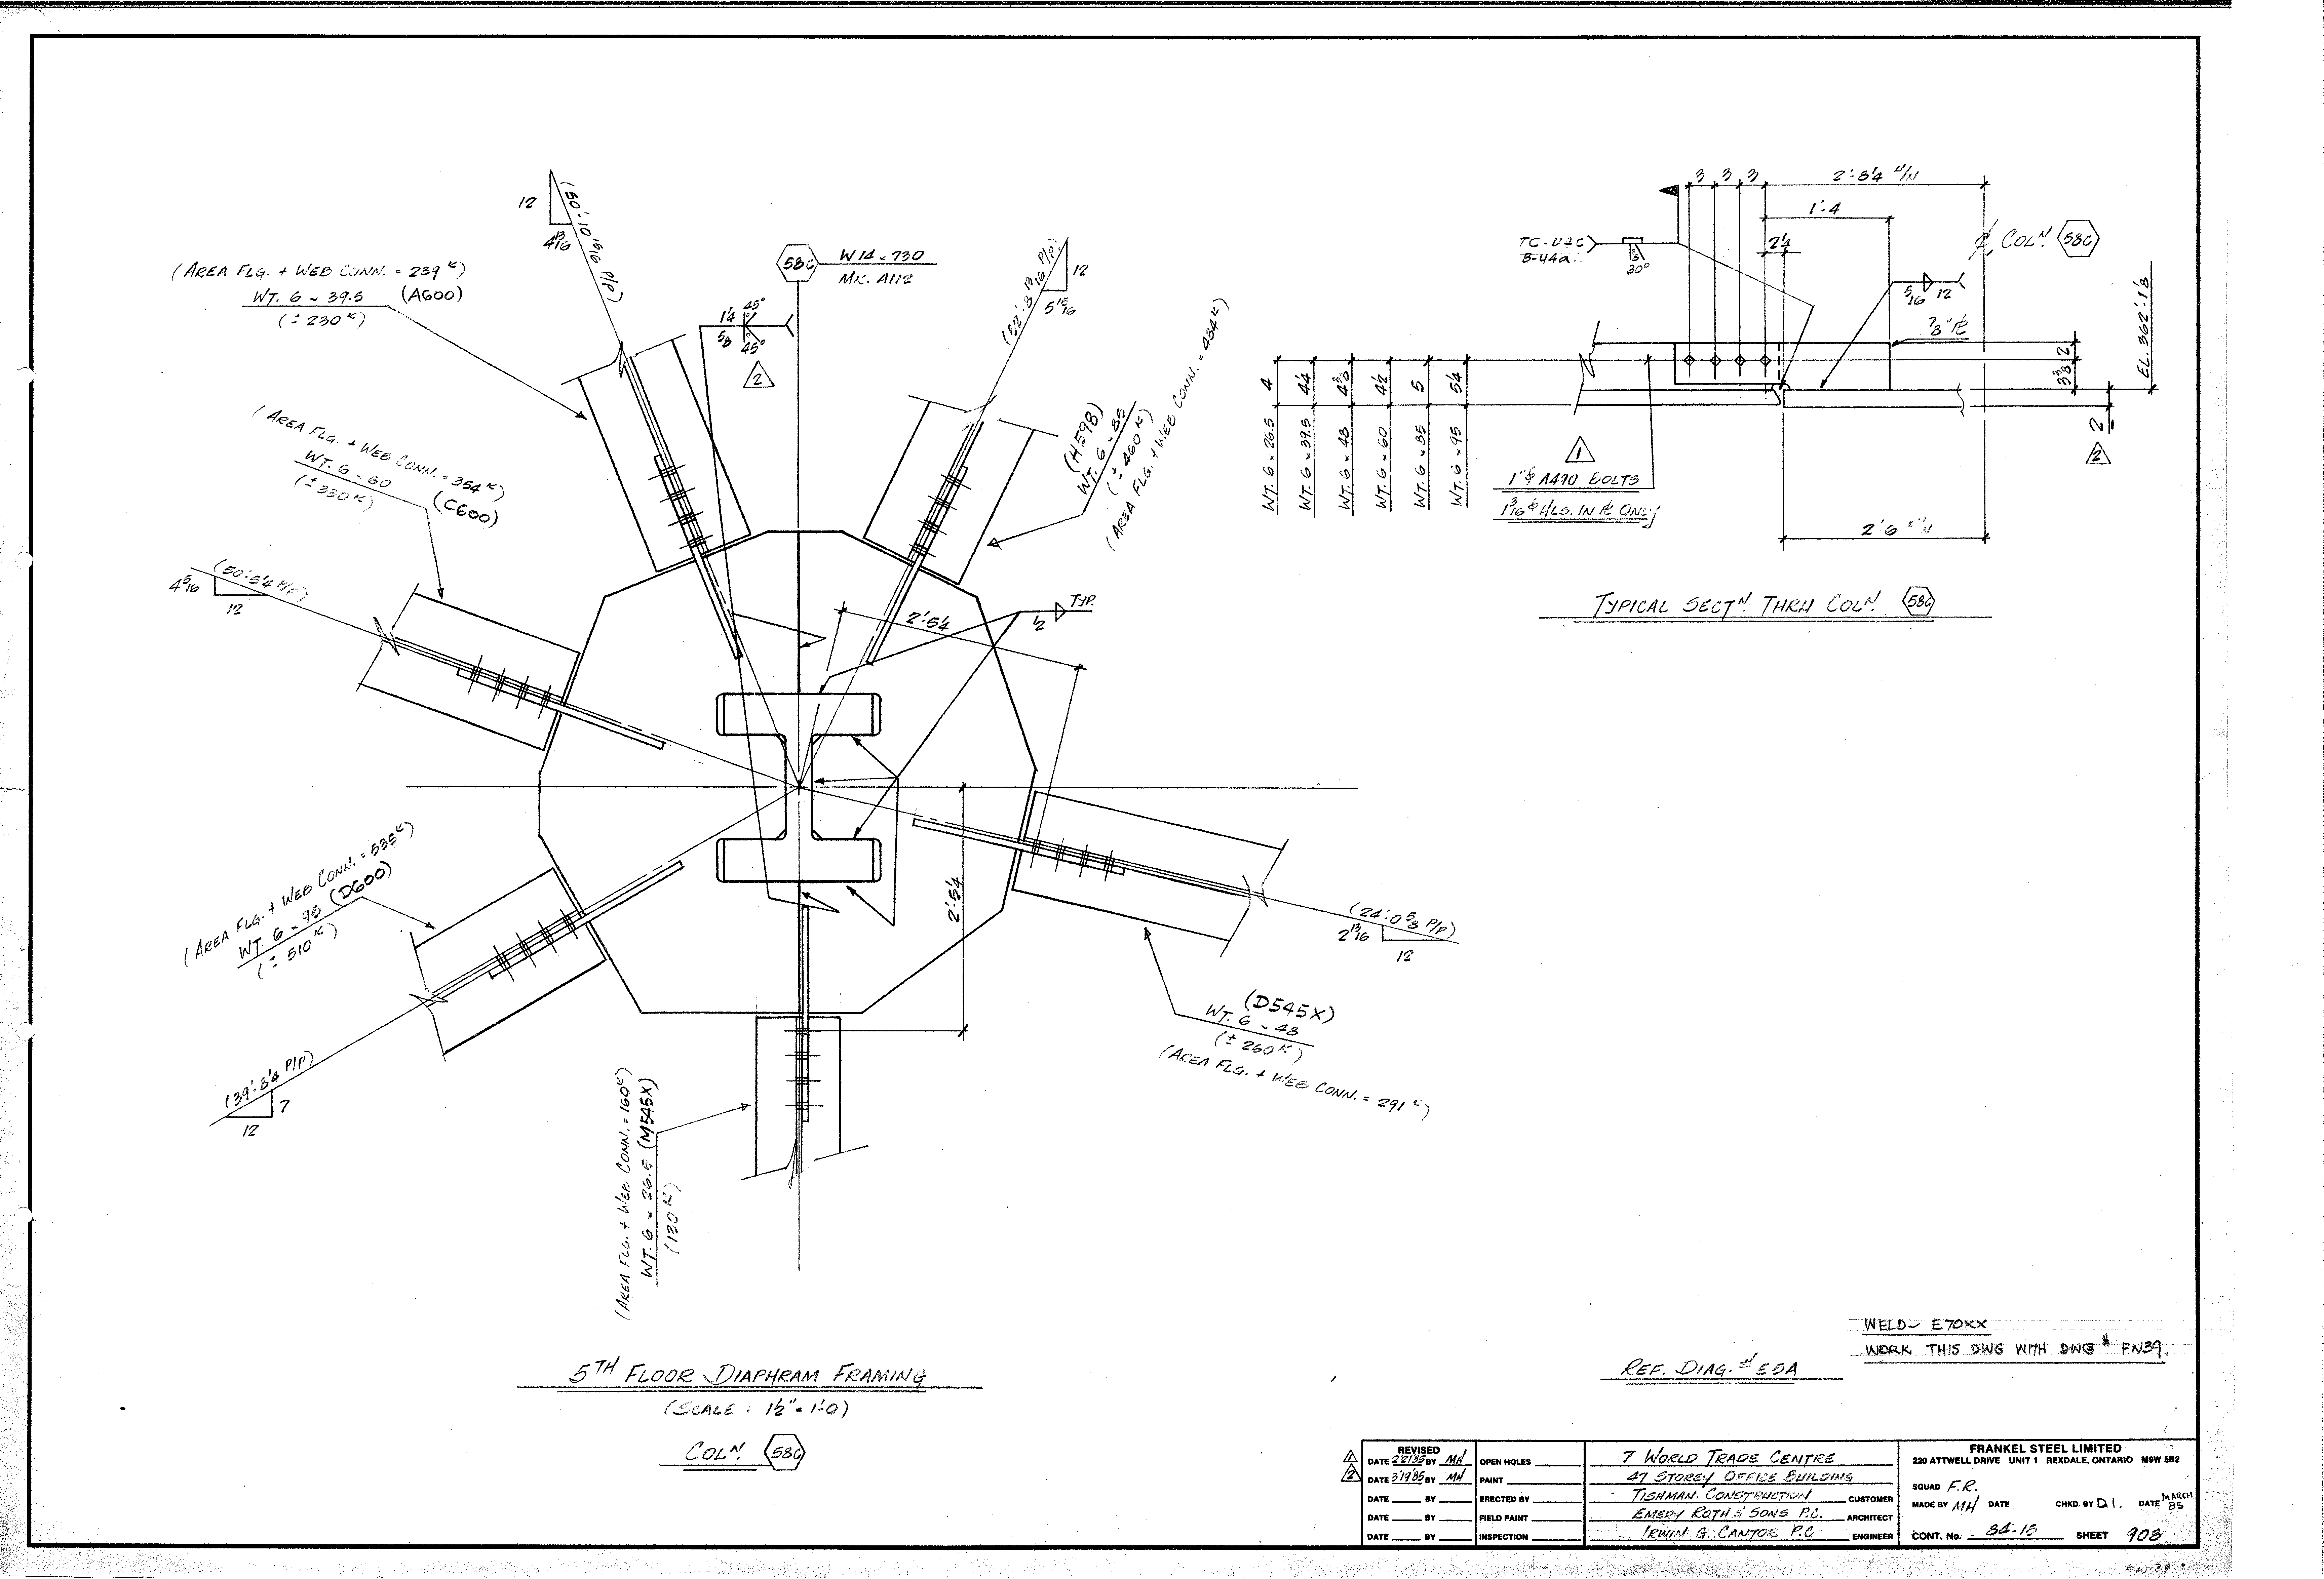
| 0908.png | 277.9 KB | 0908 | 5TH FLOOR DIAPHRAM FRAMING - COL. 58C | https://911warroom.com/model/files/WTC7/DRAWINGS/STRUCTURAL/DETAILS-PNG/0908.png |
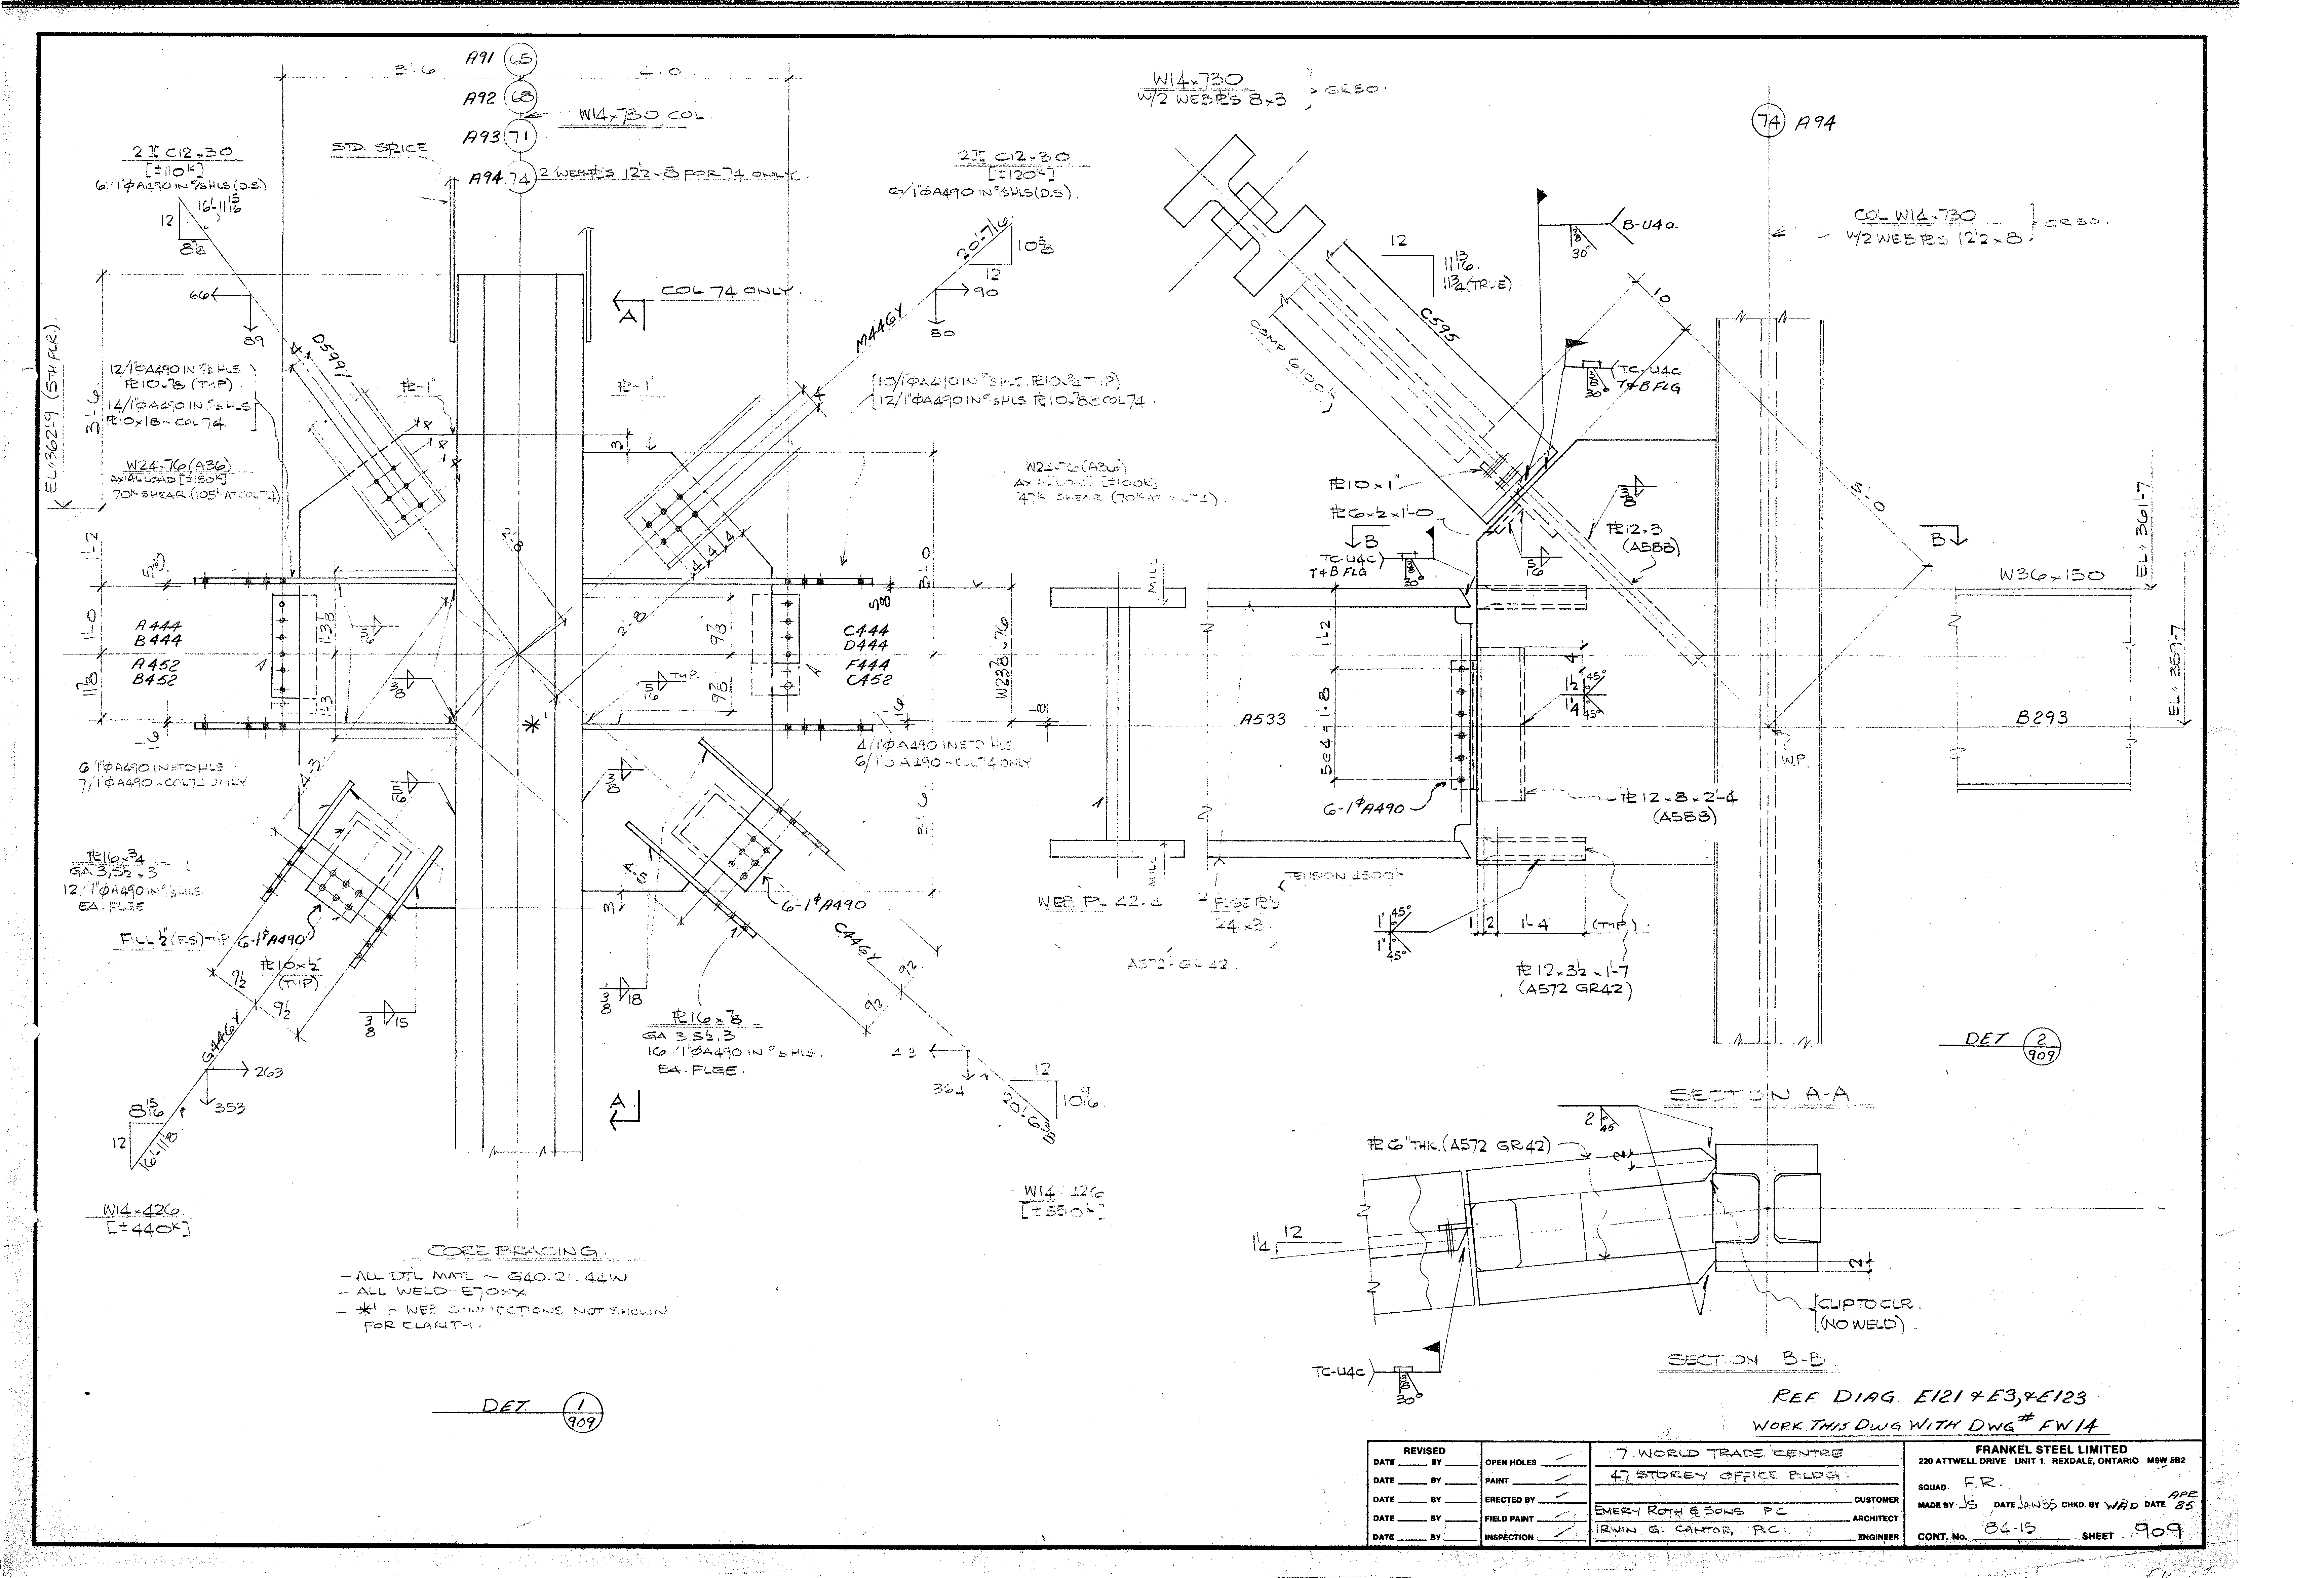
| 0909.png | 401.6 KB | 0909 | CORE BRACING | https://911warroom.com/model/files/WTC7/DRAWINGS/STRUCTURAL/DETAILS-PNG/0909.png |
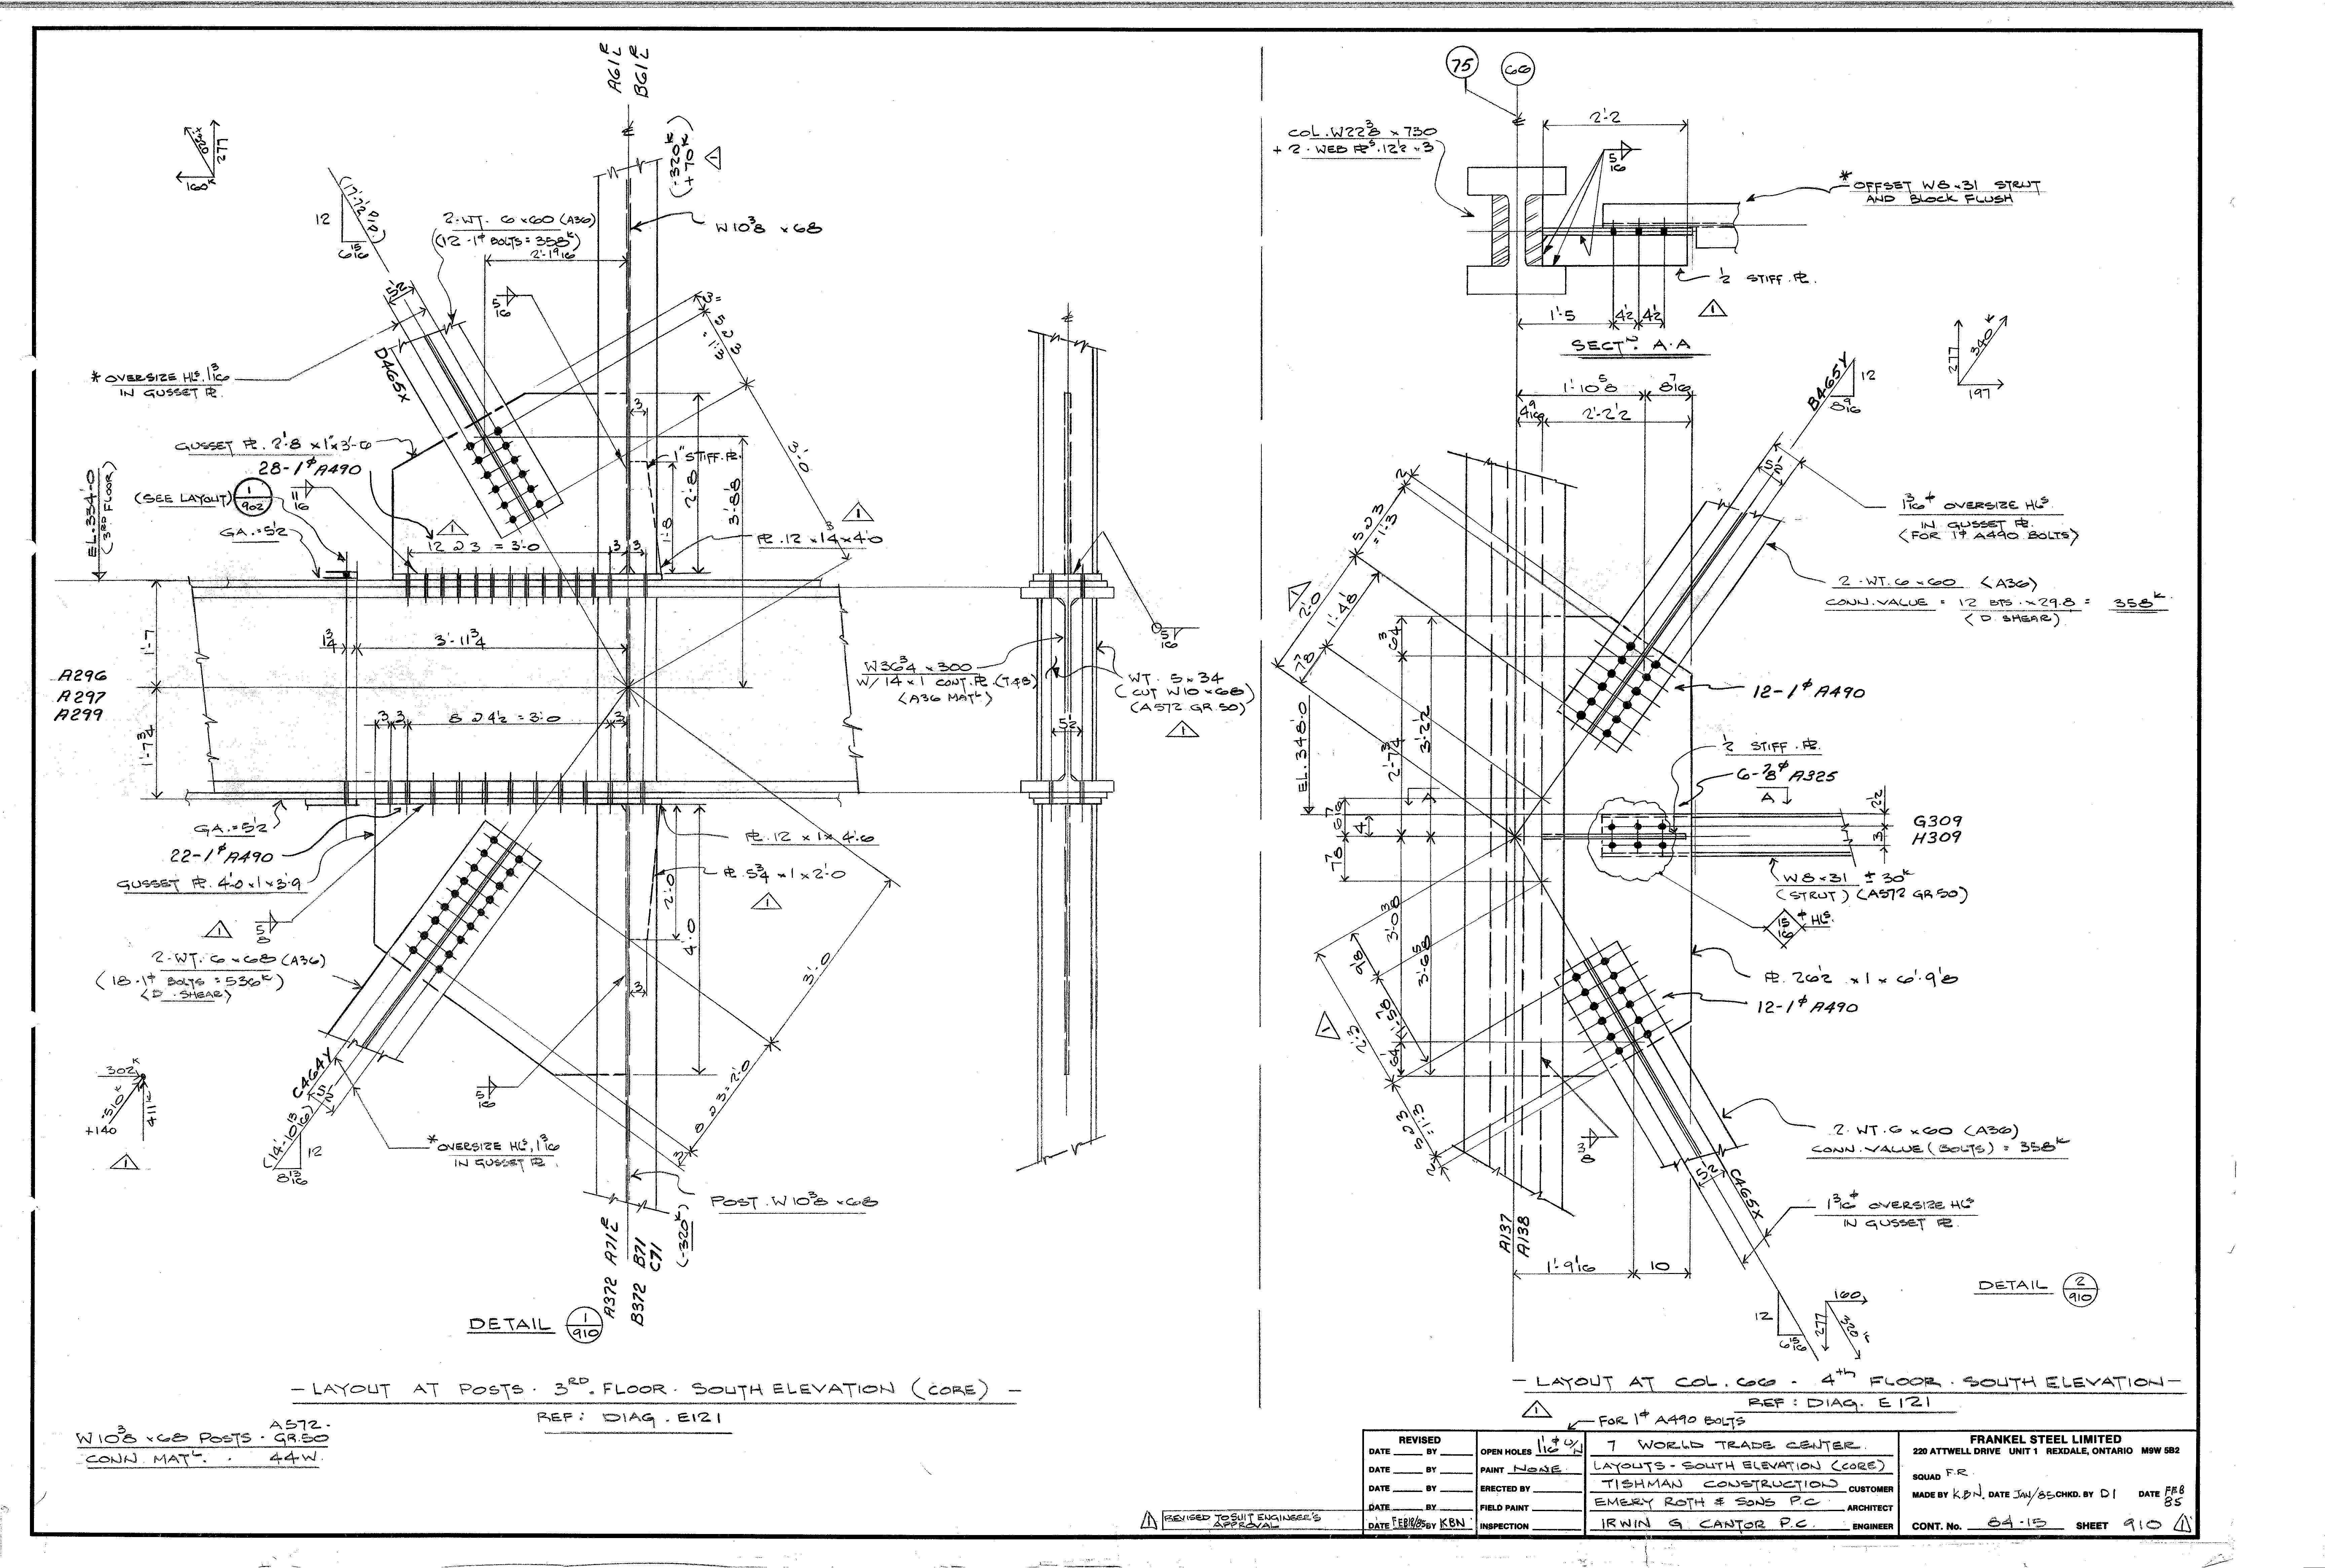
| 0910.png | 417.1 KB | 0910 | LAYOUTS - SOUTH ELEVATION (CORE) | https://911warroom.com/model/files/WTC7/DRAWINGS/STRUCTURAL/DETAILS-PNG/0910.png |
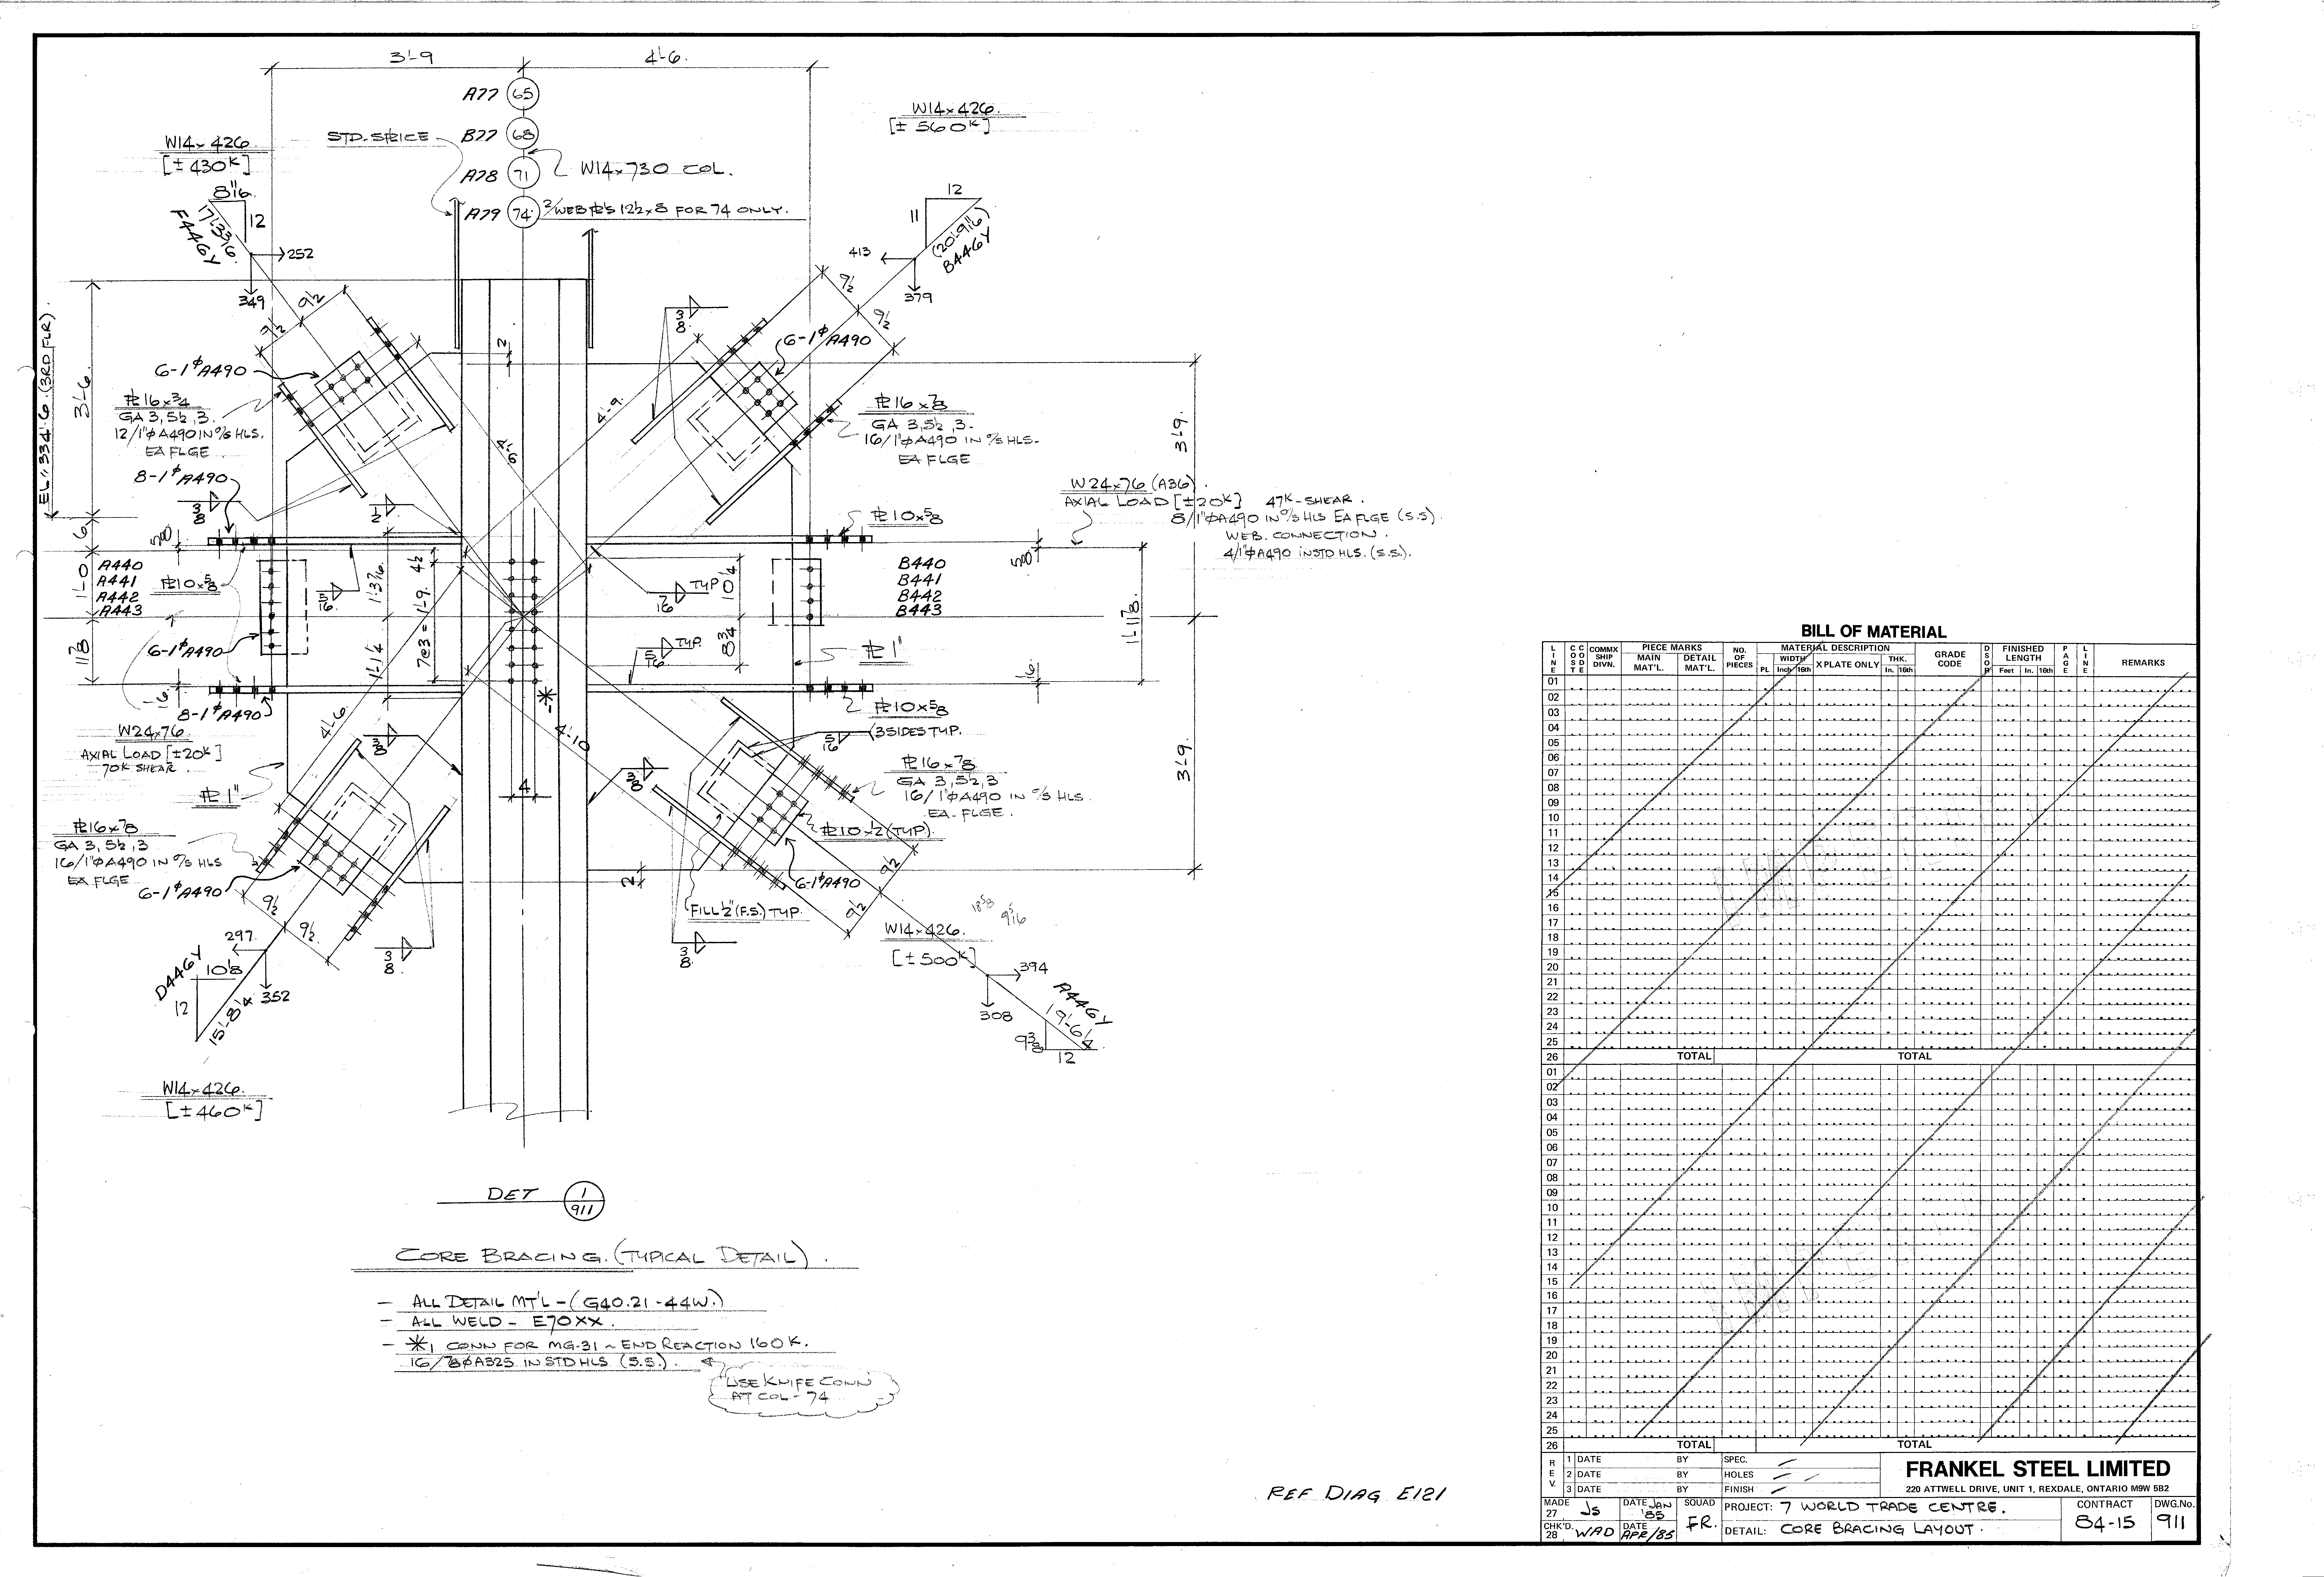
| 0911.png | 385.8 KB | 0911 | CORE BRACING LAYOUT | https://911warroom.com/model/files/WTC7/DRAWINGS/STRUCTURAL/DETAILS-PNG/0911.png |
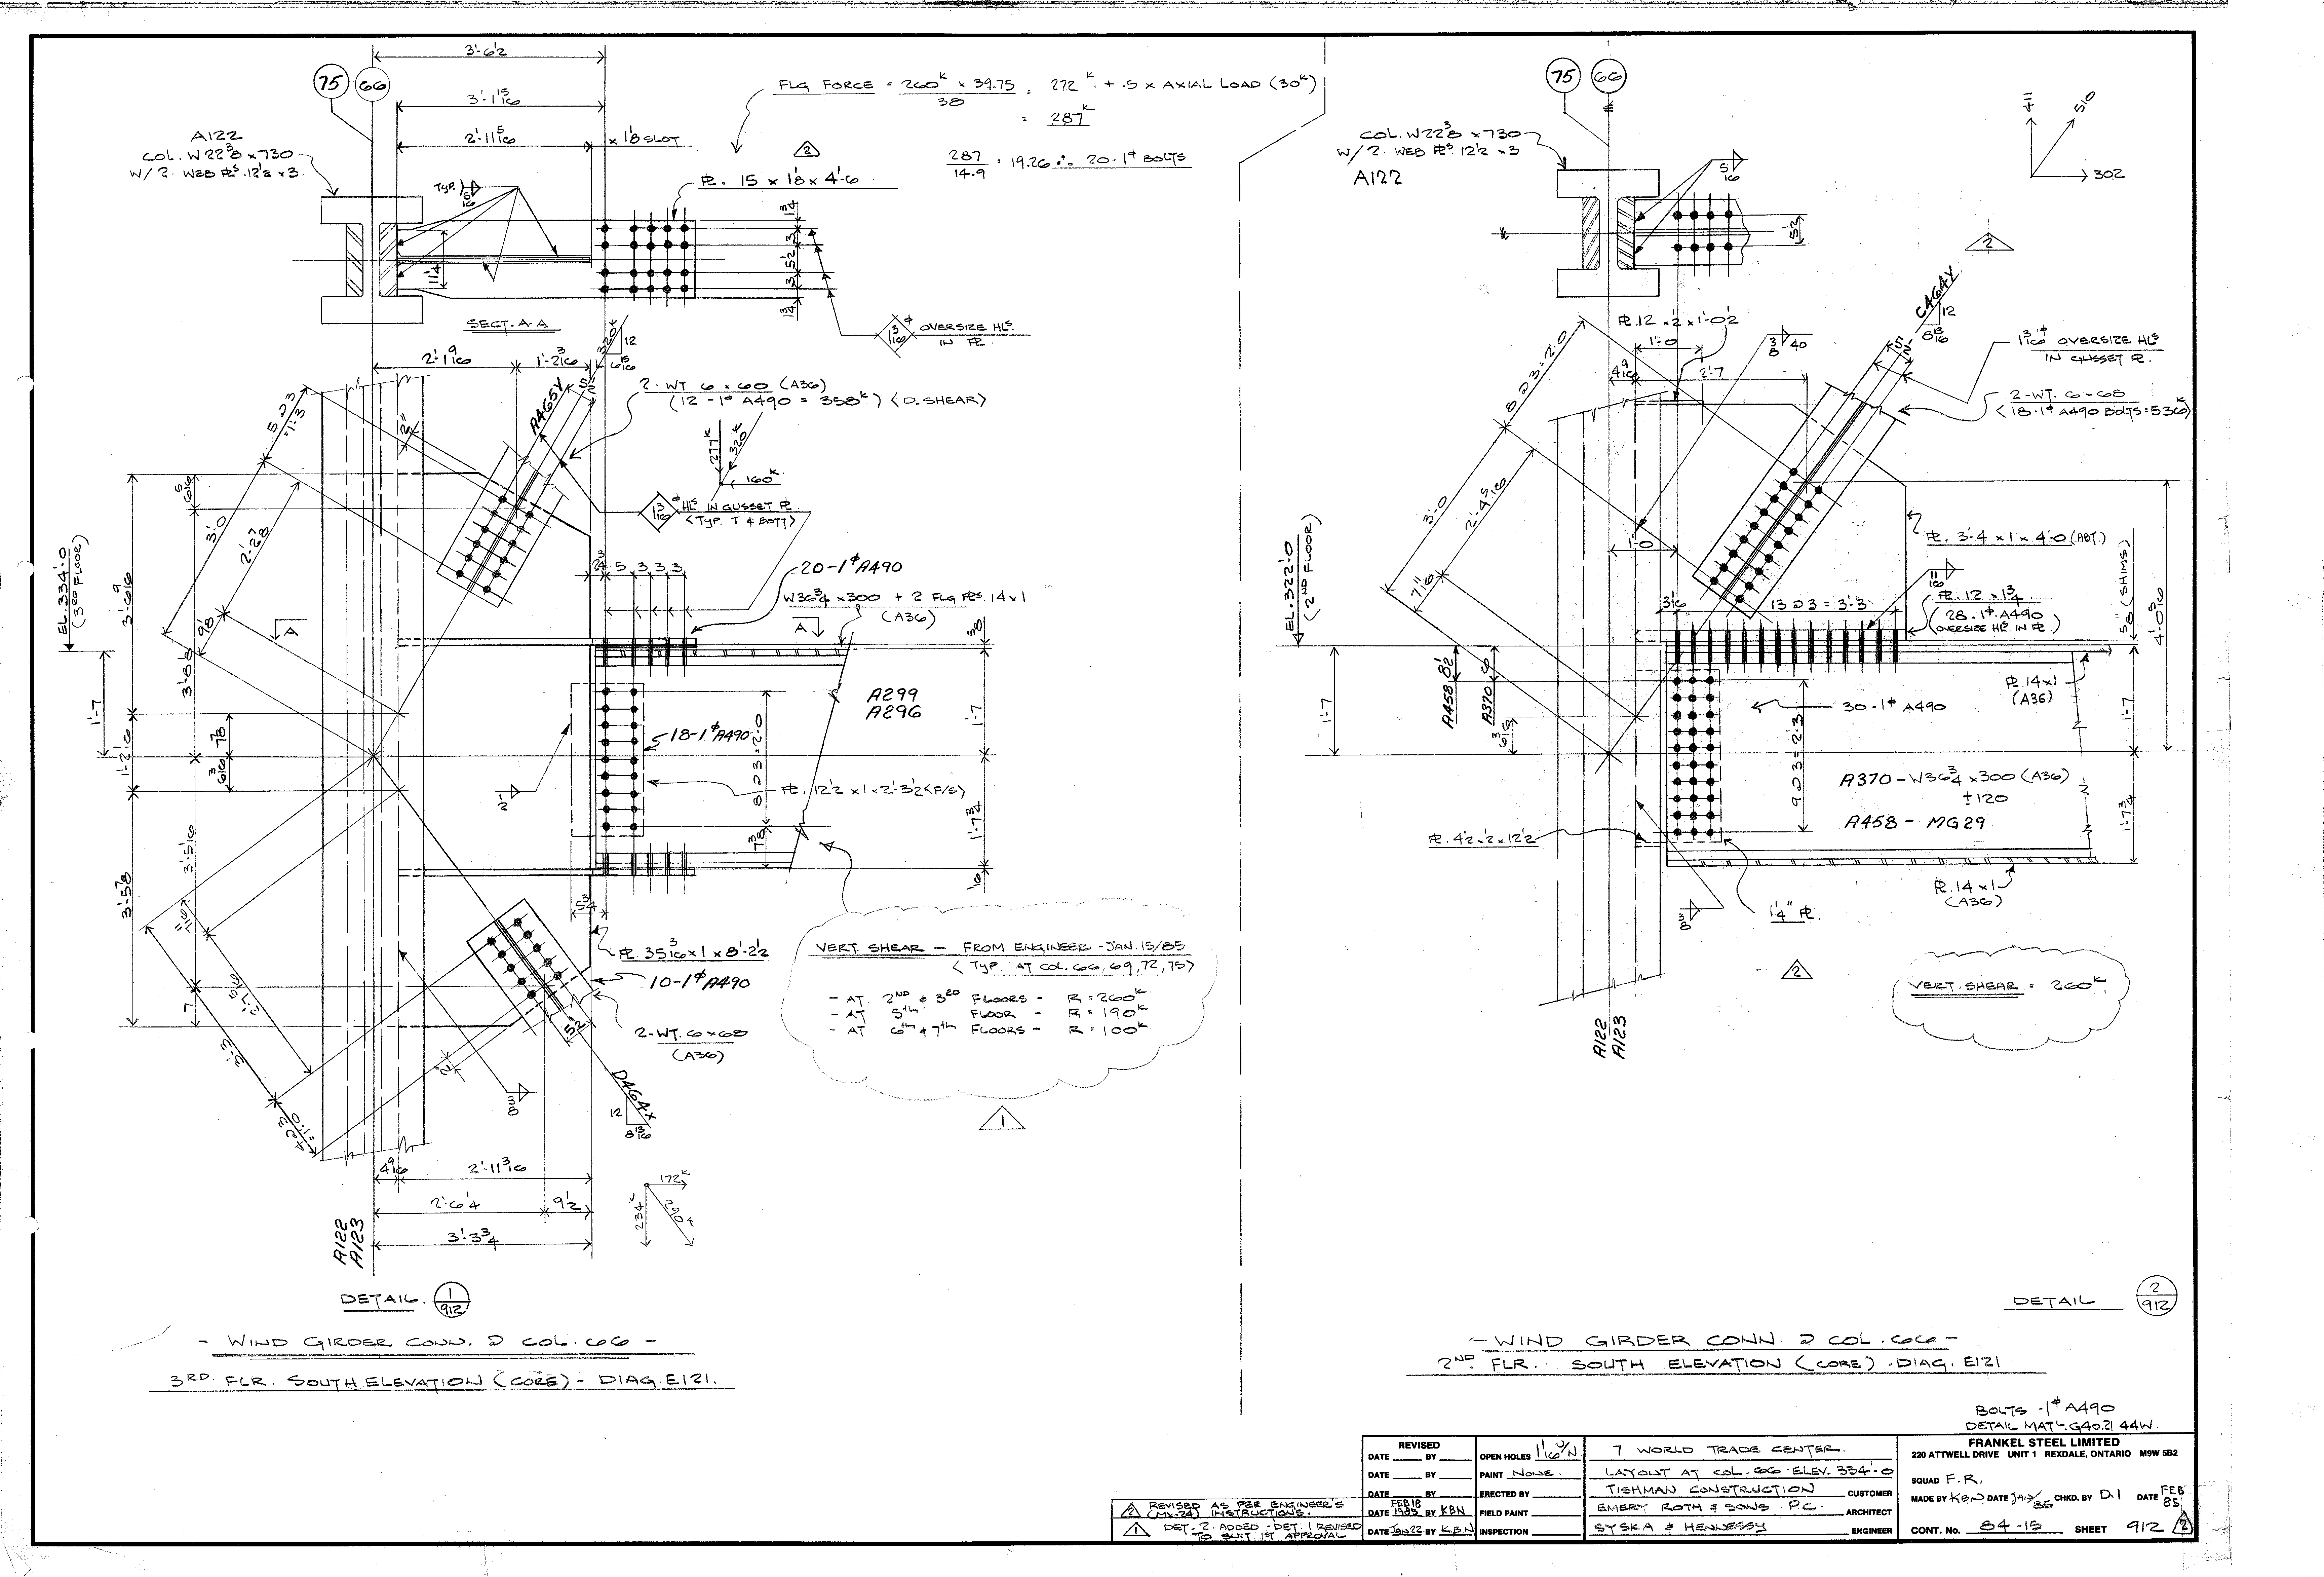
| 0912.png | 388.8 KB | 0912 | LAYOUT AT COL. 66 ELEV. 334'-0 | https://911warroom.com/model/files/WTC7/DRAWINGS/STRUCTURAL/DETAILS-PNG/0912.png |
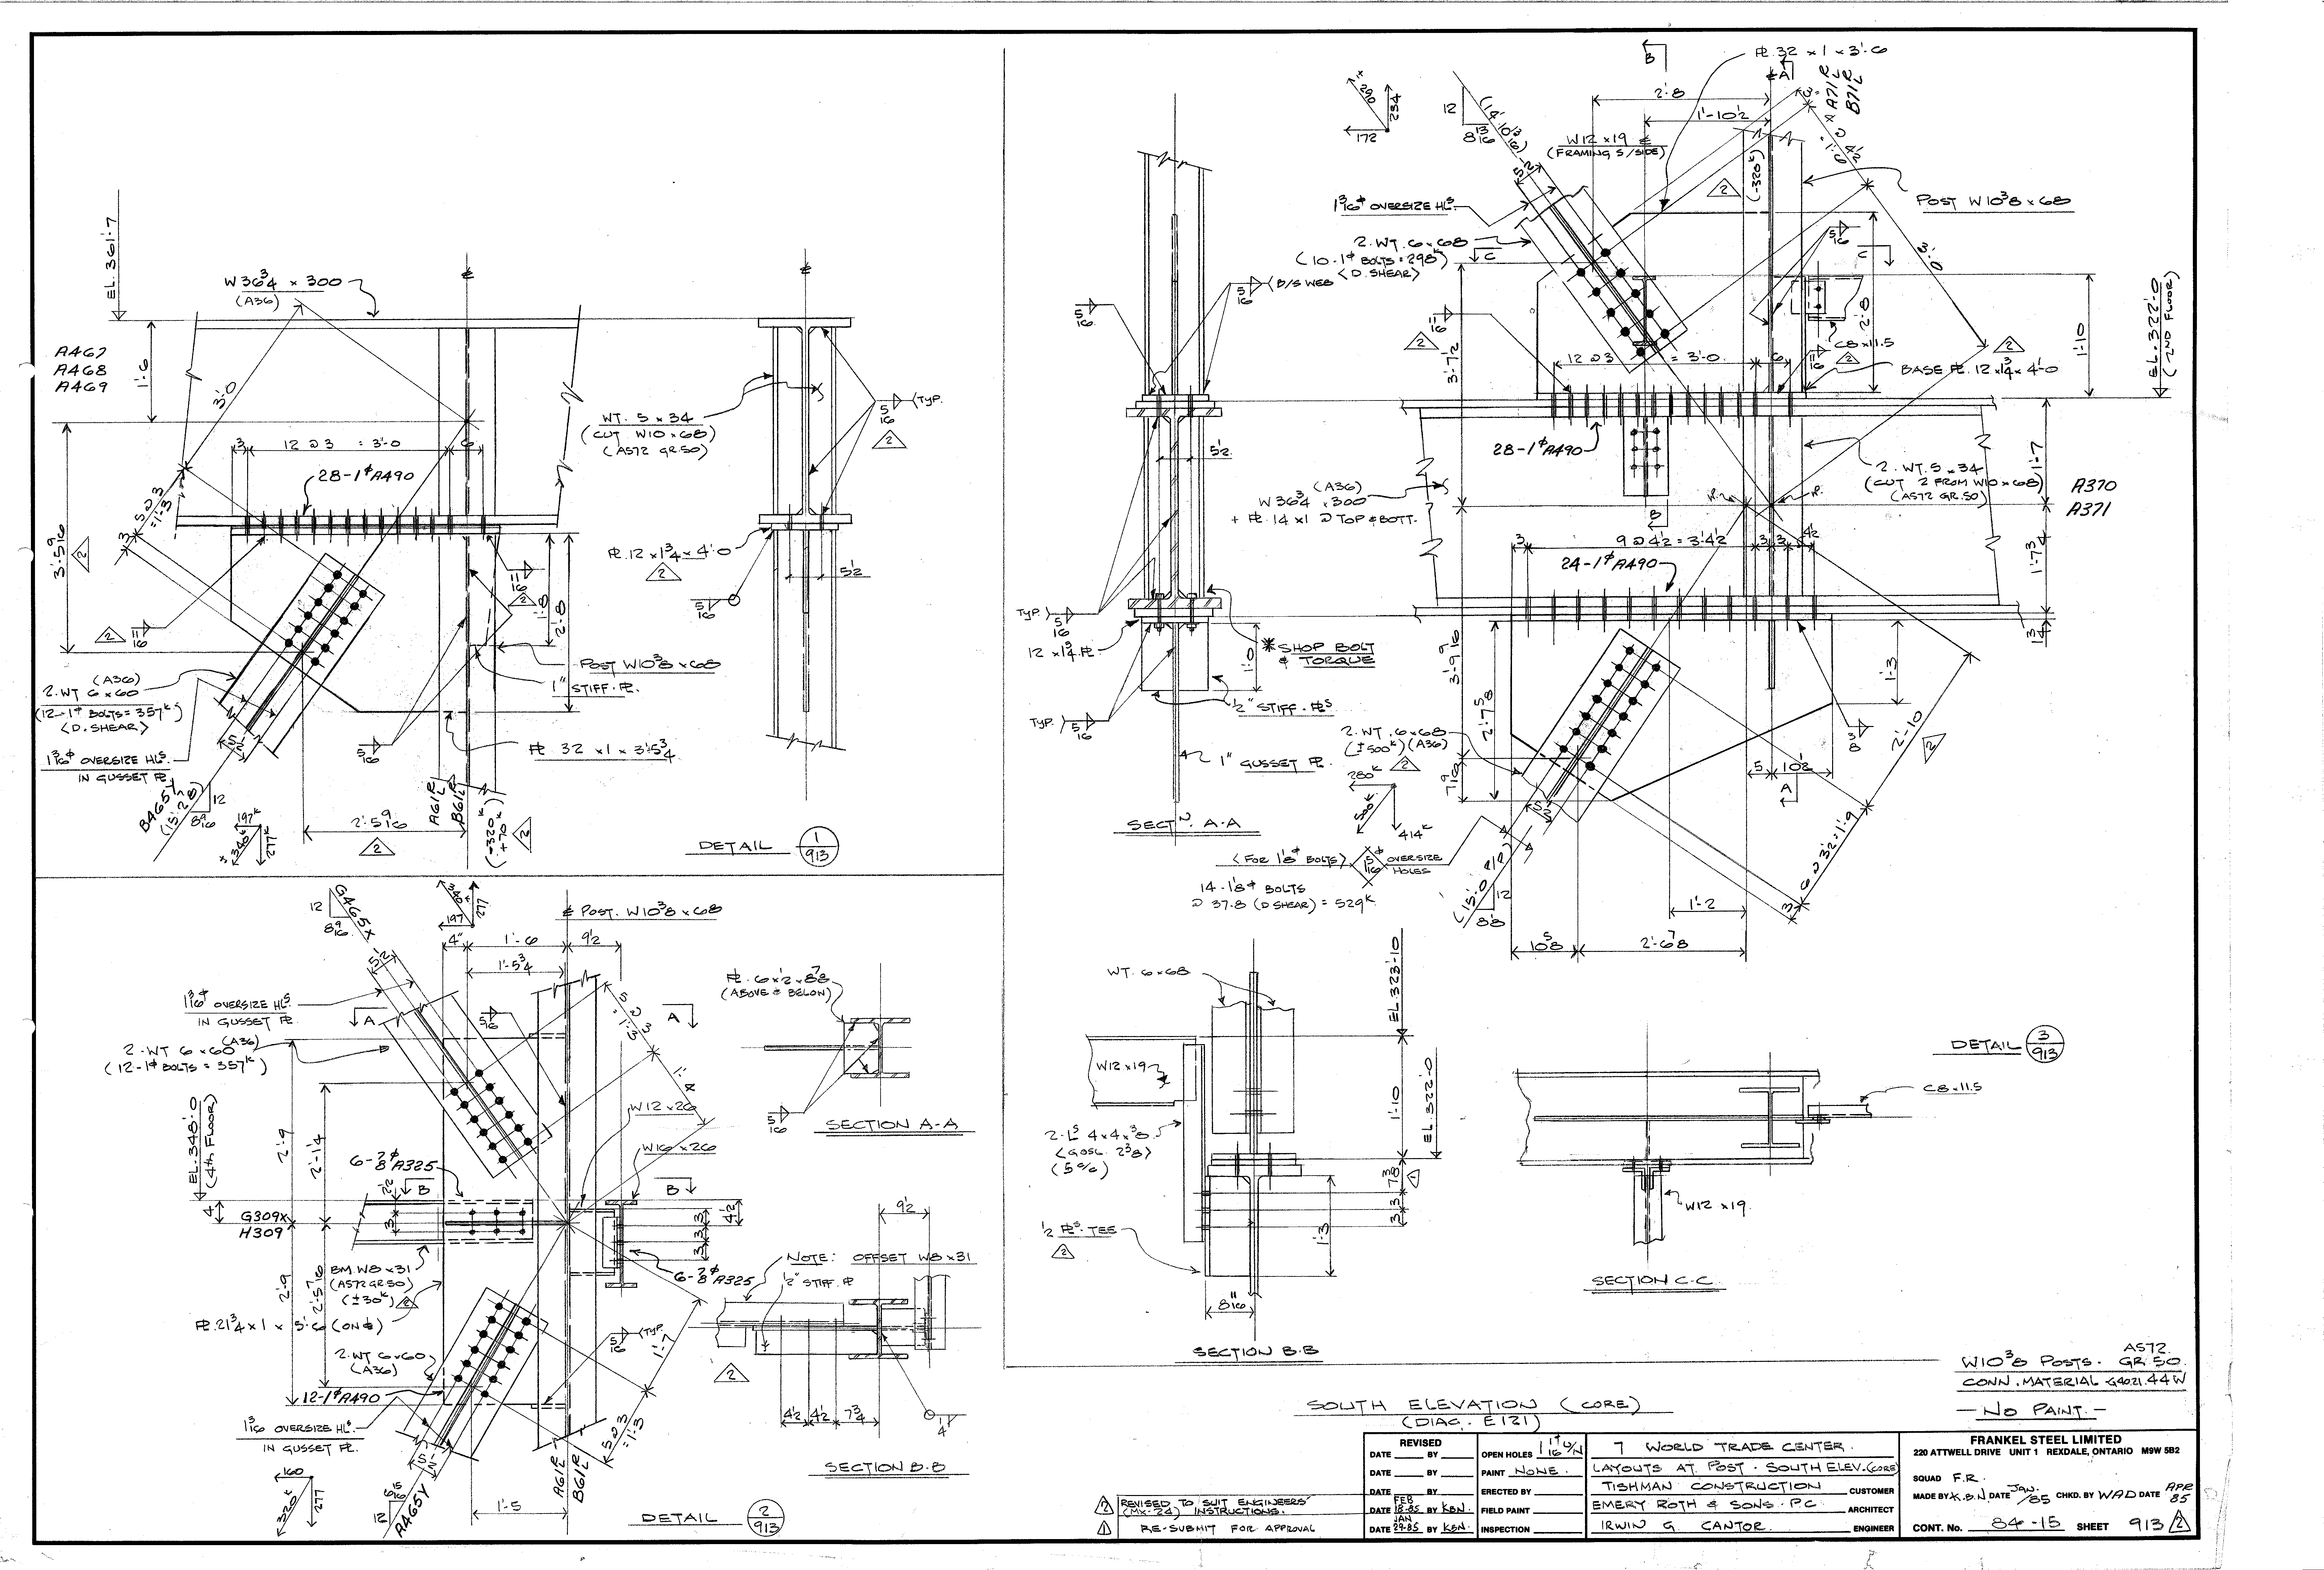
| 0913.png | 470.0 KB | 0913 | LAYOUTS AT POST - SOUTH ELEV. (CORE) | https://911warroom.com/model/files/WTC7/DRAWINGS/STRUCTURAL/DETAILS-PNG/0913.png |
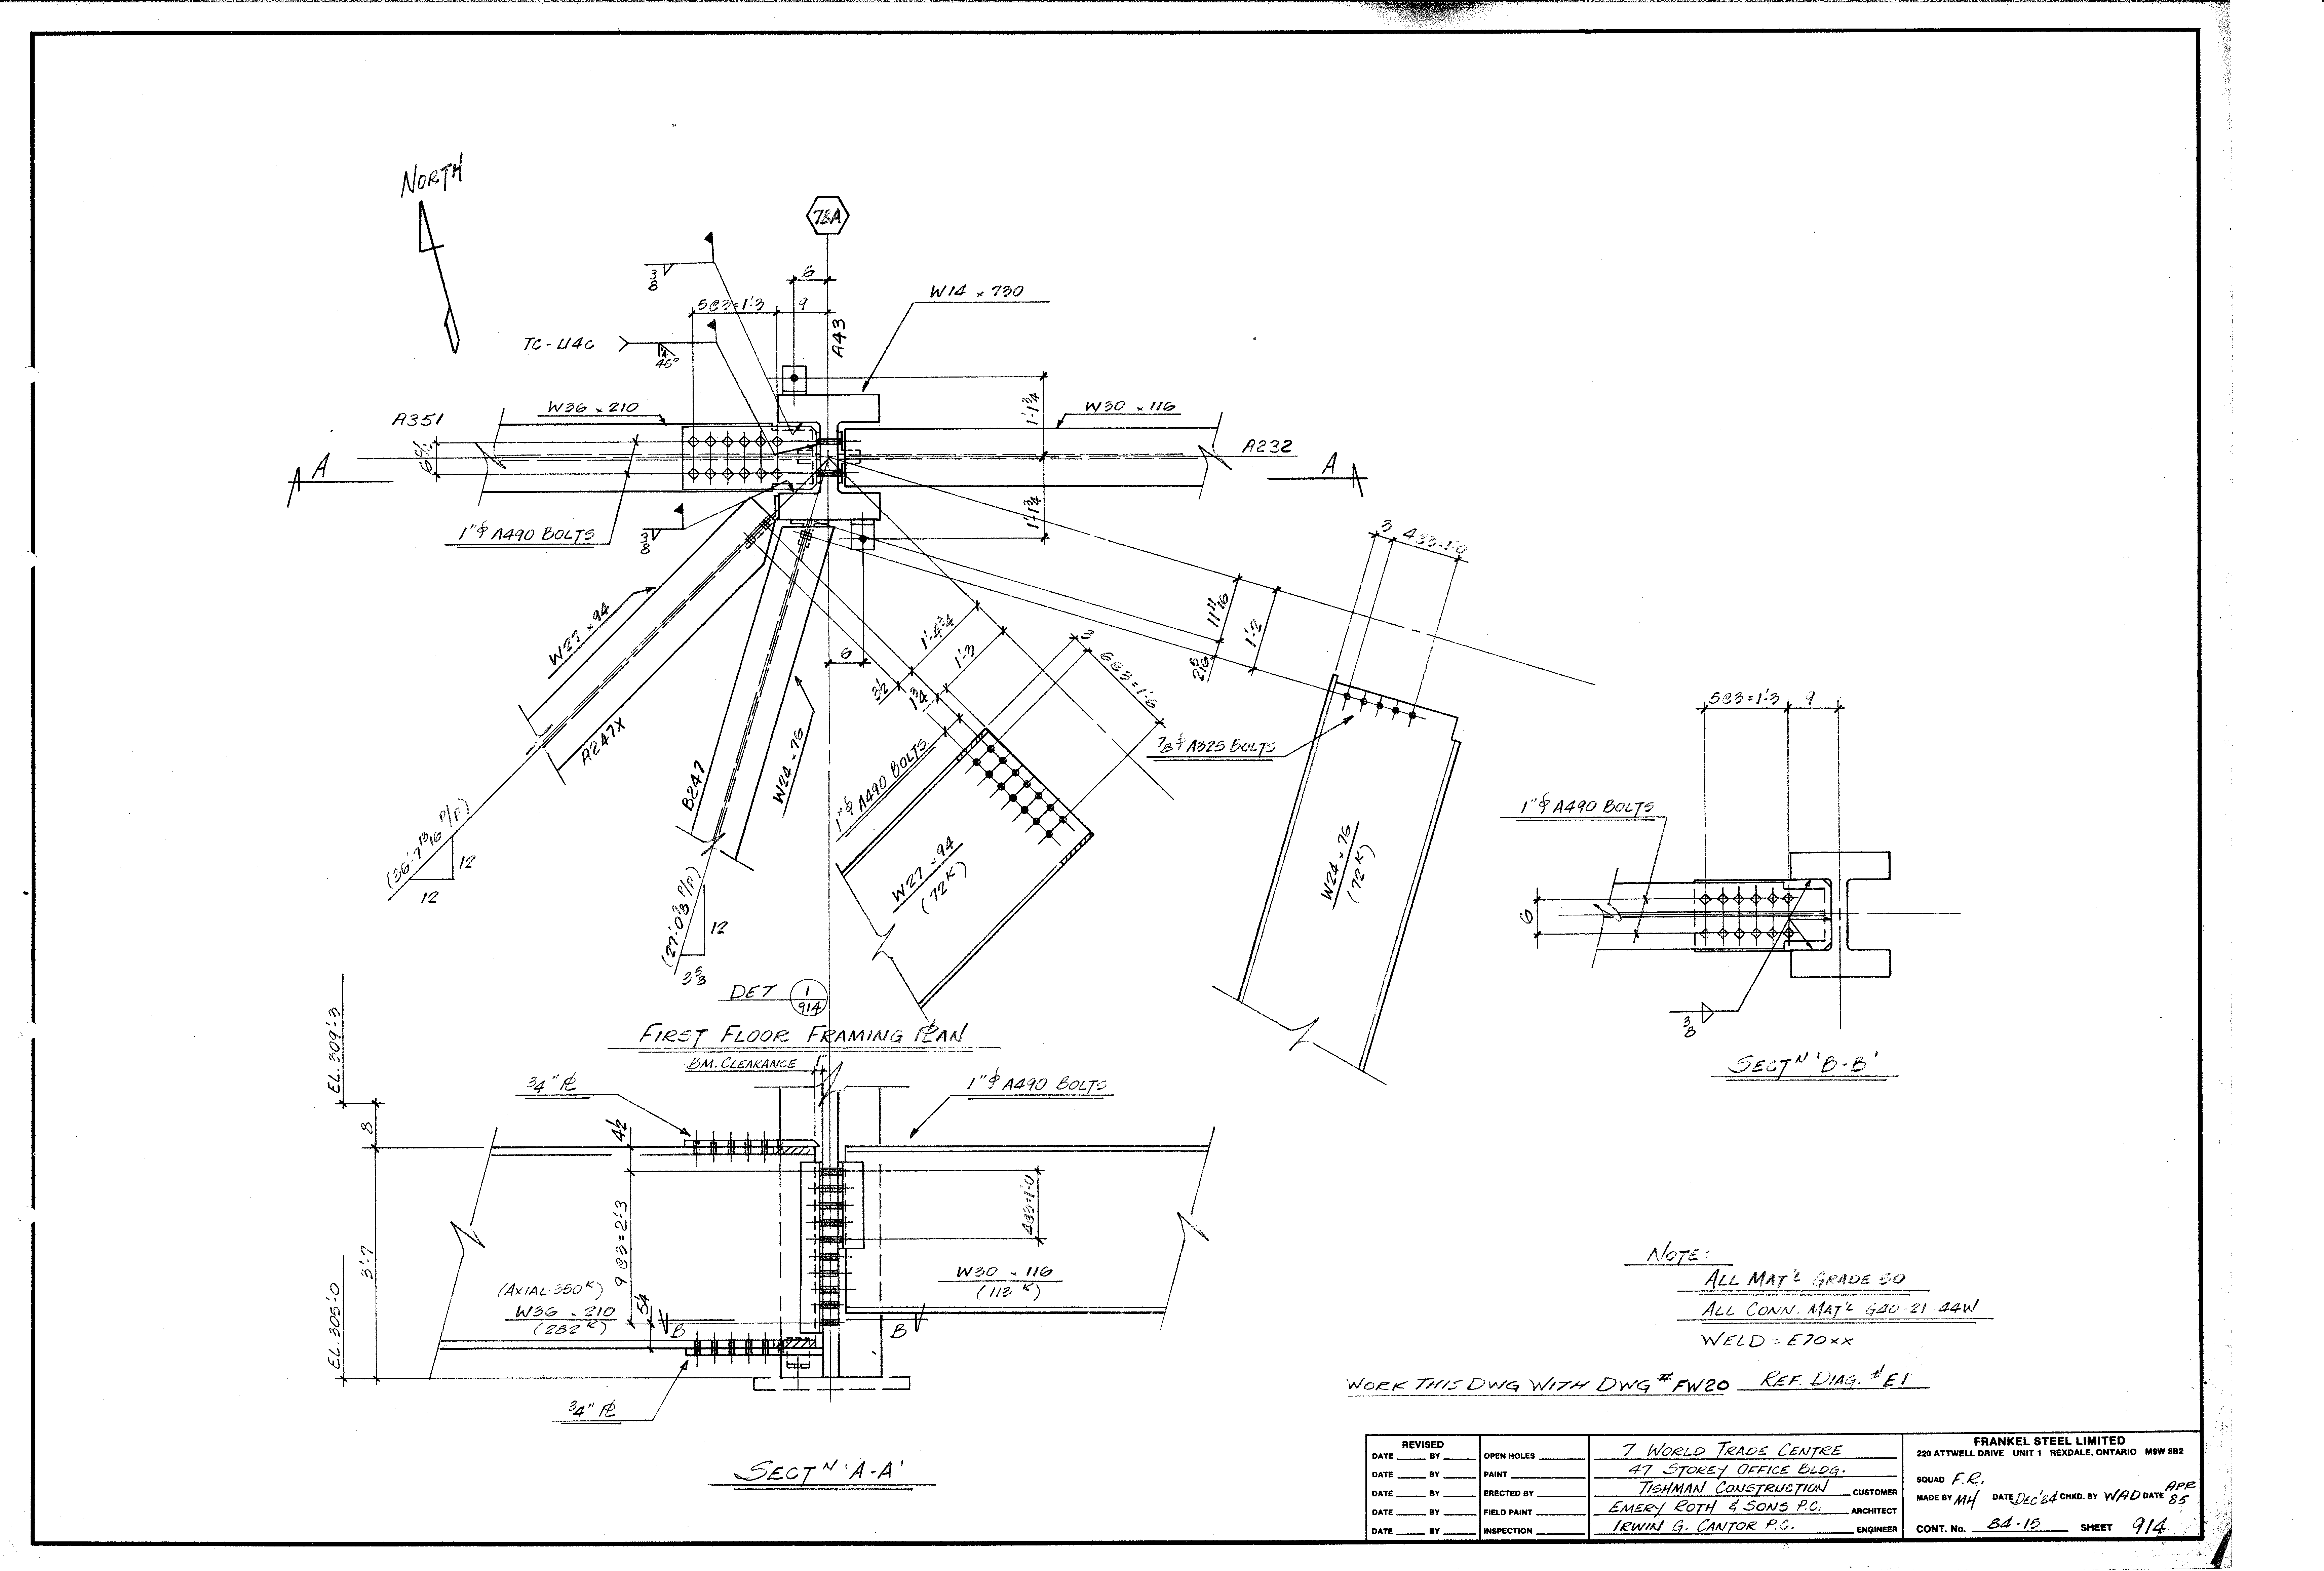
| 0914.png | 246.8 KB | 0914 | FIRST FLOOR FRAMING PLAN (DET 1/914) | https://911warroom.com/model/files/WTC7/DRAWINGS/STRUCTURAL/DETAILS-PNG/0914.png |
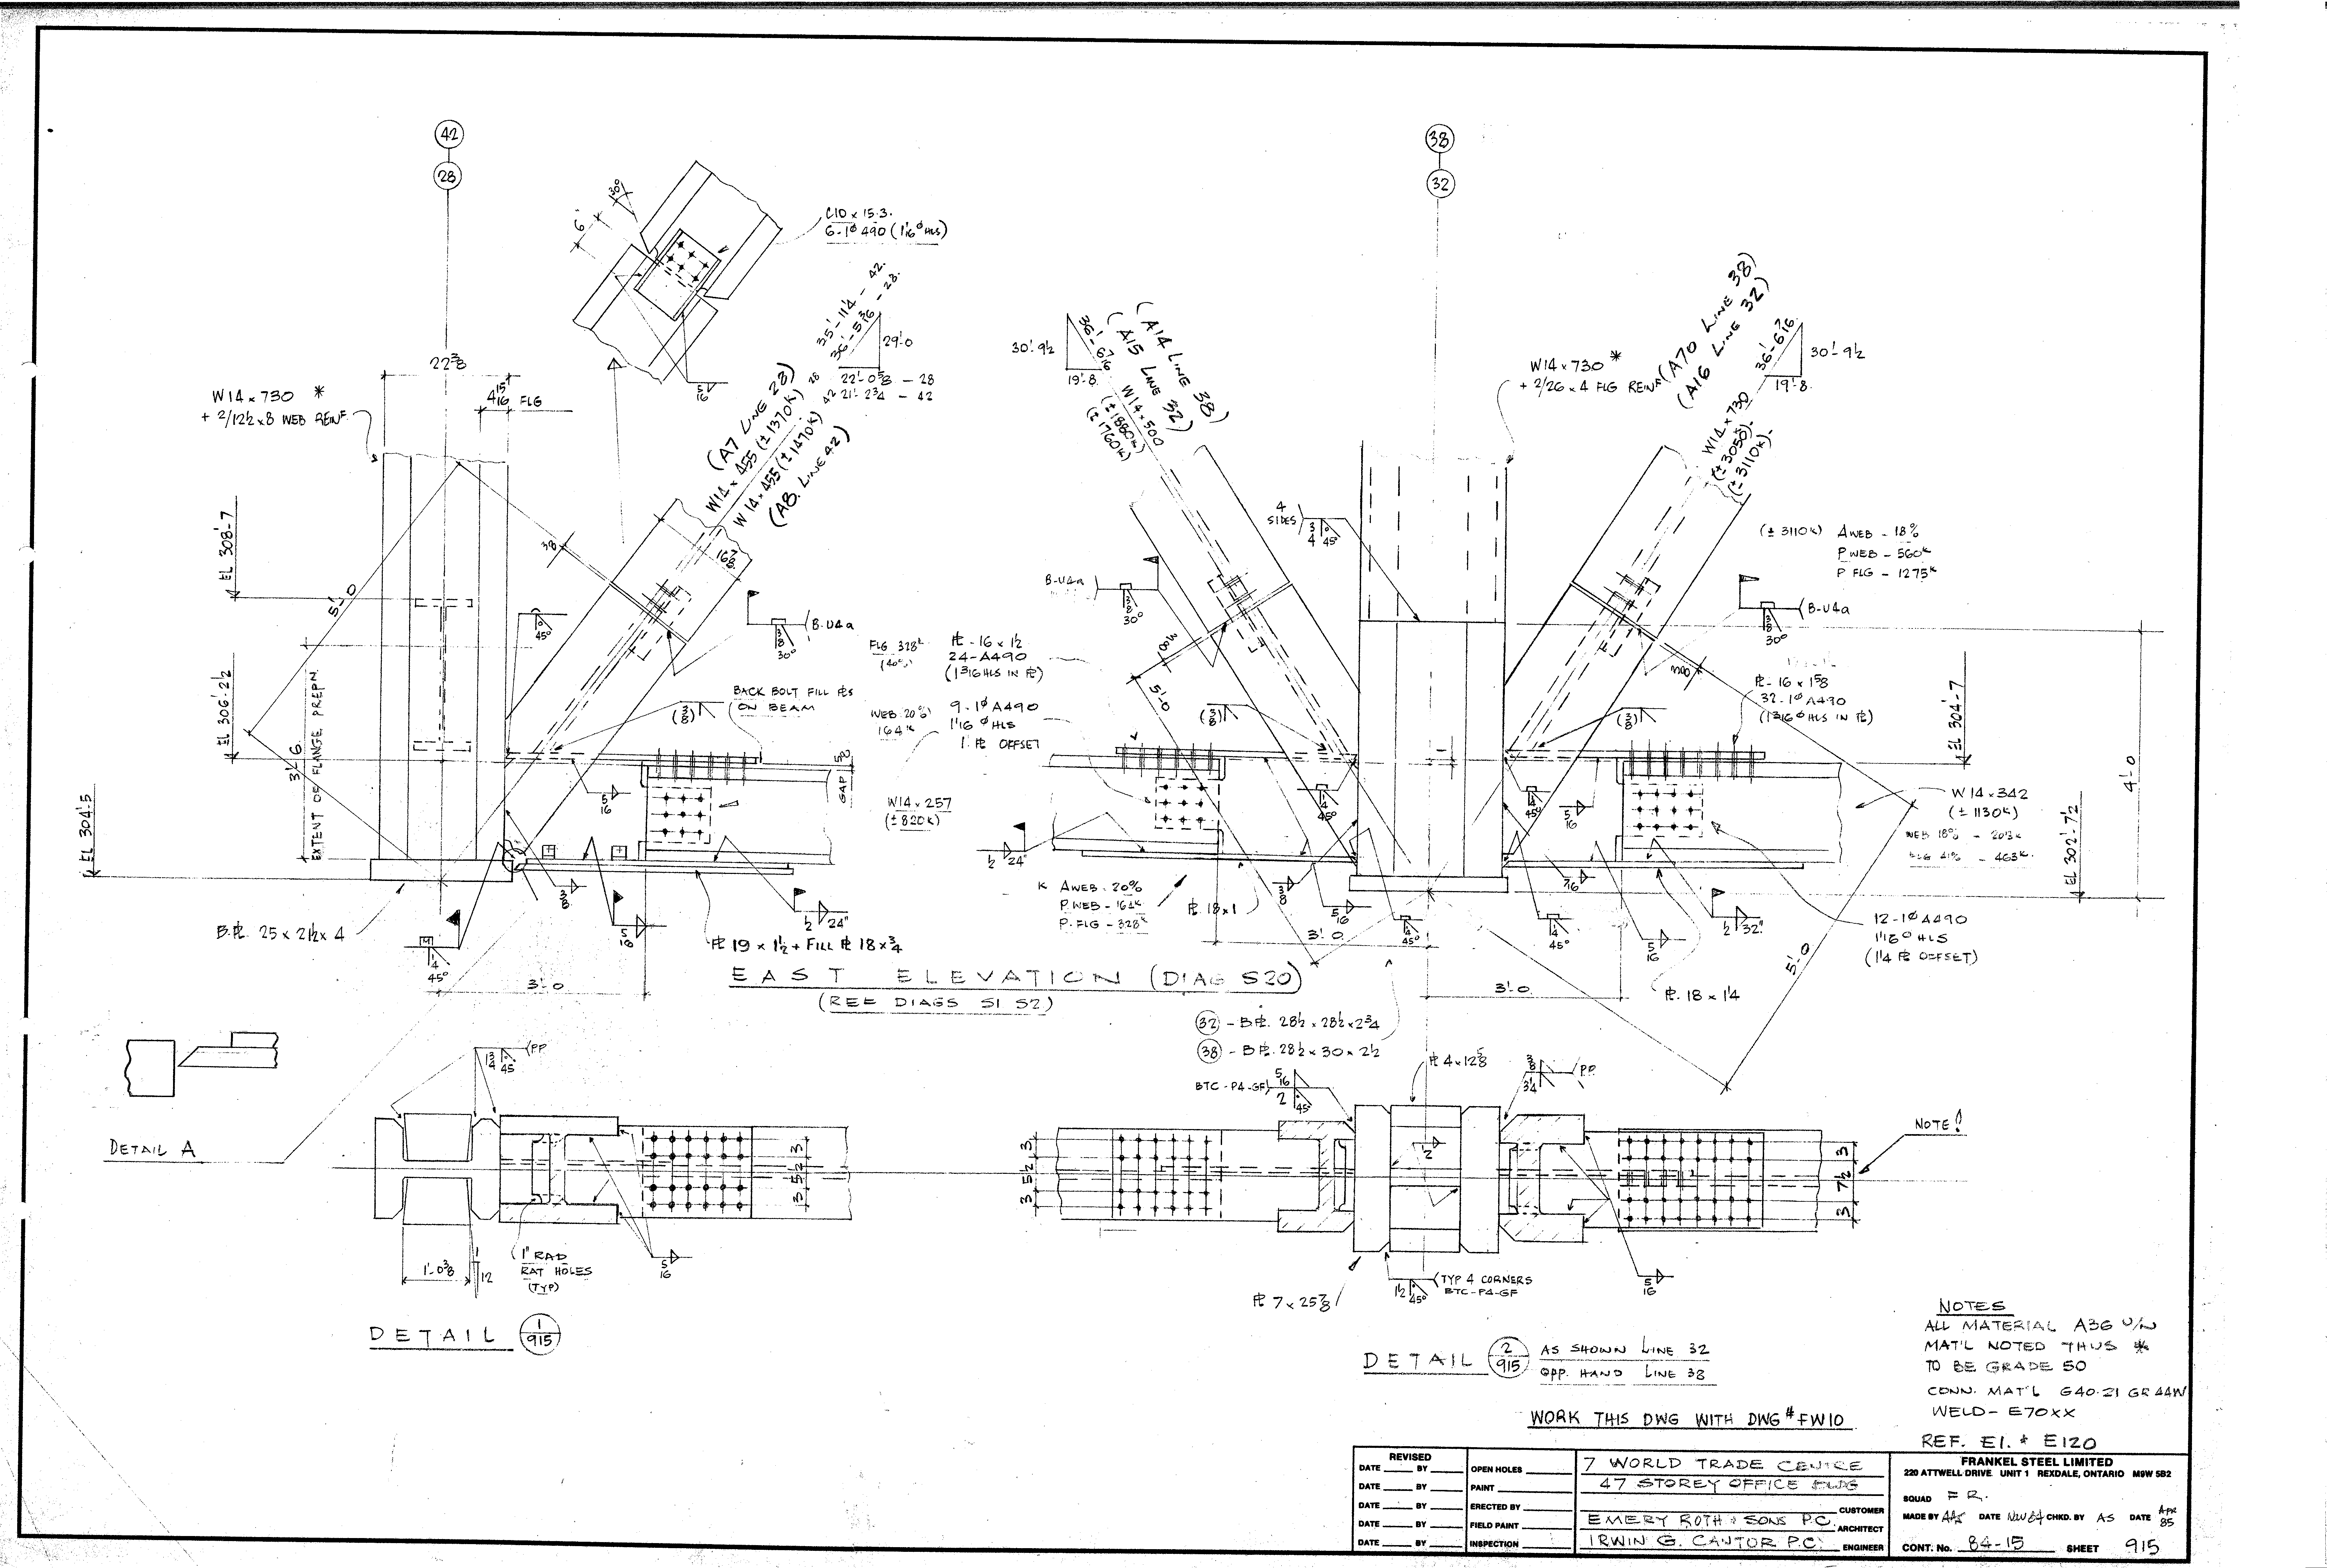
| 0915.png | 363.7 KB | 0915 | EAST ELEVATION (DIAG S20) | https://911warroom.com/model/files/WTC7/DRAWINGS/STRUCTURAL/DETAILS-PNG/0915.png |
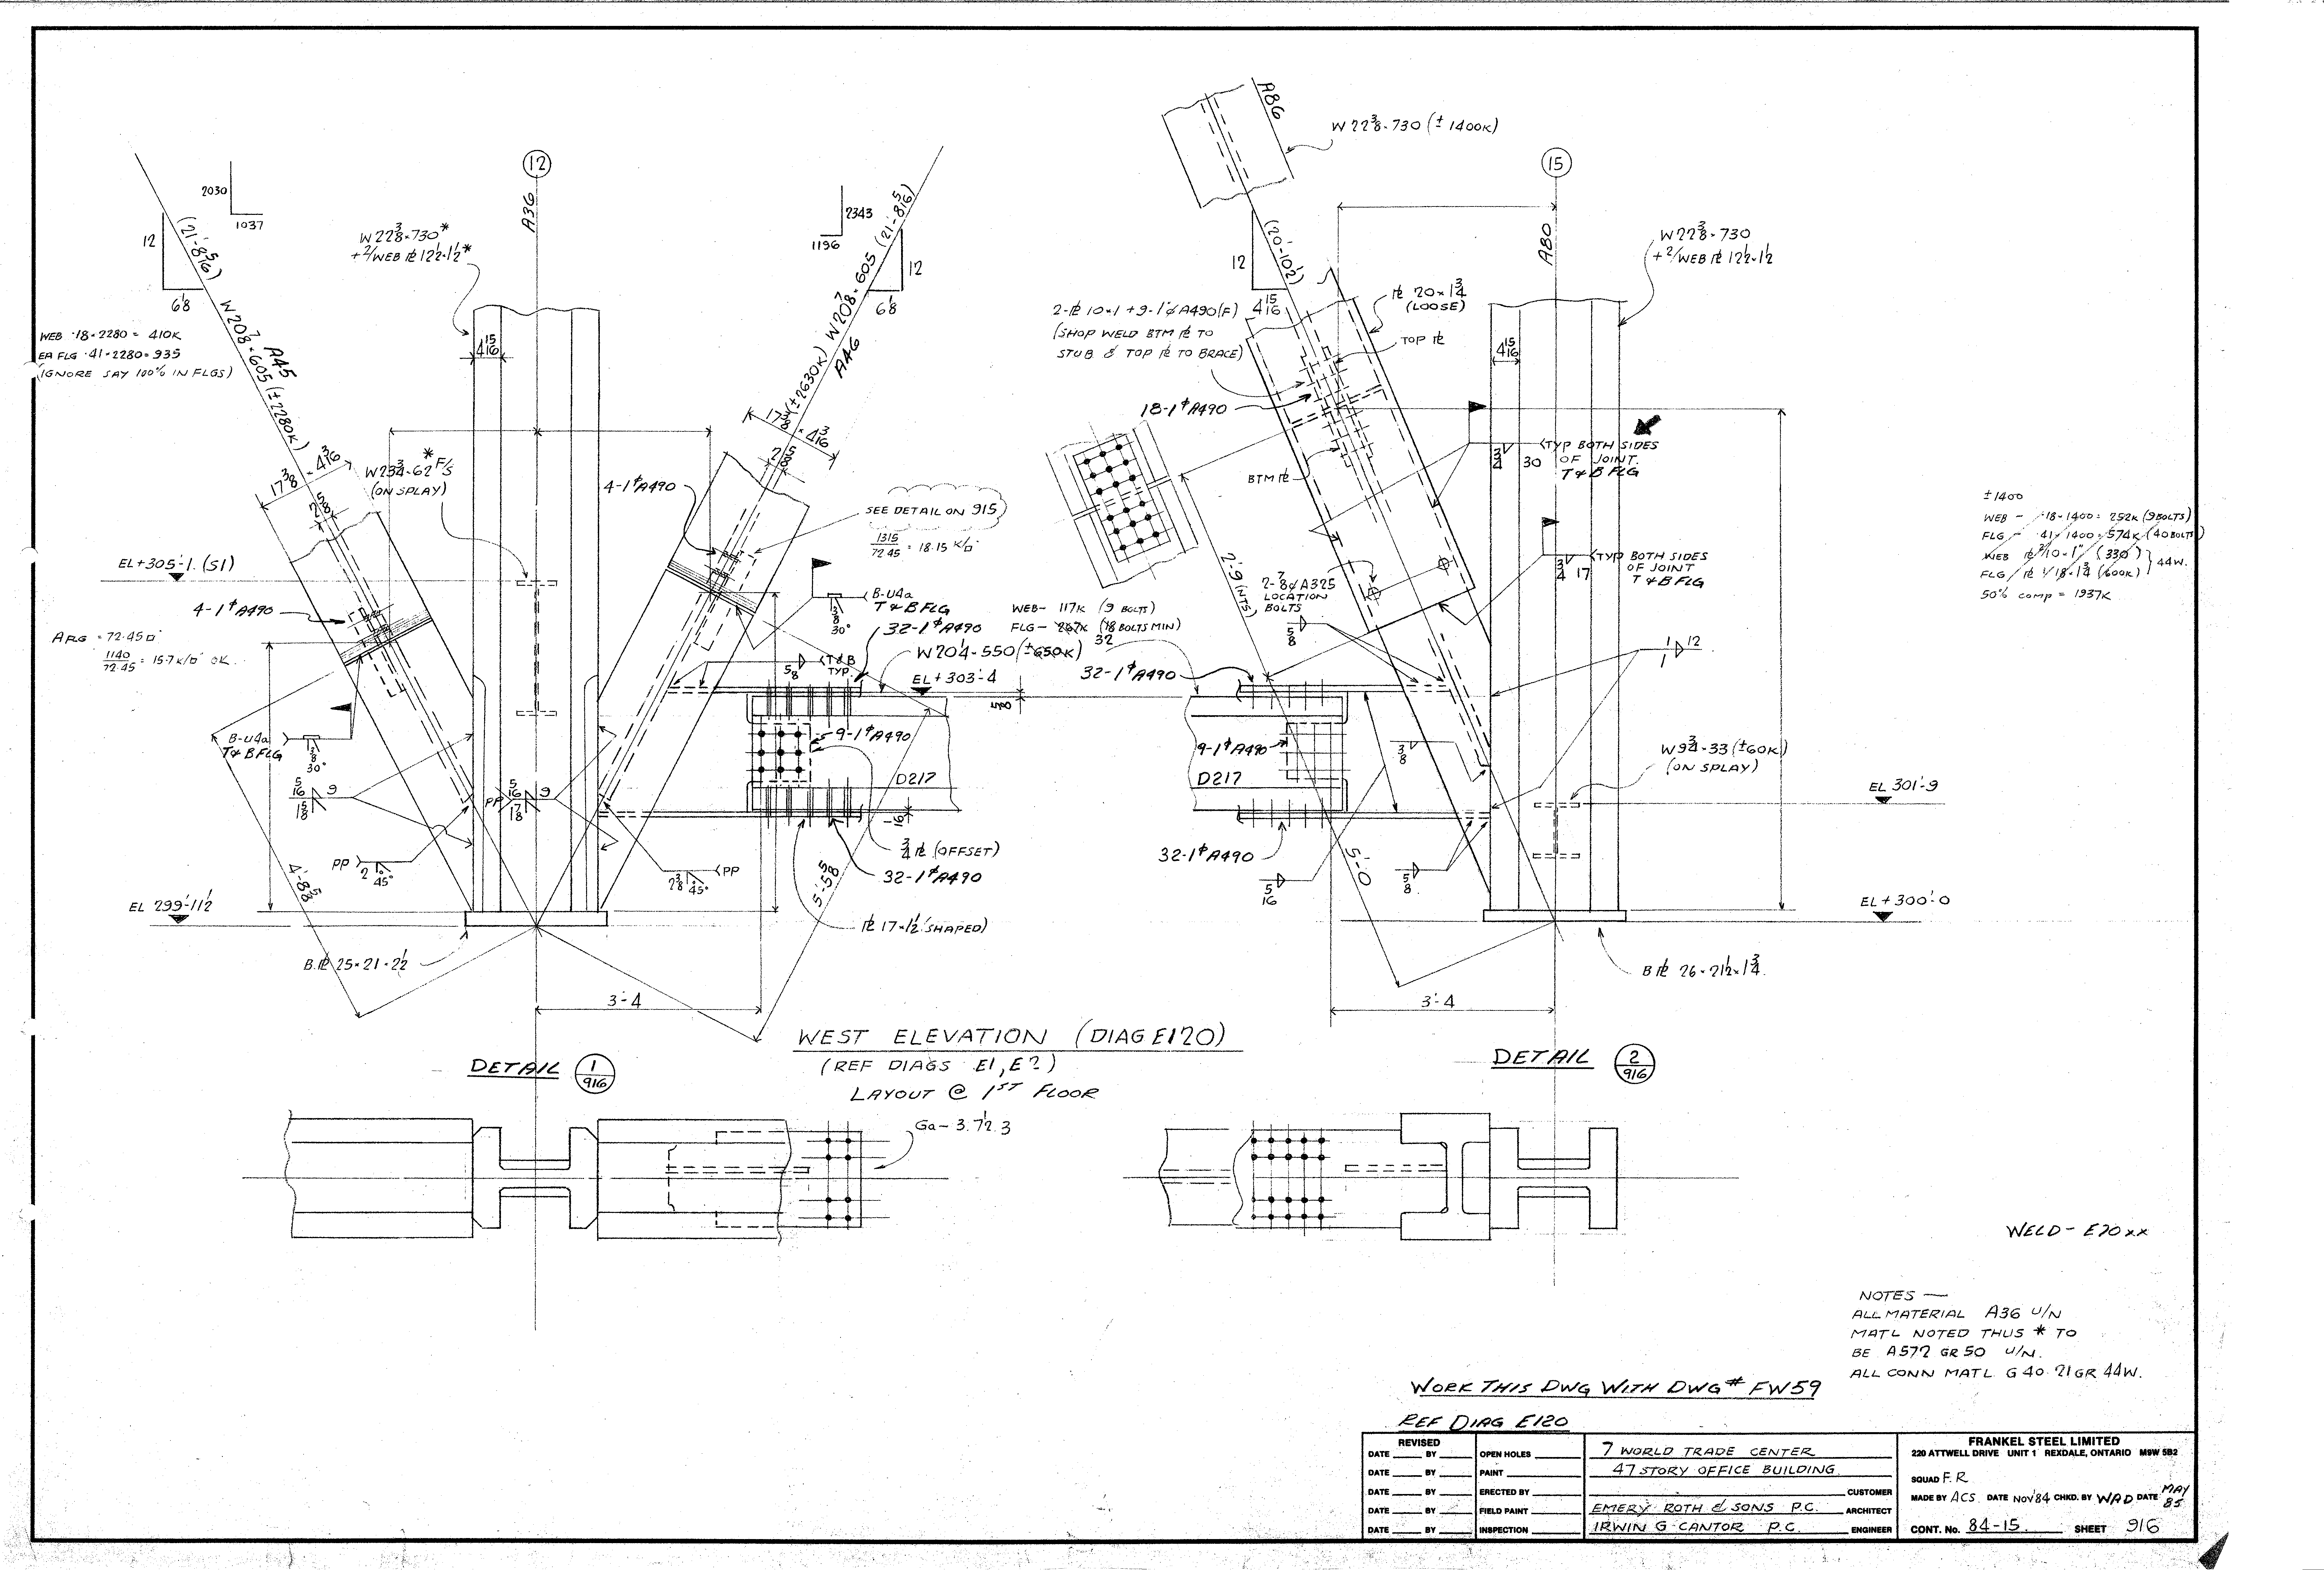
| 0916.png | 372.7 KB | 0916 | WEST ELEVATION (DIAG E120) - LAYOUT @ 1ST FLOOR | https://911warroom.com/model/files/WTC7/DRAWINGS/STRUCTURAL/DETAILS-PNG/0916.png |
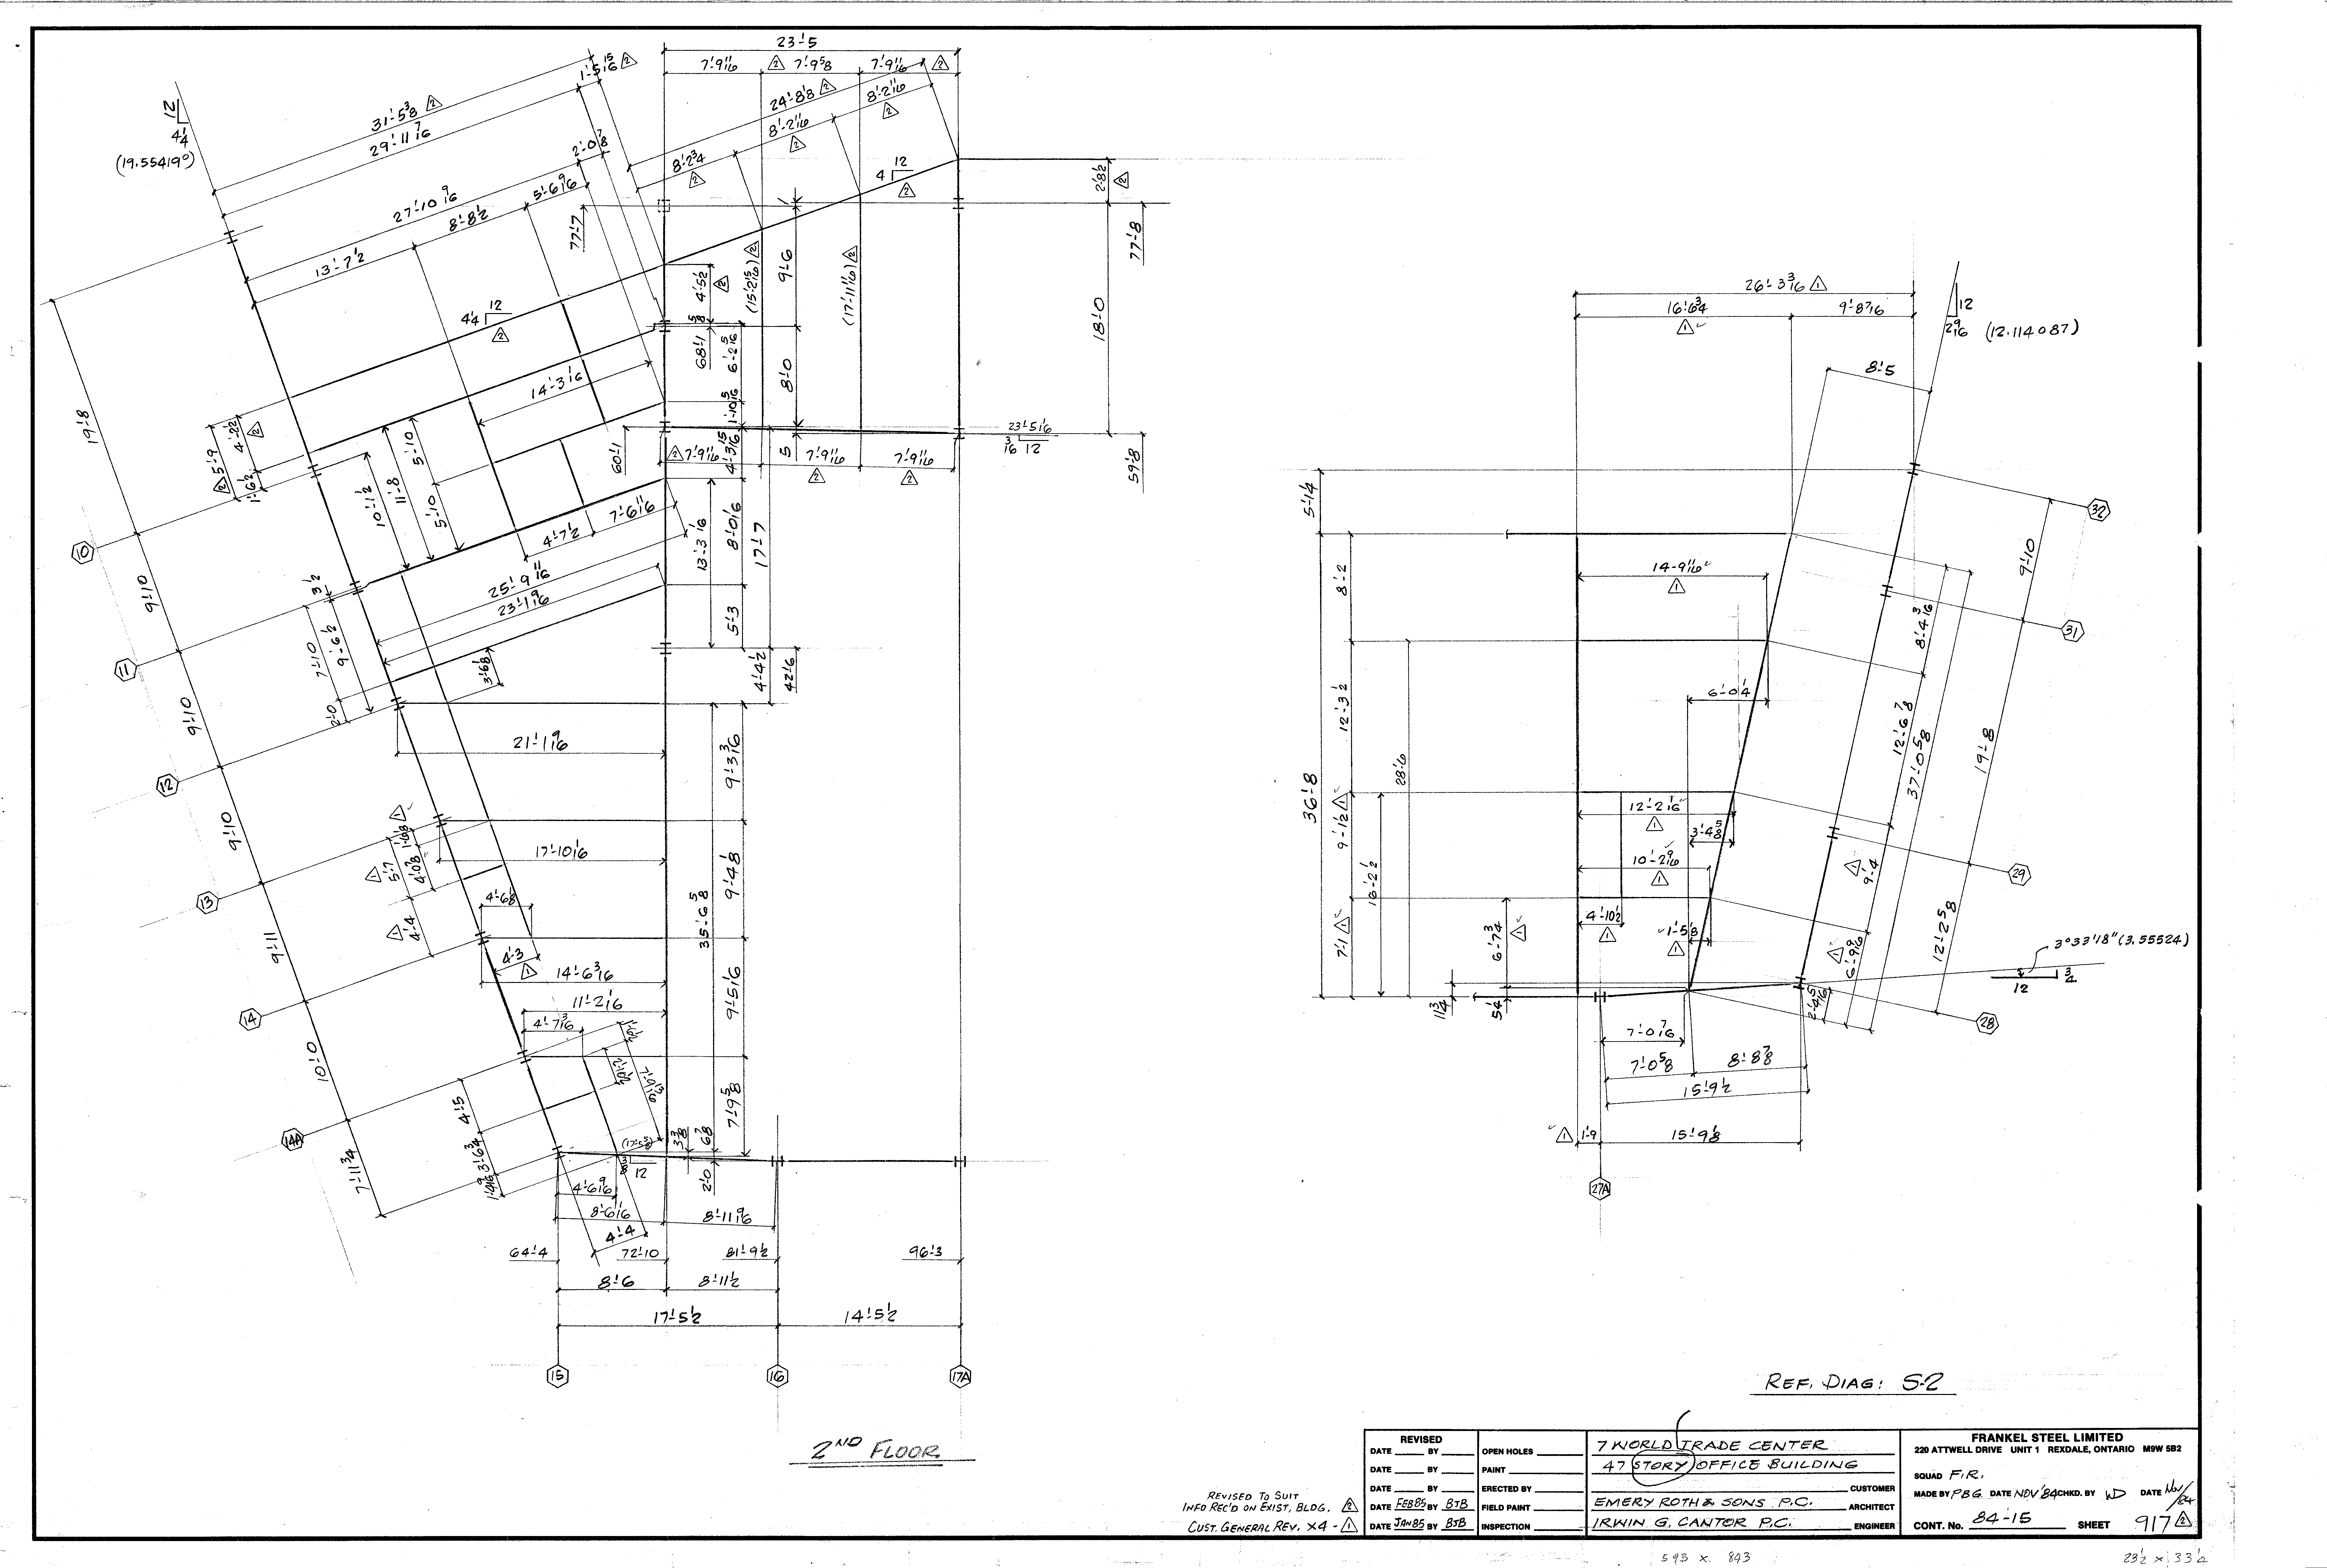
| 0917.png | 288.1 KB | 0917 | 2ND FLOOR | https://911warroom.com/model/files/WTC7/DRAWINGS/STRUCTURAL/DETAILS-PNG/0917.png |
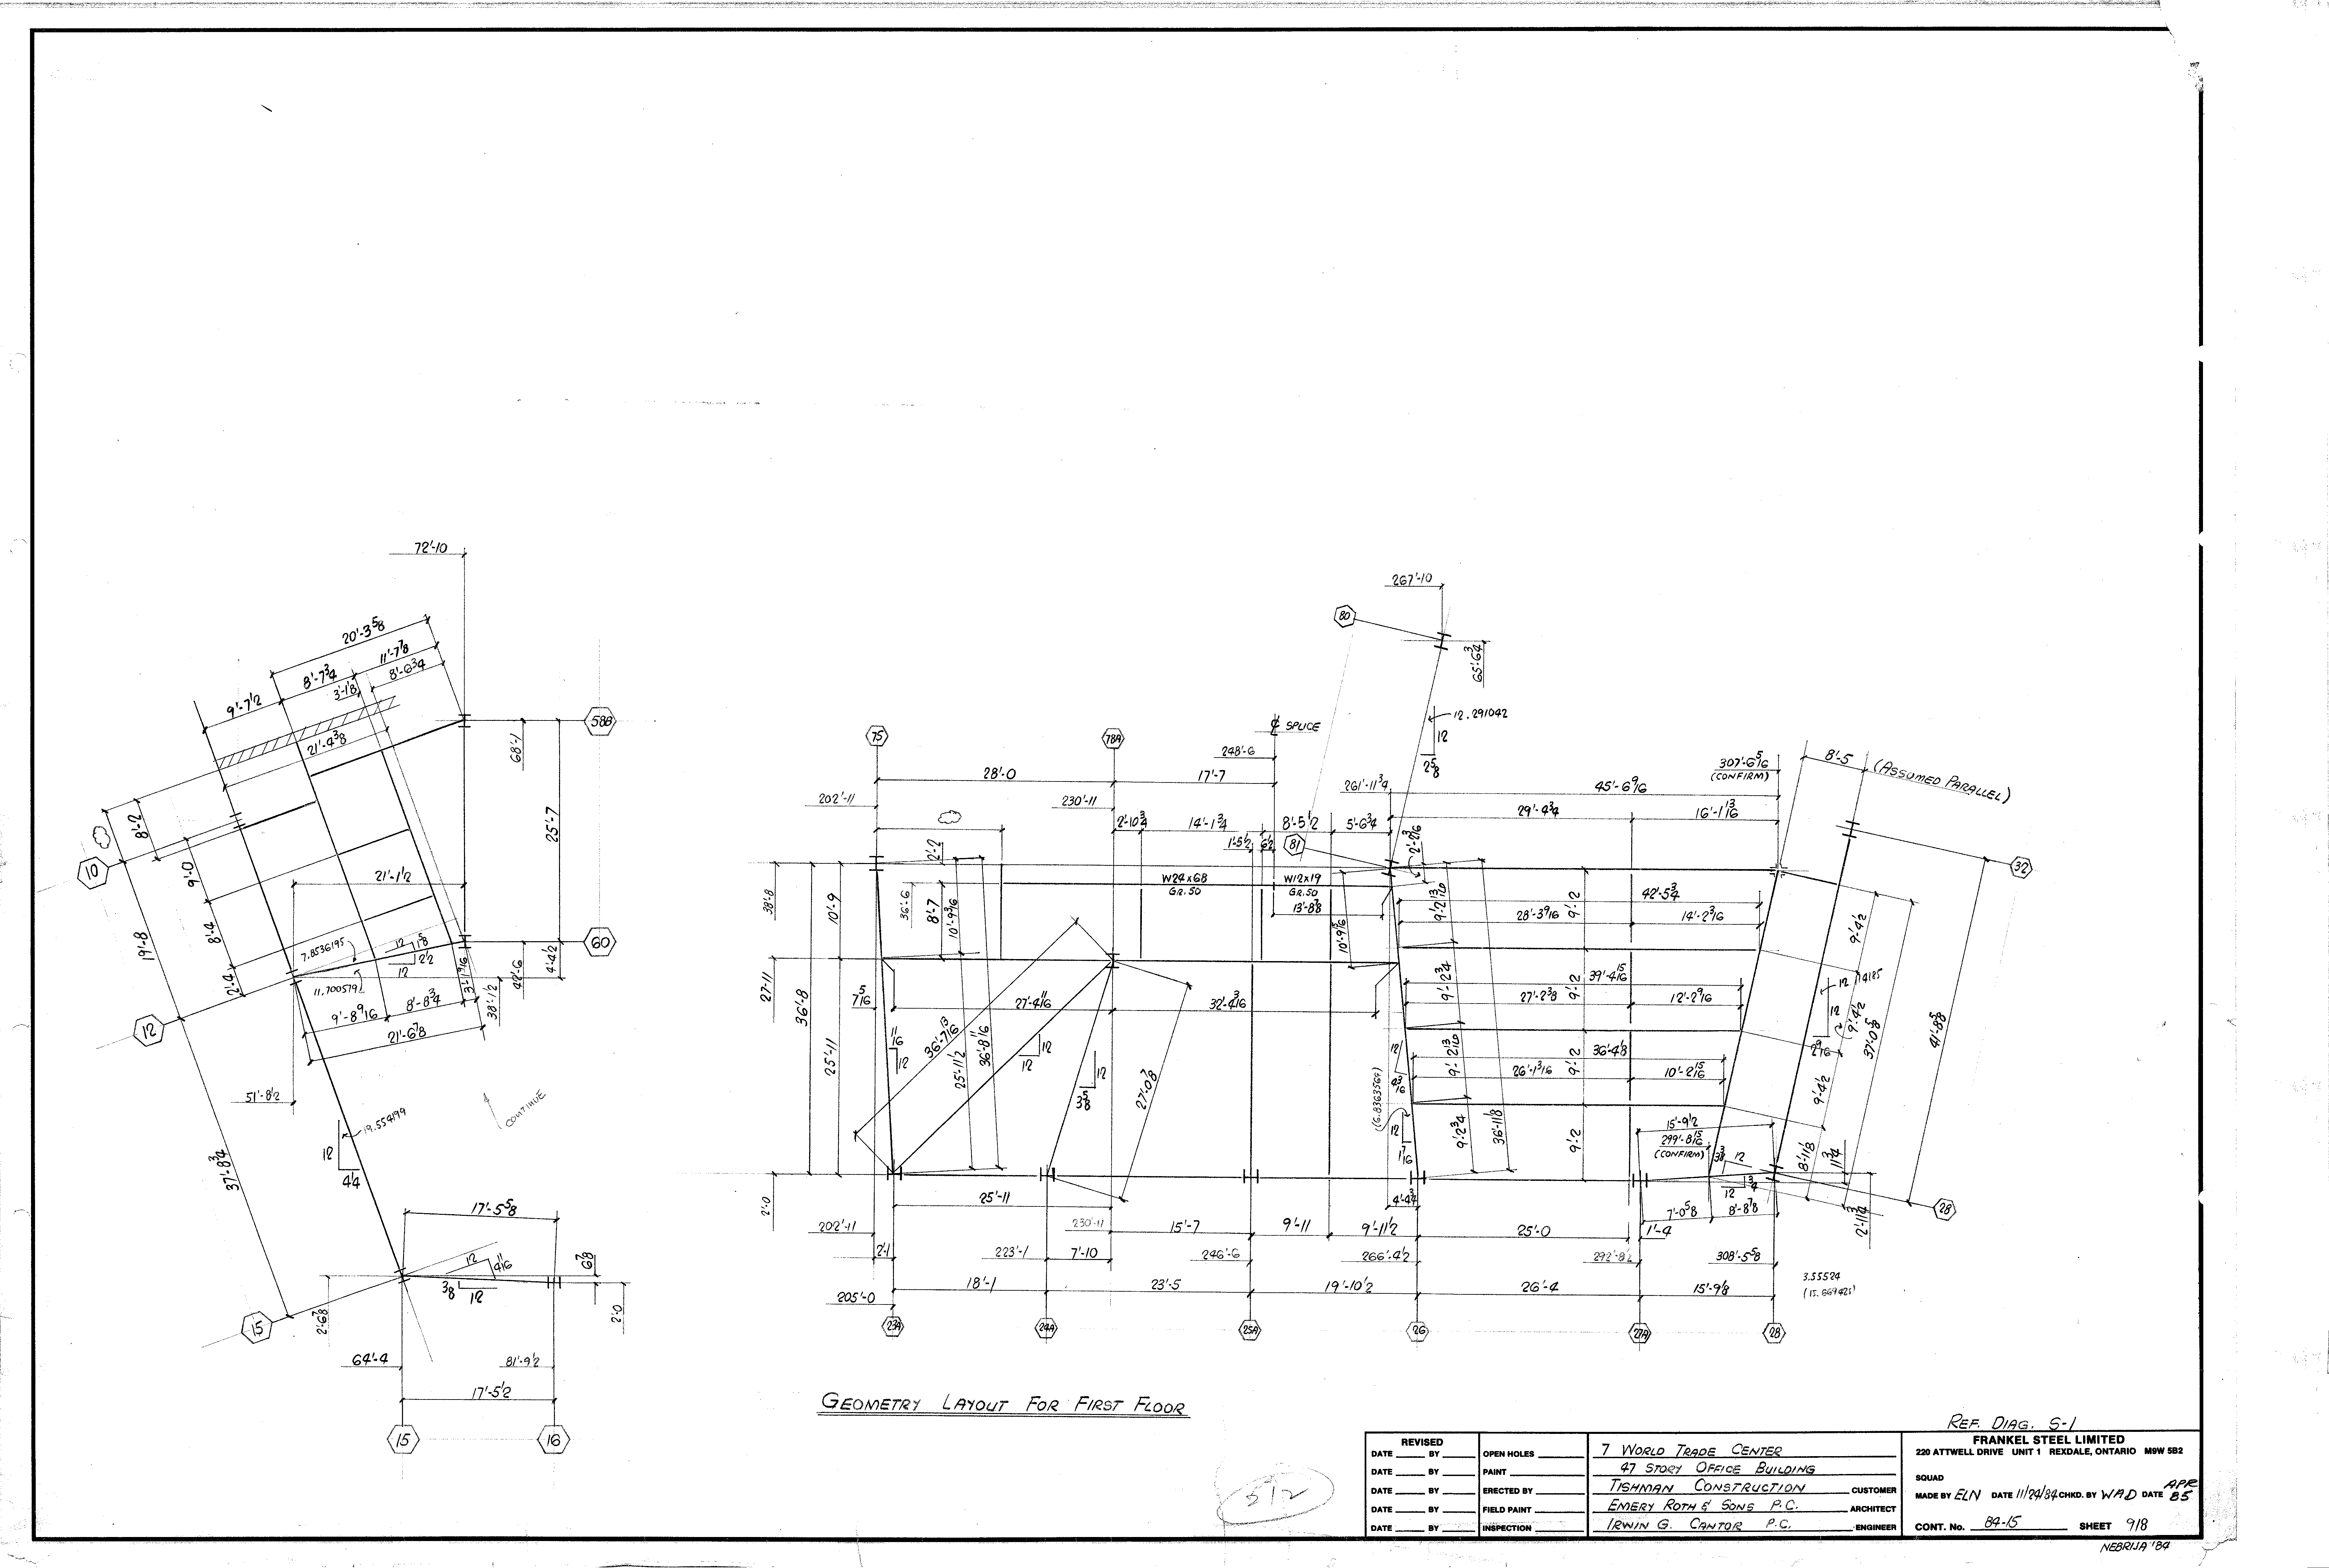
| 0918.png | 248.4 KB | 0918 | GEOMETRY LAYOUT FOR FIRST FLOOR | https://911warroom.com/model/files/WTC7/DRAWINGS/STRUCTURAL/DETAILS-PNG/0918.png |
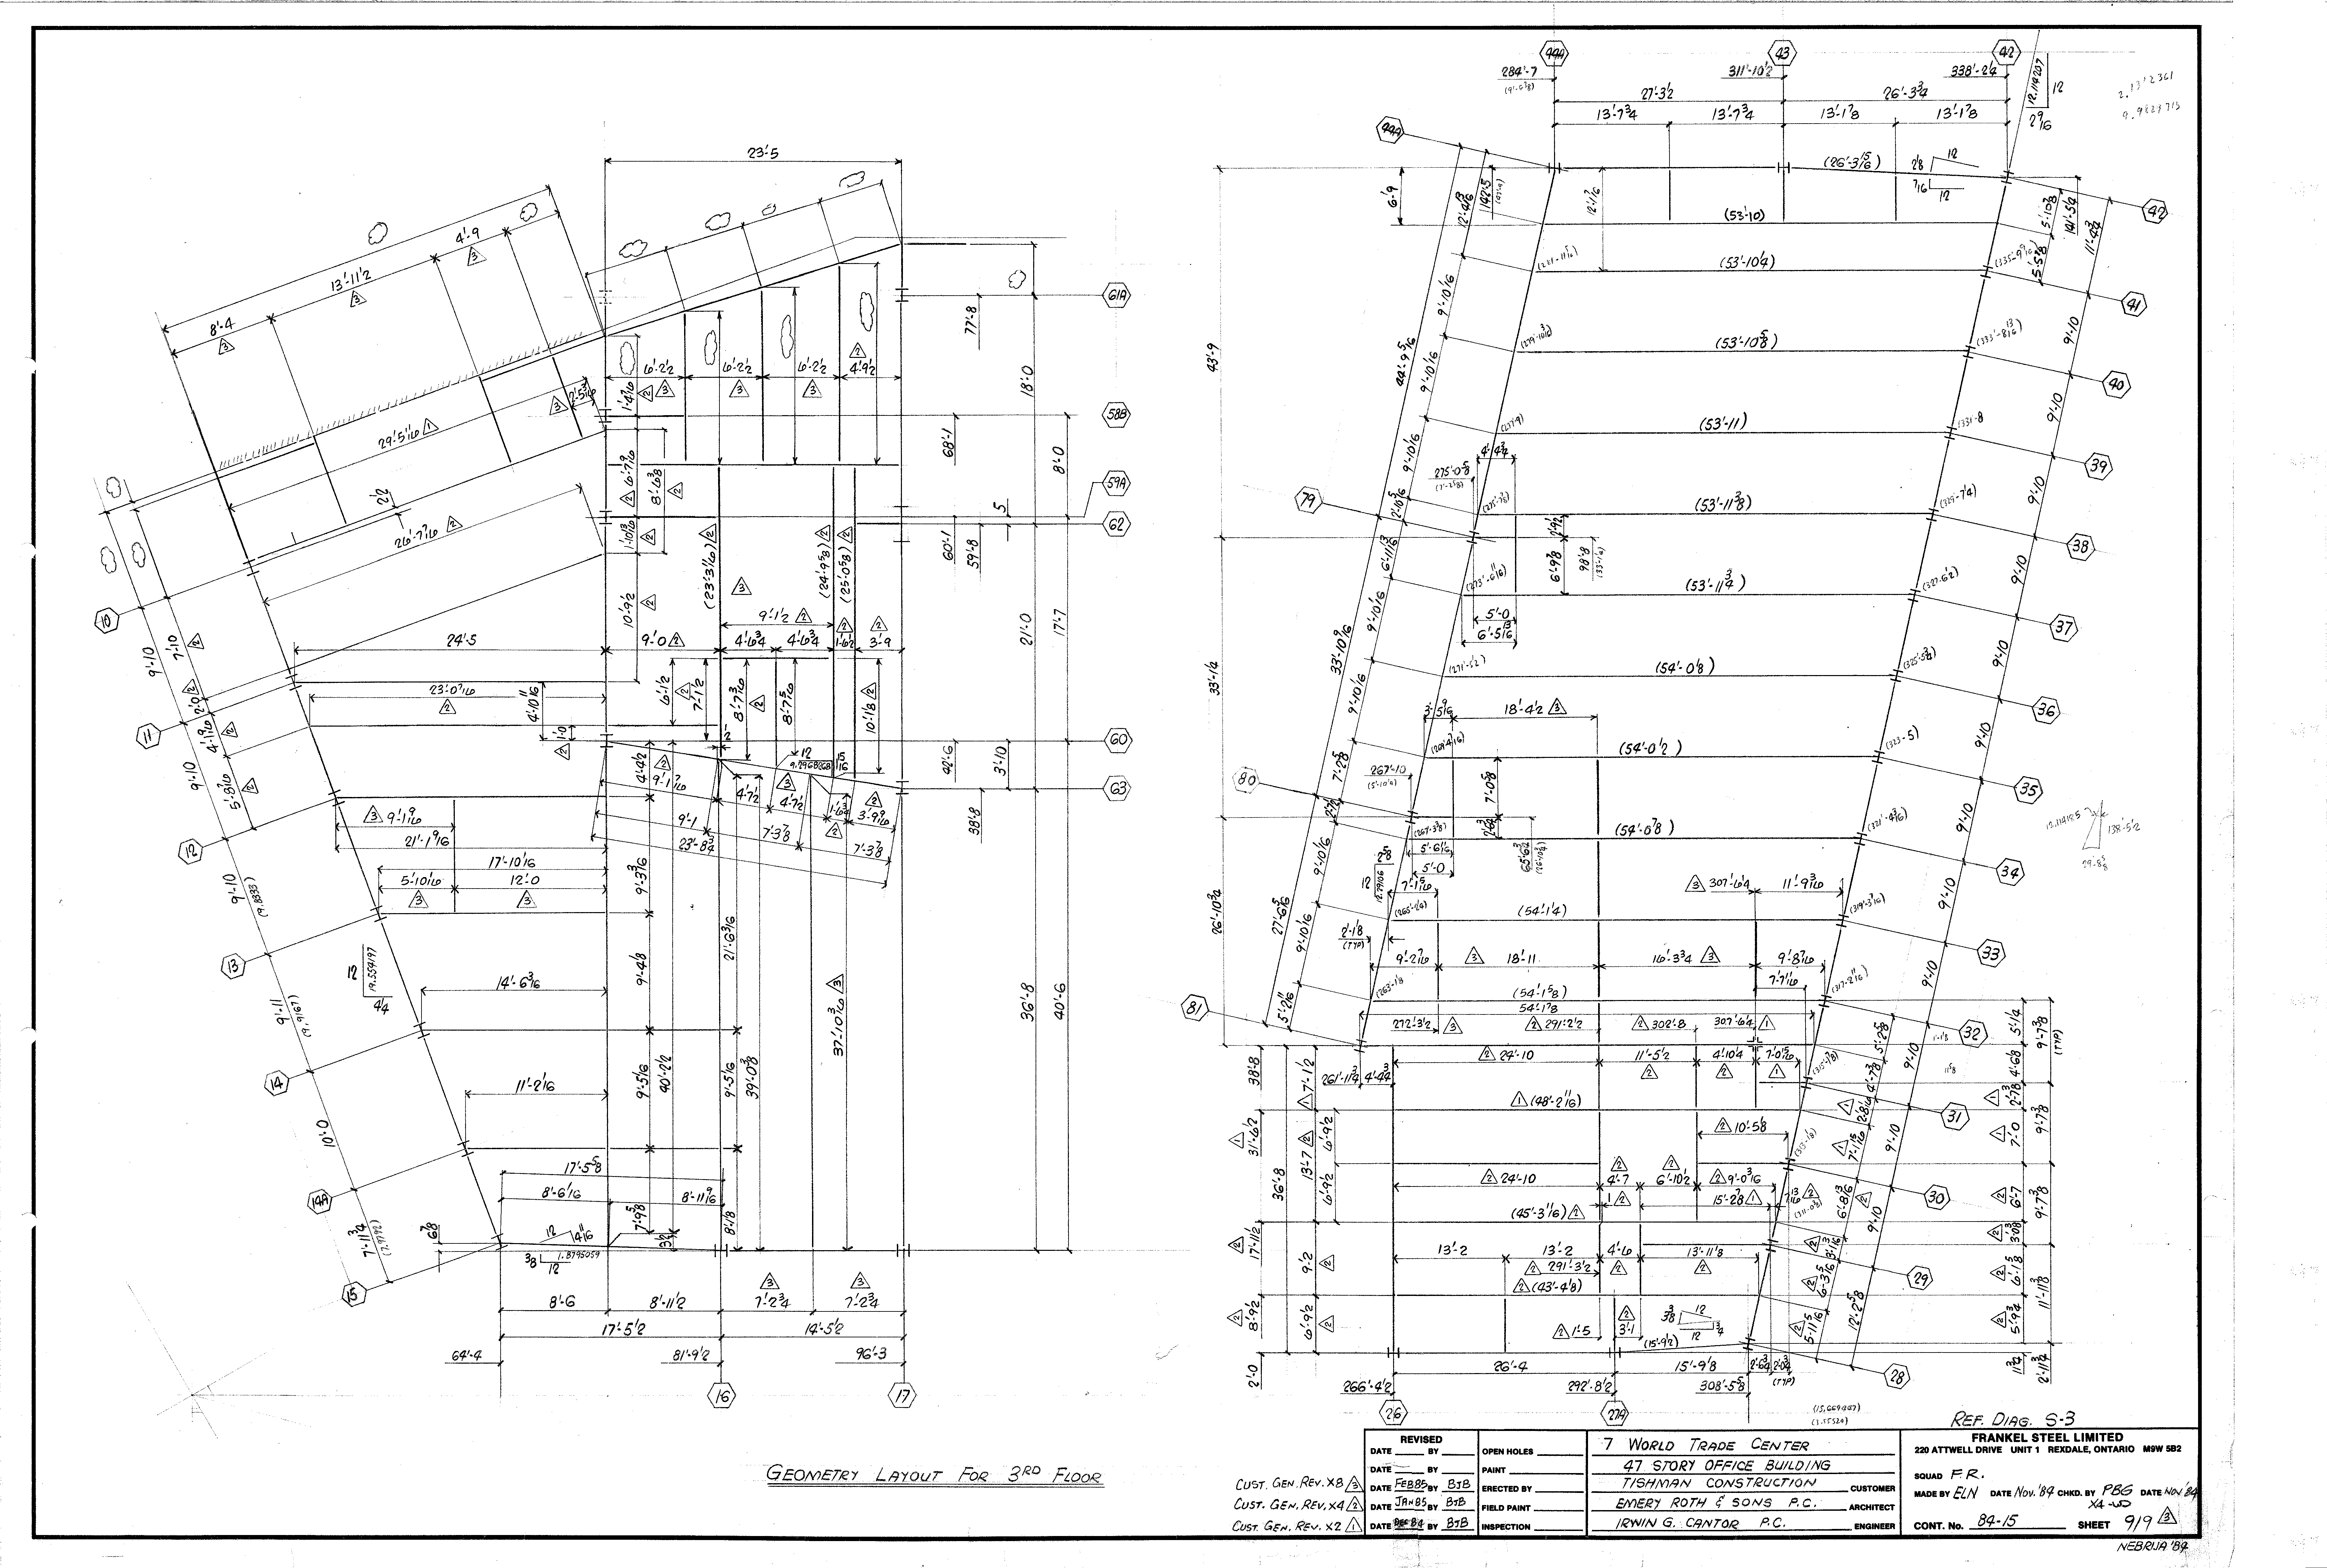
| 0919.png | 418.9 KB | 0919 | GEOMETRY LAYOUT FOR 3RD FLOOR | https://911warroom.com/model/files/WTC7/DRAWINGS/STRUCTURAL/DETAILS-PNG/0919.png |
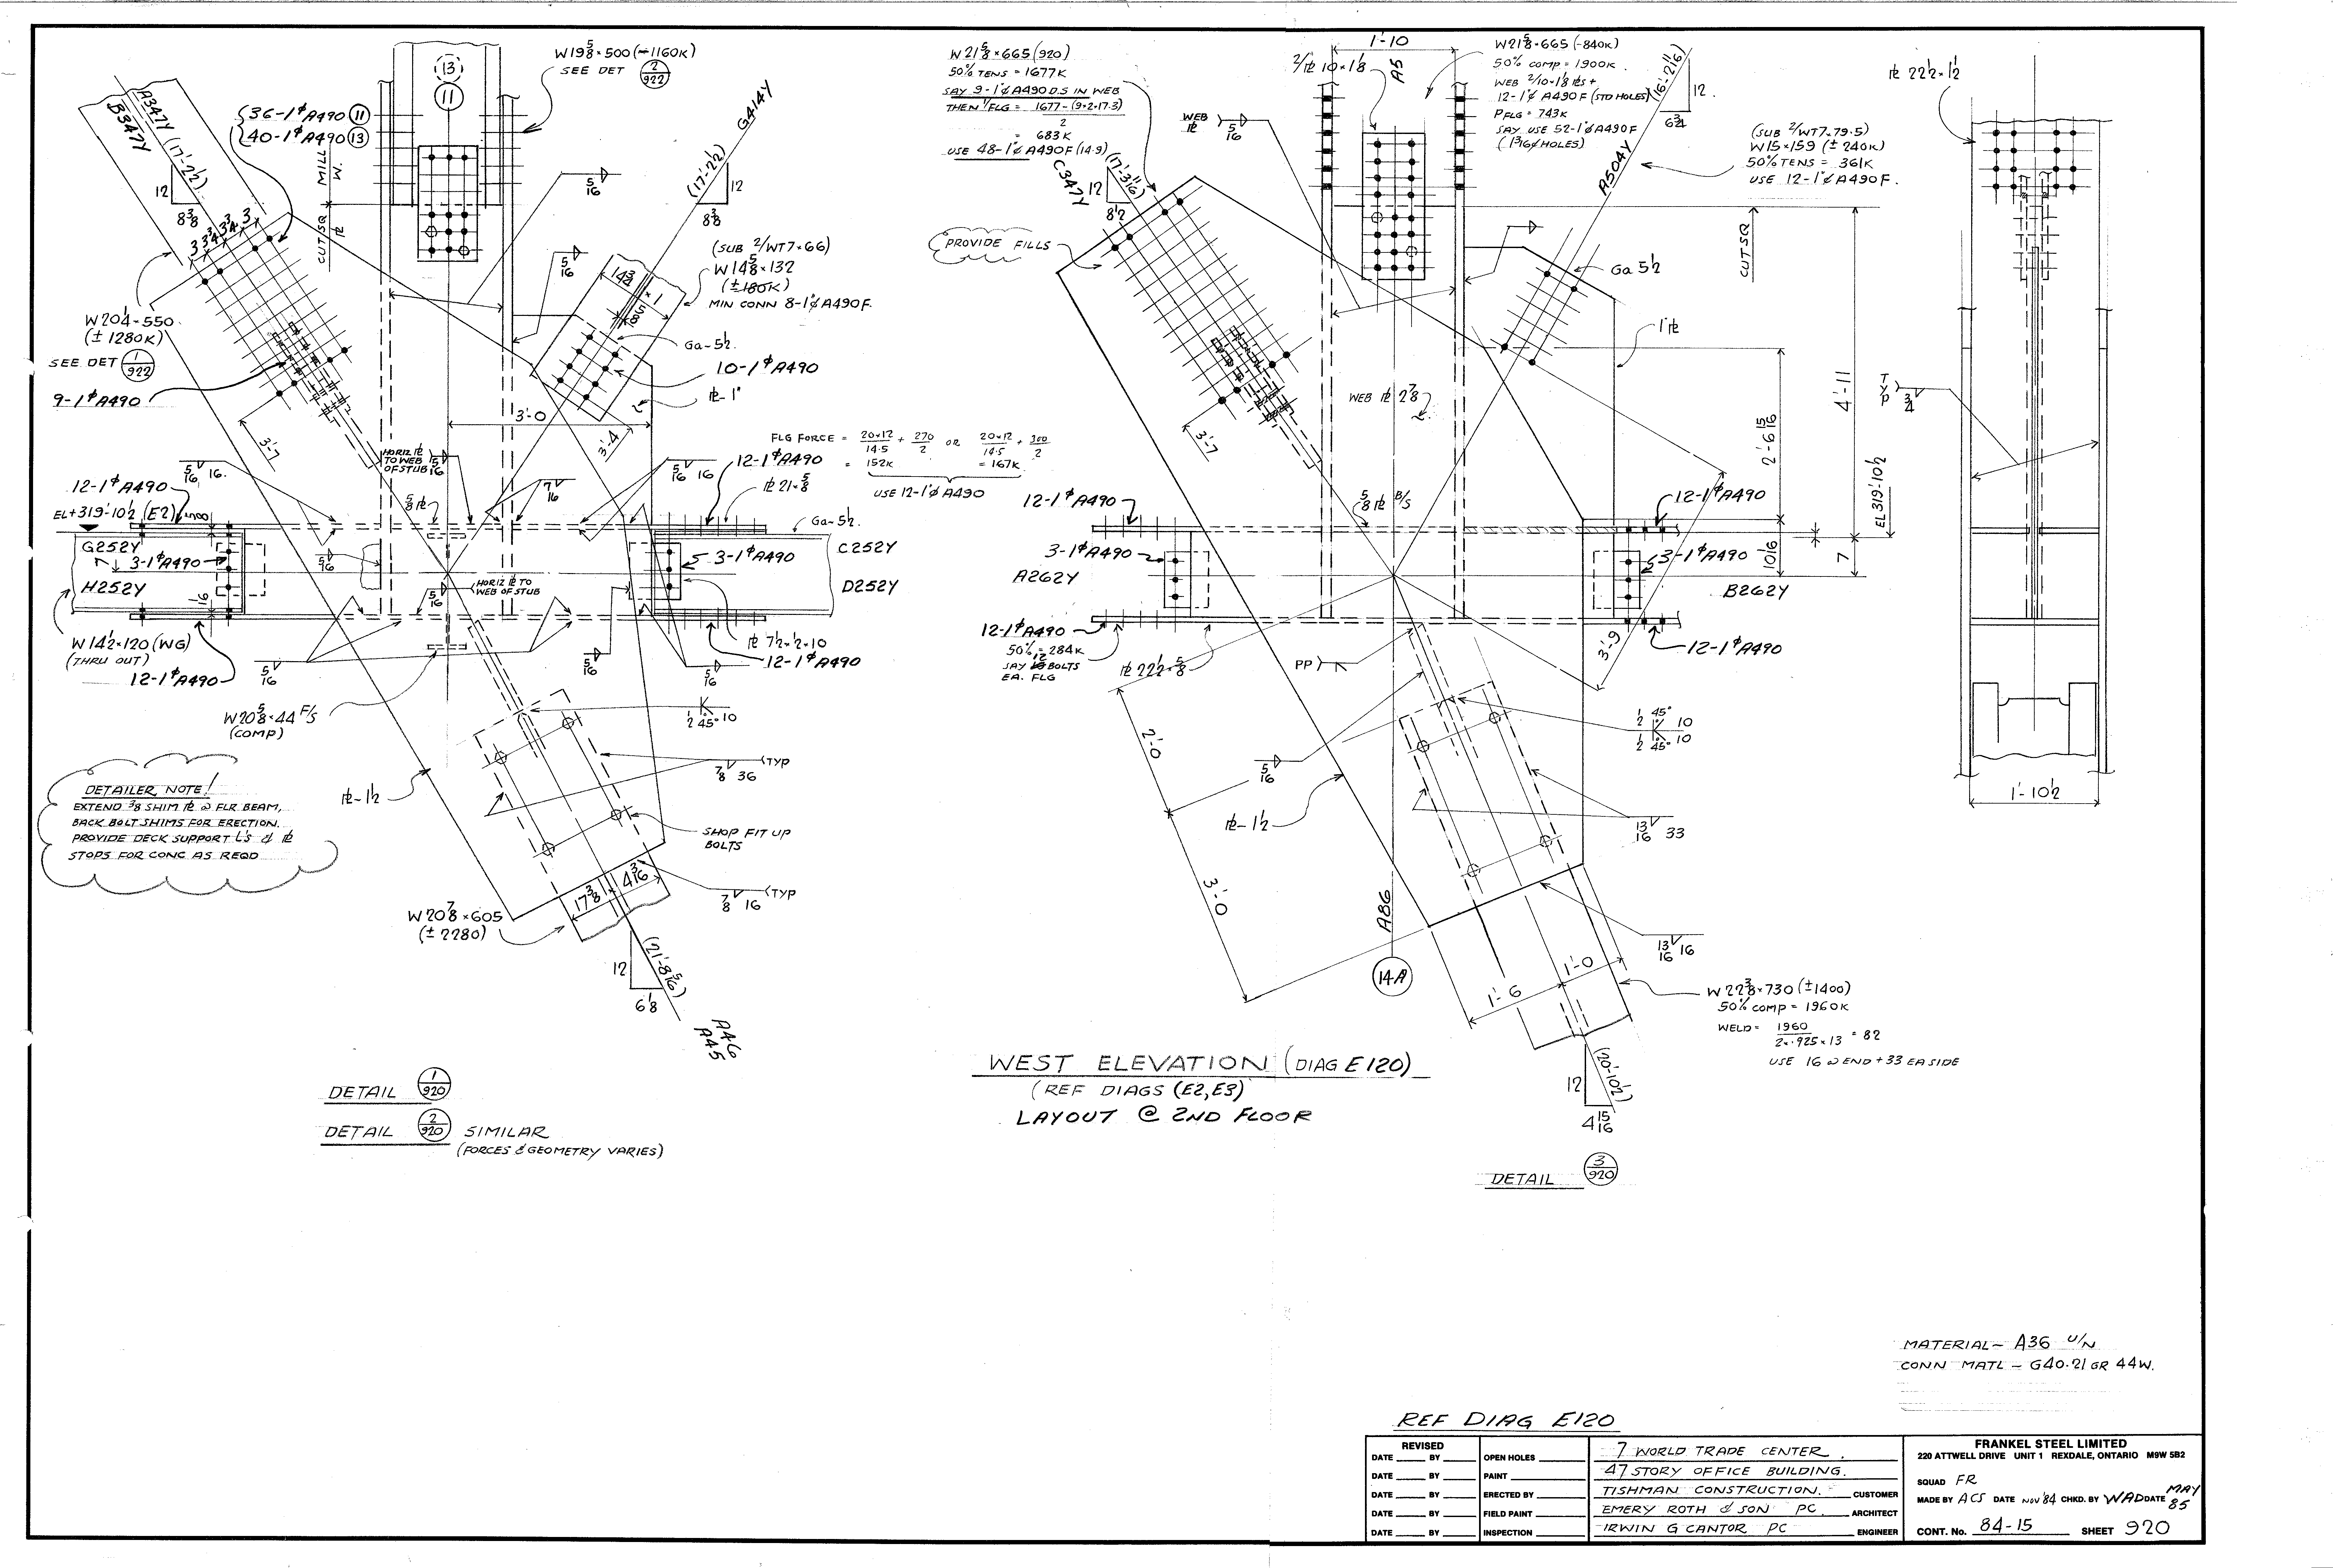
| 0920.png | 368.8 KB | 0920 | WEST ELEVATION (DIAG E120) - LAYOUT @ 2ND FLOOR | https://911warroom.com/model/files/WTC7/DRAWINGS/STRUCTURAL/DETAILS-PNG/0920.png |
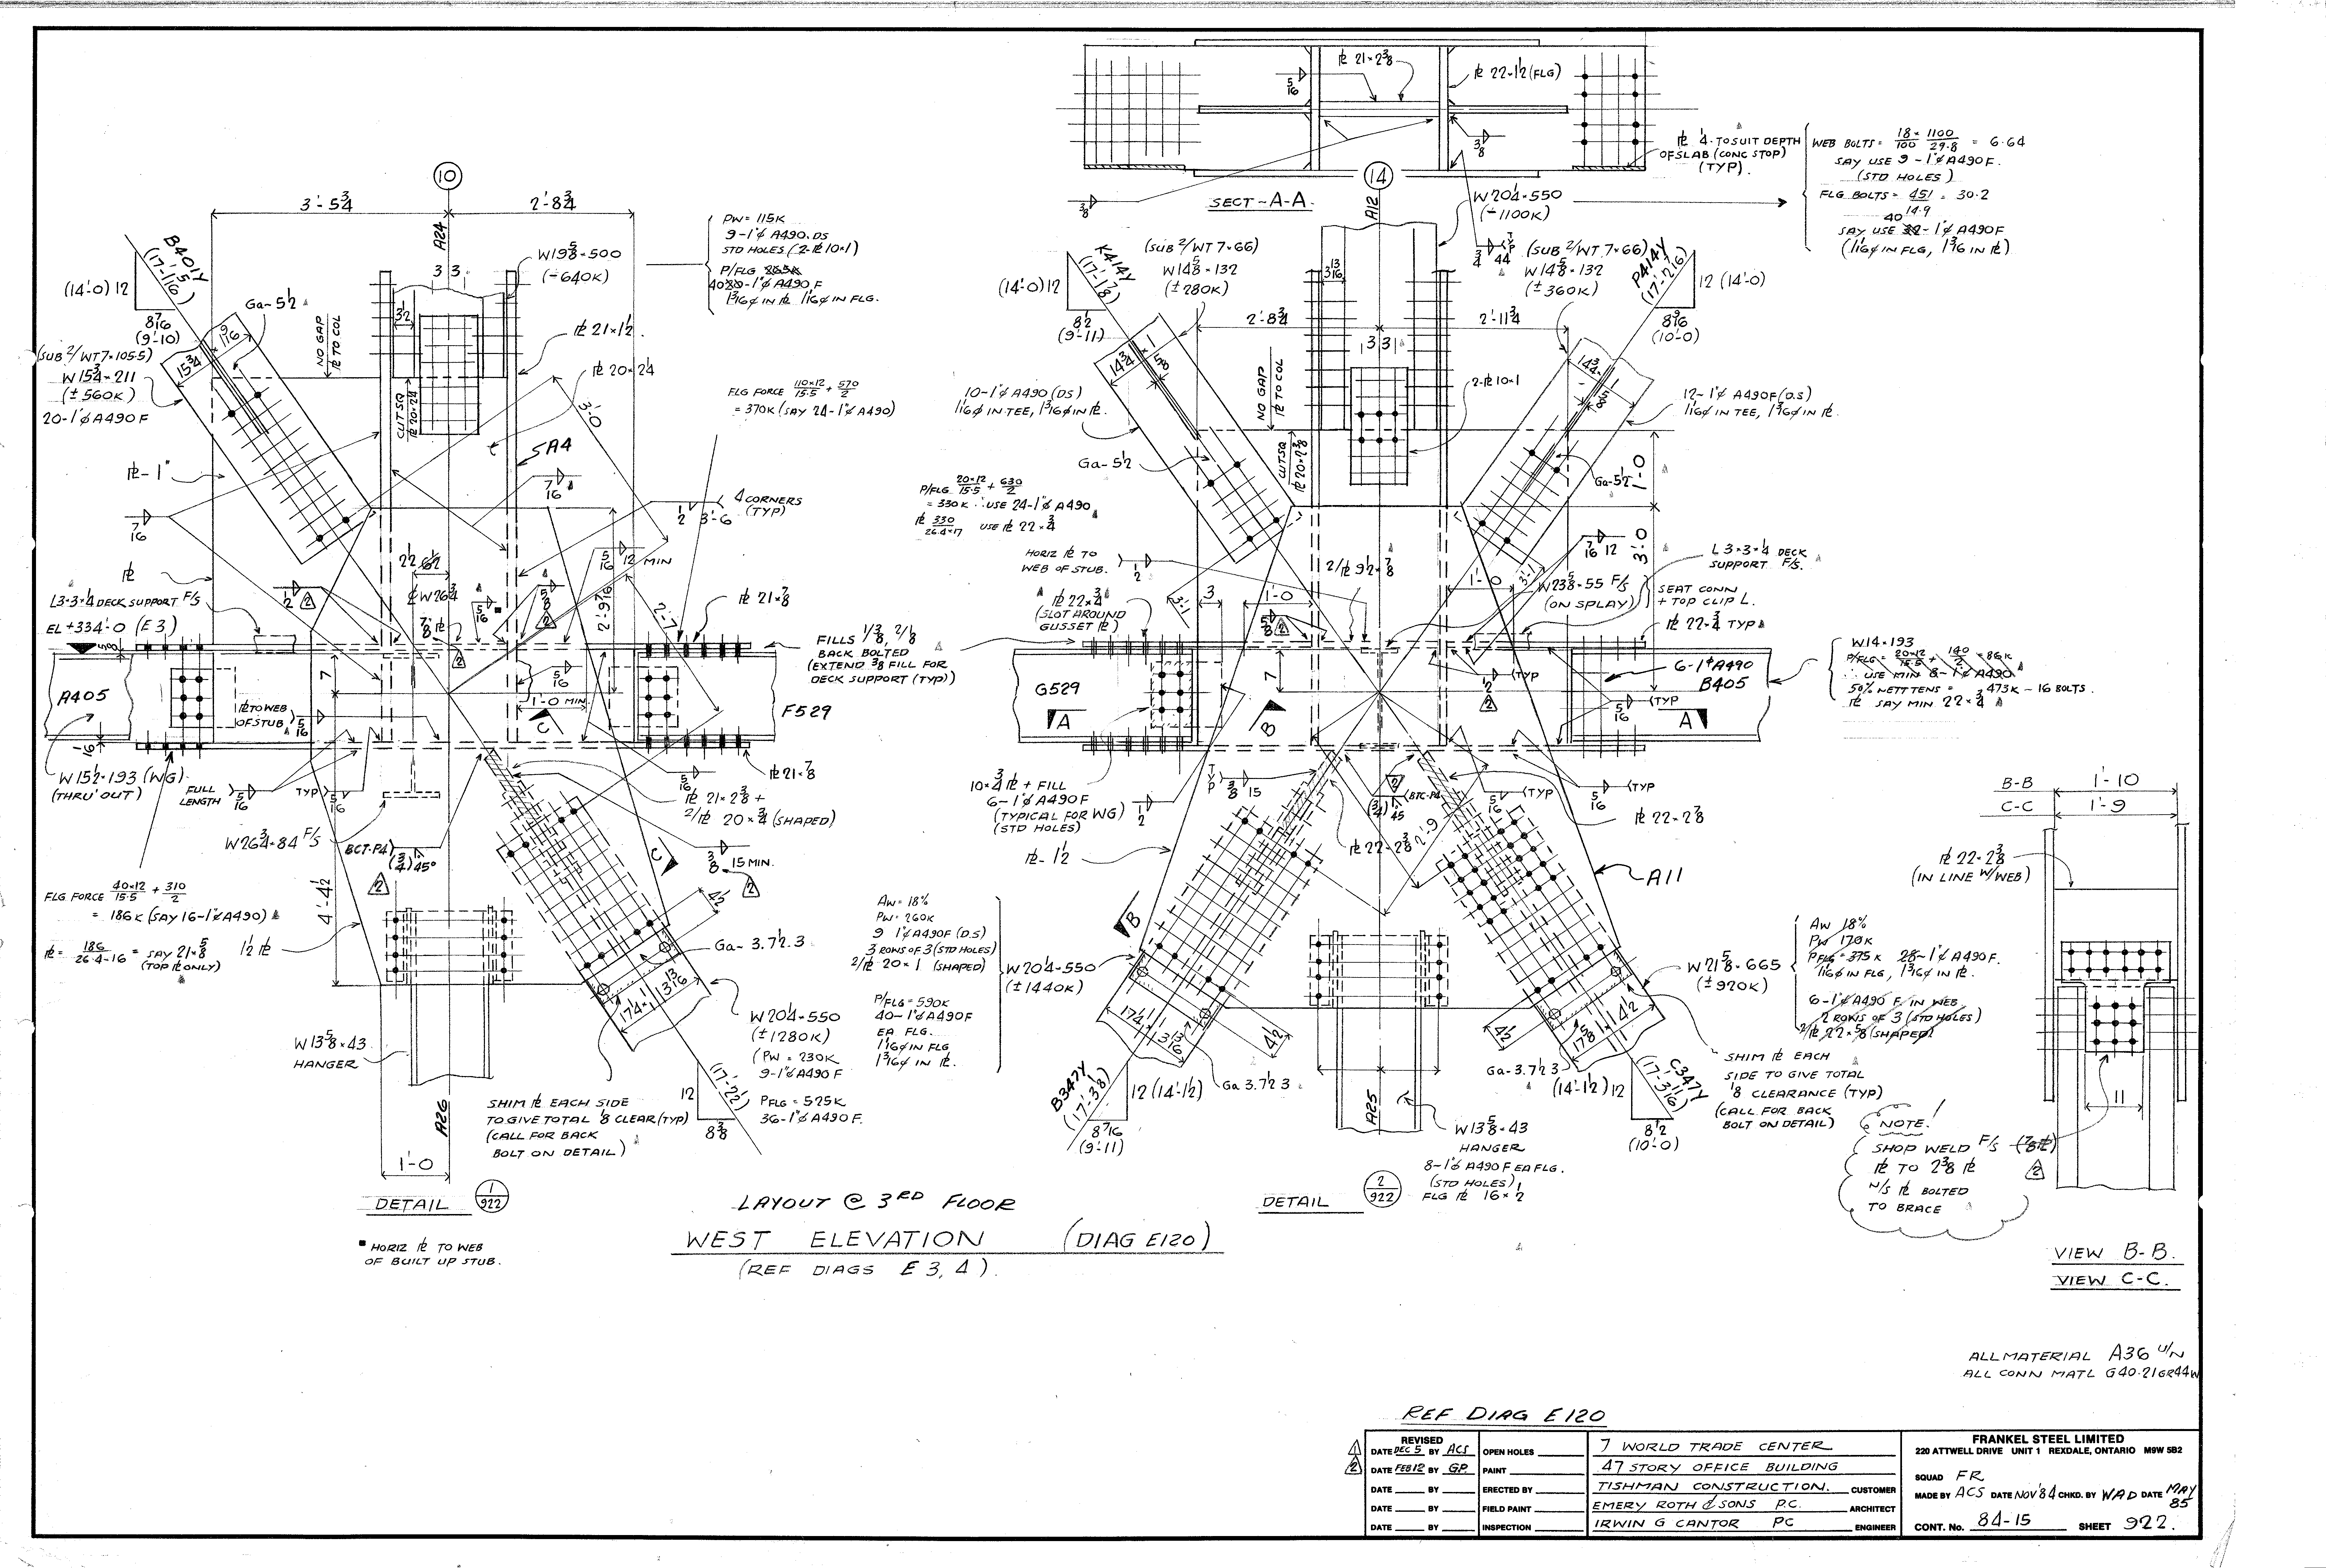
| 0922.png | 499.3 KB | 0922 | WEST ELEVATION (DIAG E120) - LAYOUT @ 3RD FLOOR | https://911warroom.com/model/files/WTC7/DRAWINGS/STRUCTURAL/DETAILS-PNG/0922.png |
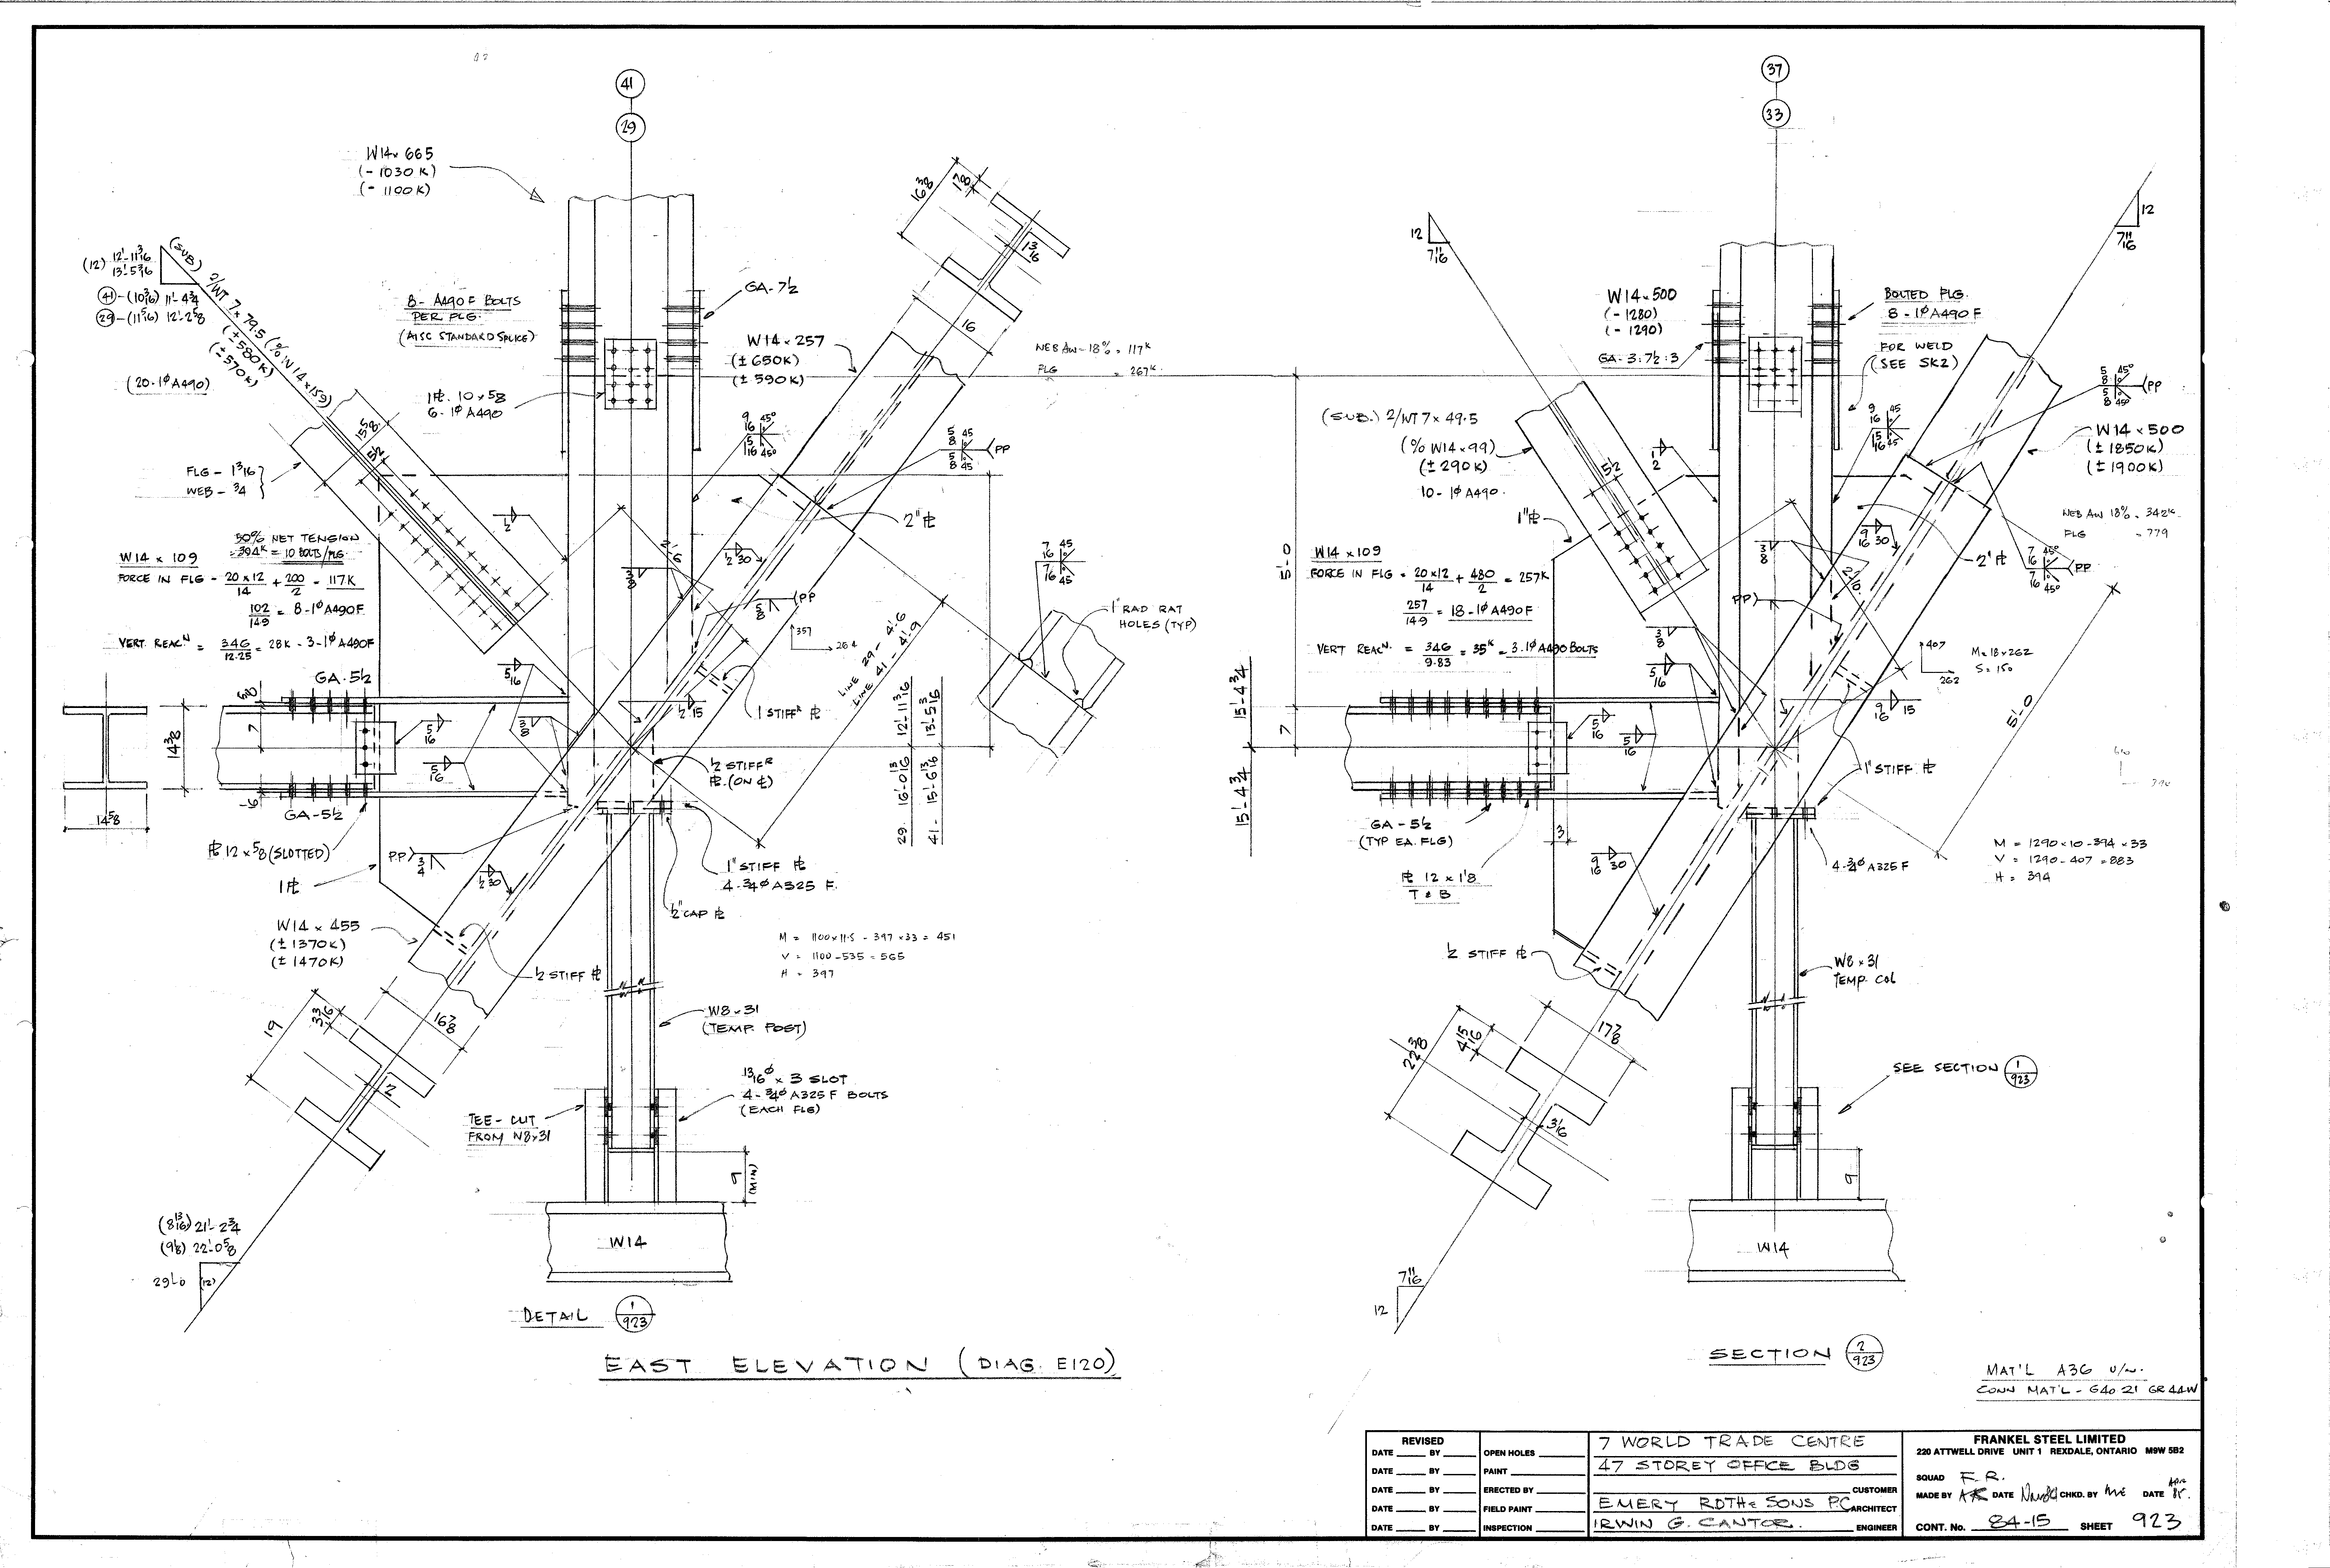
| 0923.png | 391.3 KB | 0923 | EAST ELEVATION (DIAG E120) | https://911warroom.com/model/files/WTC7/DRAWINGS/STRUCTURAL/DETAILS-PNG/0923.png |
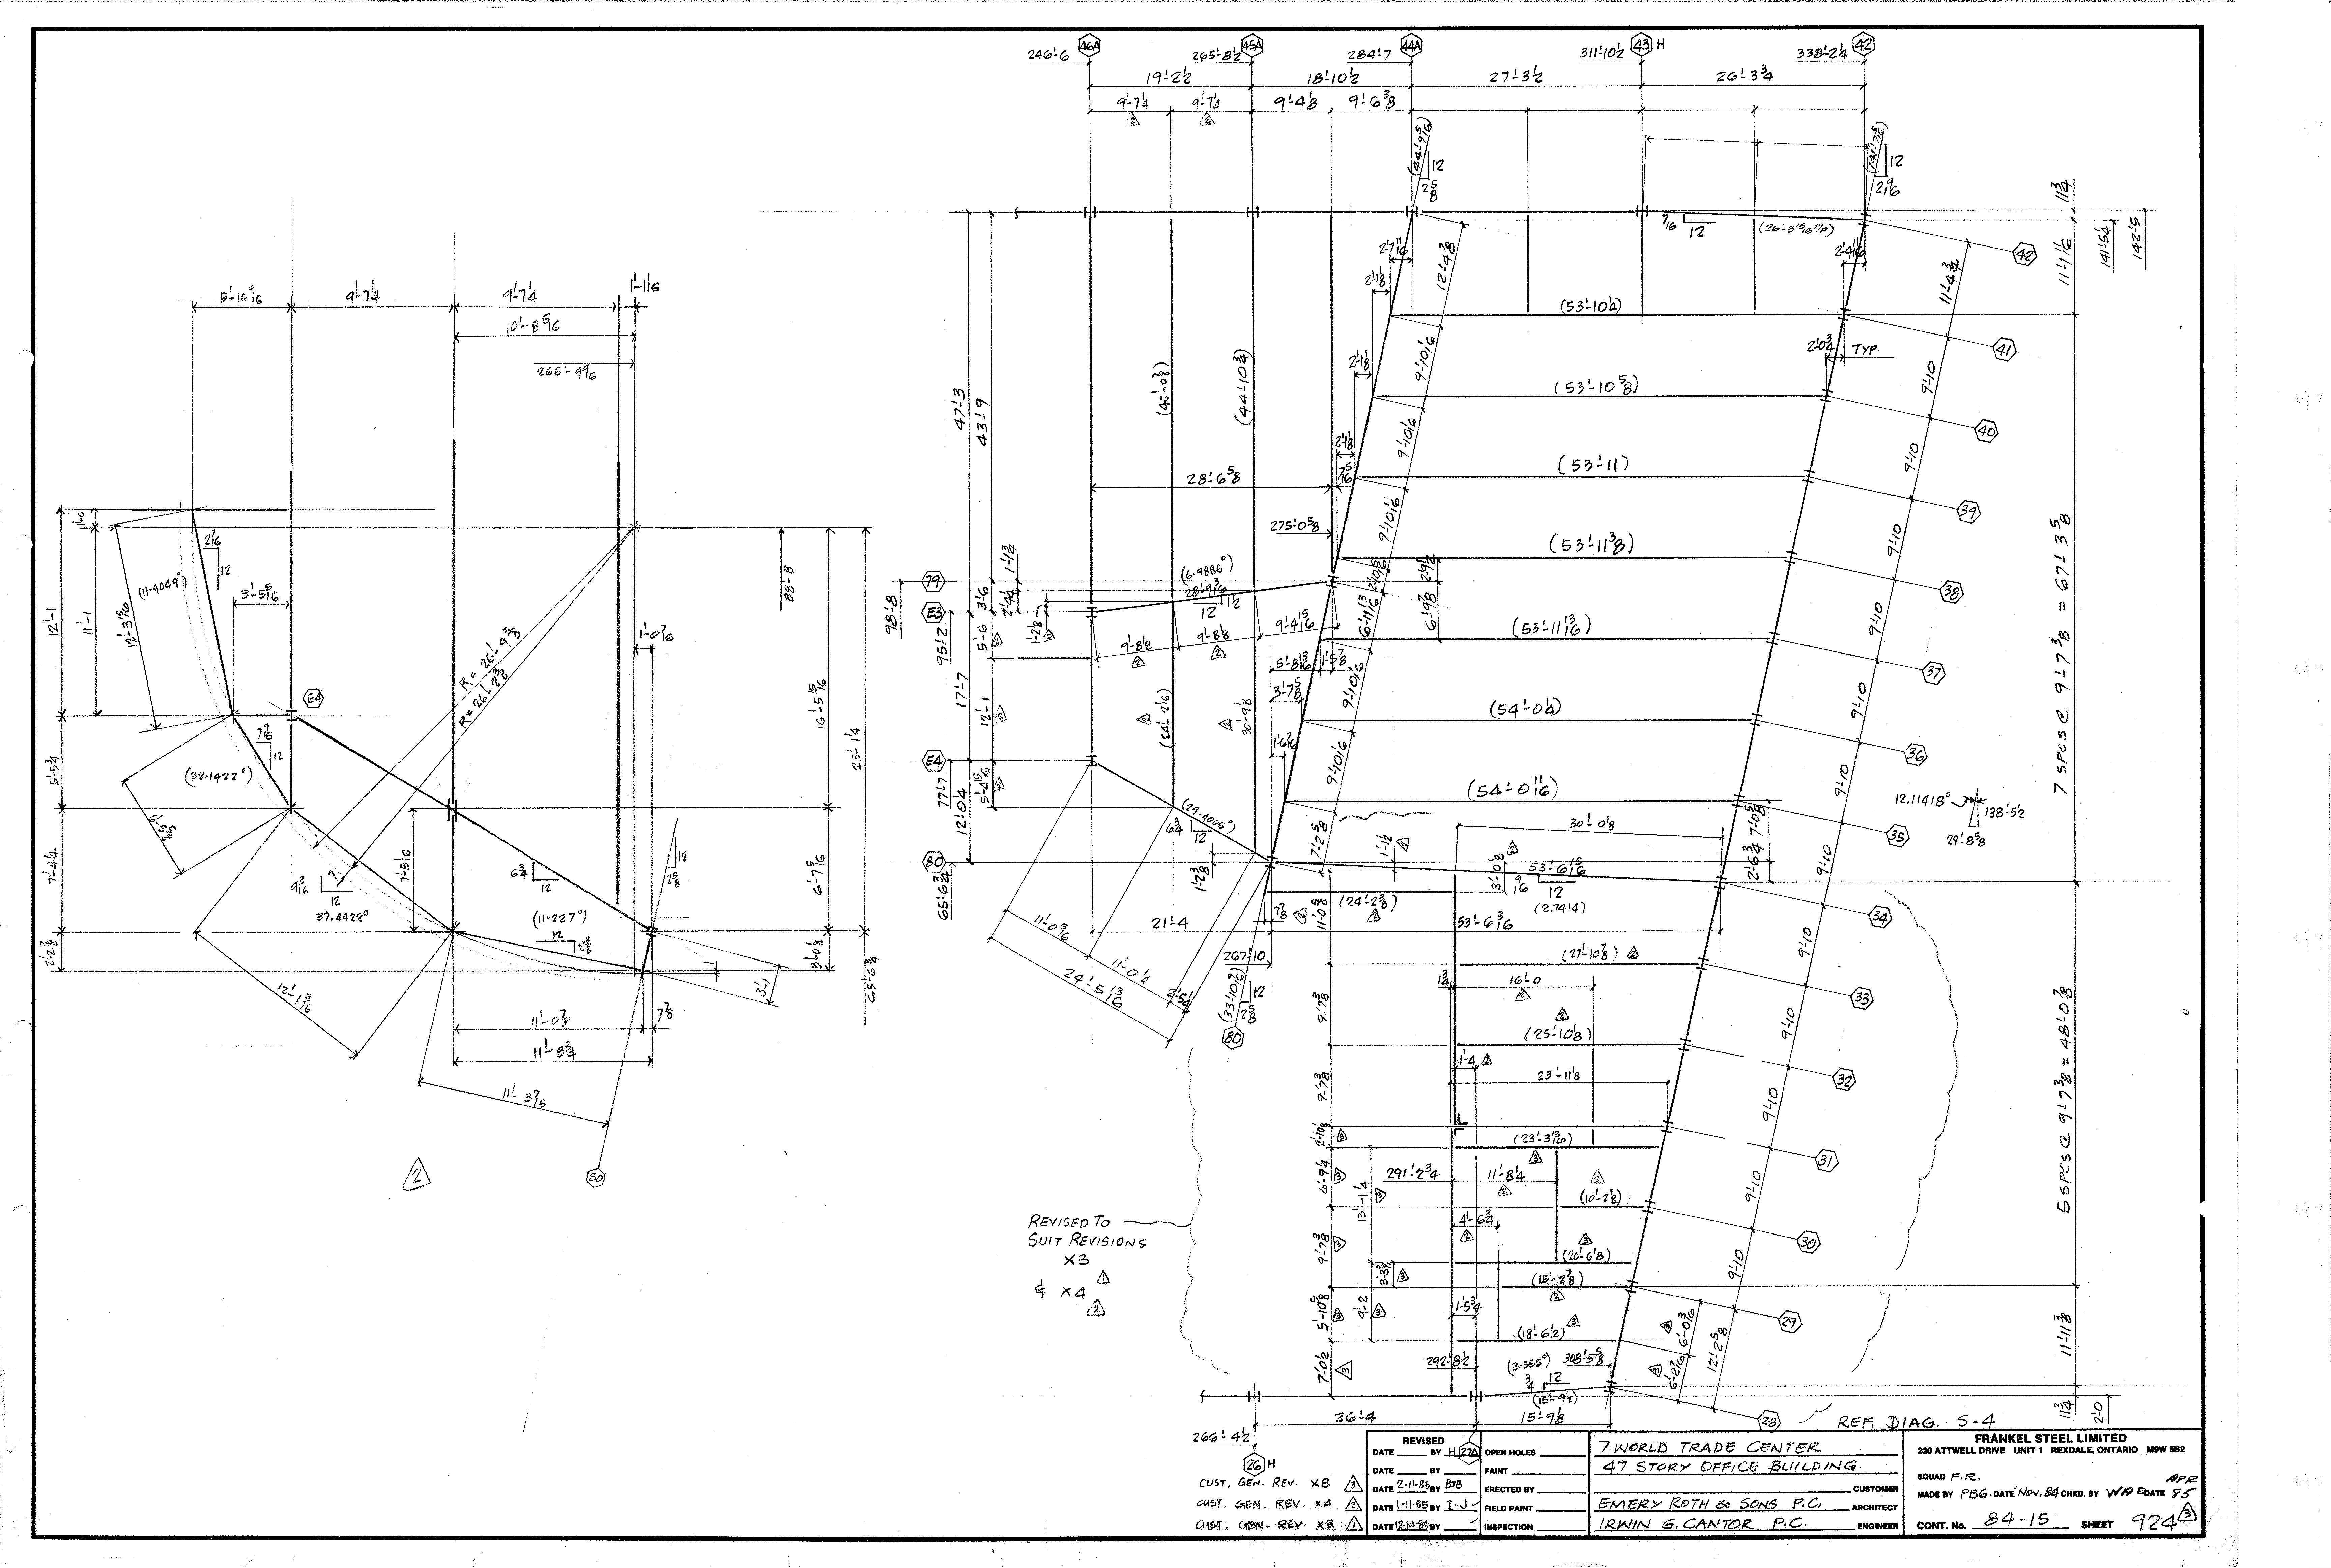
| 0924.png | 351.5 KB | 0924 | (no detail title) — ref. diag. S-4 | https://911warroom.com/model/files/WTC7/DRAWINGS/STRUCTURAL/DETAILS-PNG/0924.png |
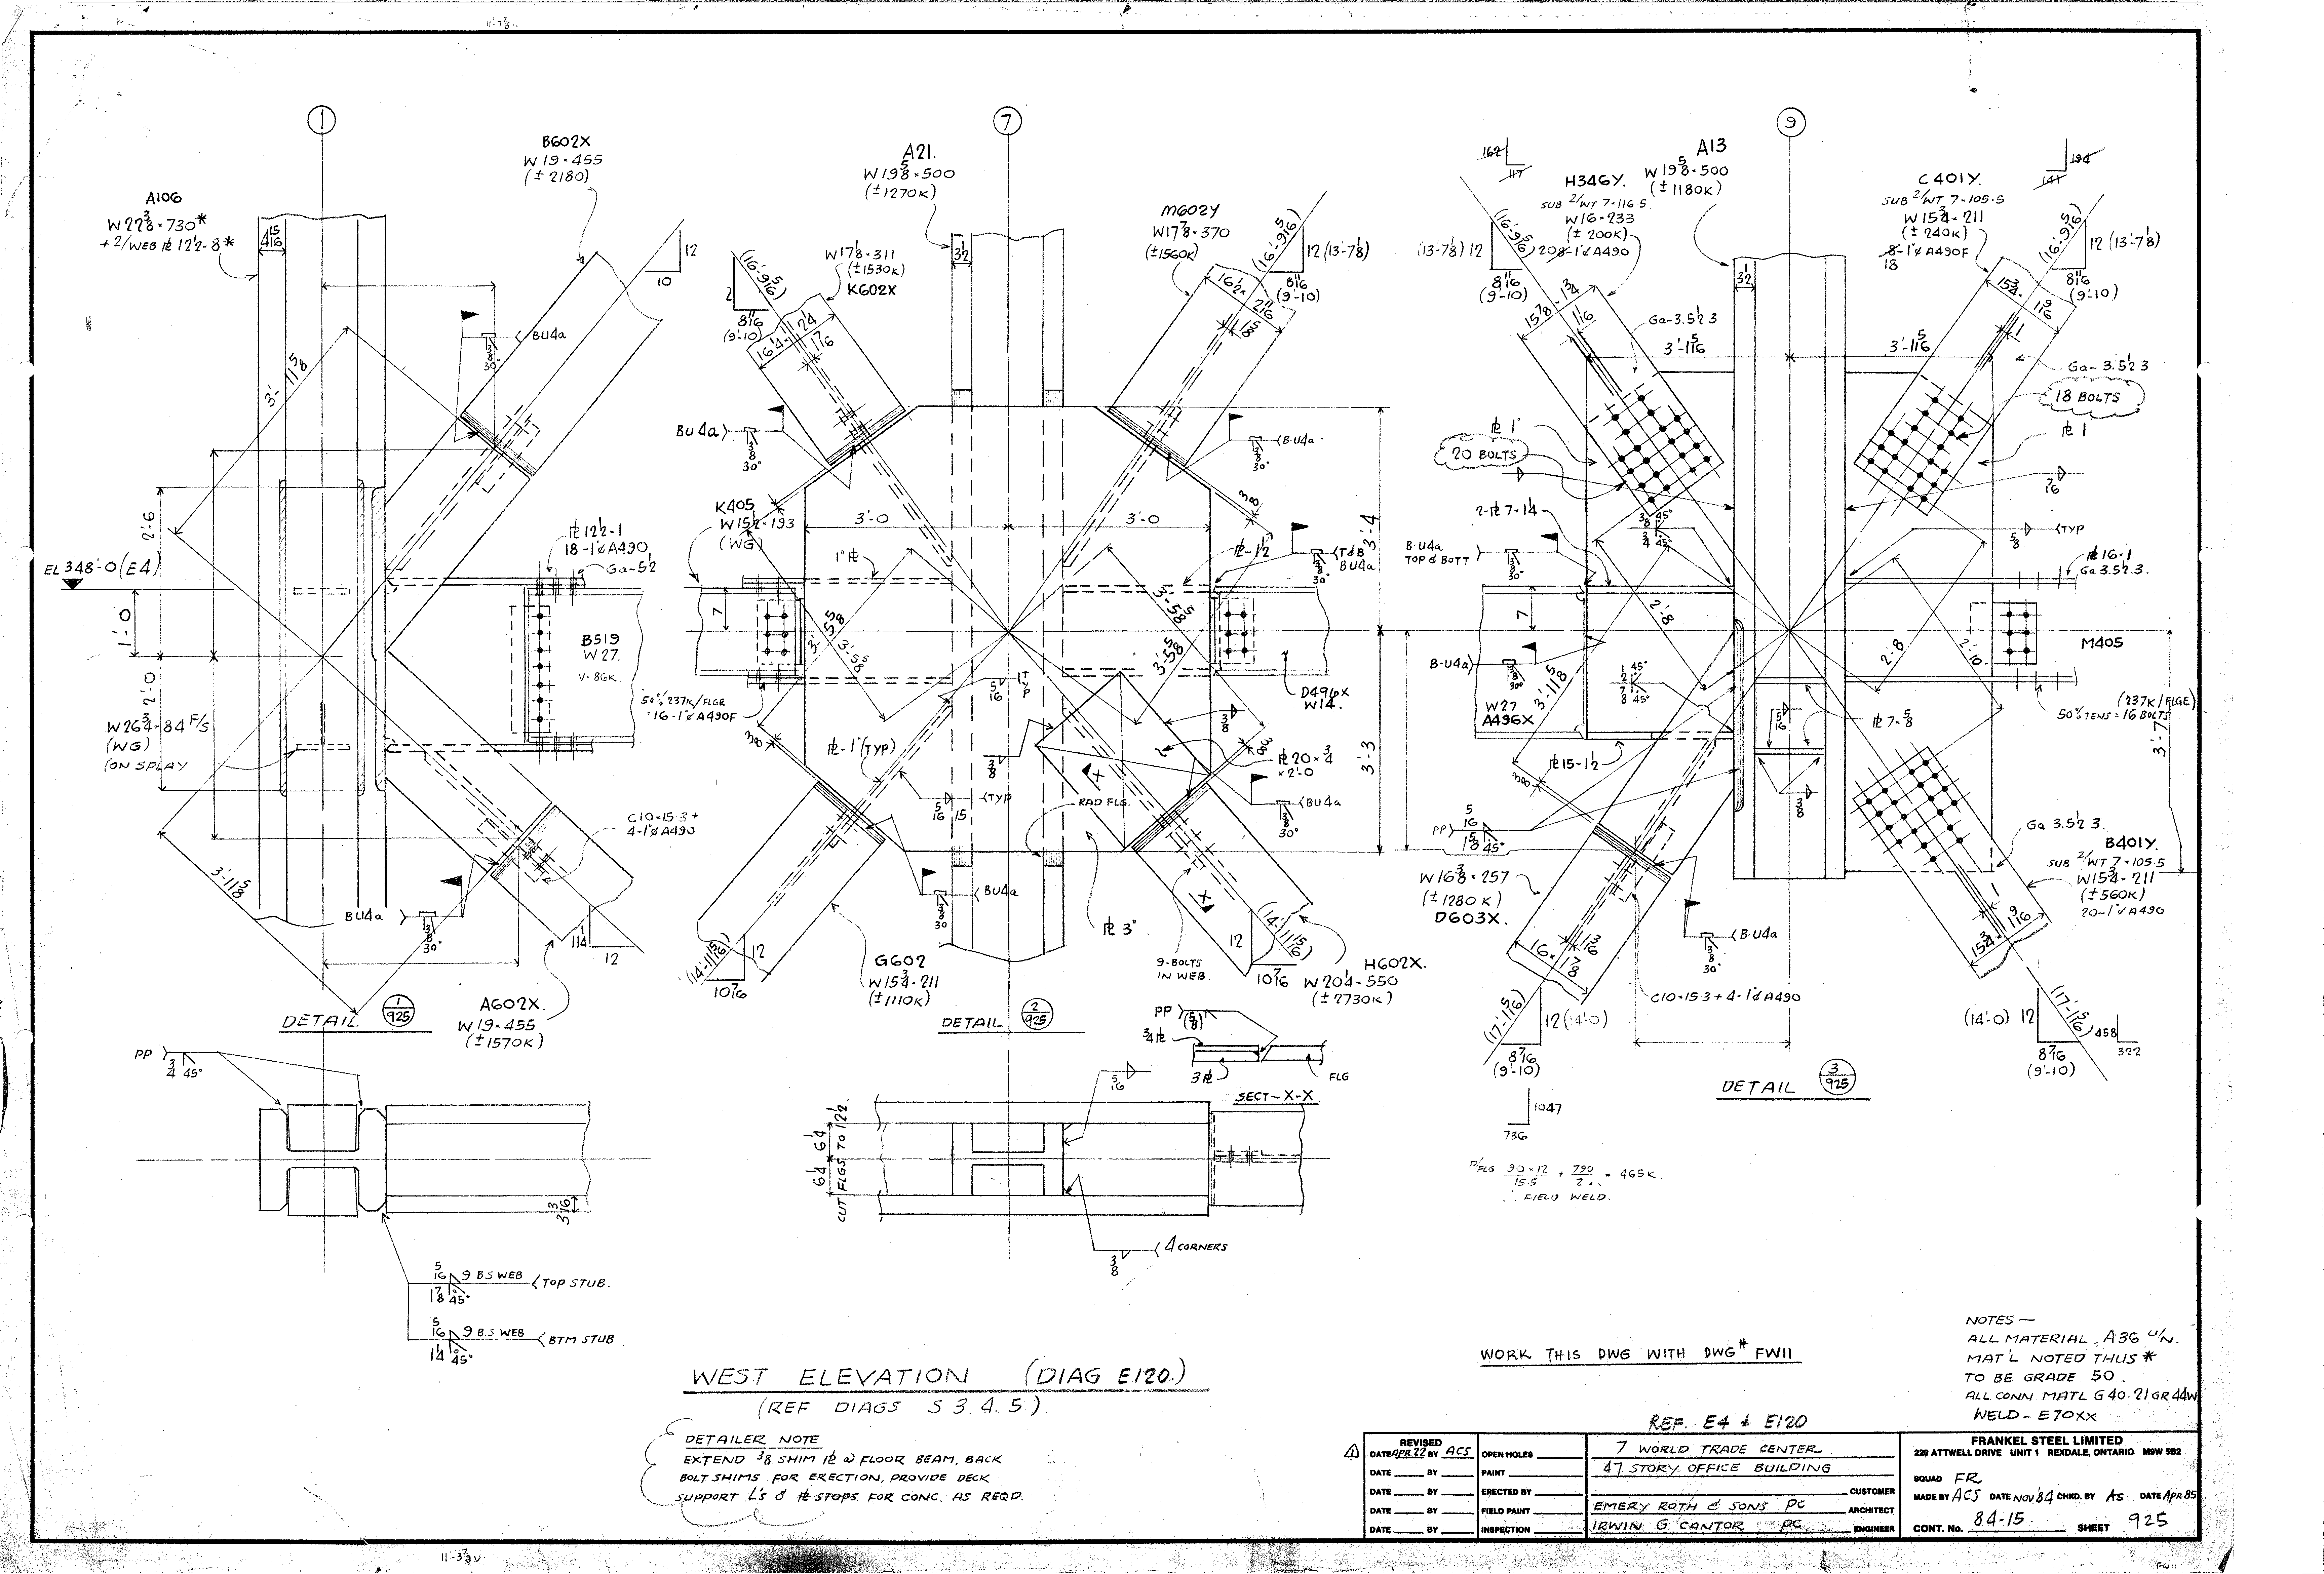
| 0925.png | 496.8 KB | 0925 | WEST ELEVATION (DIAG E120) (REF DIAGS S3, 4, 5) | https://911warroom.com/model/files/WTC7/DRAWINGS/STRUCTURAL/DETAILS-PNG/0925.png |
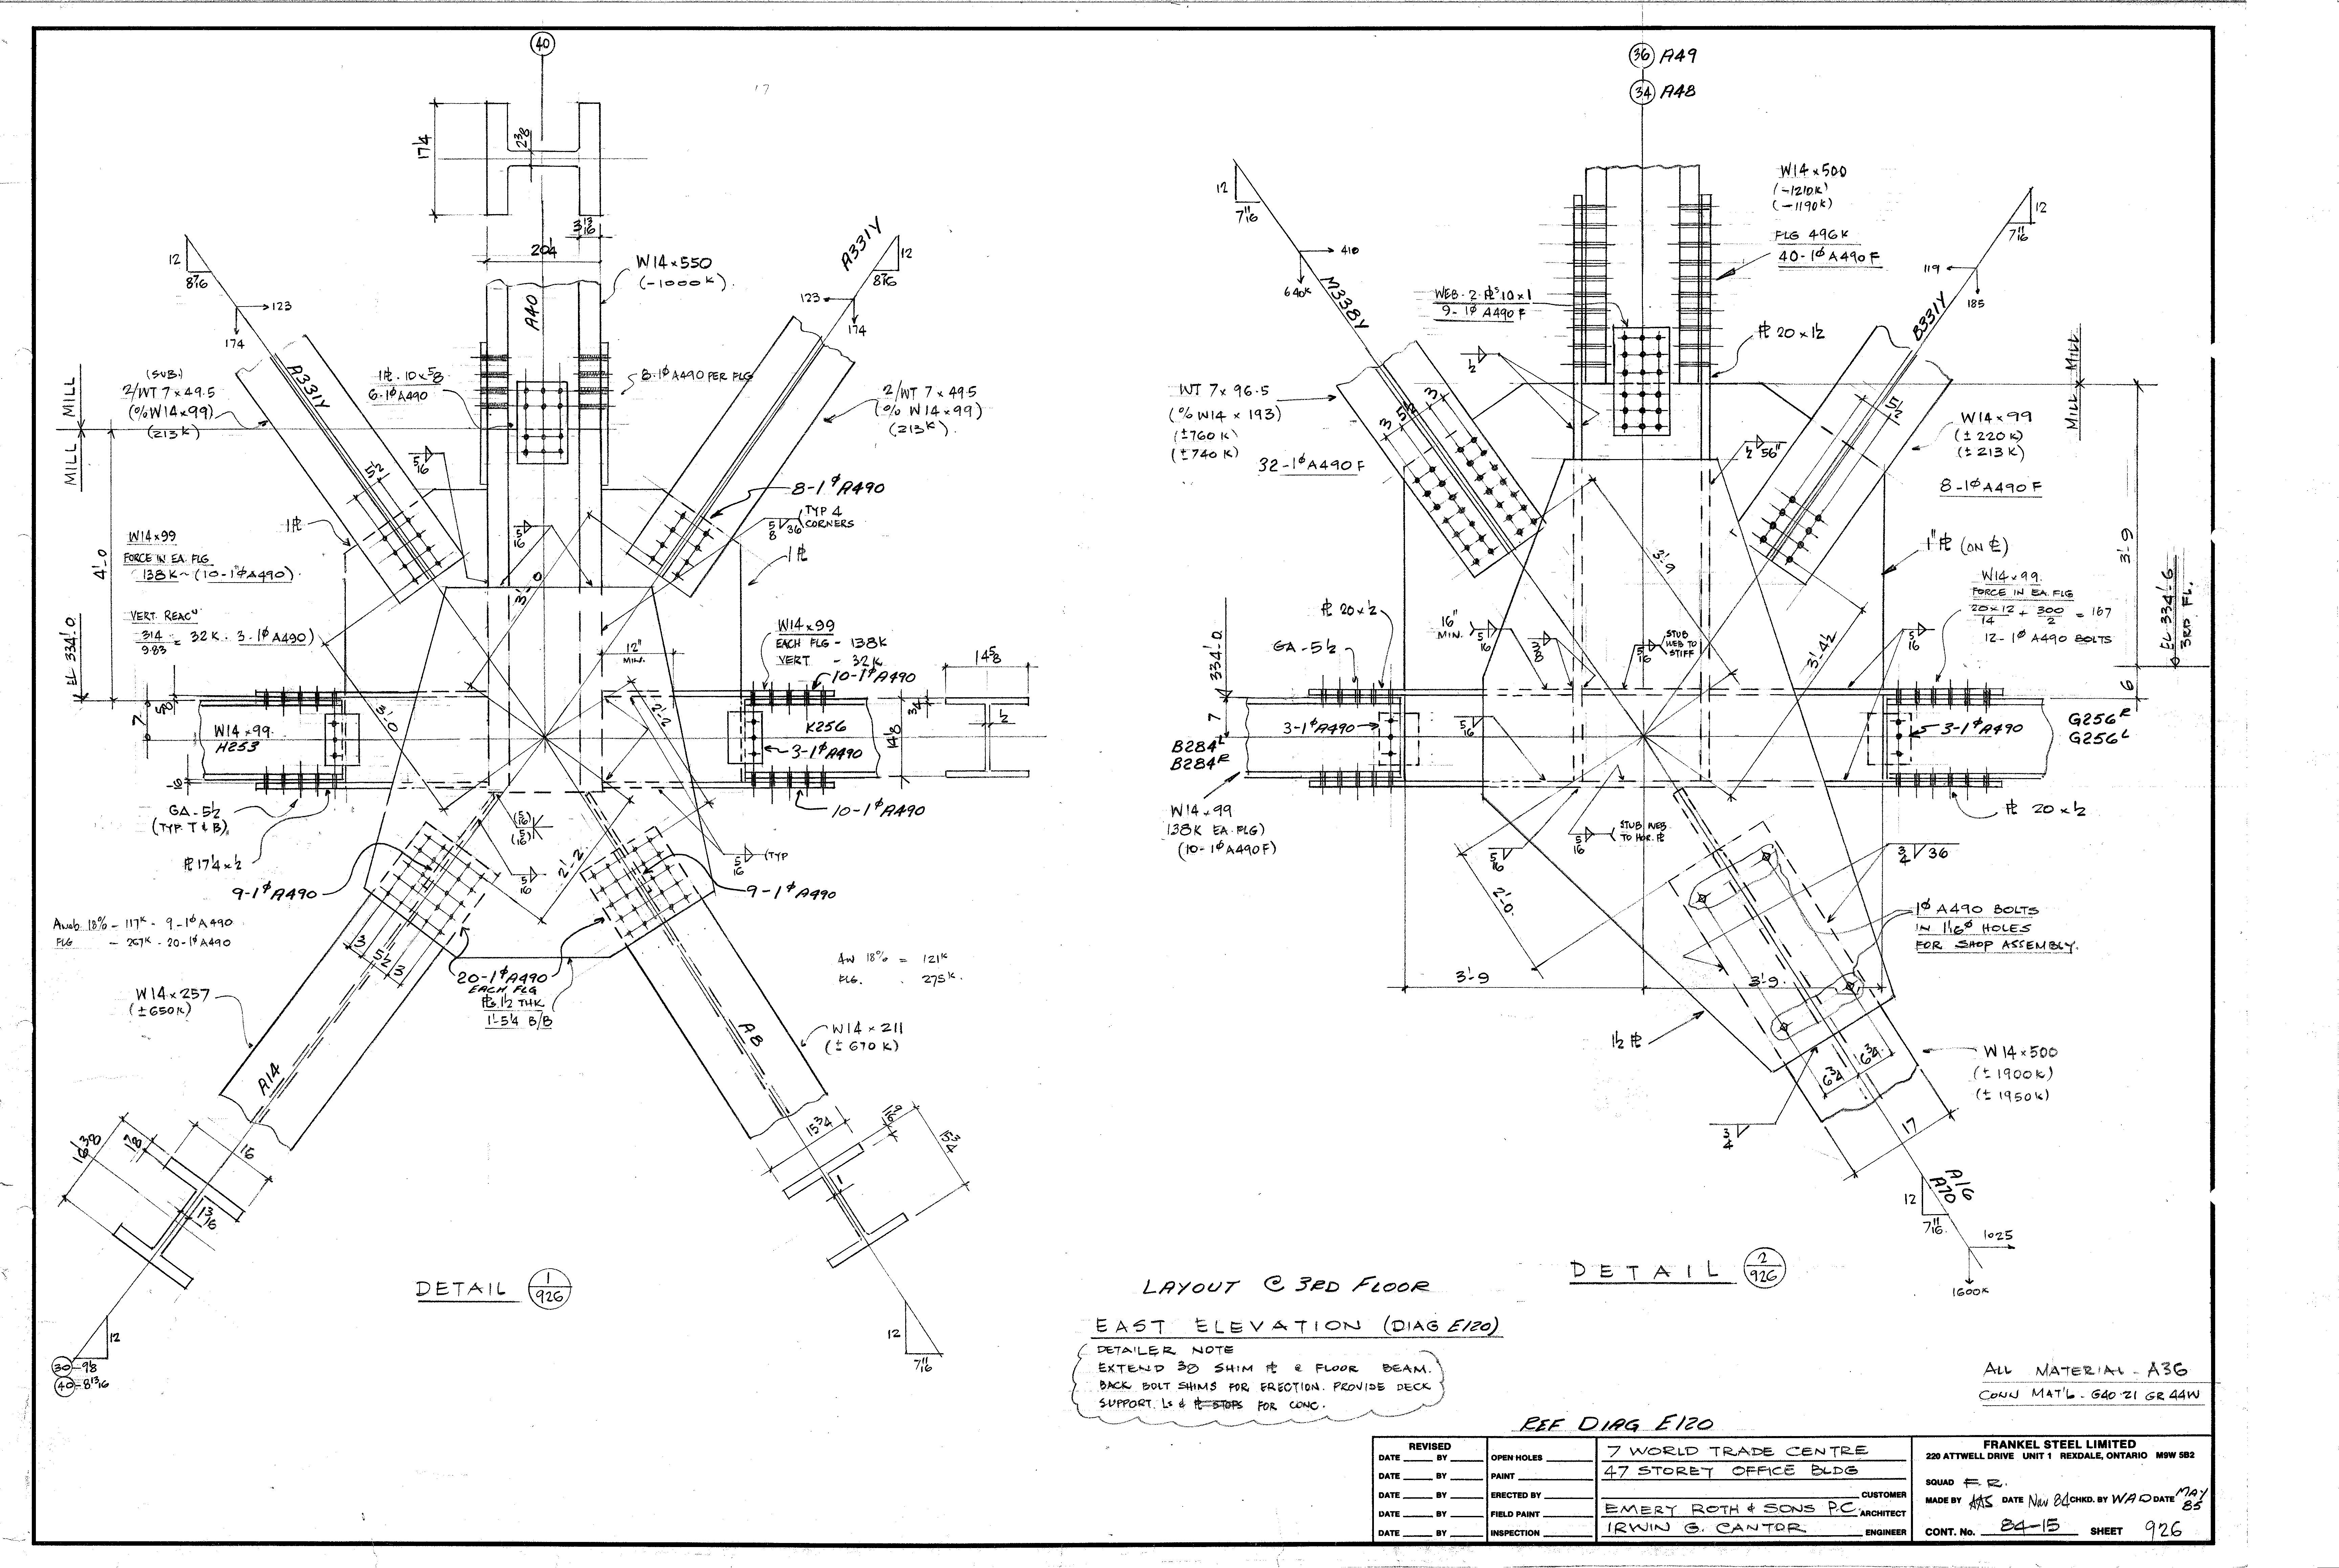
| 0926.png | 418.9 KB | 0926 | EAST ELEVATION (DIAG E120) - LAYOUT @ 3RD FLOOR | https://911warroom.com/model/files/WTC7/DRAWINGS/STRUCTURAL/DETAILS-PNG/0926.png |
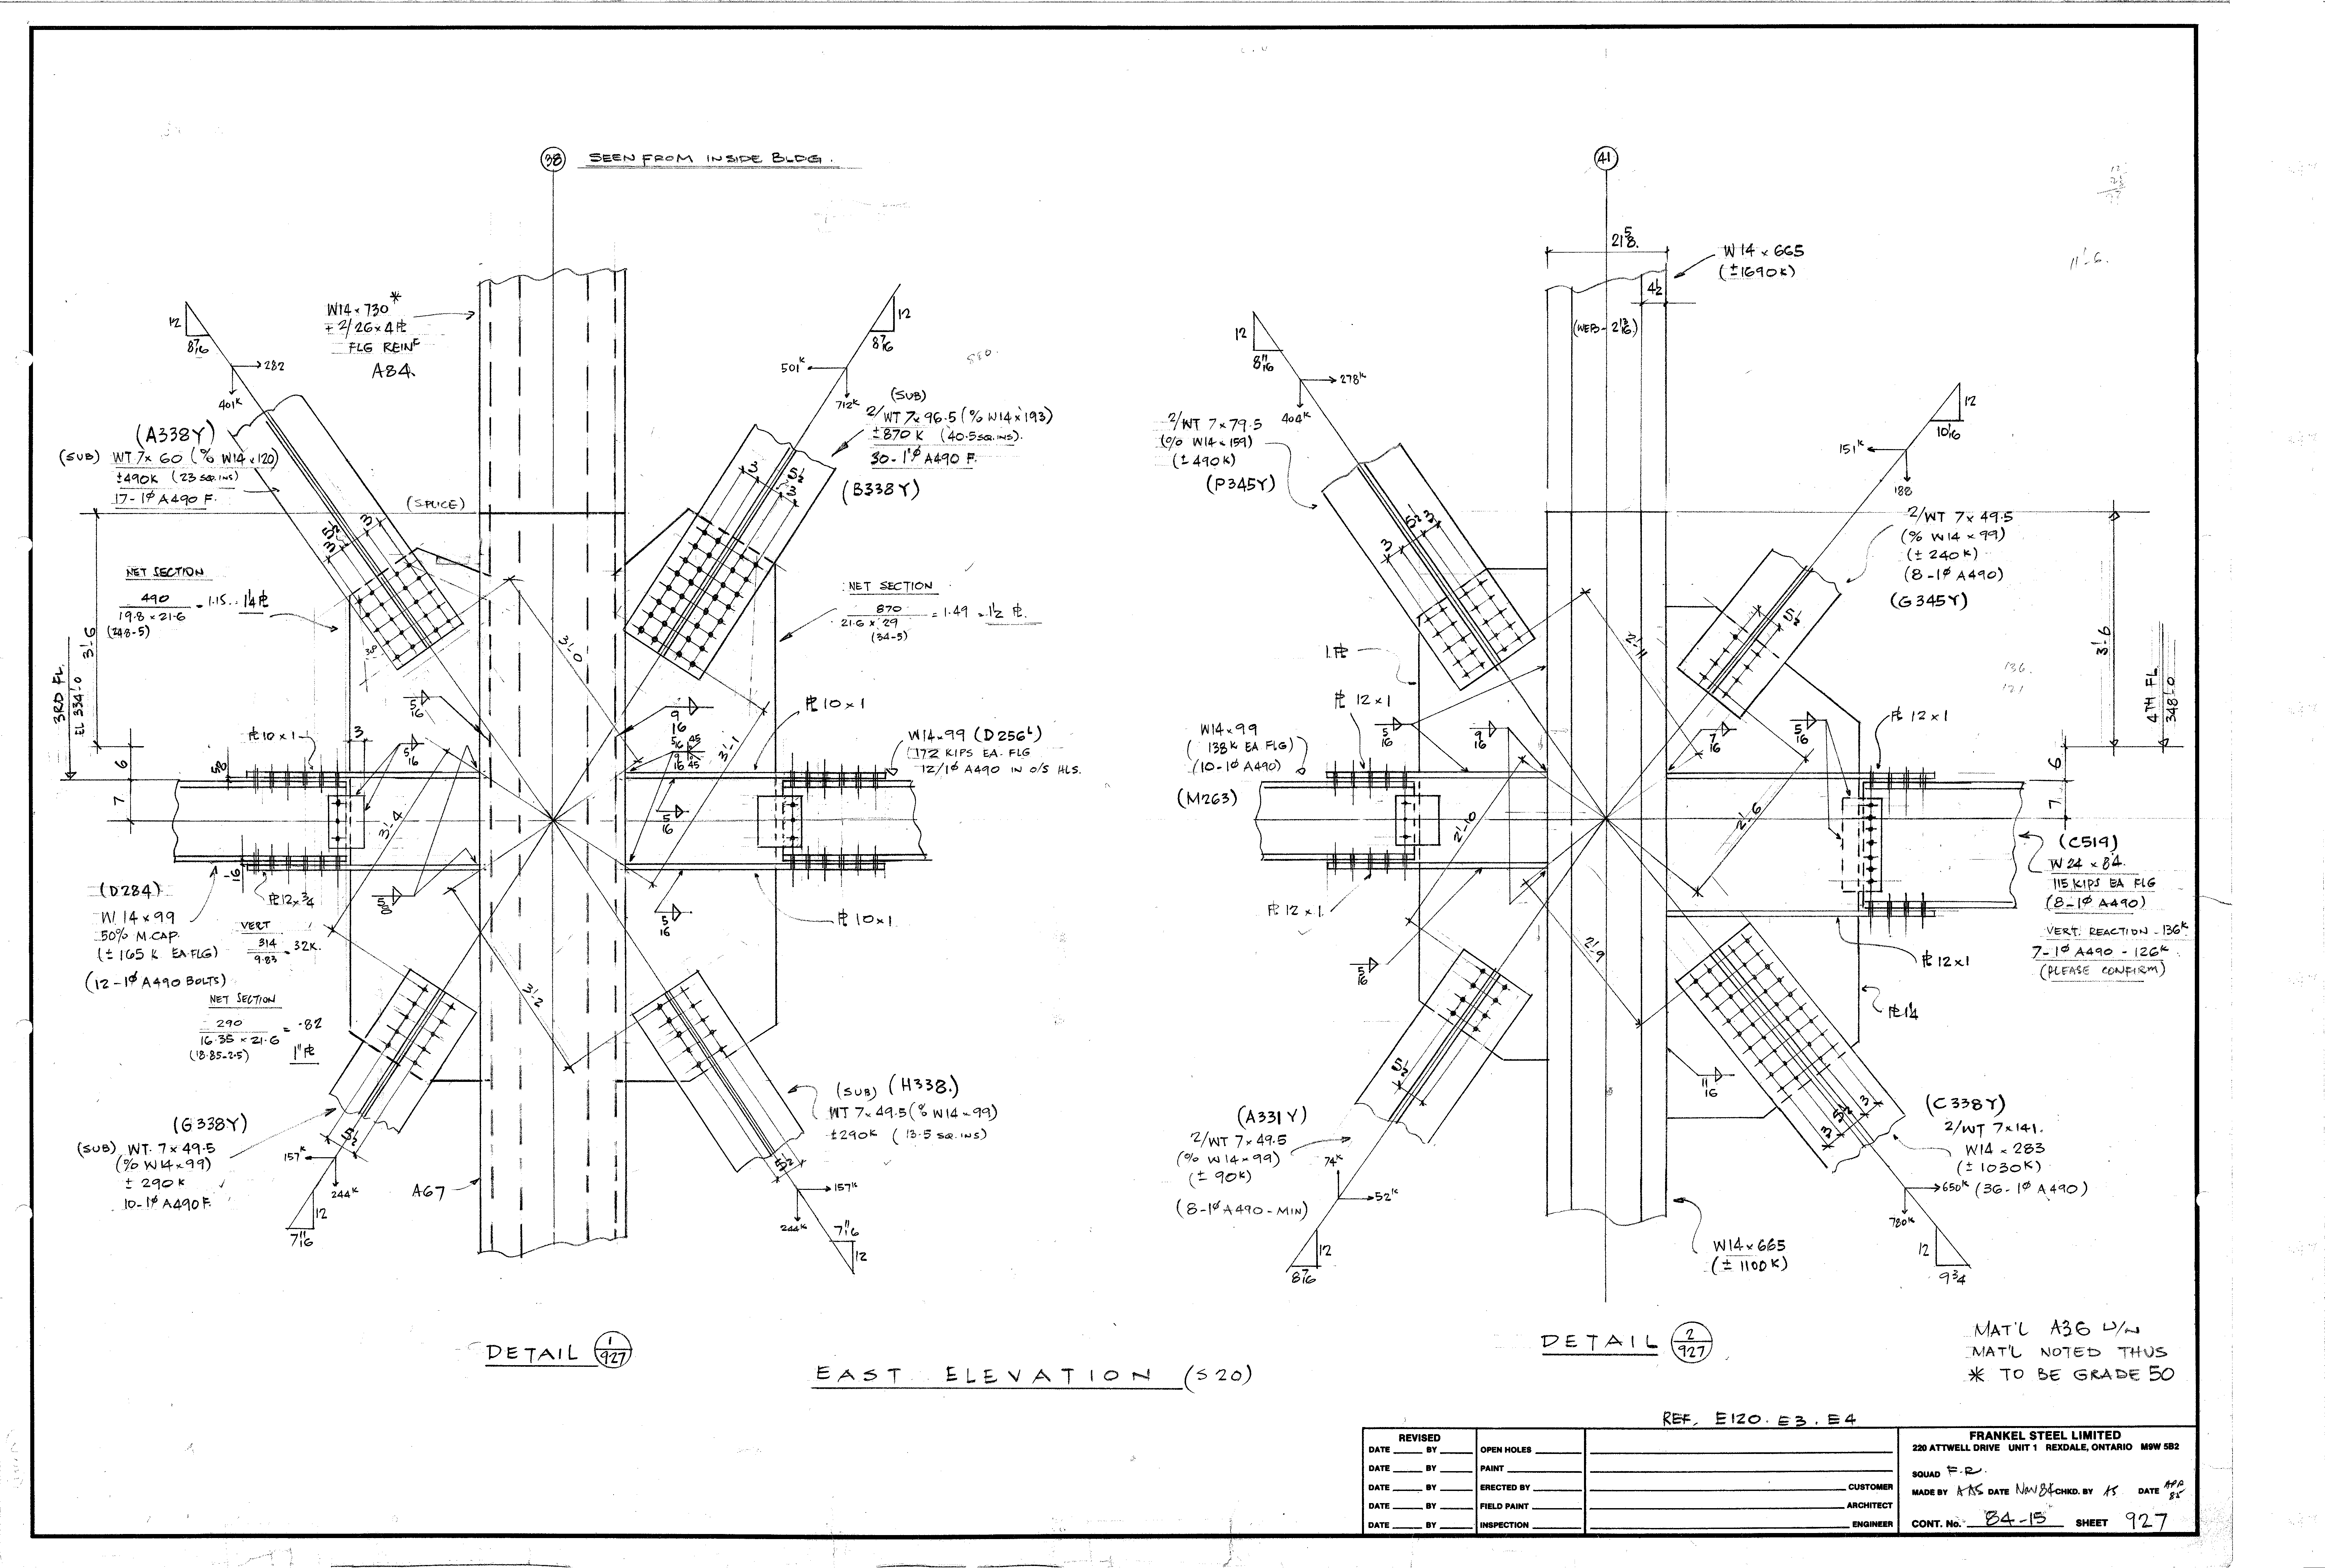
| 0927.png | 384.1 KB | 0927 | EAST ELEVATION (S20) | https://911warroom.com/model/files/WTC7/DRAWINGS/STRUCTURAL/DETAILS-PNG/0927.png |
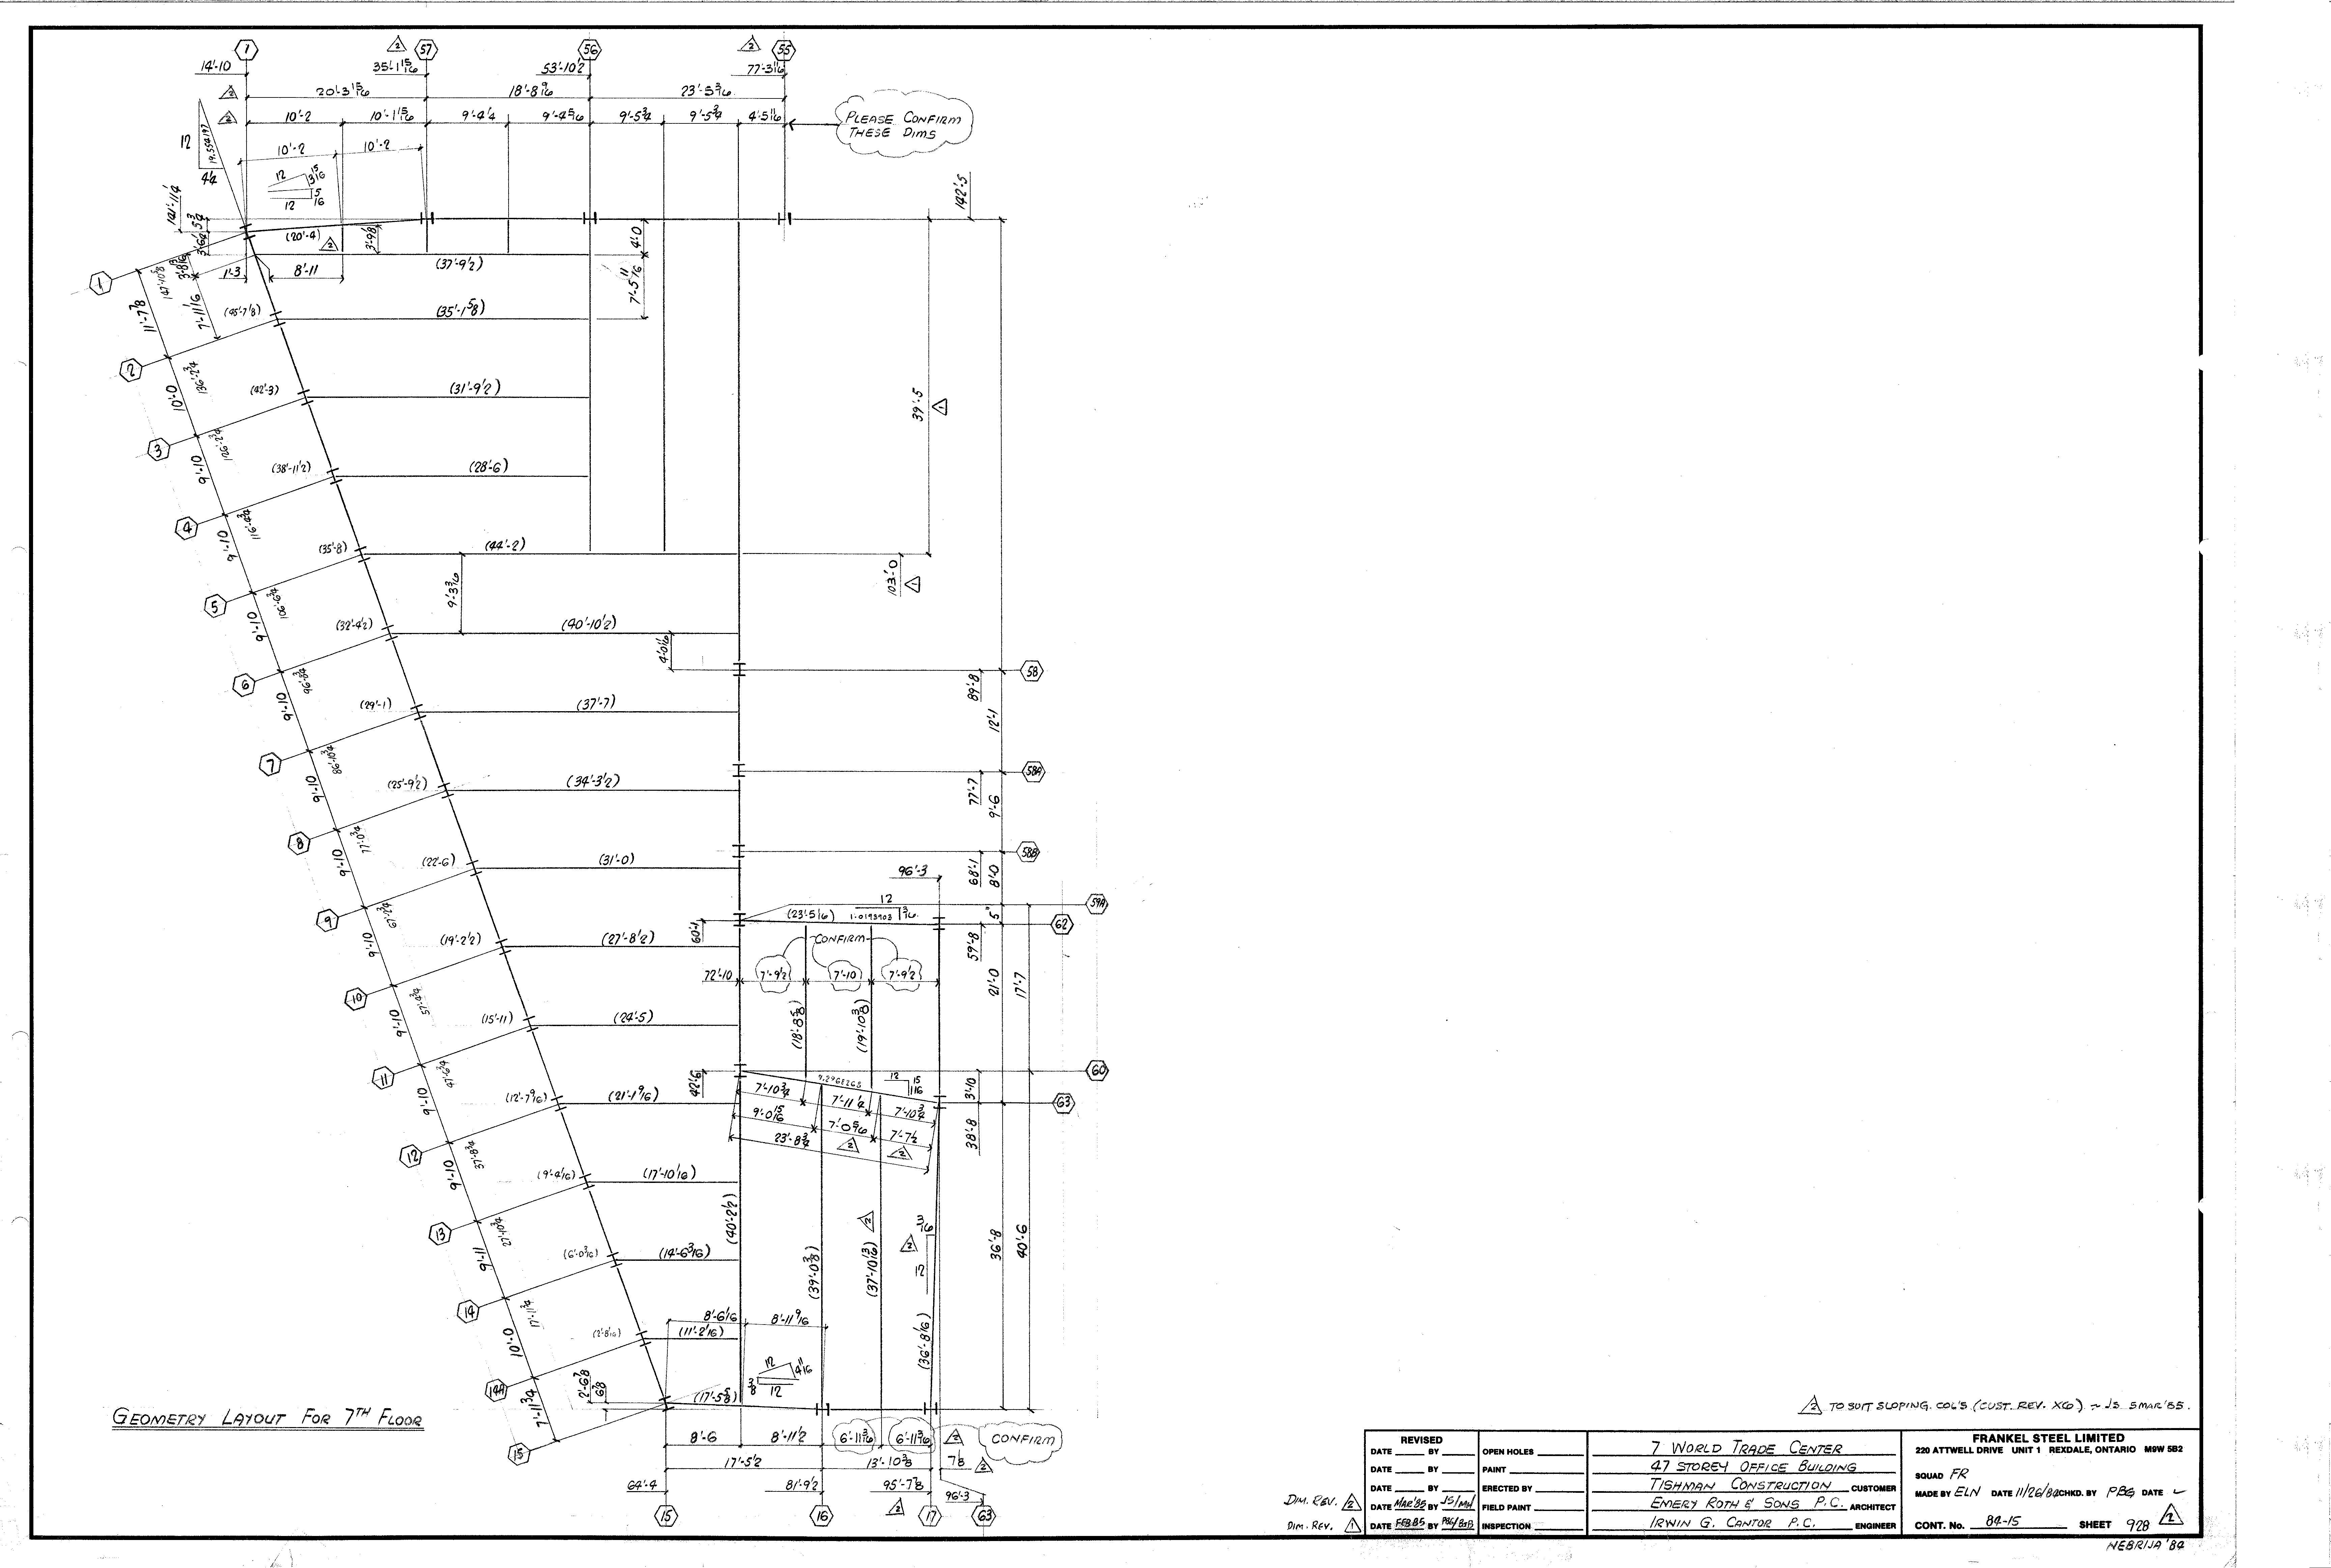
| 0928.png | 223.2 KB | 0928 | GEOMETRY LAYOUT FOR 7TH FLOOR | https://911warroom.com/model/files/WTC7/DRAWINGS/STRUCTURAL/DETAILS-PNG/0928.png |
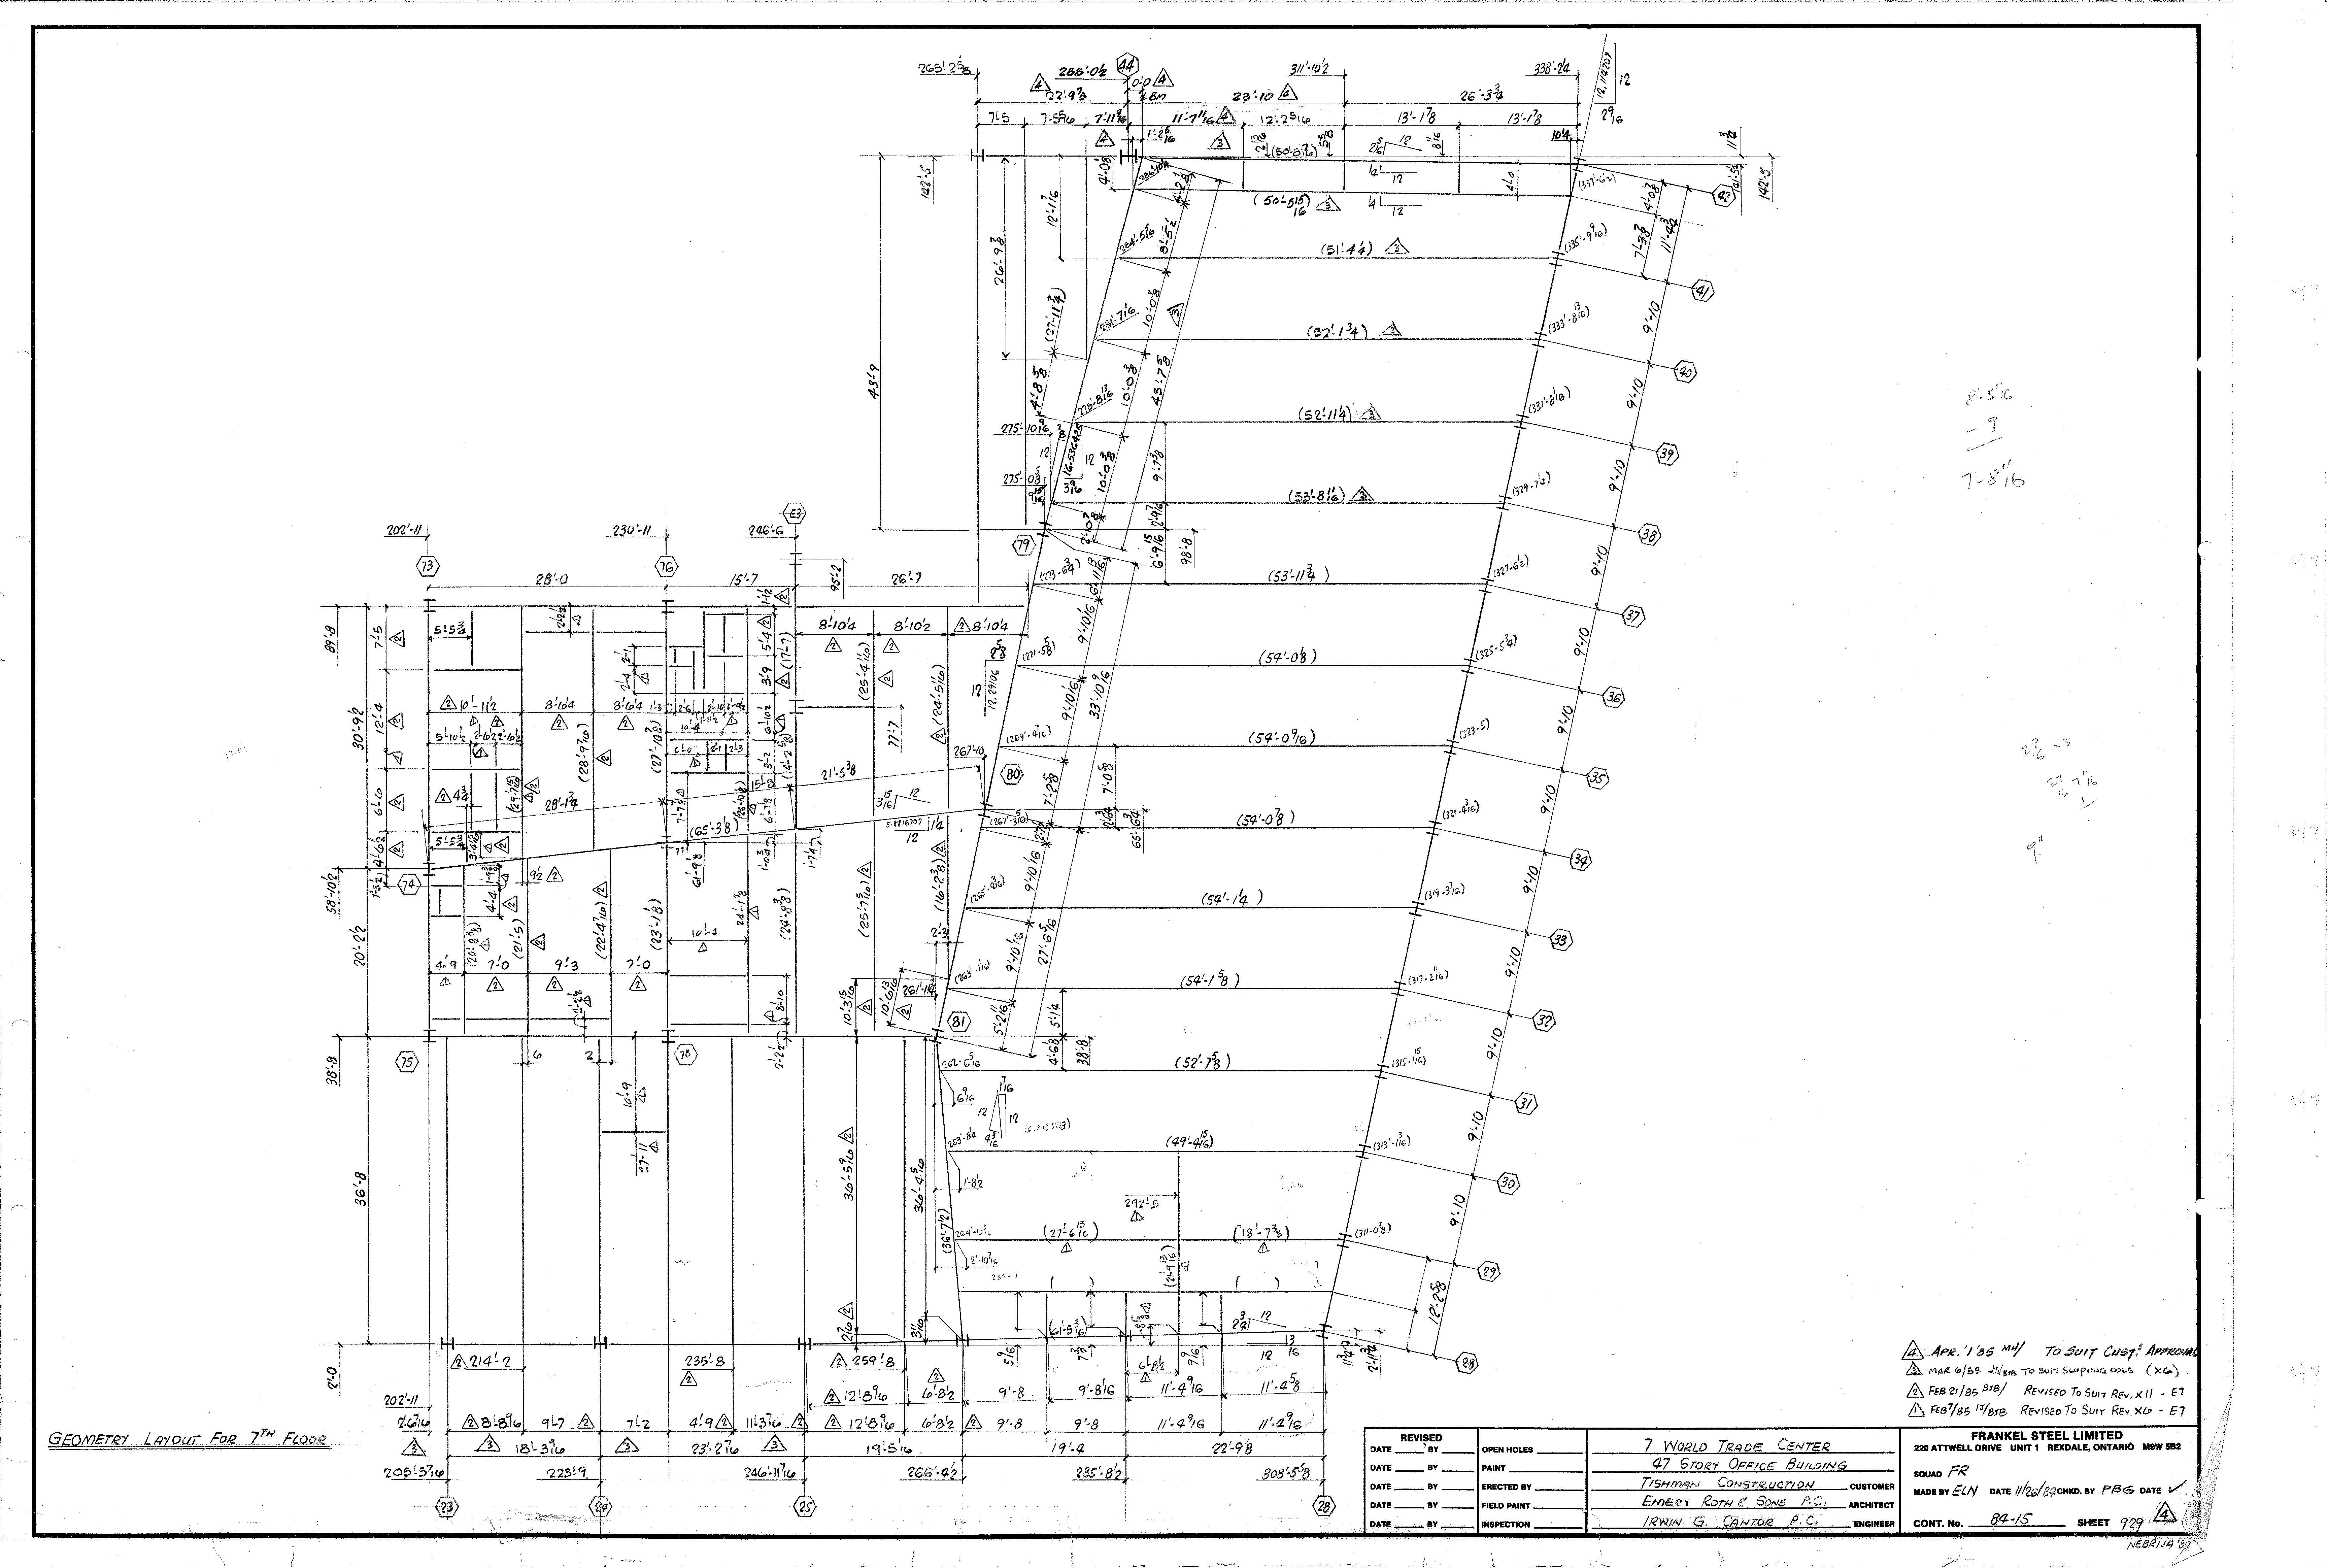
| 0929.png | 356.0 KB | 0929 | GEOMETRY LAYOUT FOR 7TH FLOOR | https://911warroom.com/model/files/WTC7/DRAWINGS/STRUCTURAL/DETAILS-PNG/0929.png |
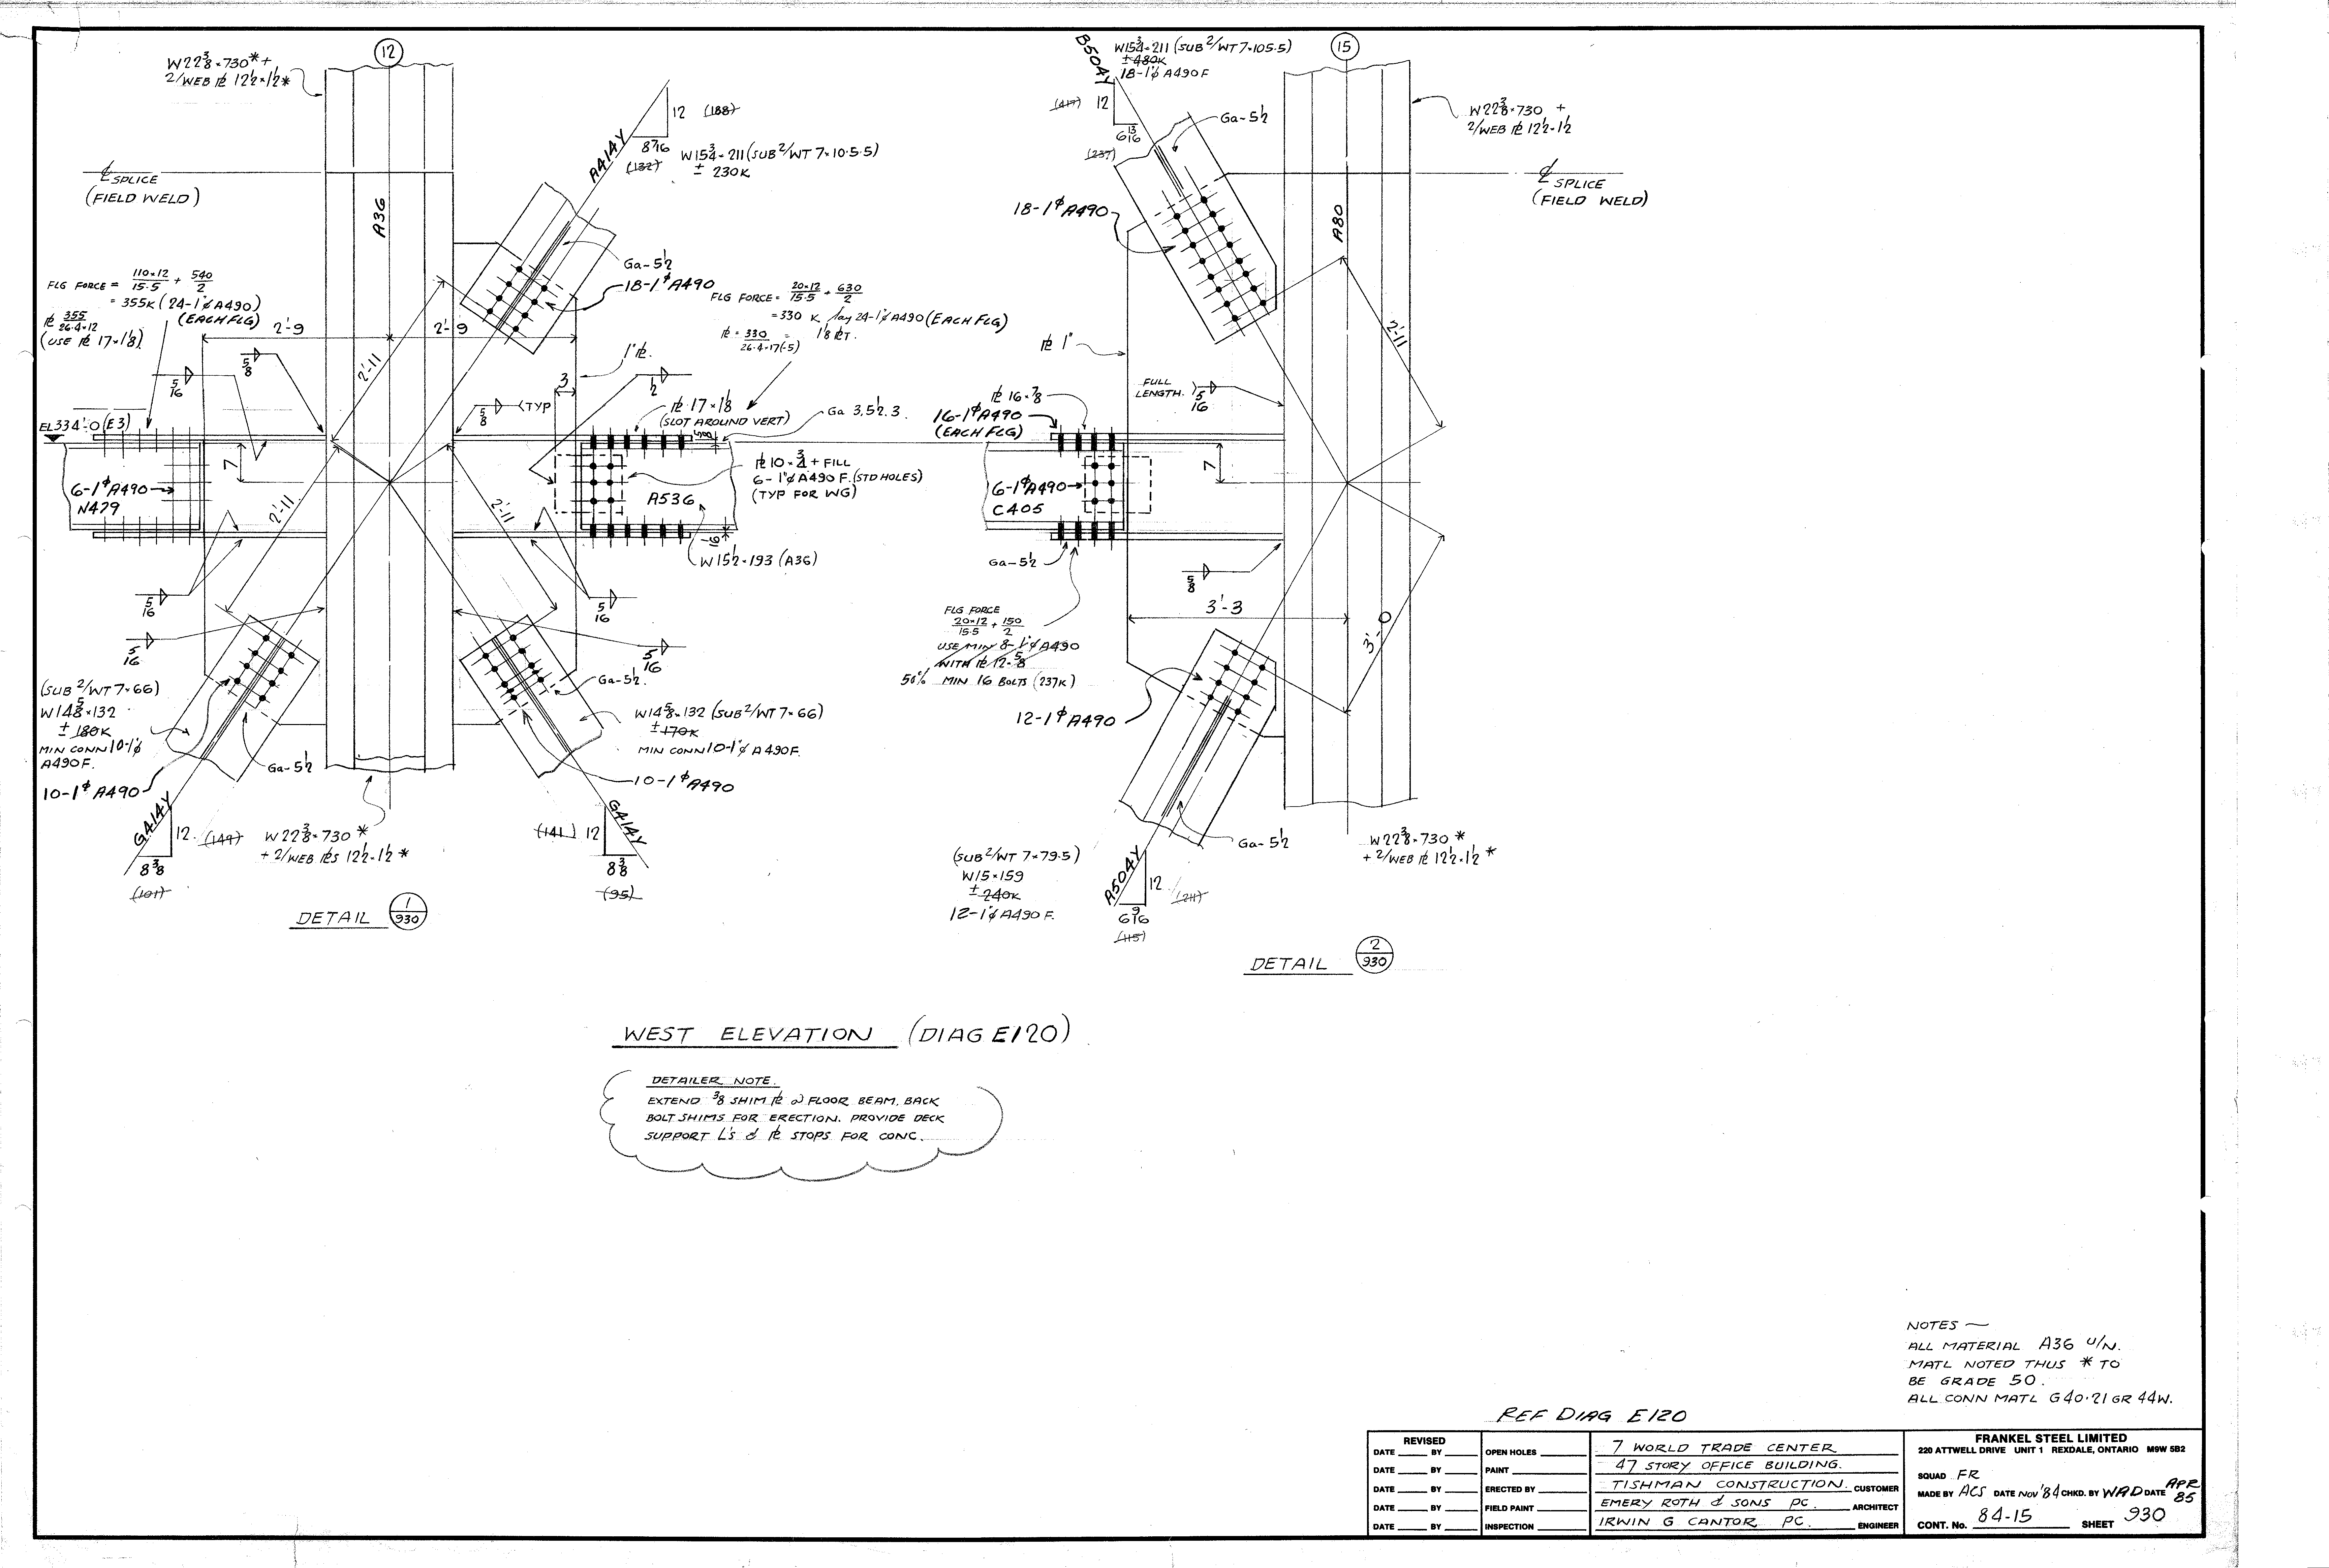
| 0930.png | 283.4 KB | 0930 | WEST ELEVATION (DIAG E120) | https://911warroom.com/model/files/WTC7/DRAWINGS/STRUCTURAL/DETAILS-PNG/0930.png |
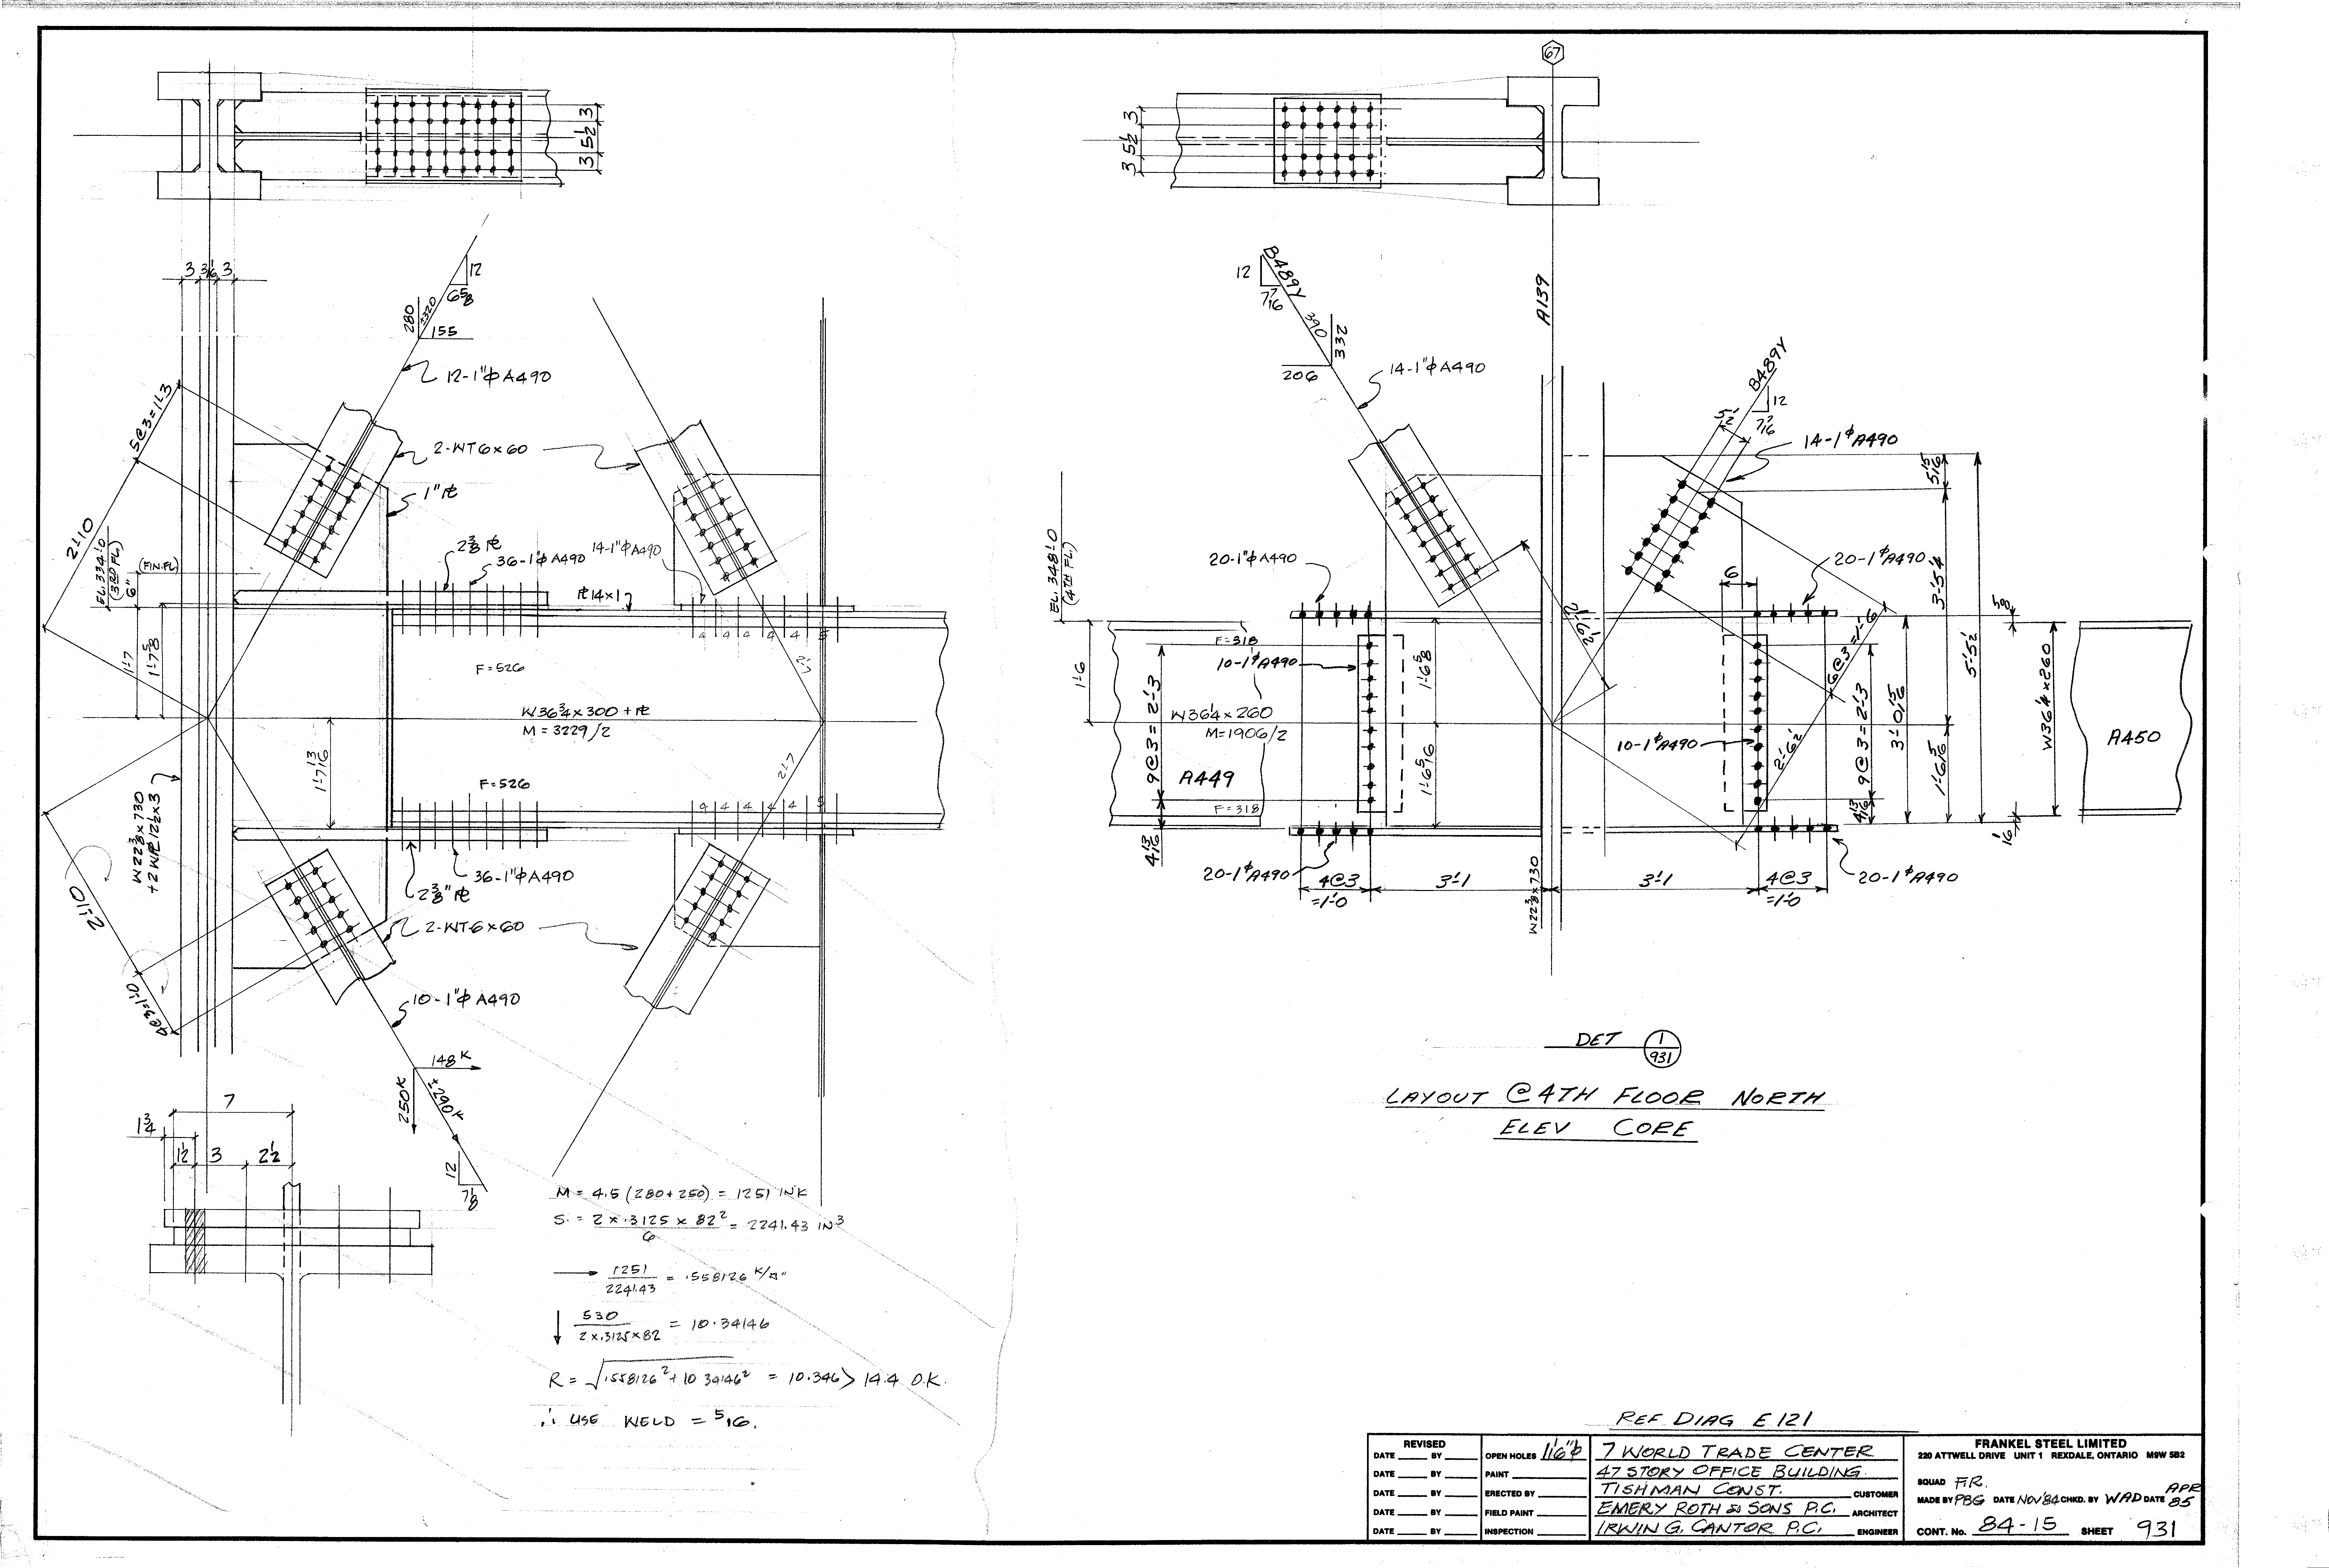
| 0931.png | 337.4 KB | 0931 | LAYOUT @ 4TH FLOOR NORTH ELEV CORE | https://911warroom.com/model/files/WTC7/DRAWINGS/STRUCTURAL/DETAILS-PNG/0931.png |
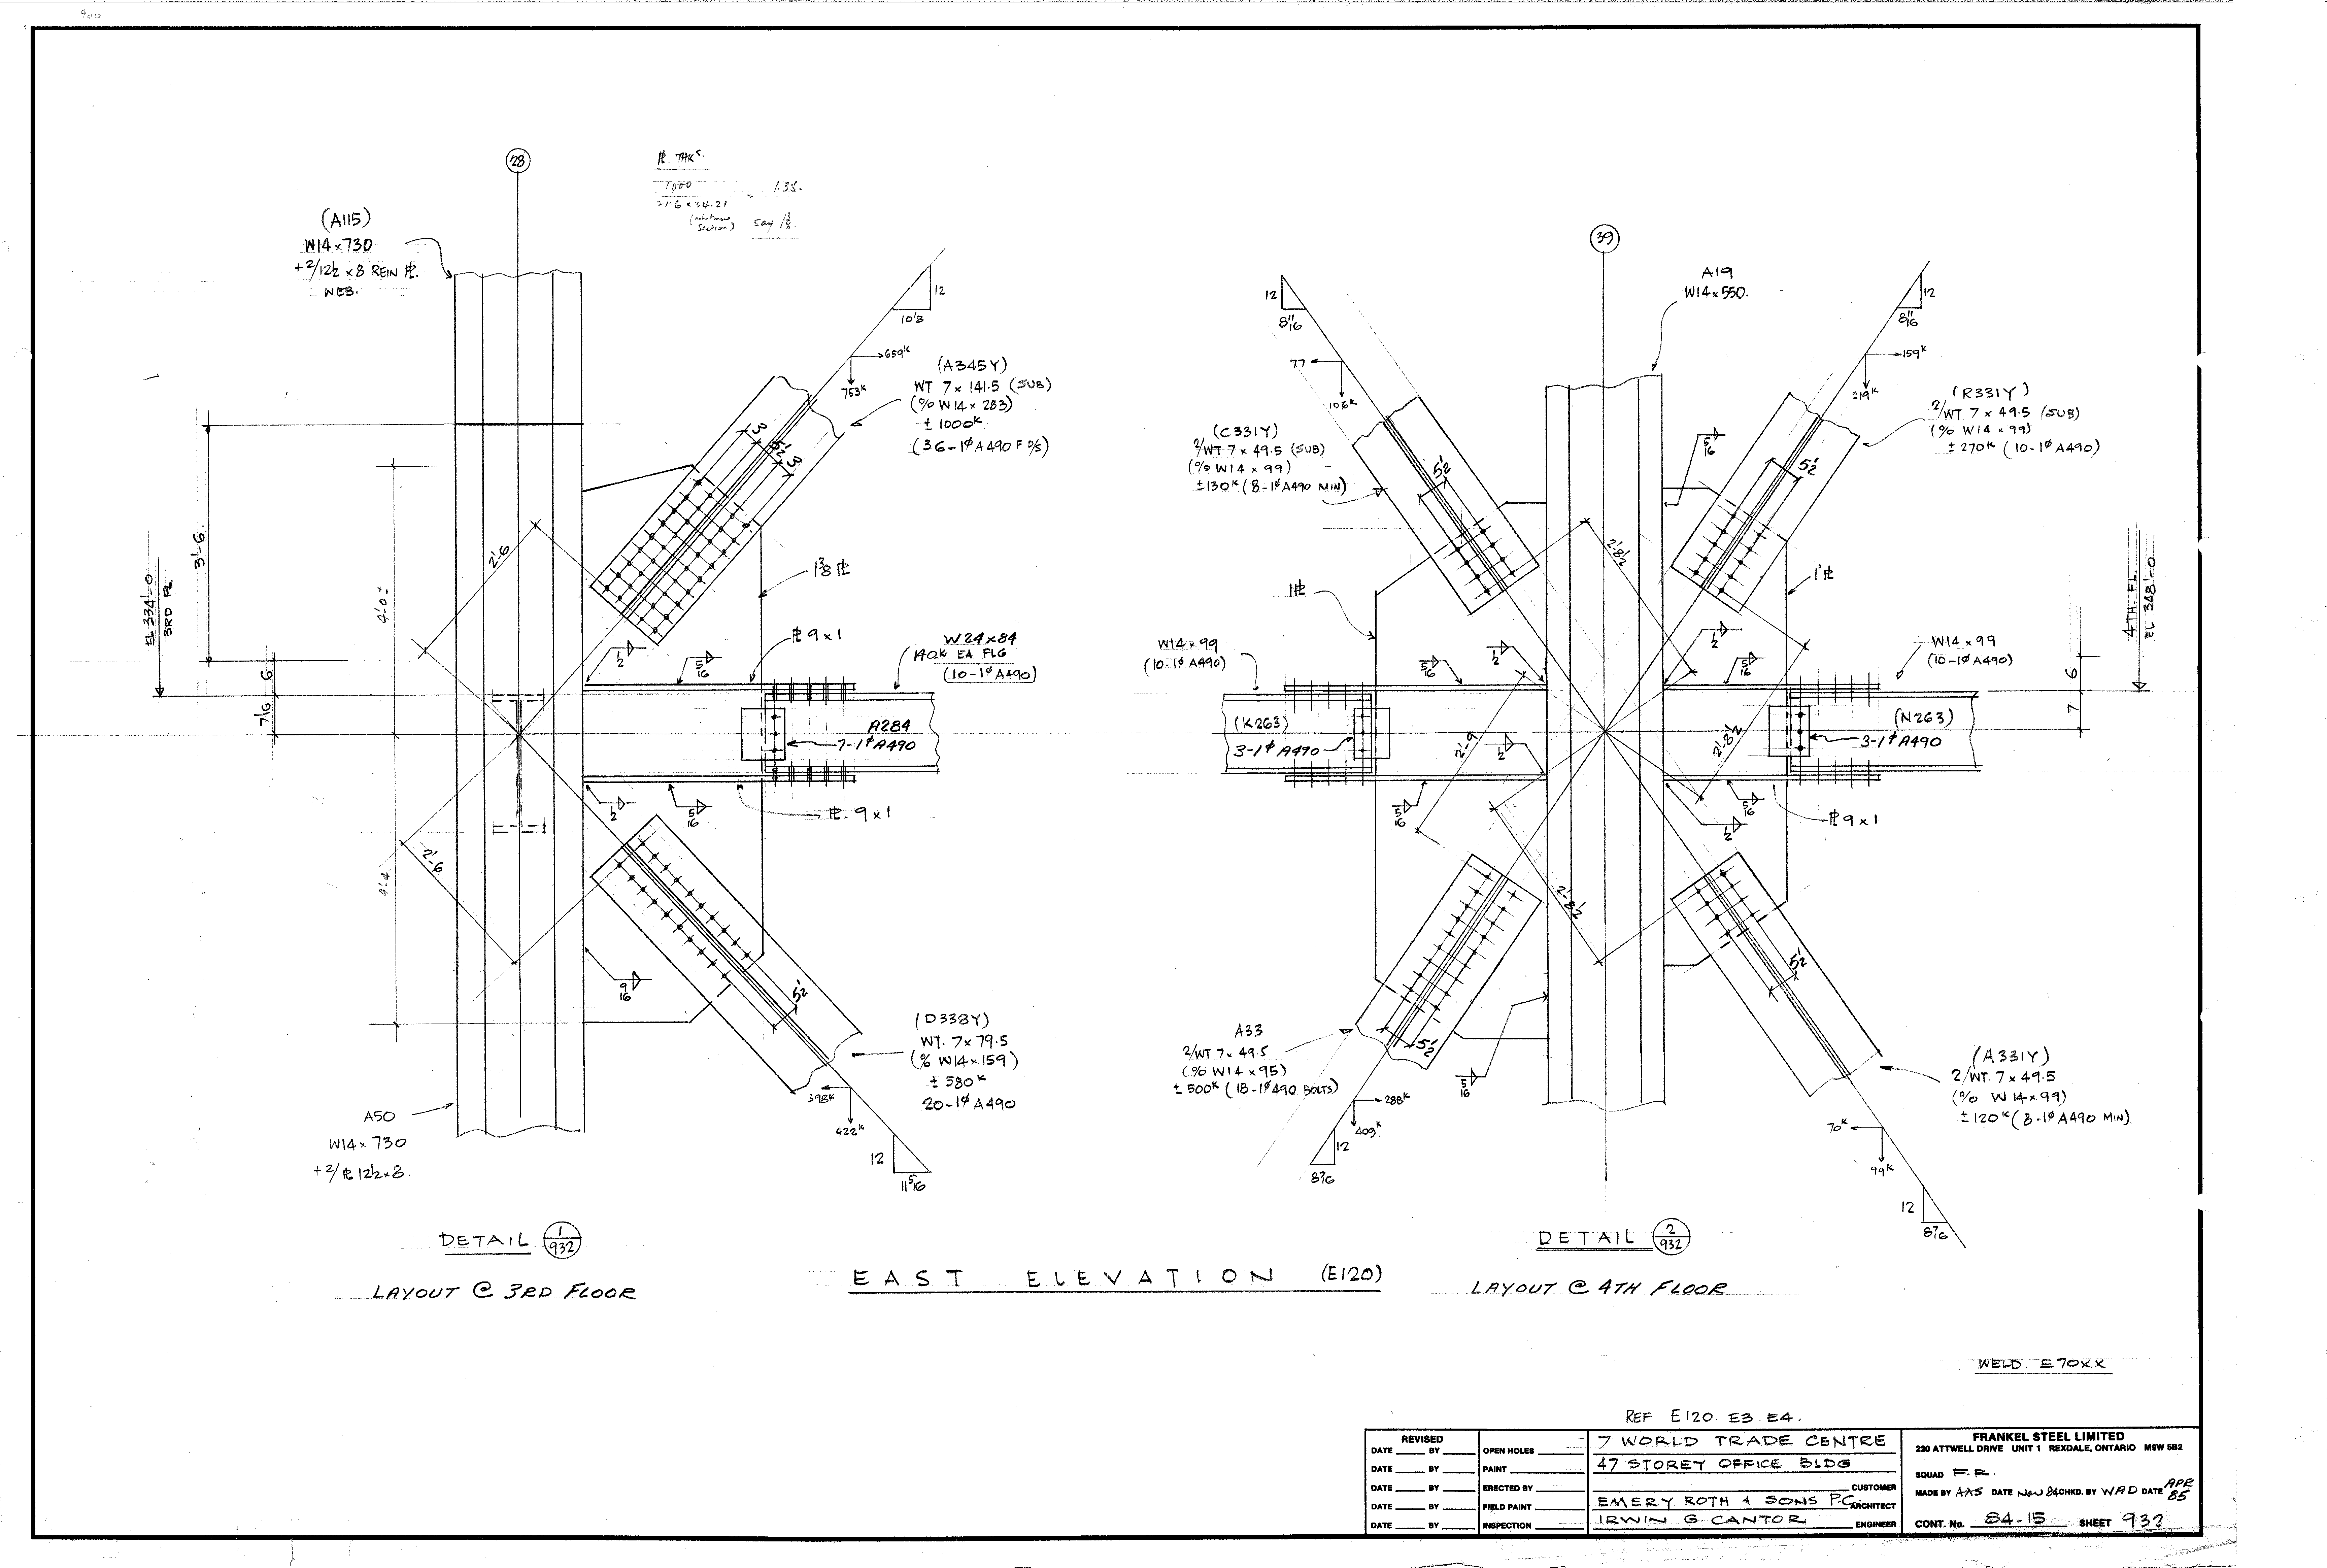
| 0932.png | 297.8 KB | 0932 | EAST ELEVATION (E120) - LAYOUTS @ 3RD & 4TH FLOOR | https://911warroom.com/model/files/WTC7/DRAWINGS/STRUCTURAL/DETAILS-PNG/0932.png |
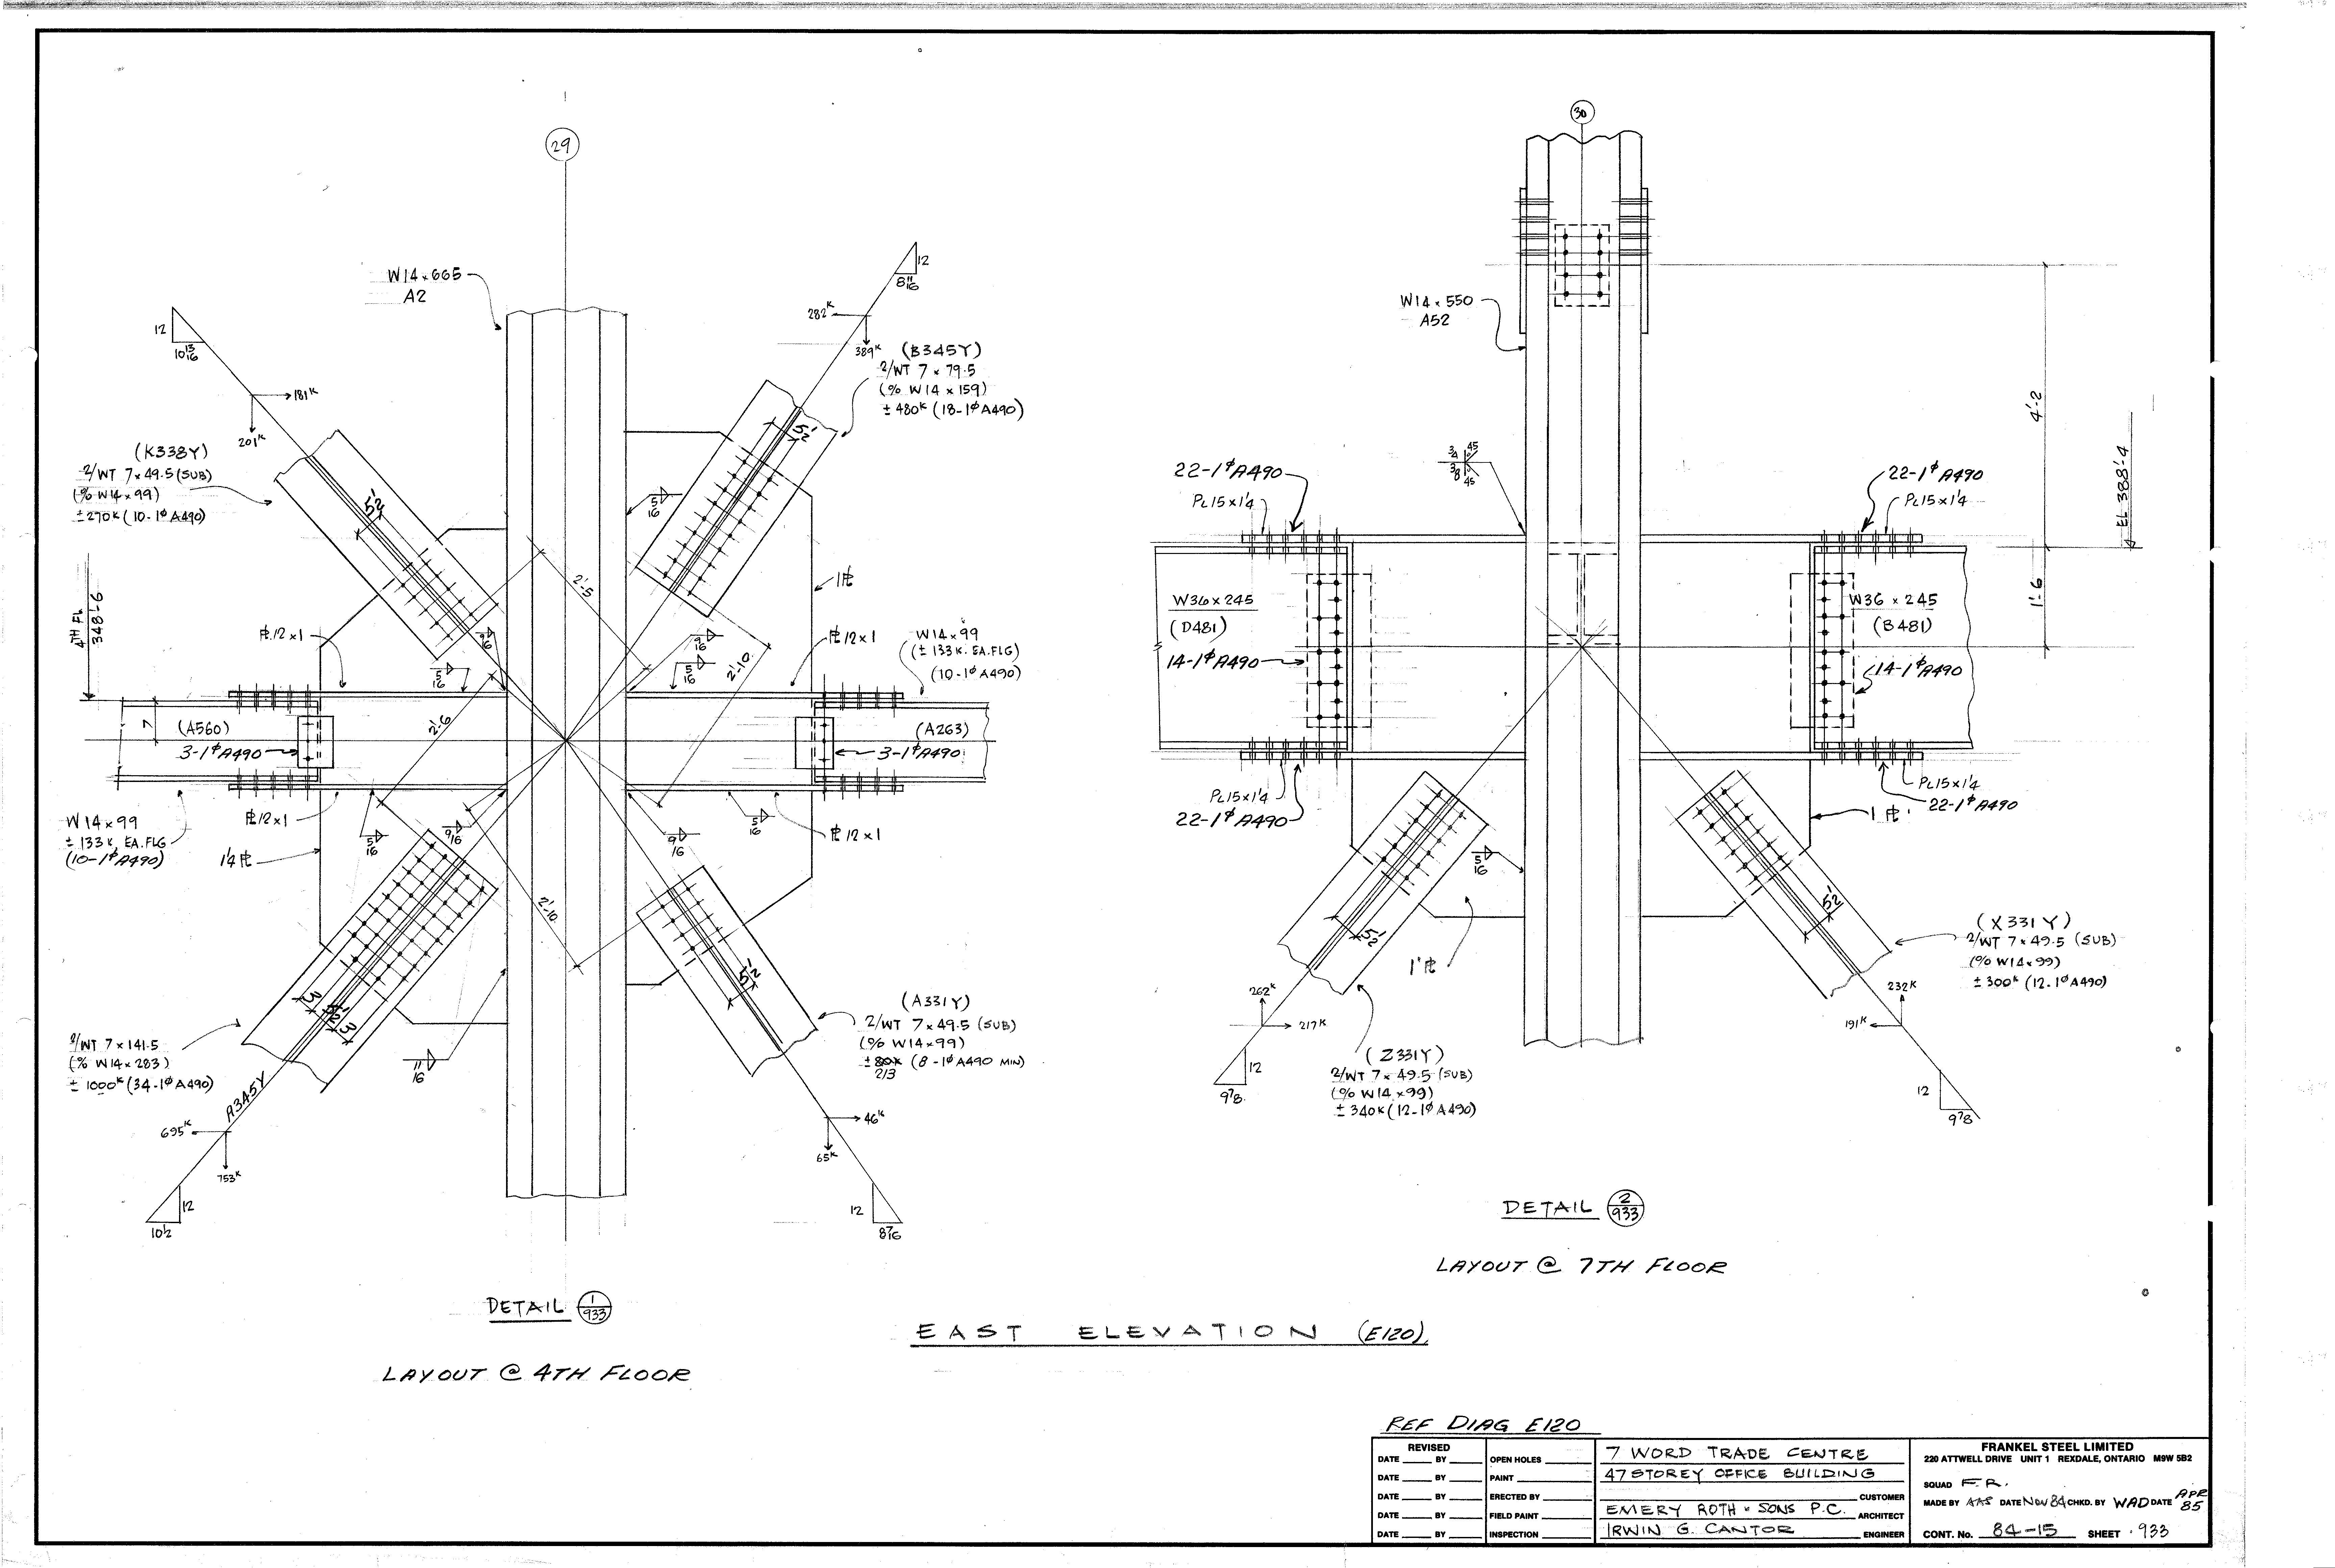
| 0933.png | 319.7 KB | 0933 | EAST ELEVATION (E120) - LAYOUTS @ 4TH & 7TH FLOOR | https://911warroom.com/model/files/WTC7/DRAWINGS/STRUCTURAL/DETAILS-PNG/0933.png |
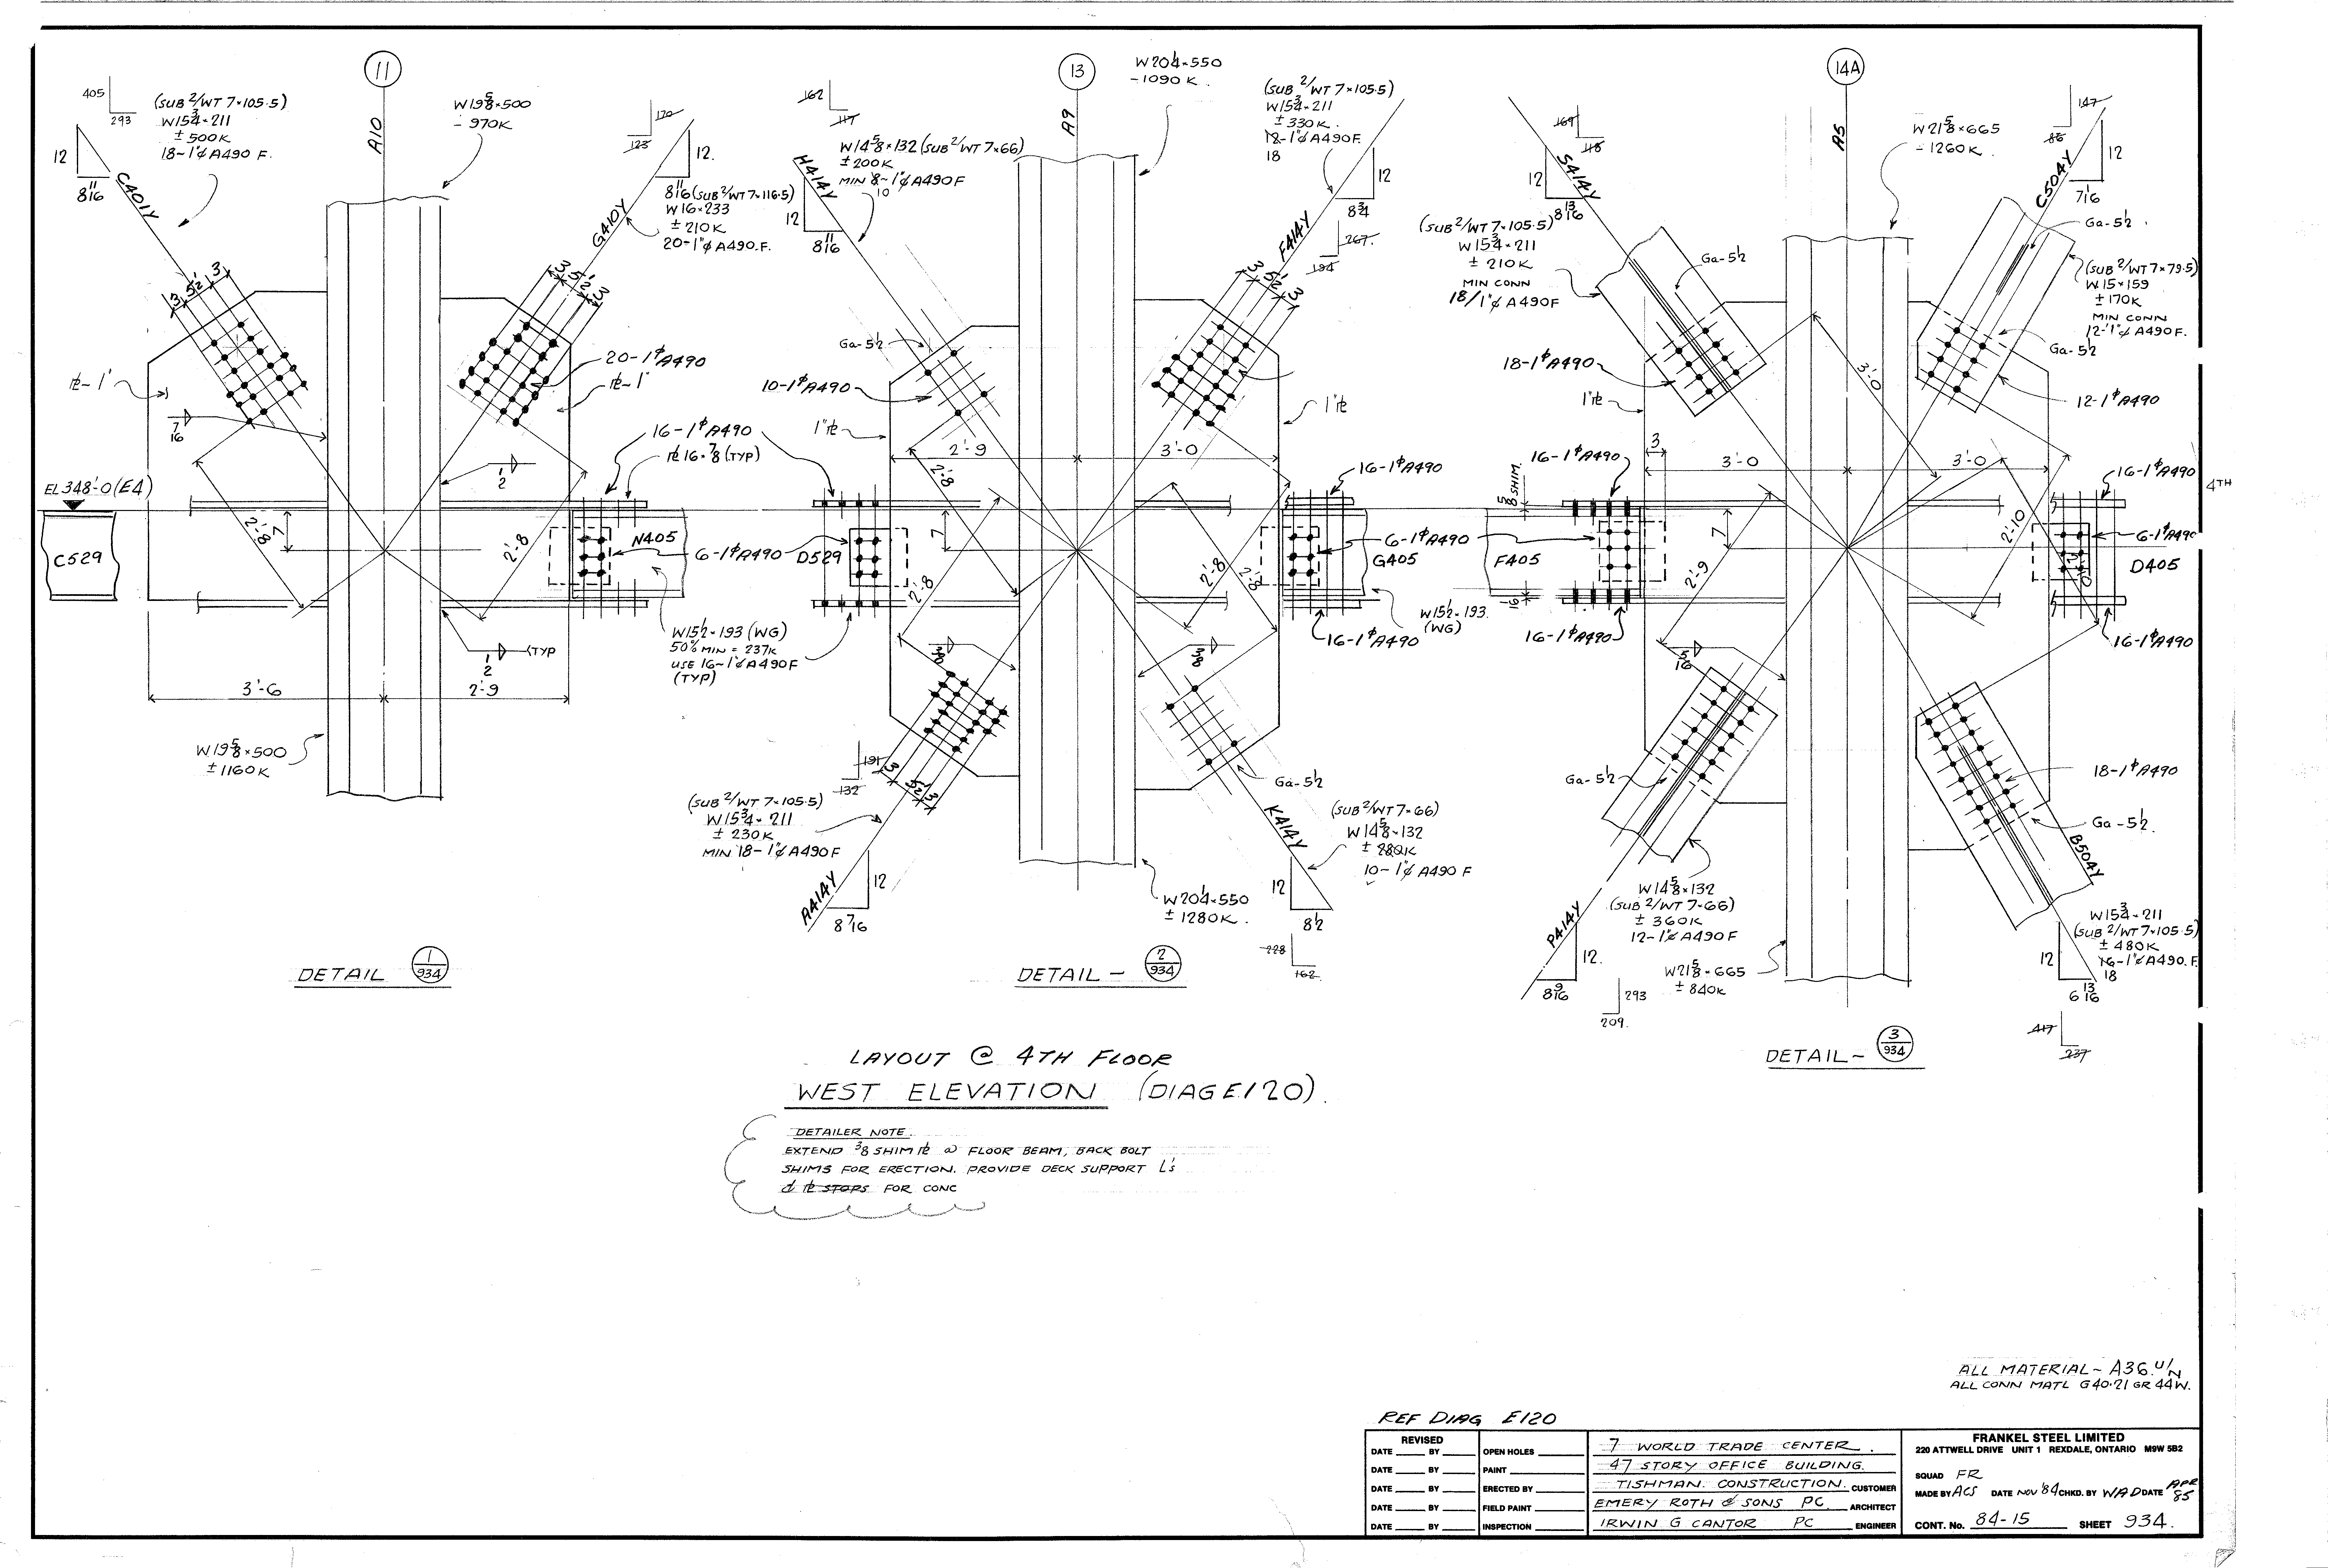
| 0934.png | 367.5 KB | 0934 | WEST ELEVATION (DIAG E120) - LAYOUT @ 4TH FLOOR | https://911warroom.com/model/files/WTC7/DRAWINGS/STRUCTURAL/DETAILS-PNG/0934.png |
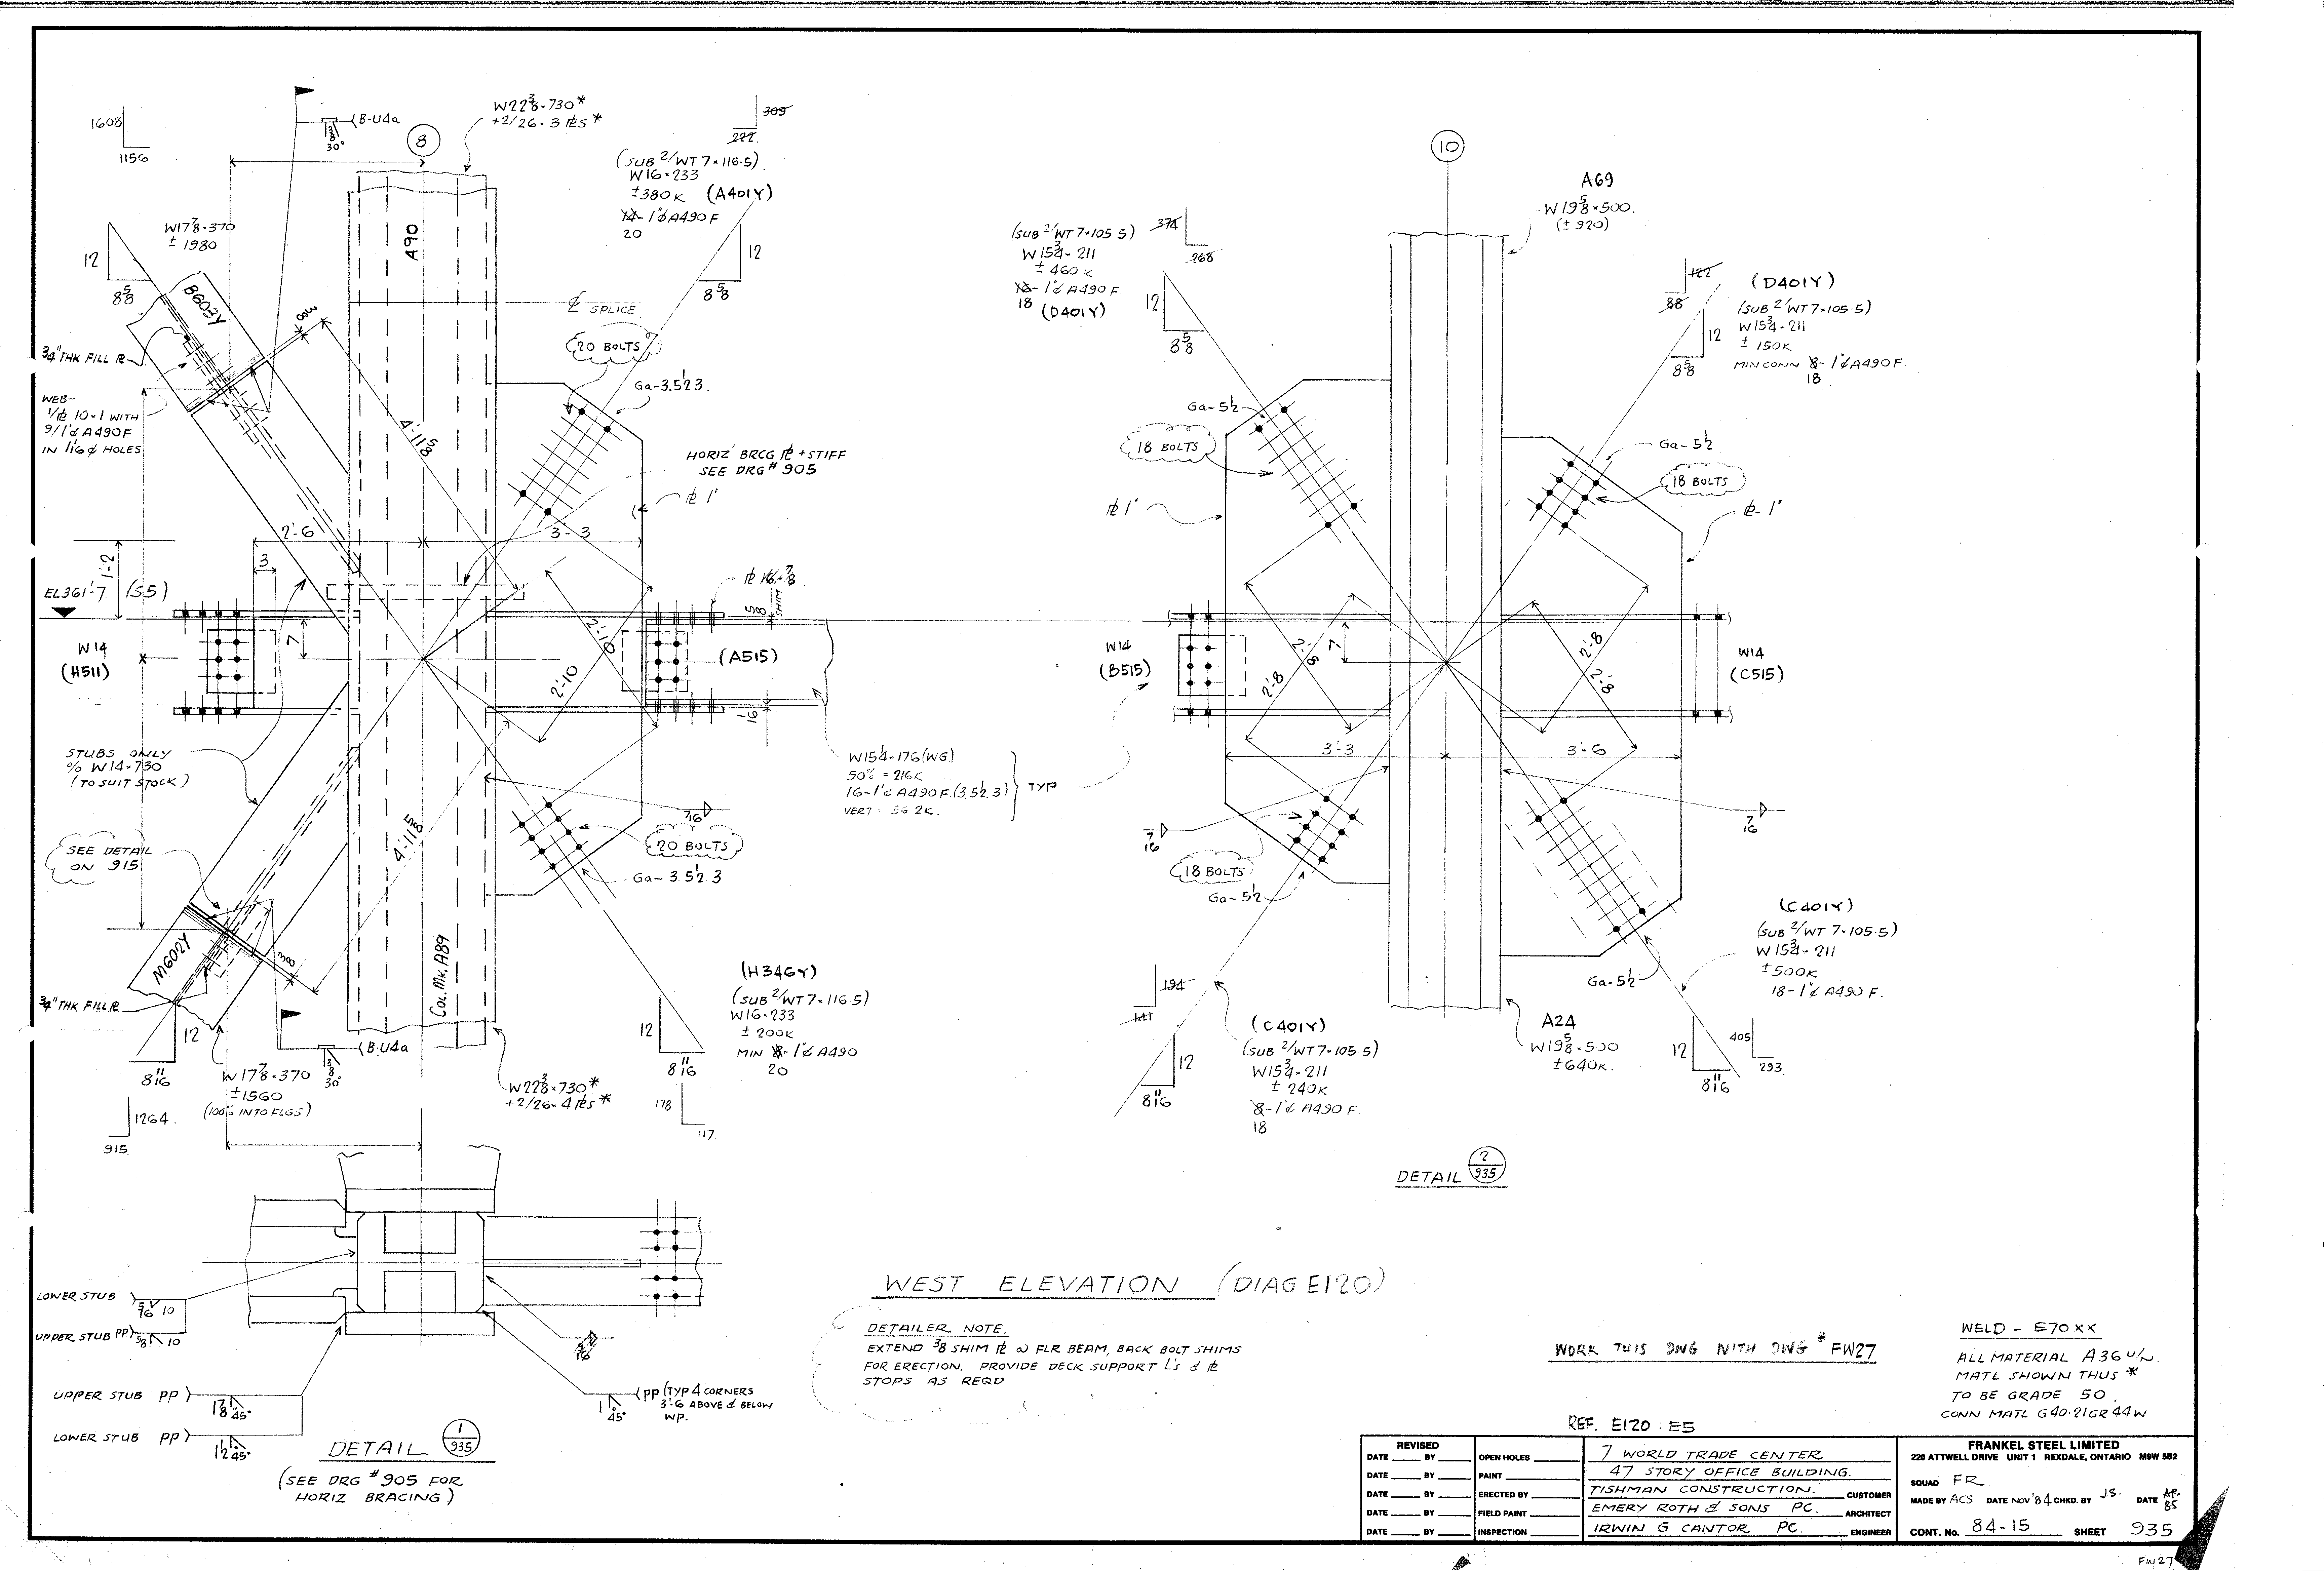
| 0935.png | 339.2 KB | 0935 | WEST ELEVATION (DIAG E120) | https://911warroom.com/model/files/WTC7/DRAWINGS/STRUCTURAL/DETAILS-PNG/0935.png |
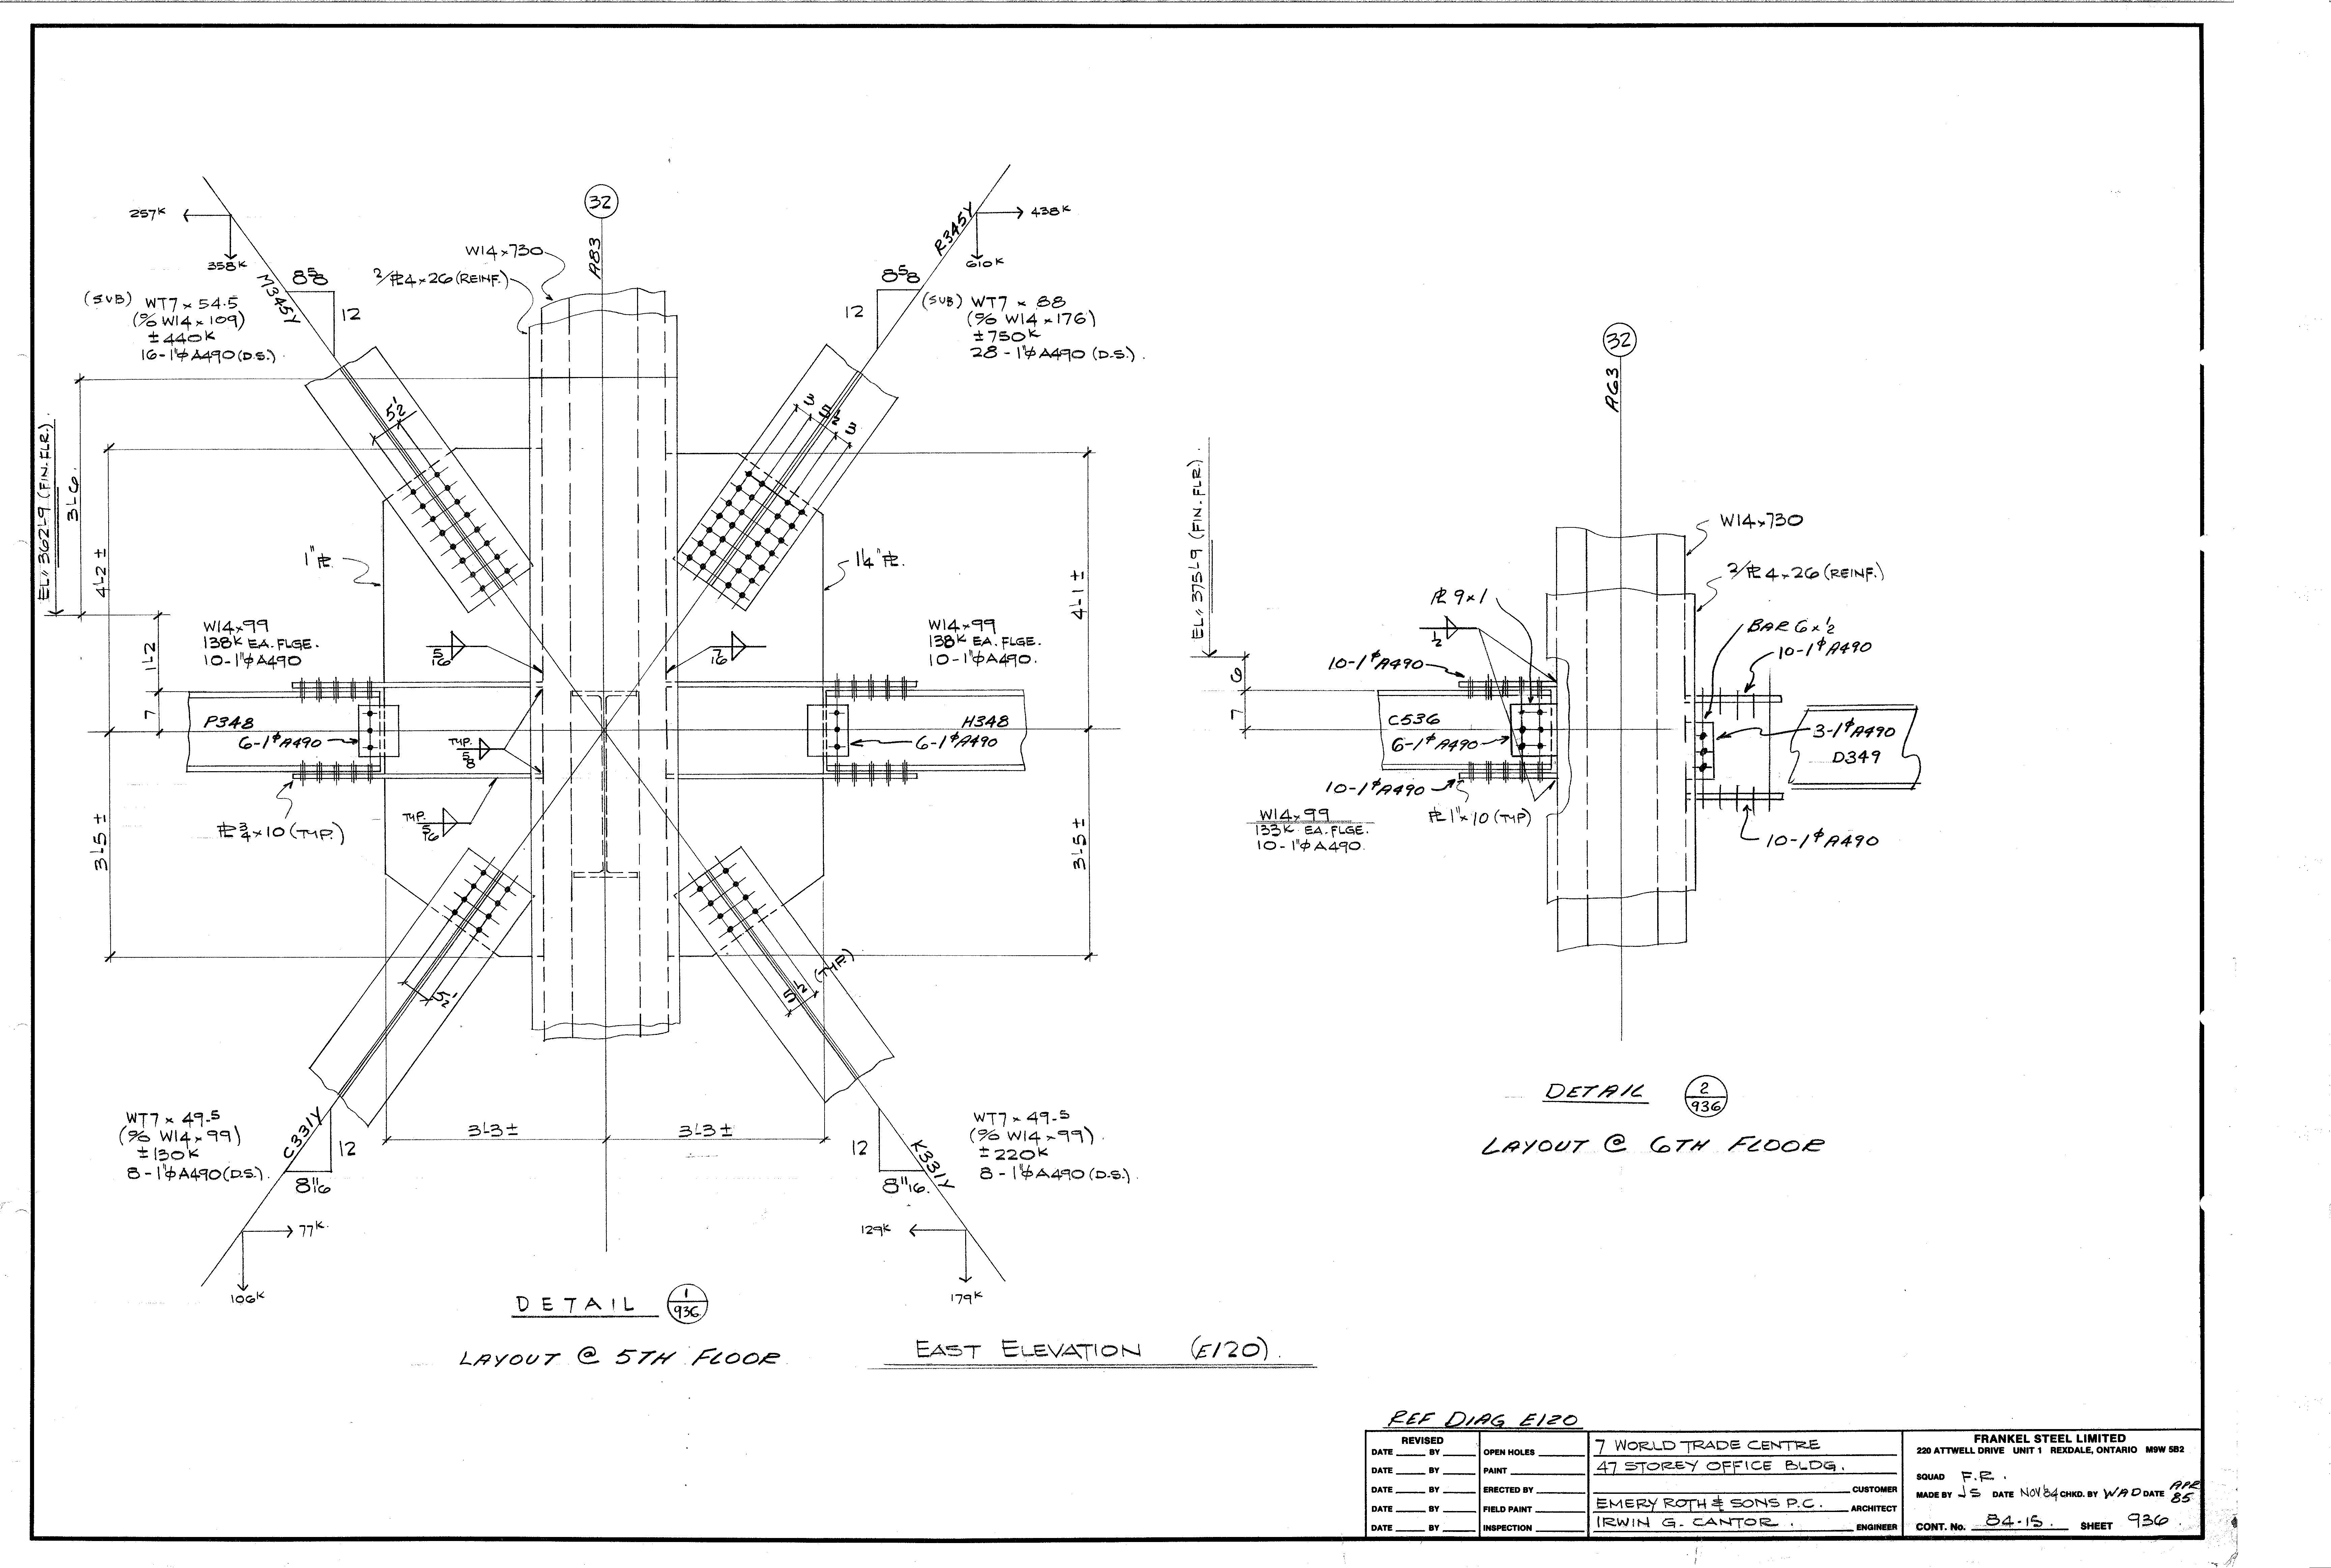
| 0936.png | 250.9 KB | 0936 | EAST ELEVATION (E120) - LAYOUTS @ 5TH & 6TH FLOOR | https://911warroom.com/model/files/WTC7/DRAWINGS/STRUCTURAL/DETAILS-PNG/0936.png |
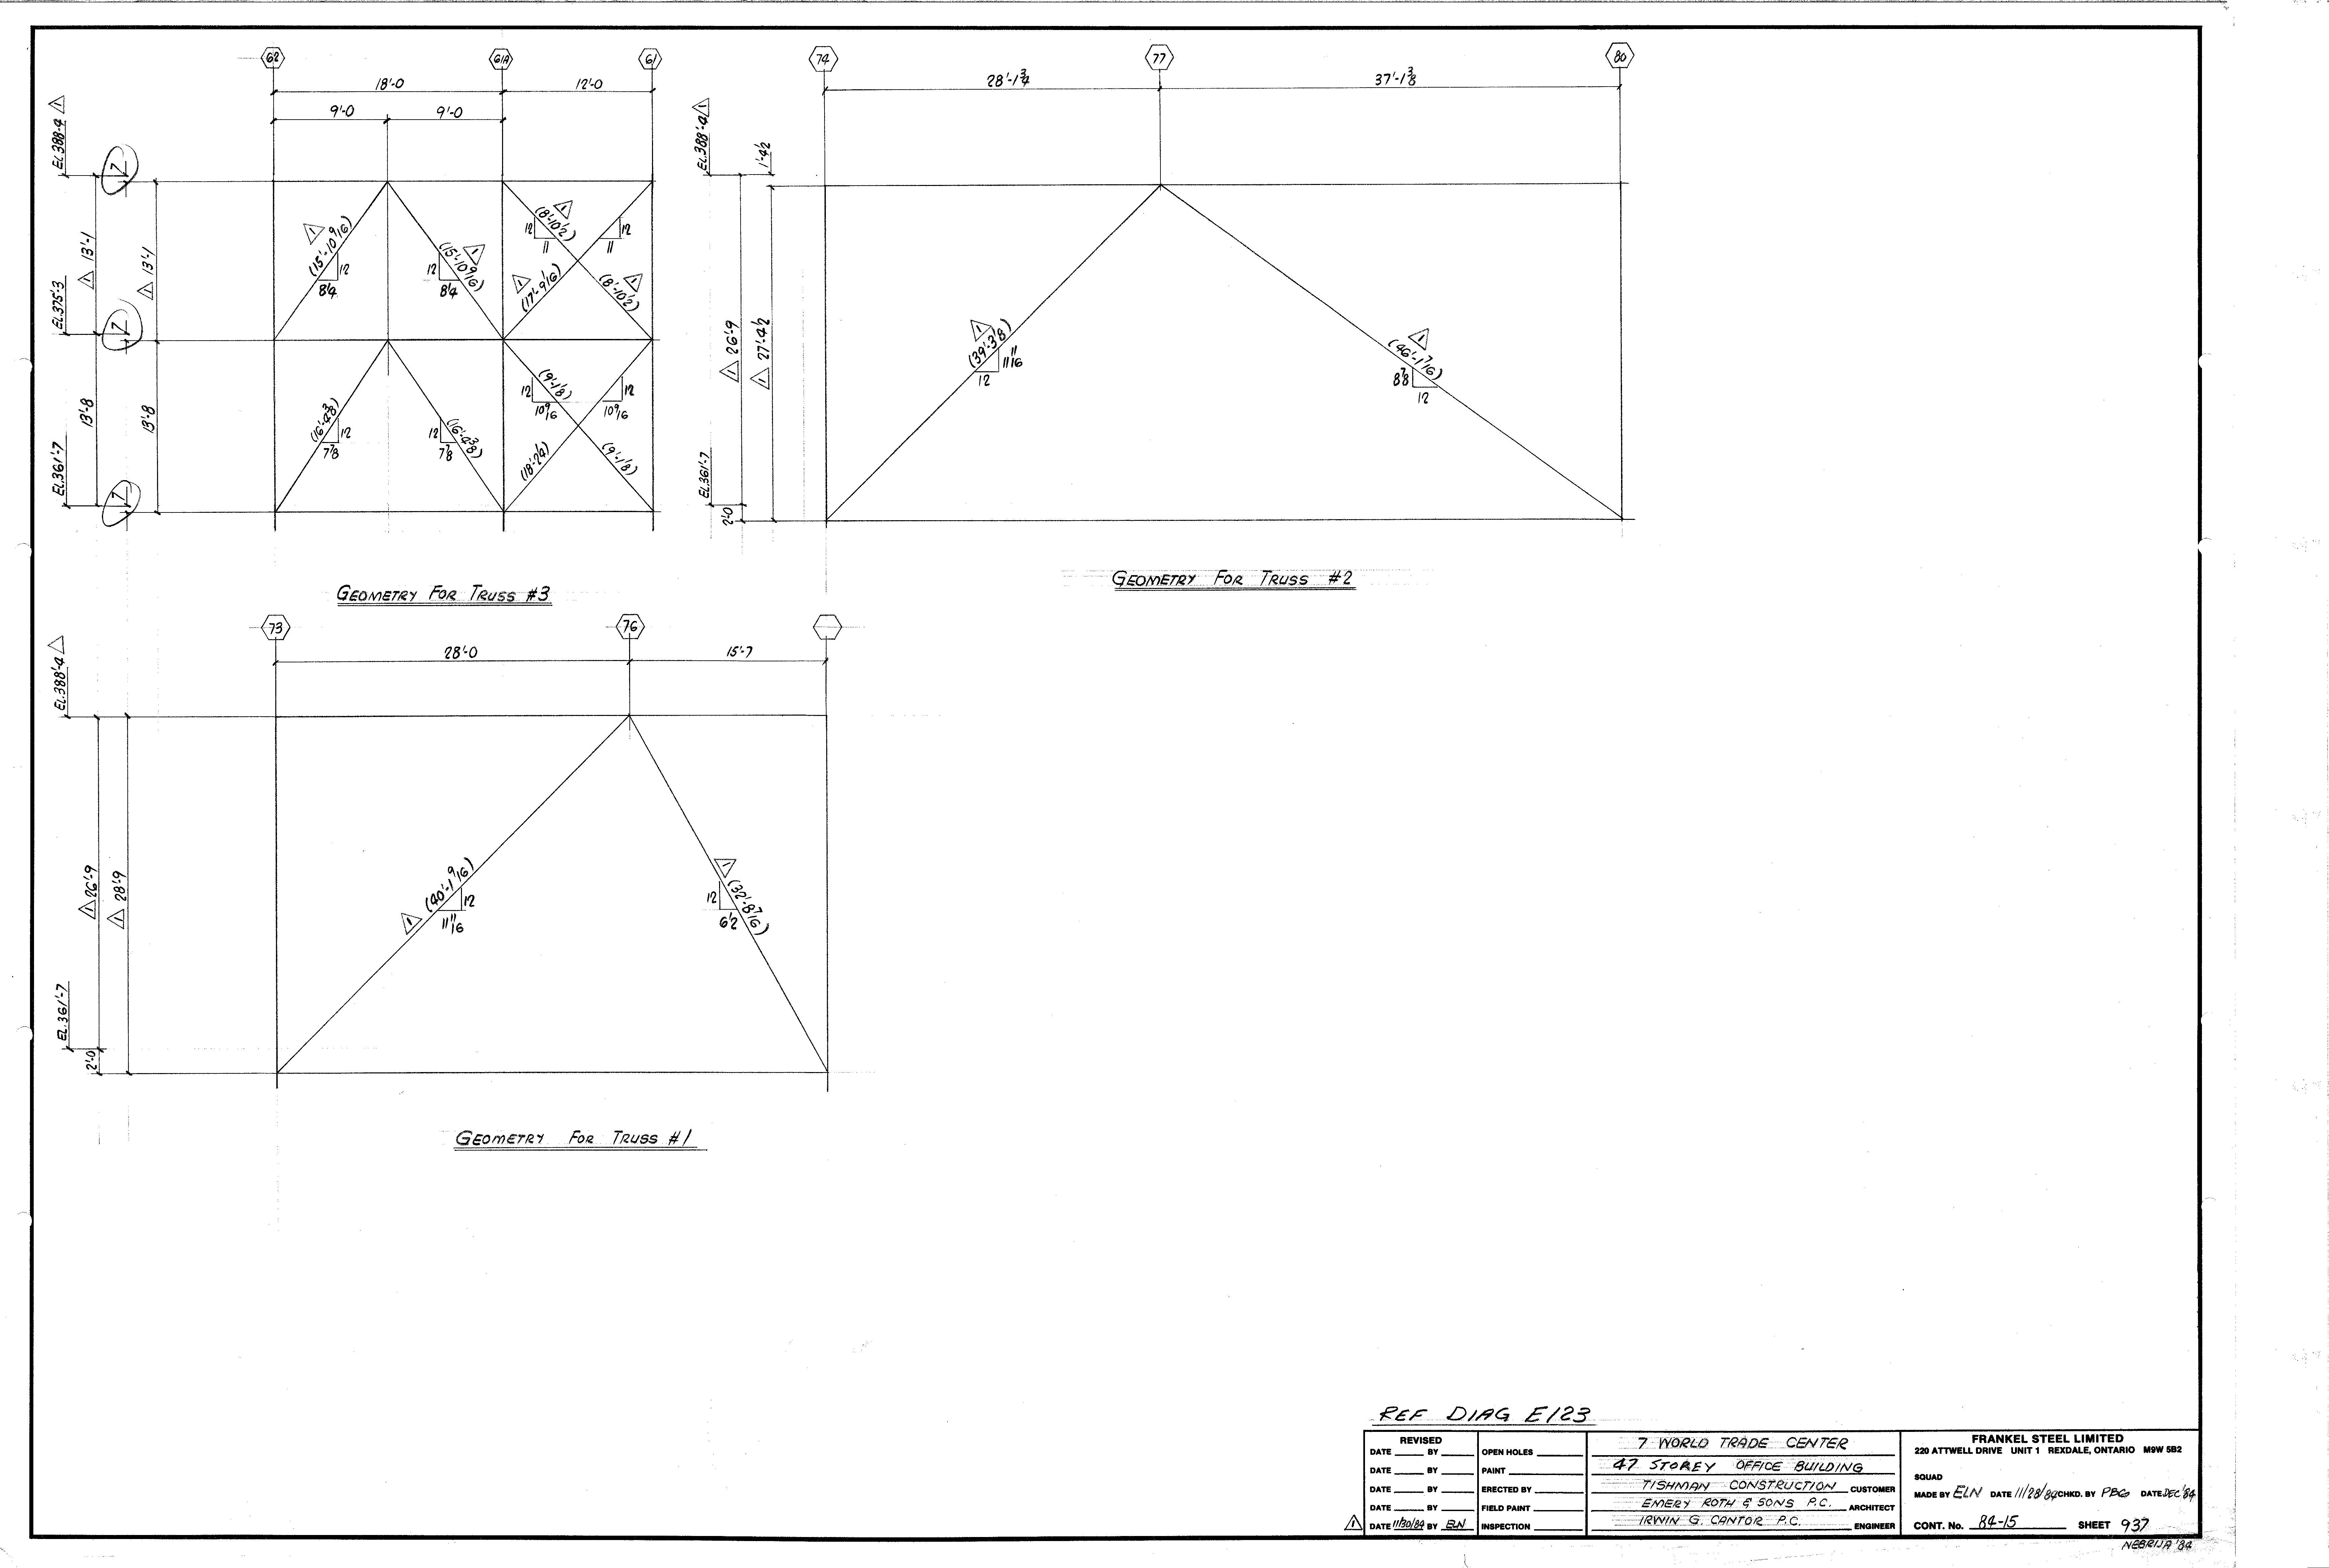
| 0937.png | 156.6 KB | 0937 | GEOMETRY FOR TRUSS #1, #2 & #3 | https://911warroom.com/model/files/WTC7/DRAWINGS/STRUCTURAL/DETAILS-PNG/0937.png |
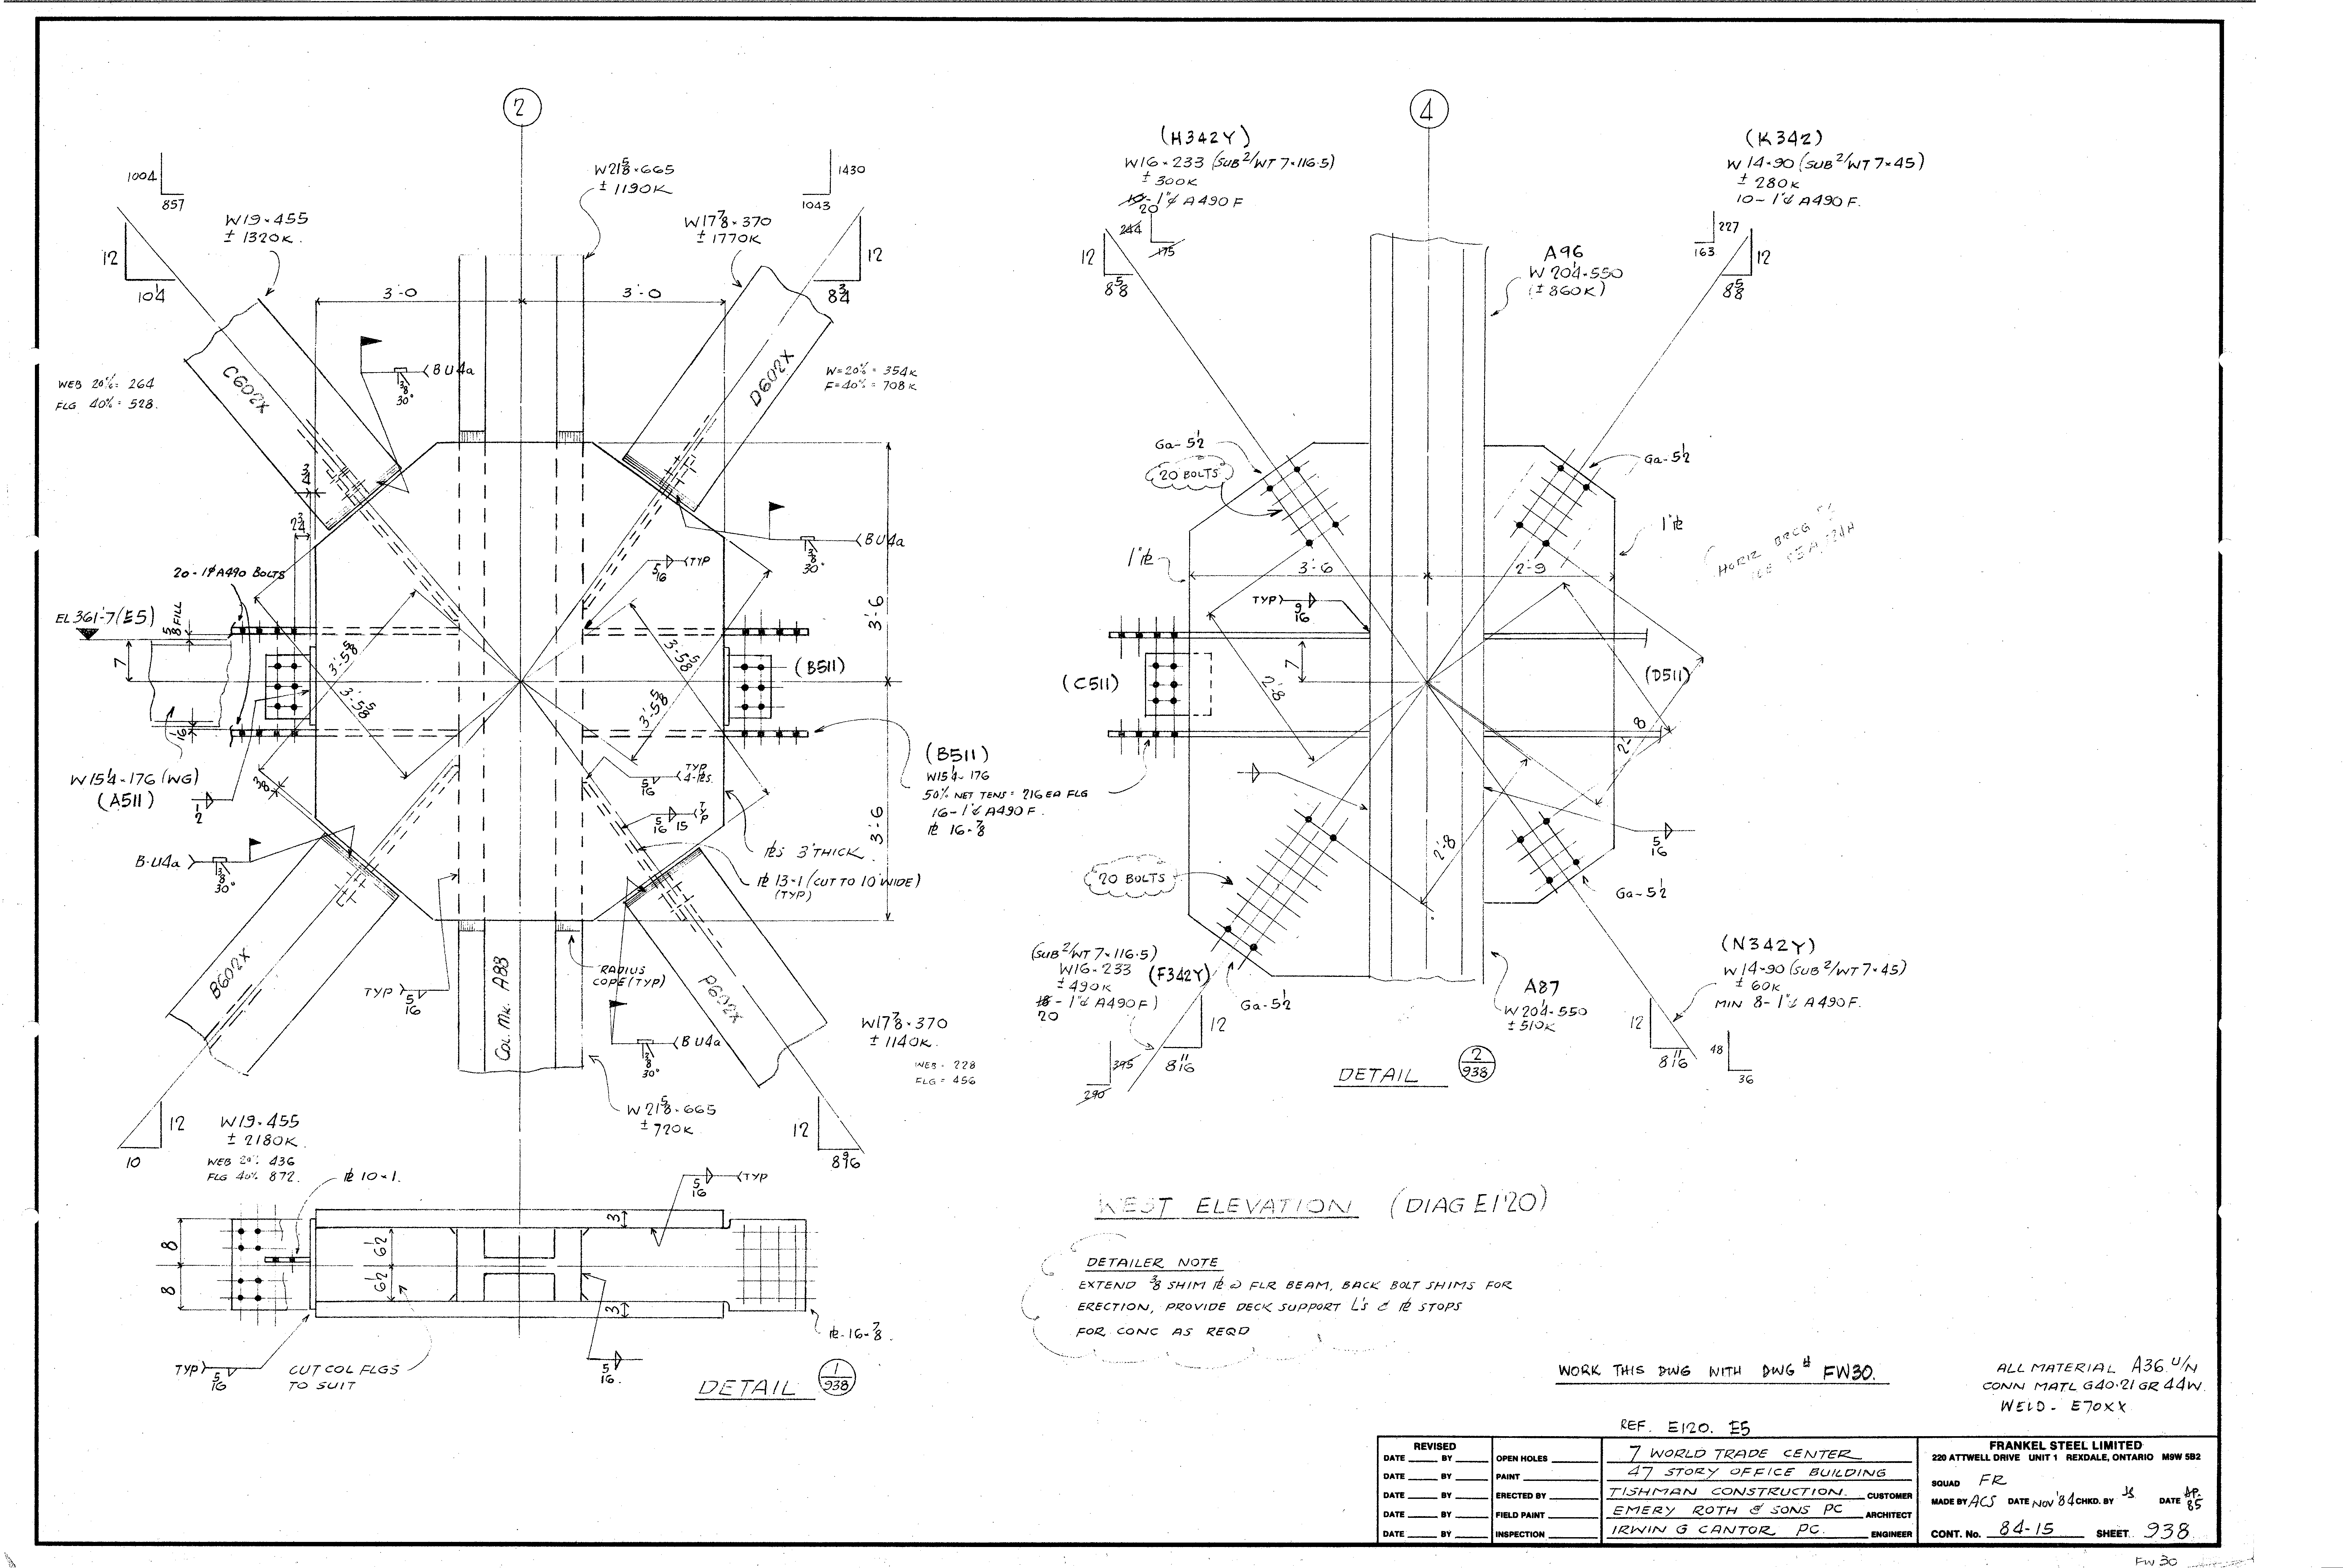
| 0938.png | 321.1 KB | 0938 | WEST ELEVATION (DIAG E120) | https://911warroom.com/model/files/WTC7/DRAWINGS/STRUCTURAL/DETAILS-PNG/0938.png |
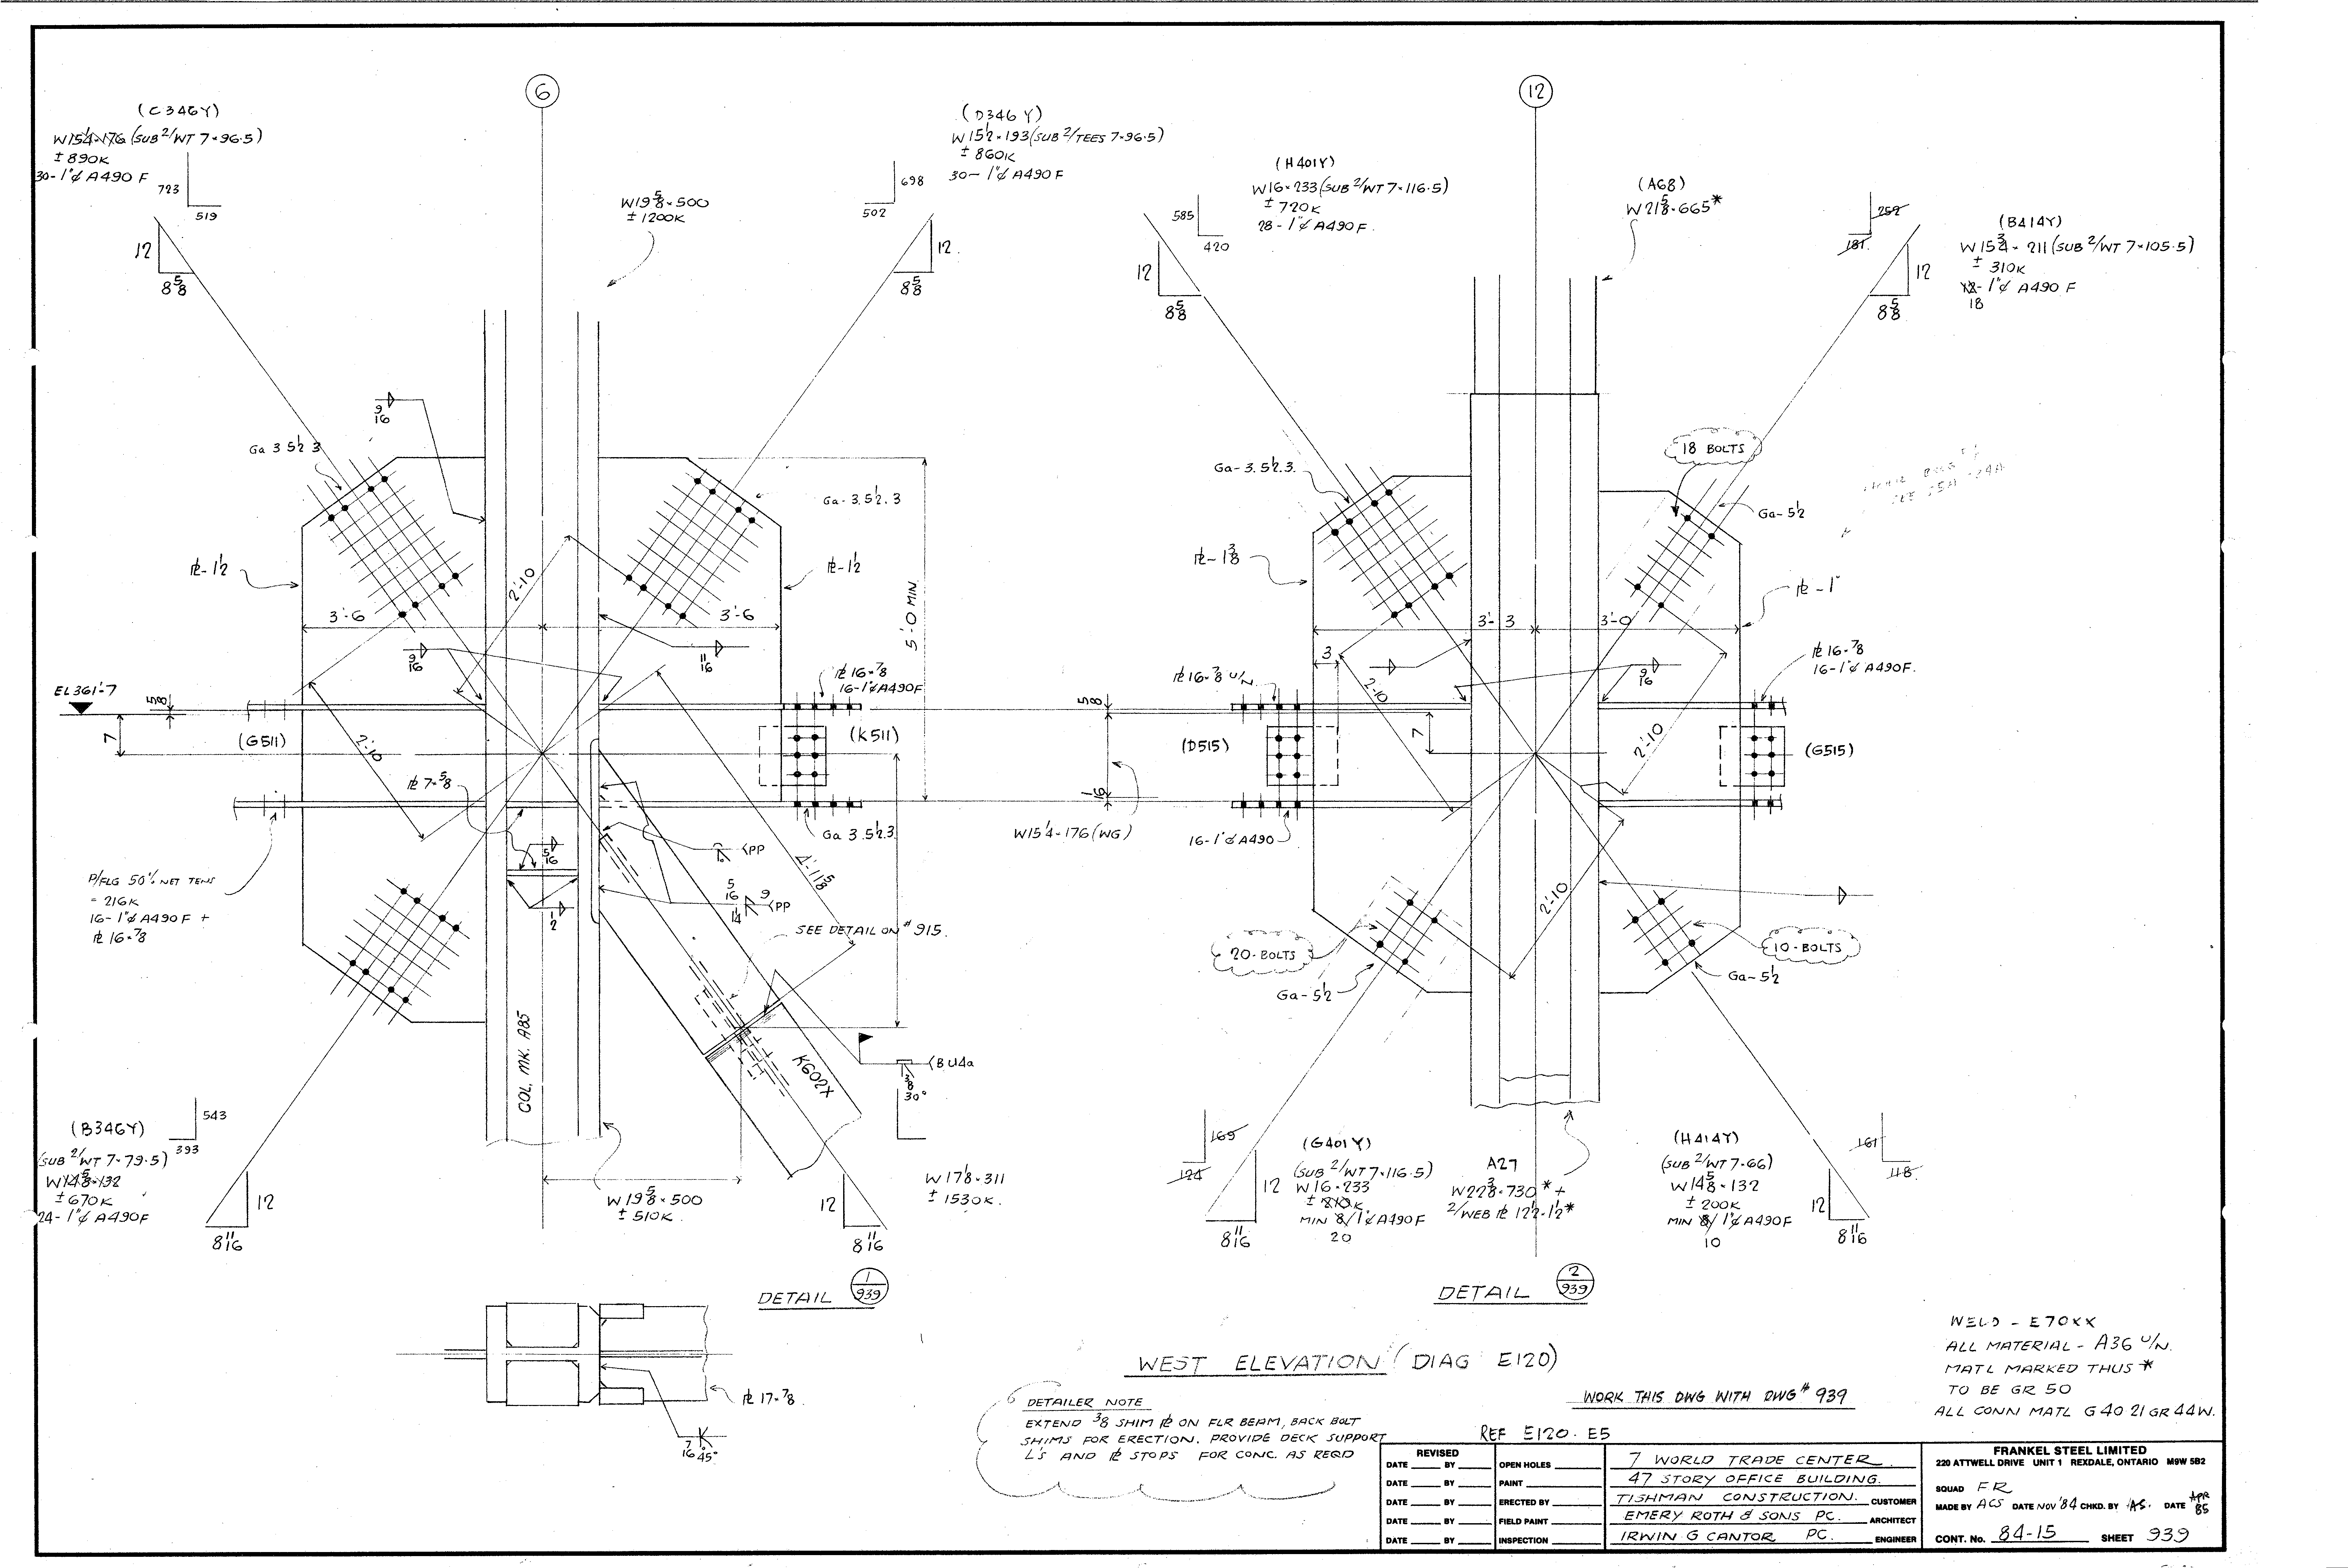
| 0939.png | 317.3 KB | 0939 | WEST ELEVATION (DIAG E120) | https://911warroom.com/model/files/WTC7/DRAWINGS/STRUCTURAL/DETAILS-PNG/0939.png |
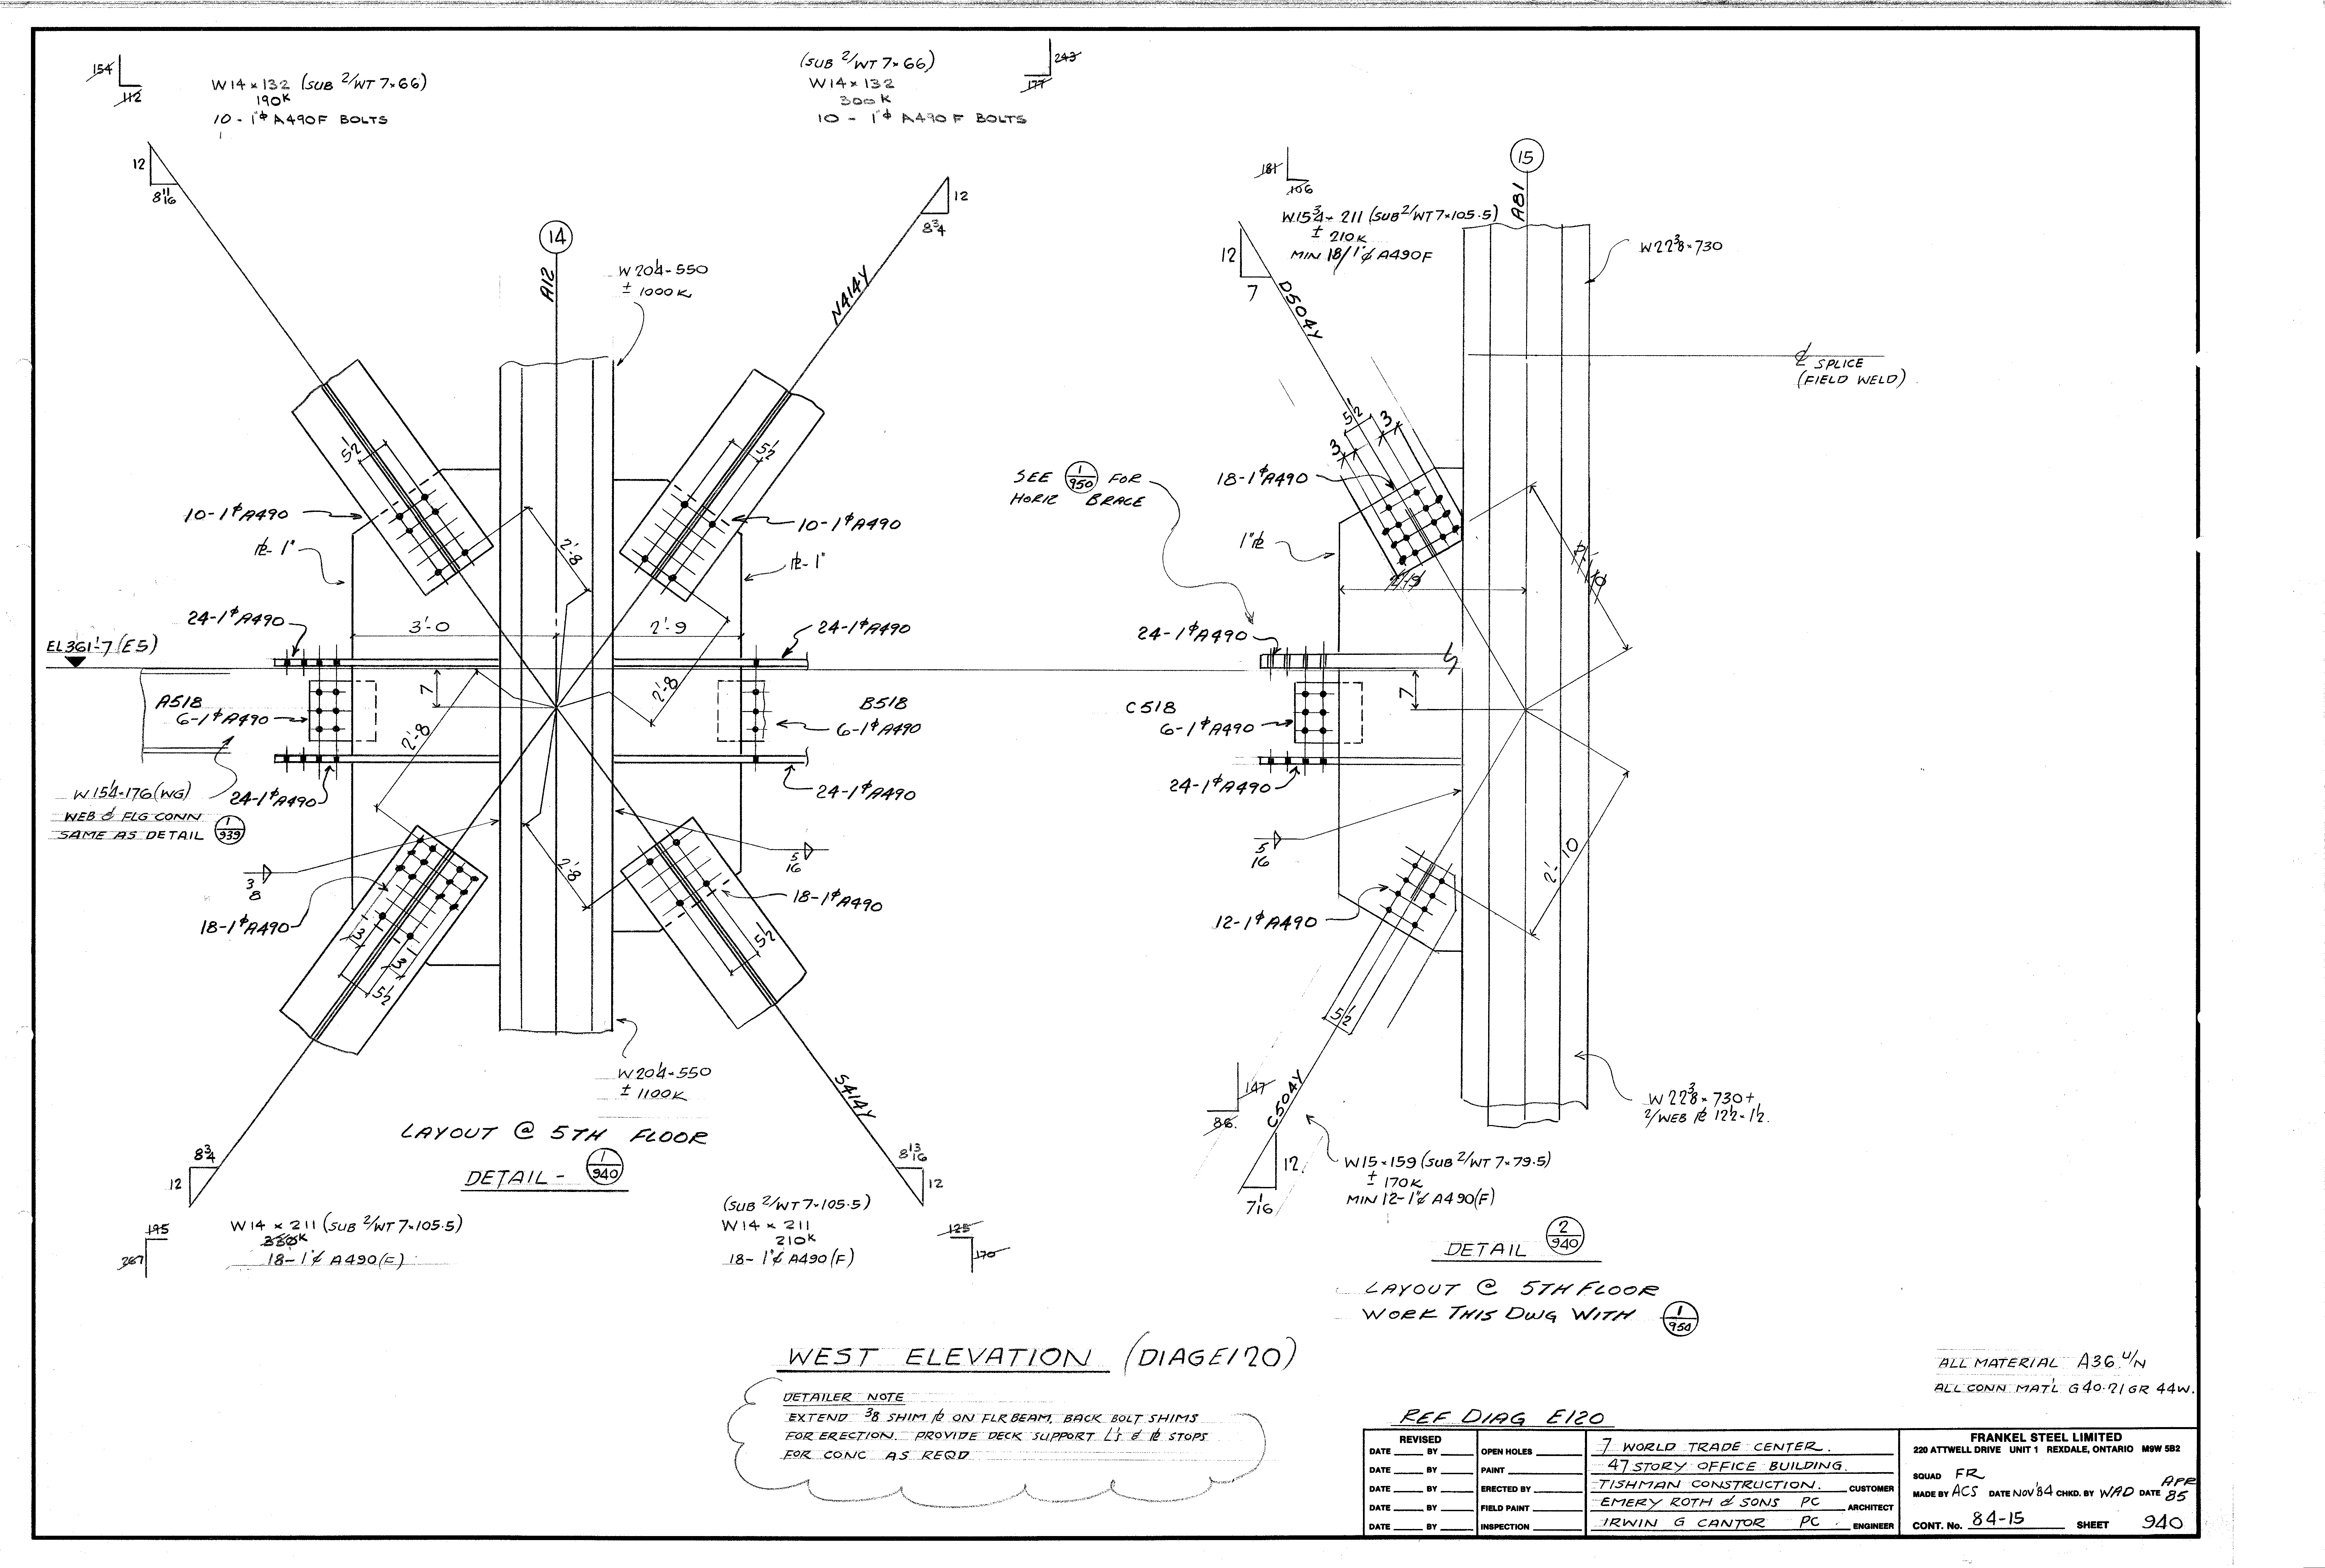
| 0940.png | 300.3 KB | 0940 | WEST ELEVATION (DIAG E120) - LAYOUT @ 5TH FLOOR | https://911warroom.com/model/files/WTC7/DRAWINGS/STRUCTURAL/DETAILS-PNG/0940.png |
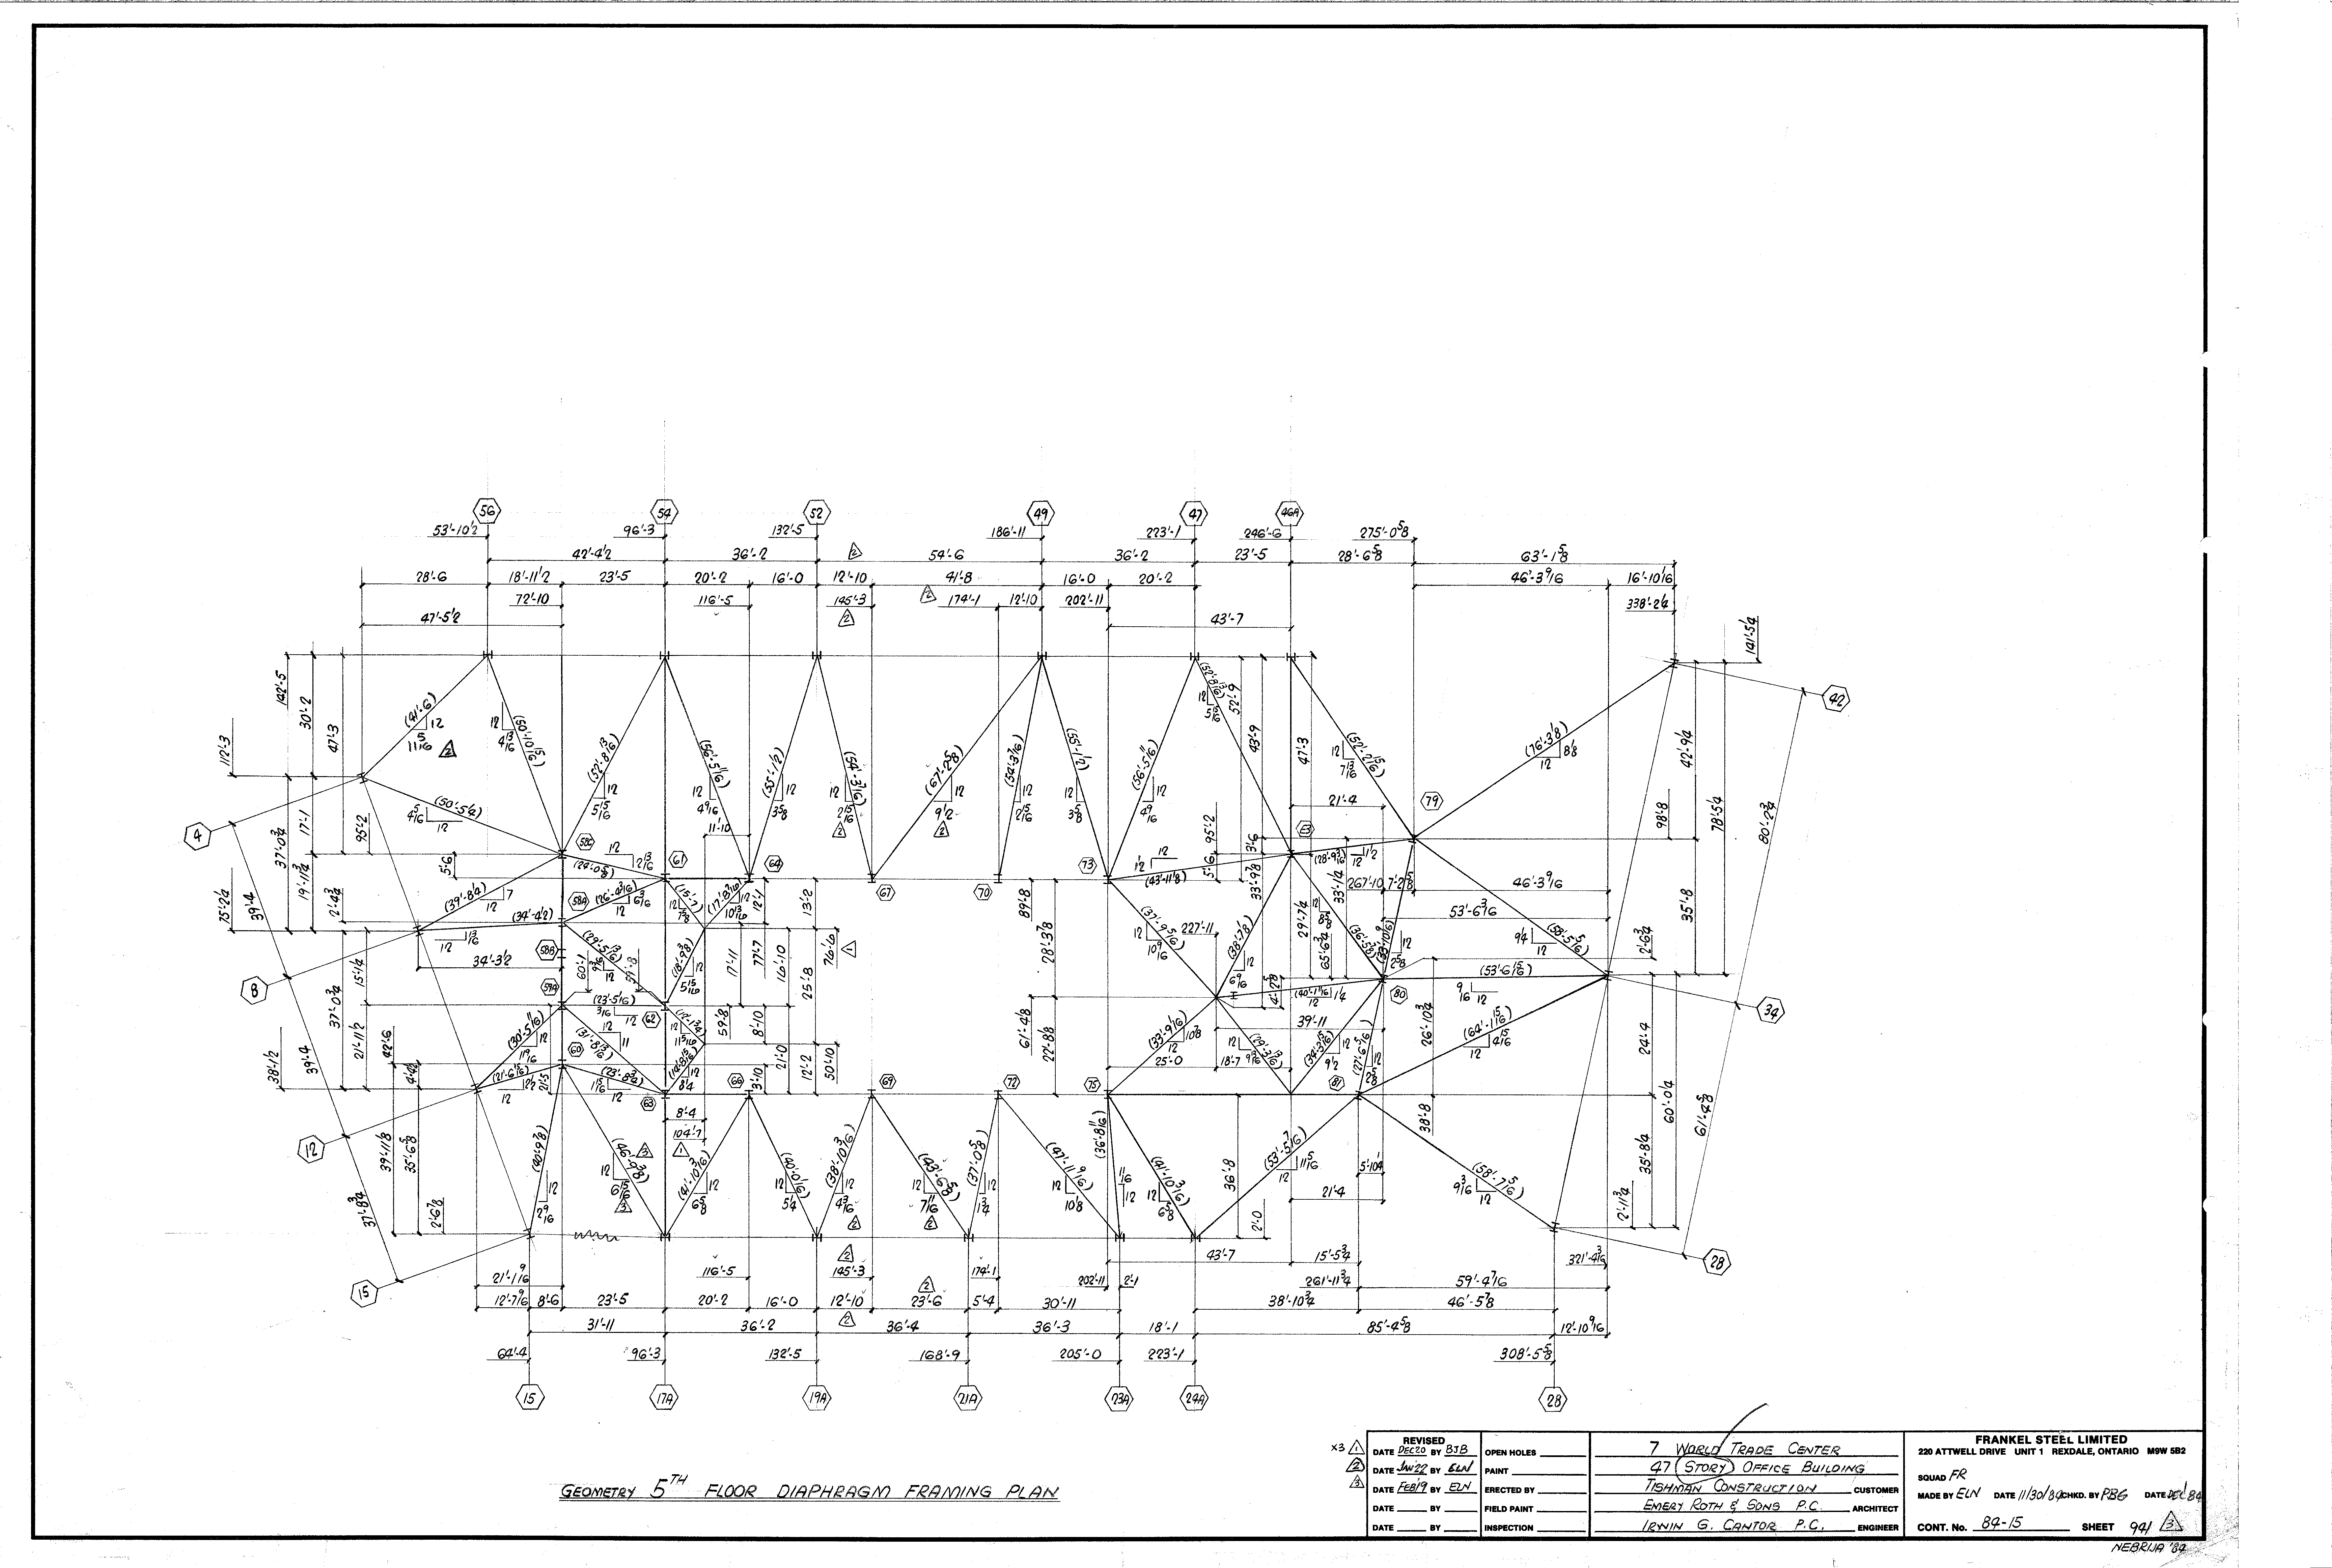
| 0941.png | 320.0 KB | 0941 | GEOMETRY 5TH FLOOR DIAPHRAGM FRAMING PLAN | https://911warroom.com/model/files/WTC7/DRAWINGS/STRUCTURAL/DETAILS-PNG/0941.png |
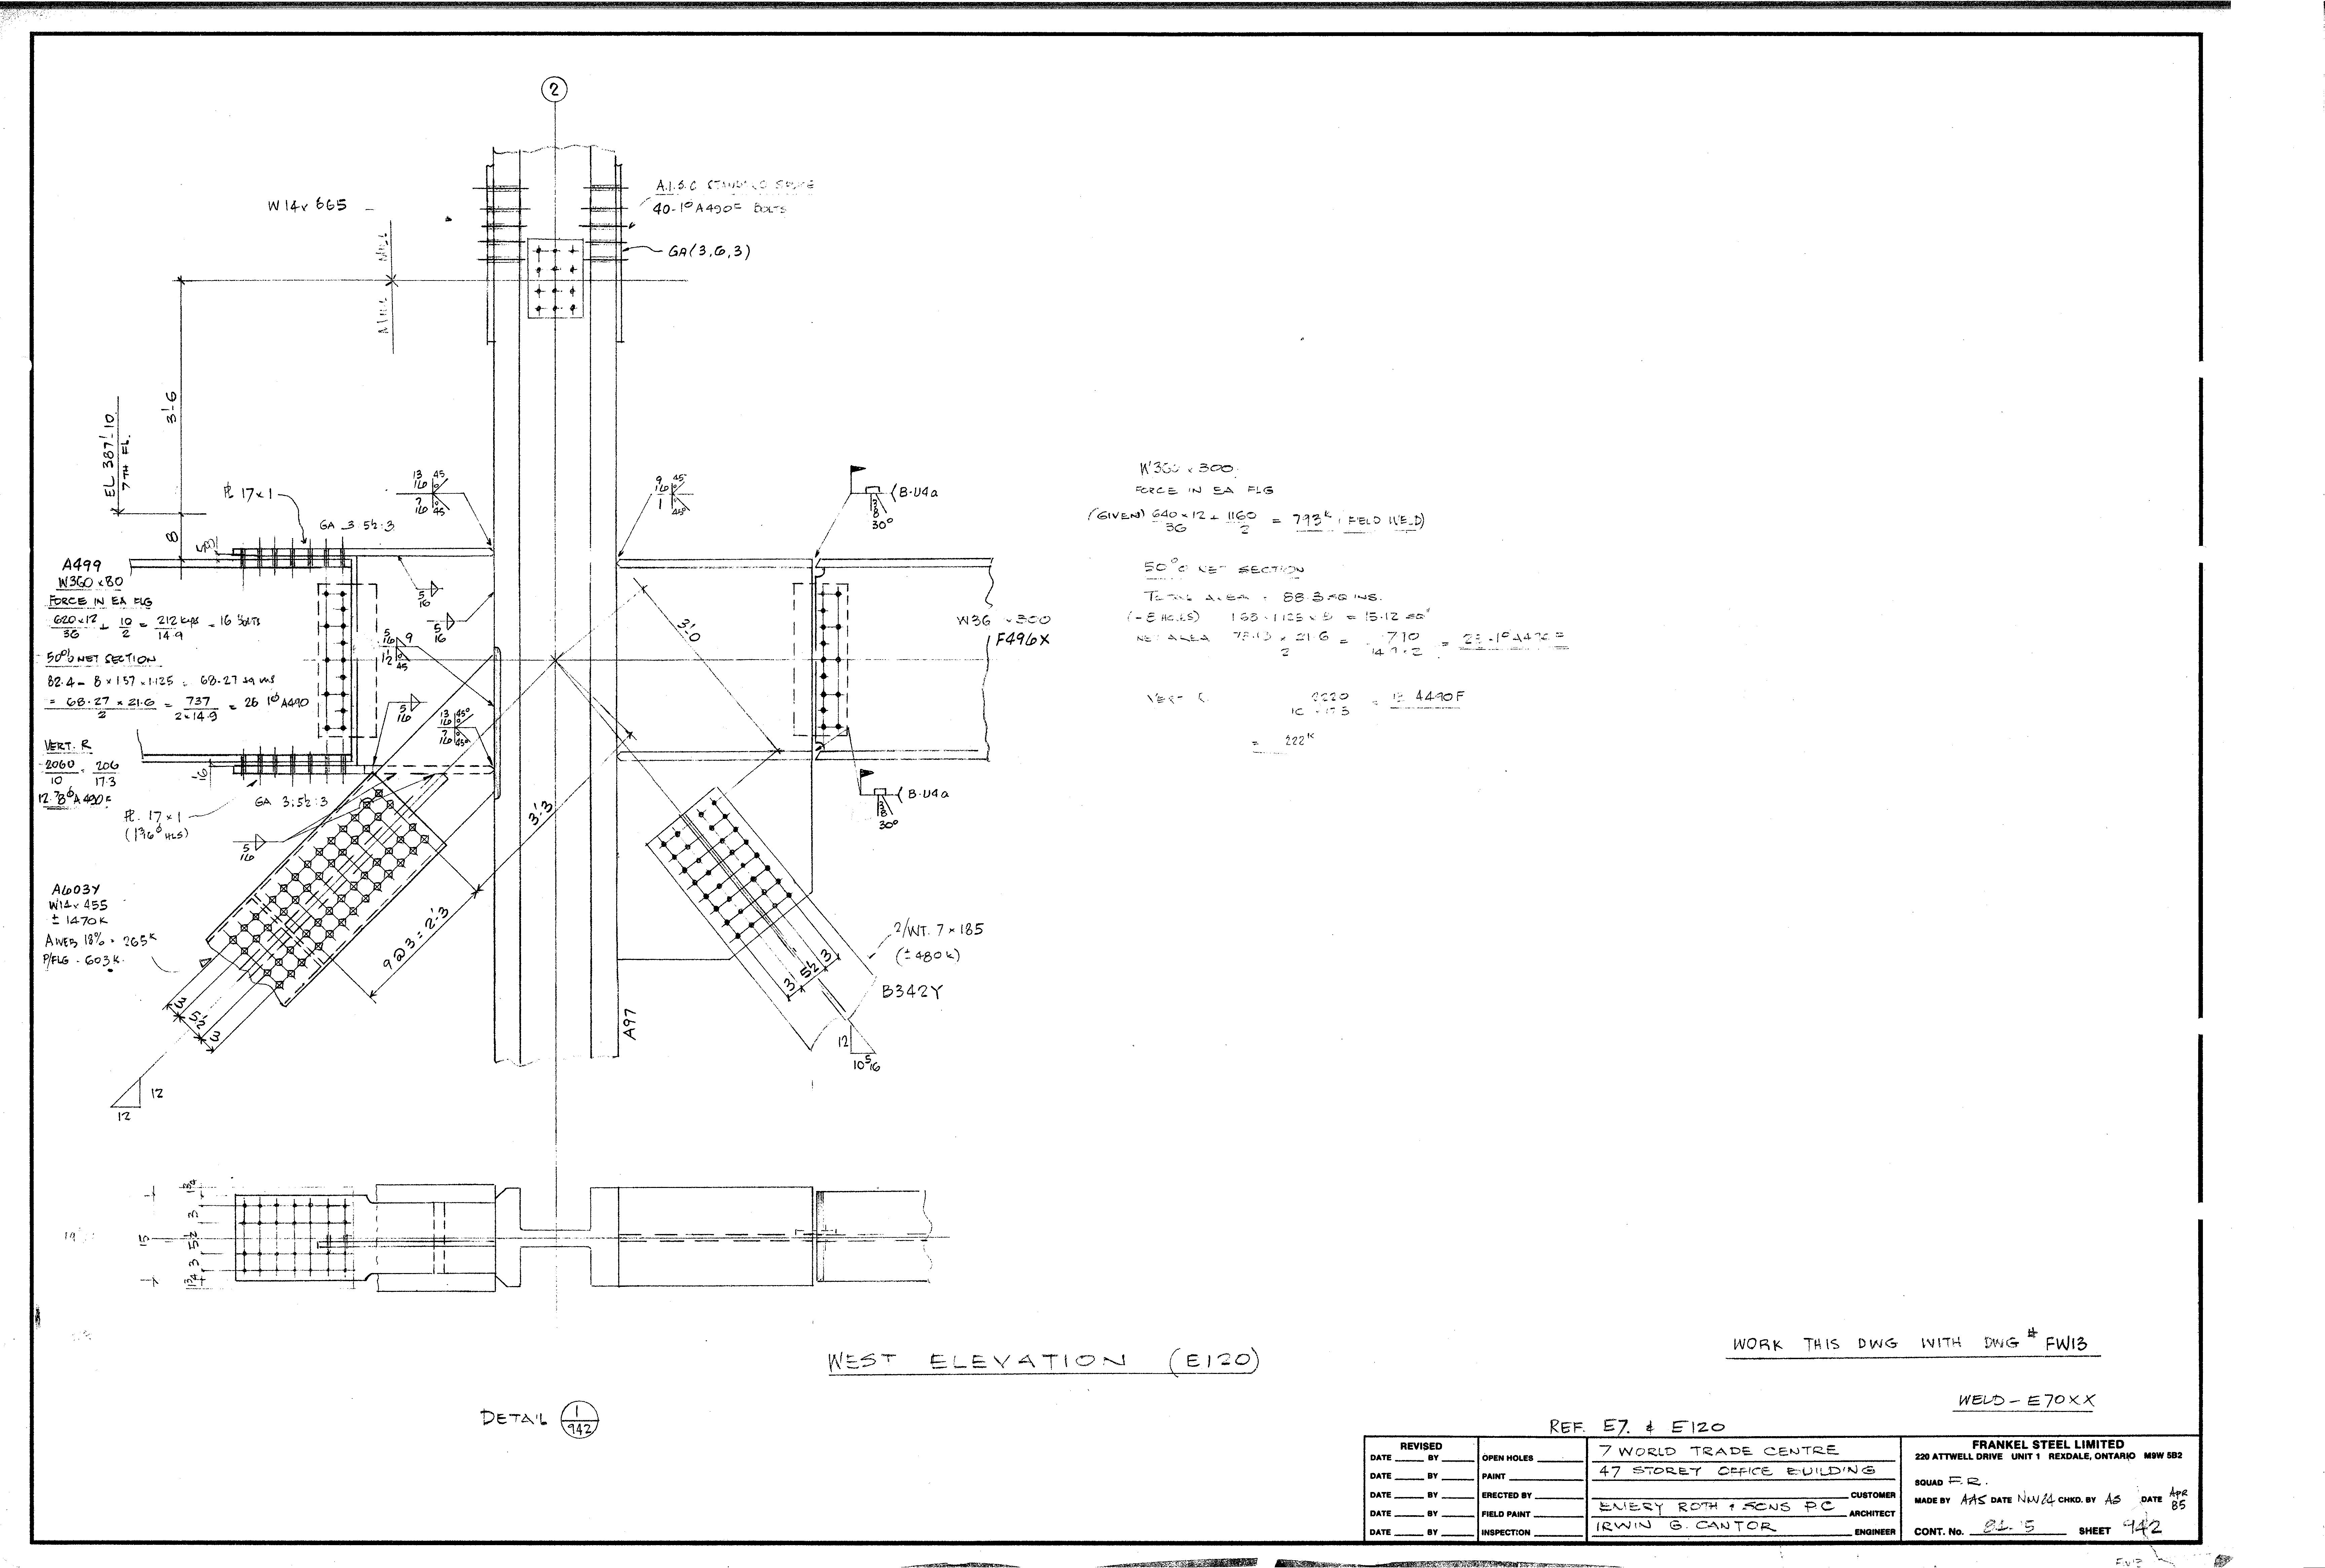
| 0942.png | 221.0 KB | 0942 | WEST ELEVATION (E120) | https://911warroom.com/model/files/WTC7/DRAWINGS/STRUCTURAL/DETAILS-PNG/0942.png |
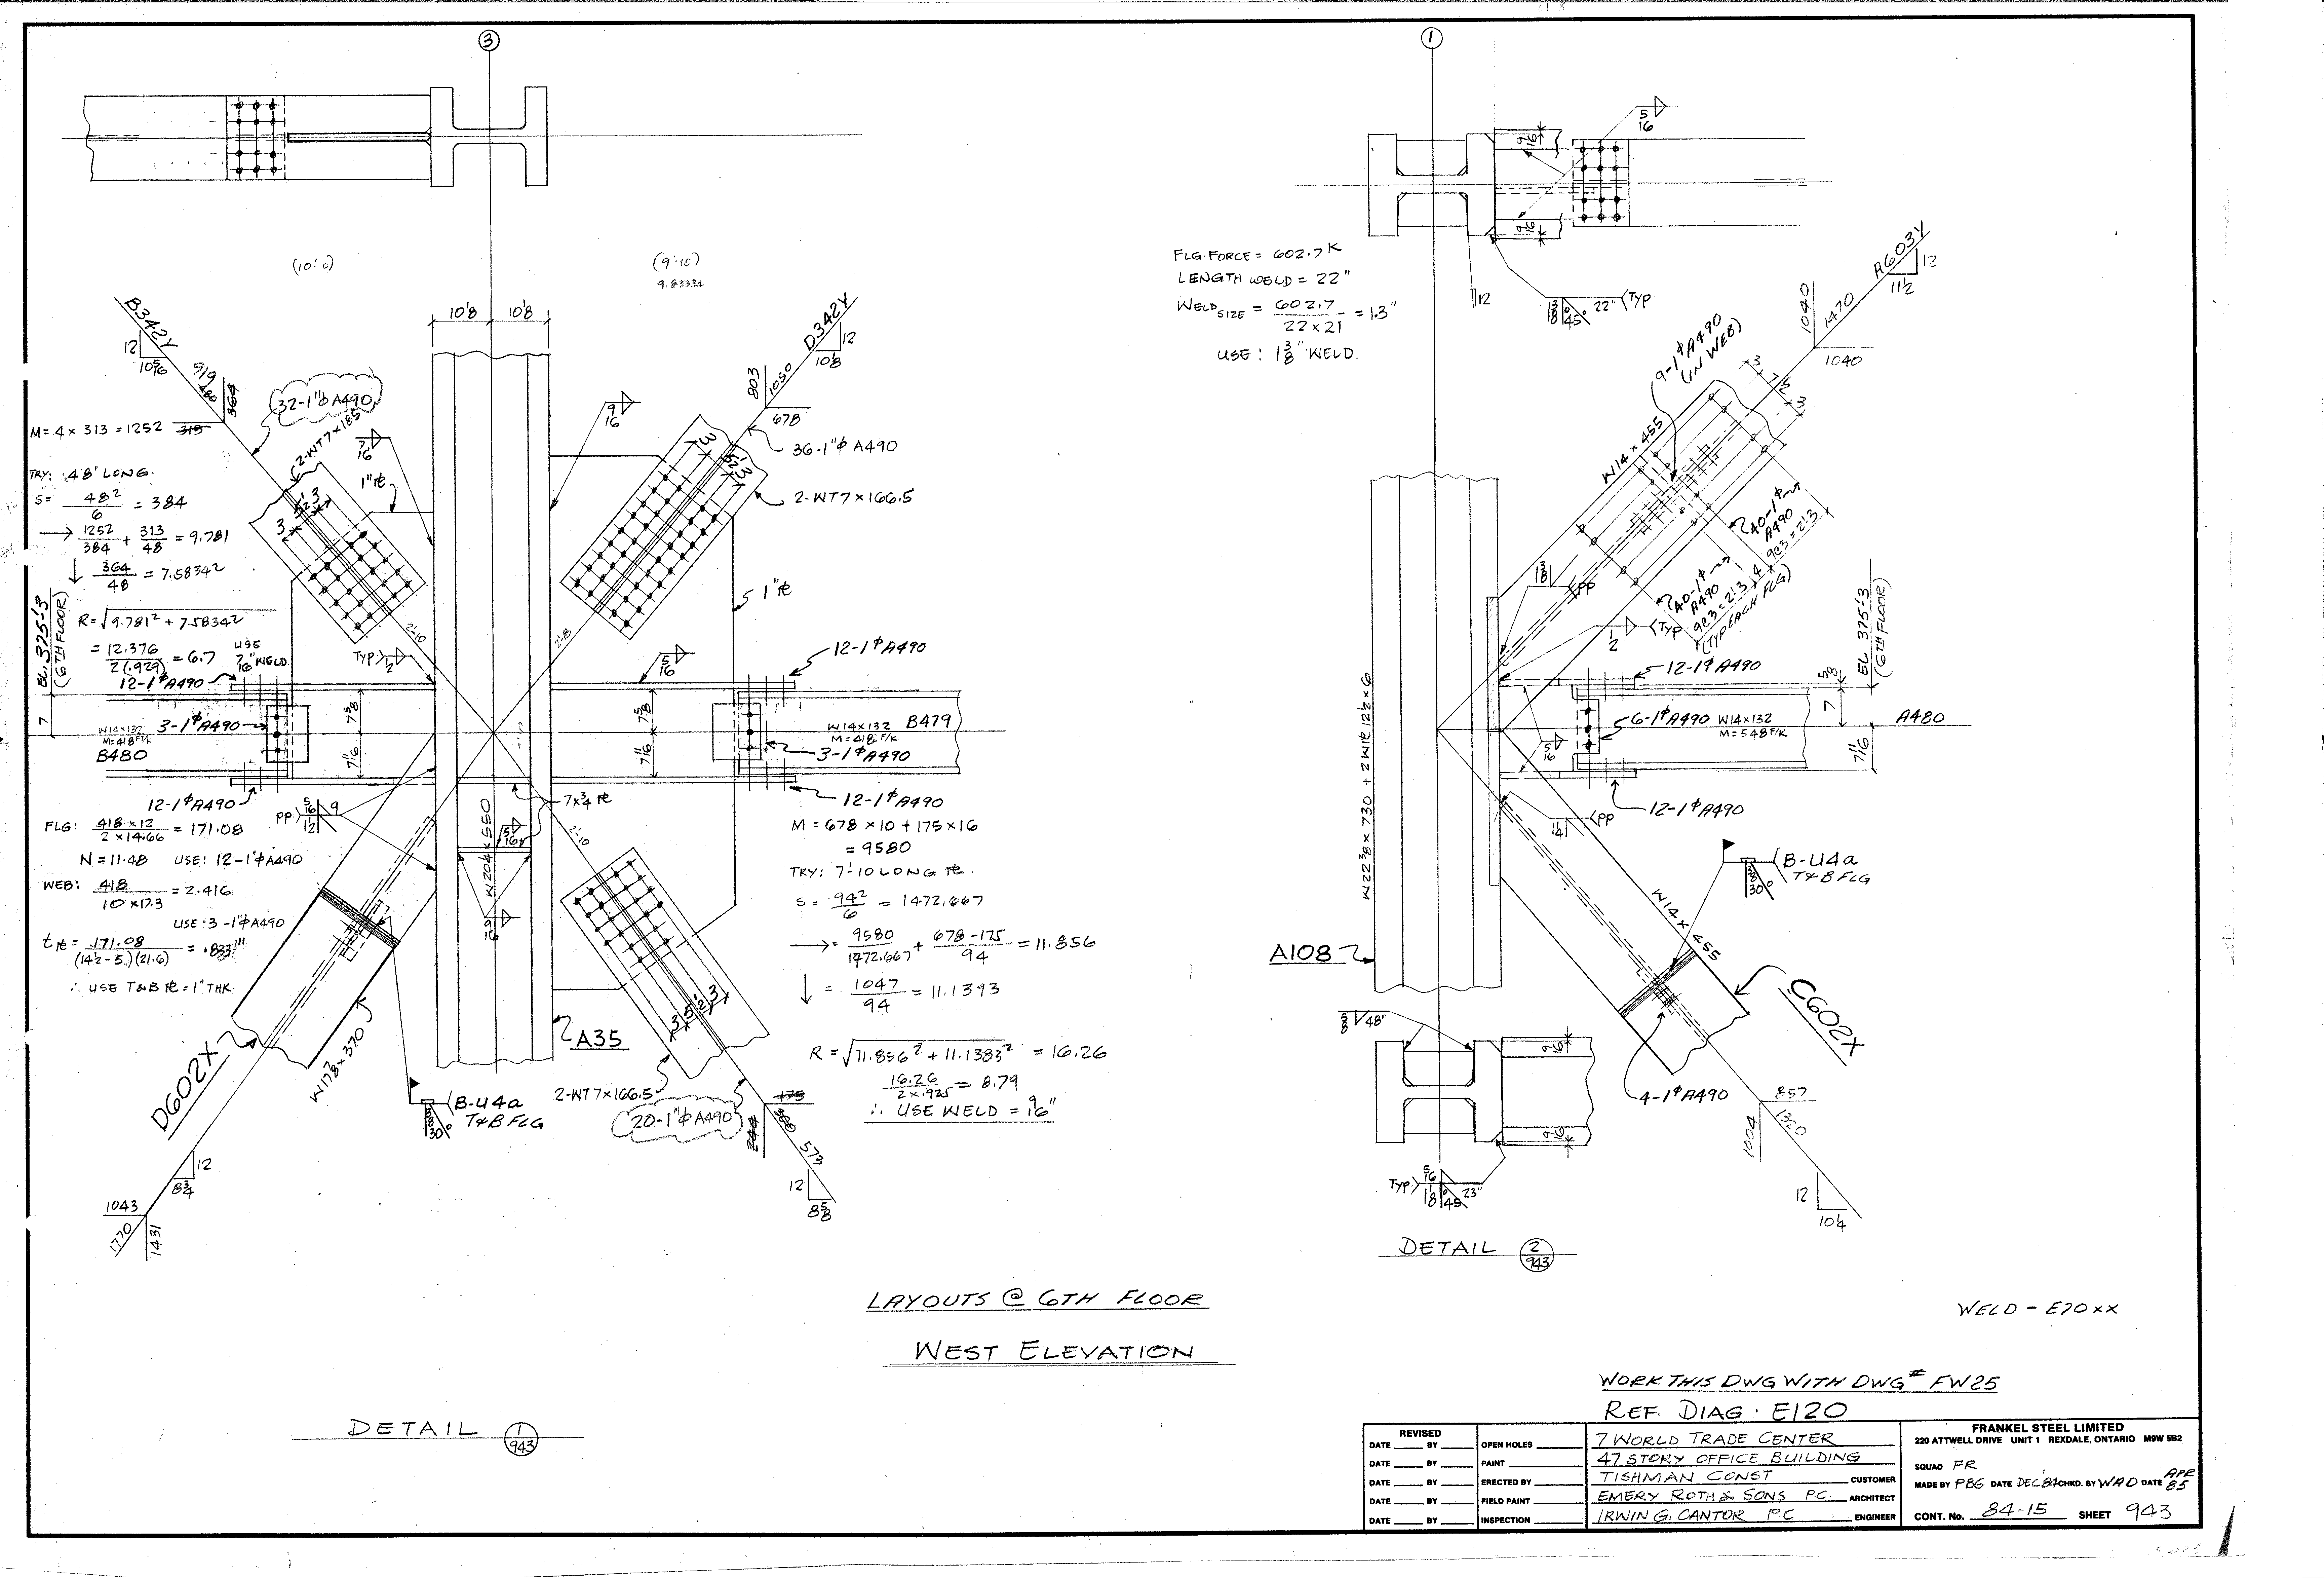
| 0943.png | 352.7 KB | 0943 | WEST ELEVATION - LAYOUTS @ 6TH FLOOR | https://911warroom.com/model/files/WTC7/DRAWINGS/STRUCTURAL/DETAILS-PNG/0943.png |
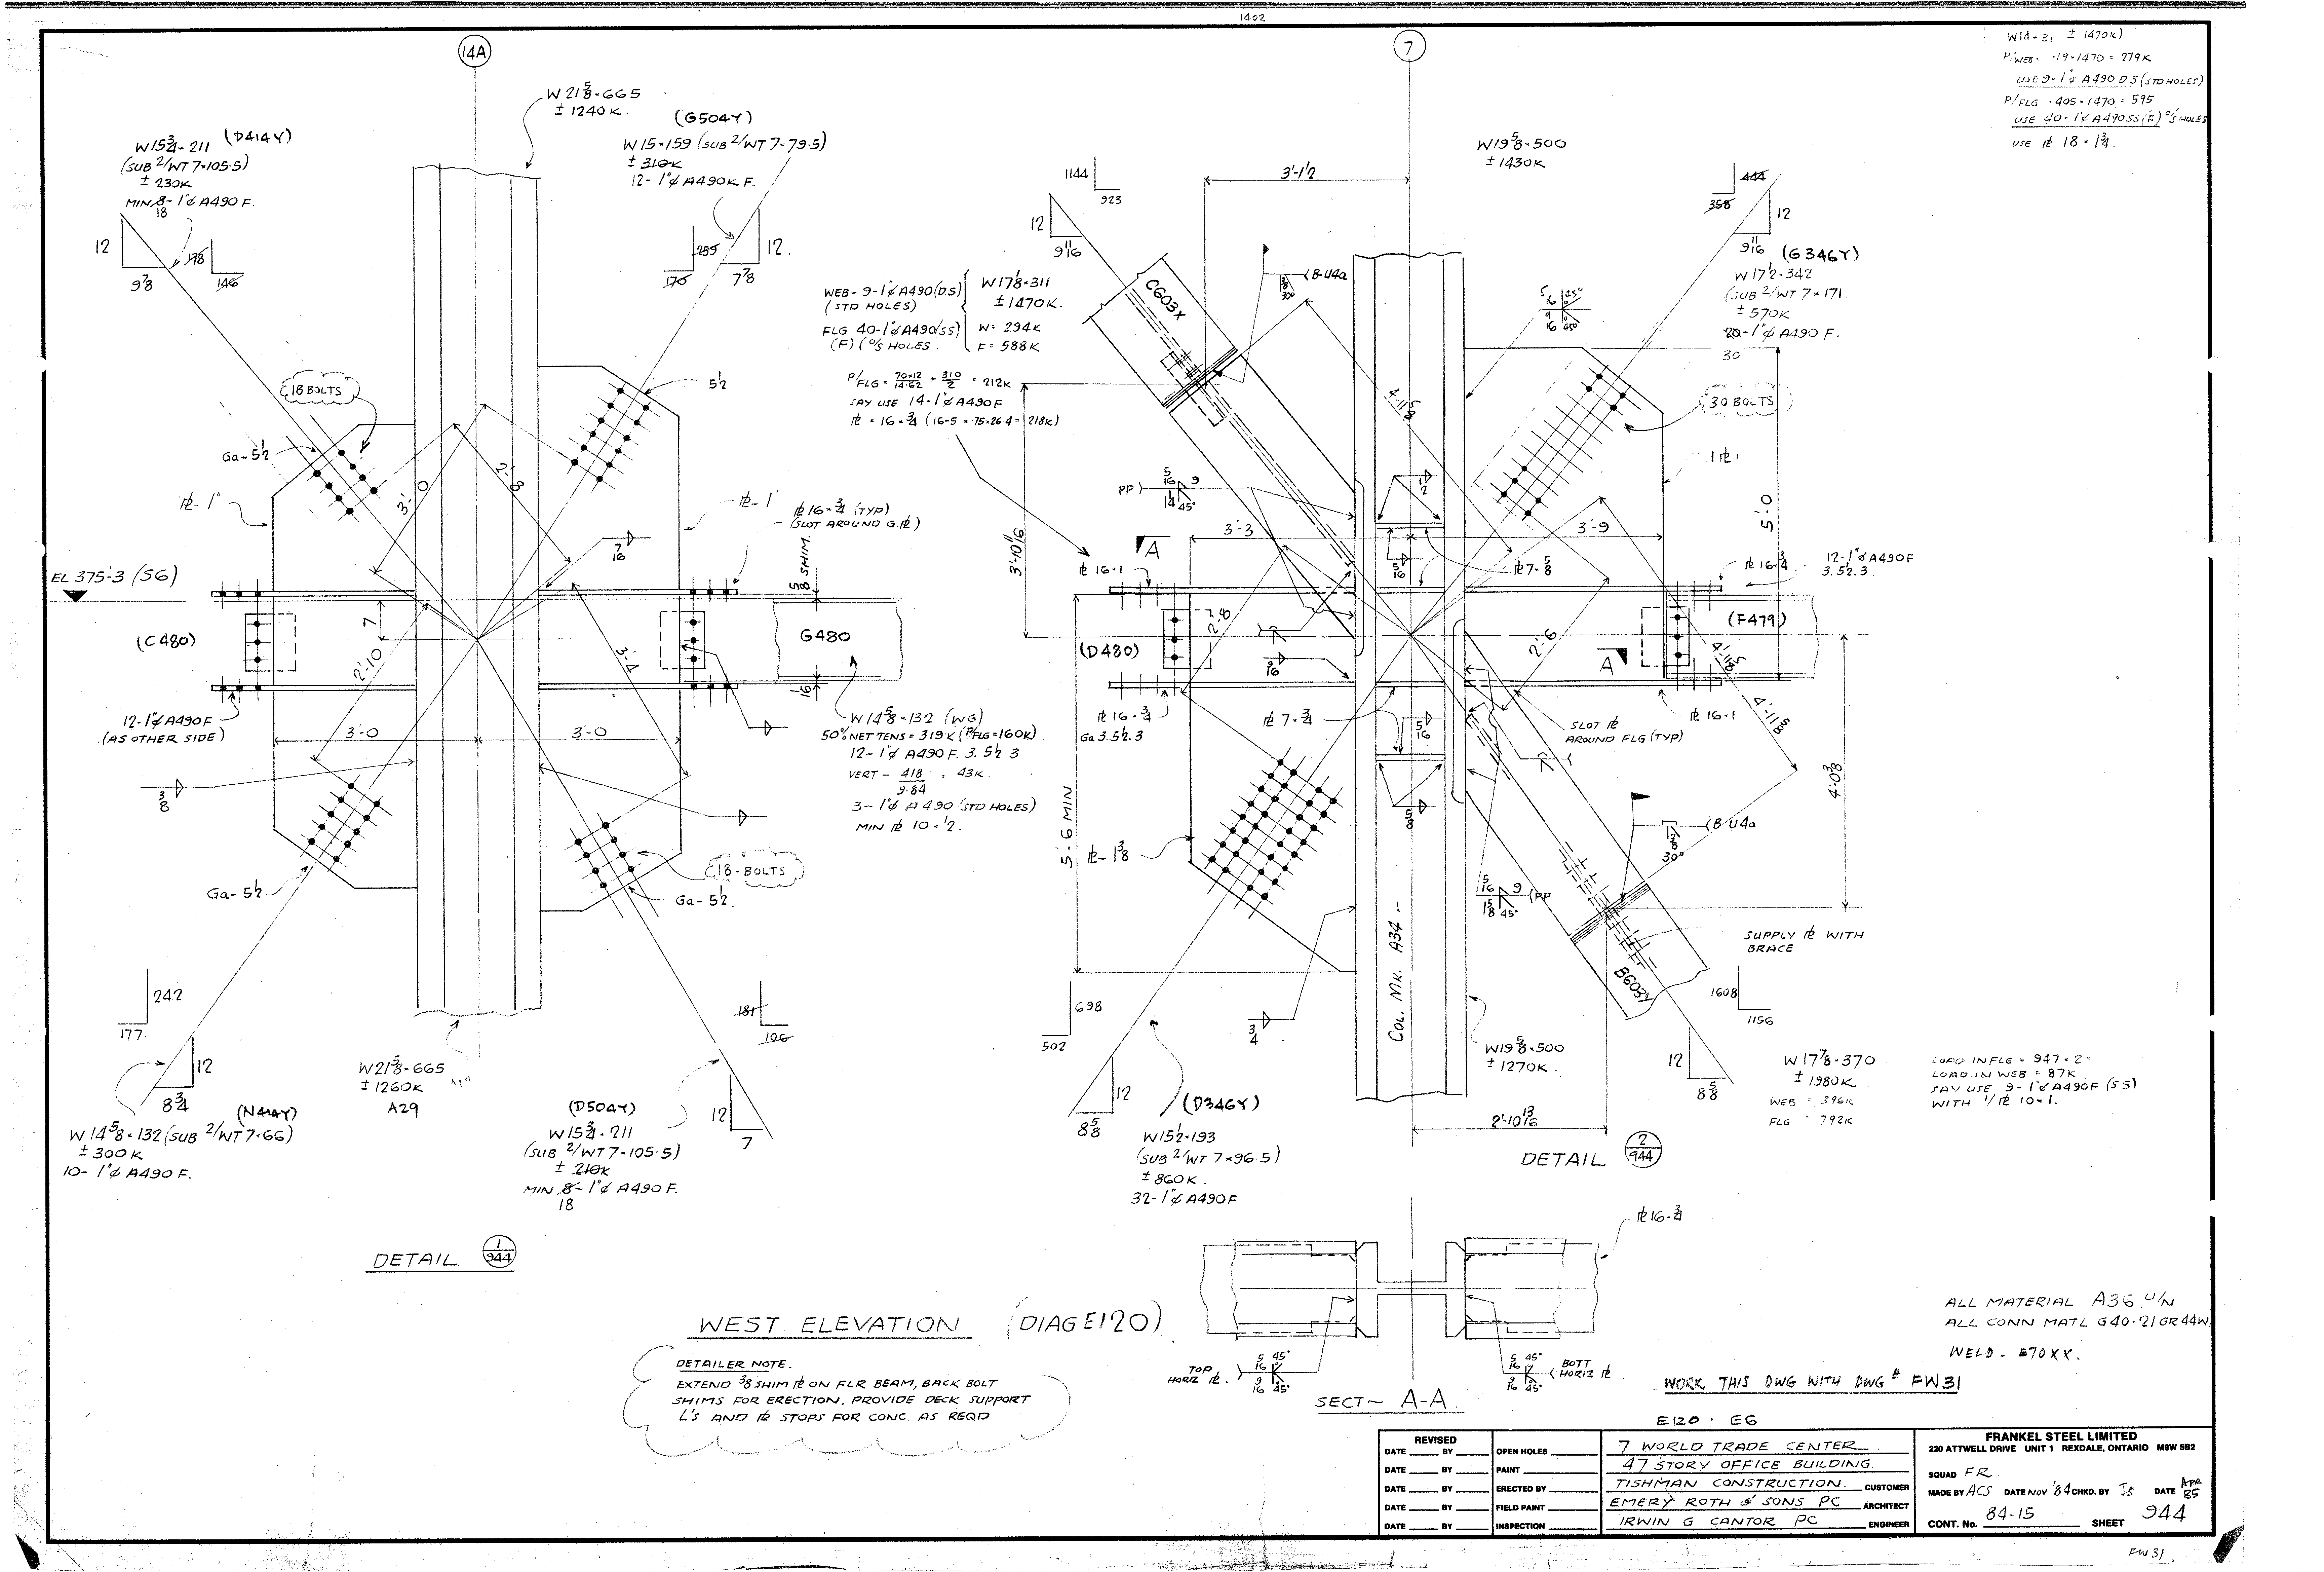
| 0944.png | 382.3 KB | 0944 | WEST ELEVATION (DIAG E120) | https://911warroom.com/model/files/WTC7/DRAWINGS/STRUCTURAL/DETAILS-PNG/0944.png |
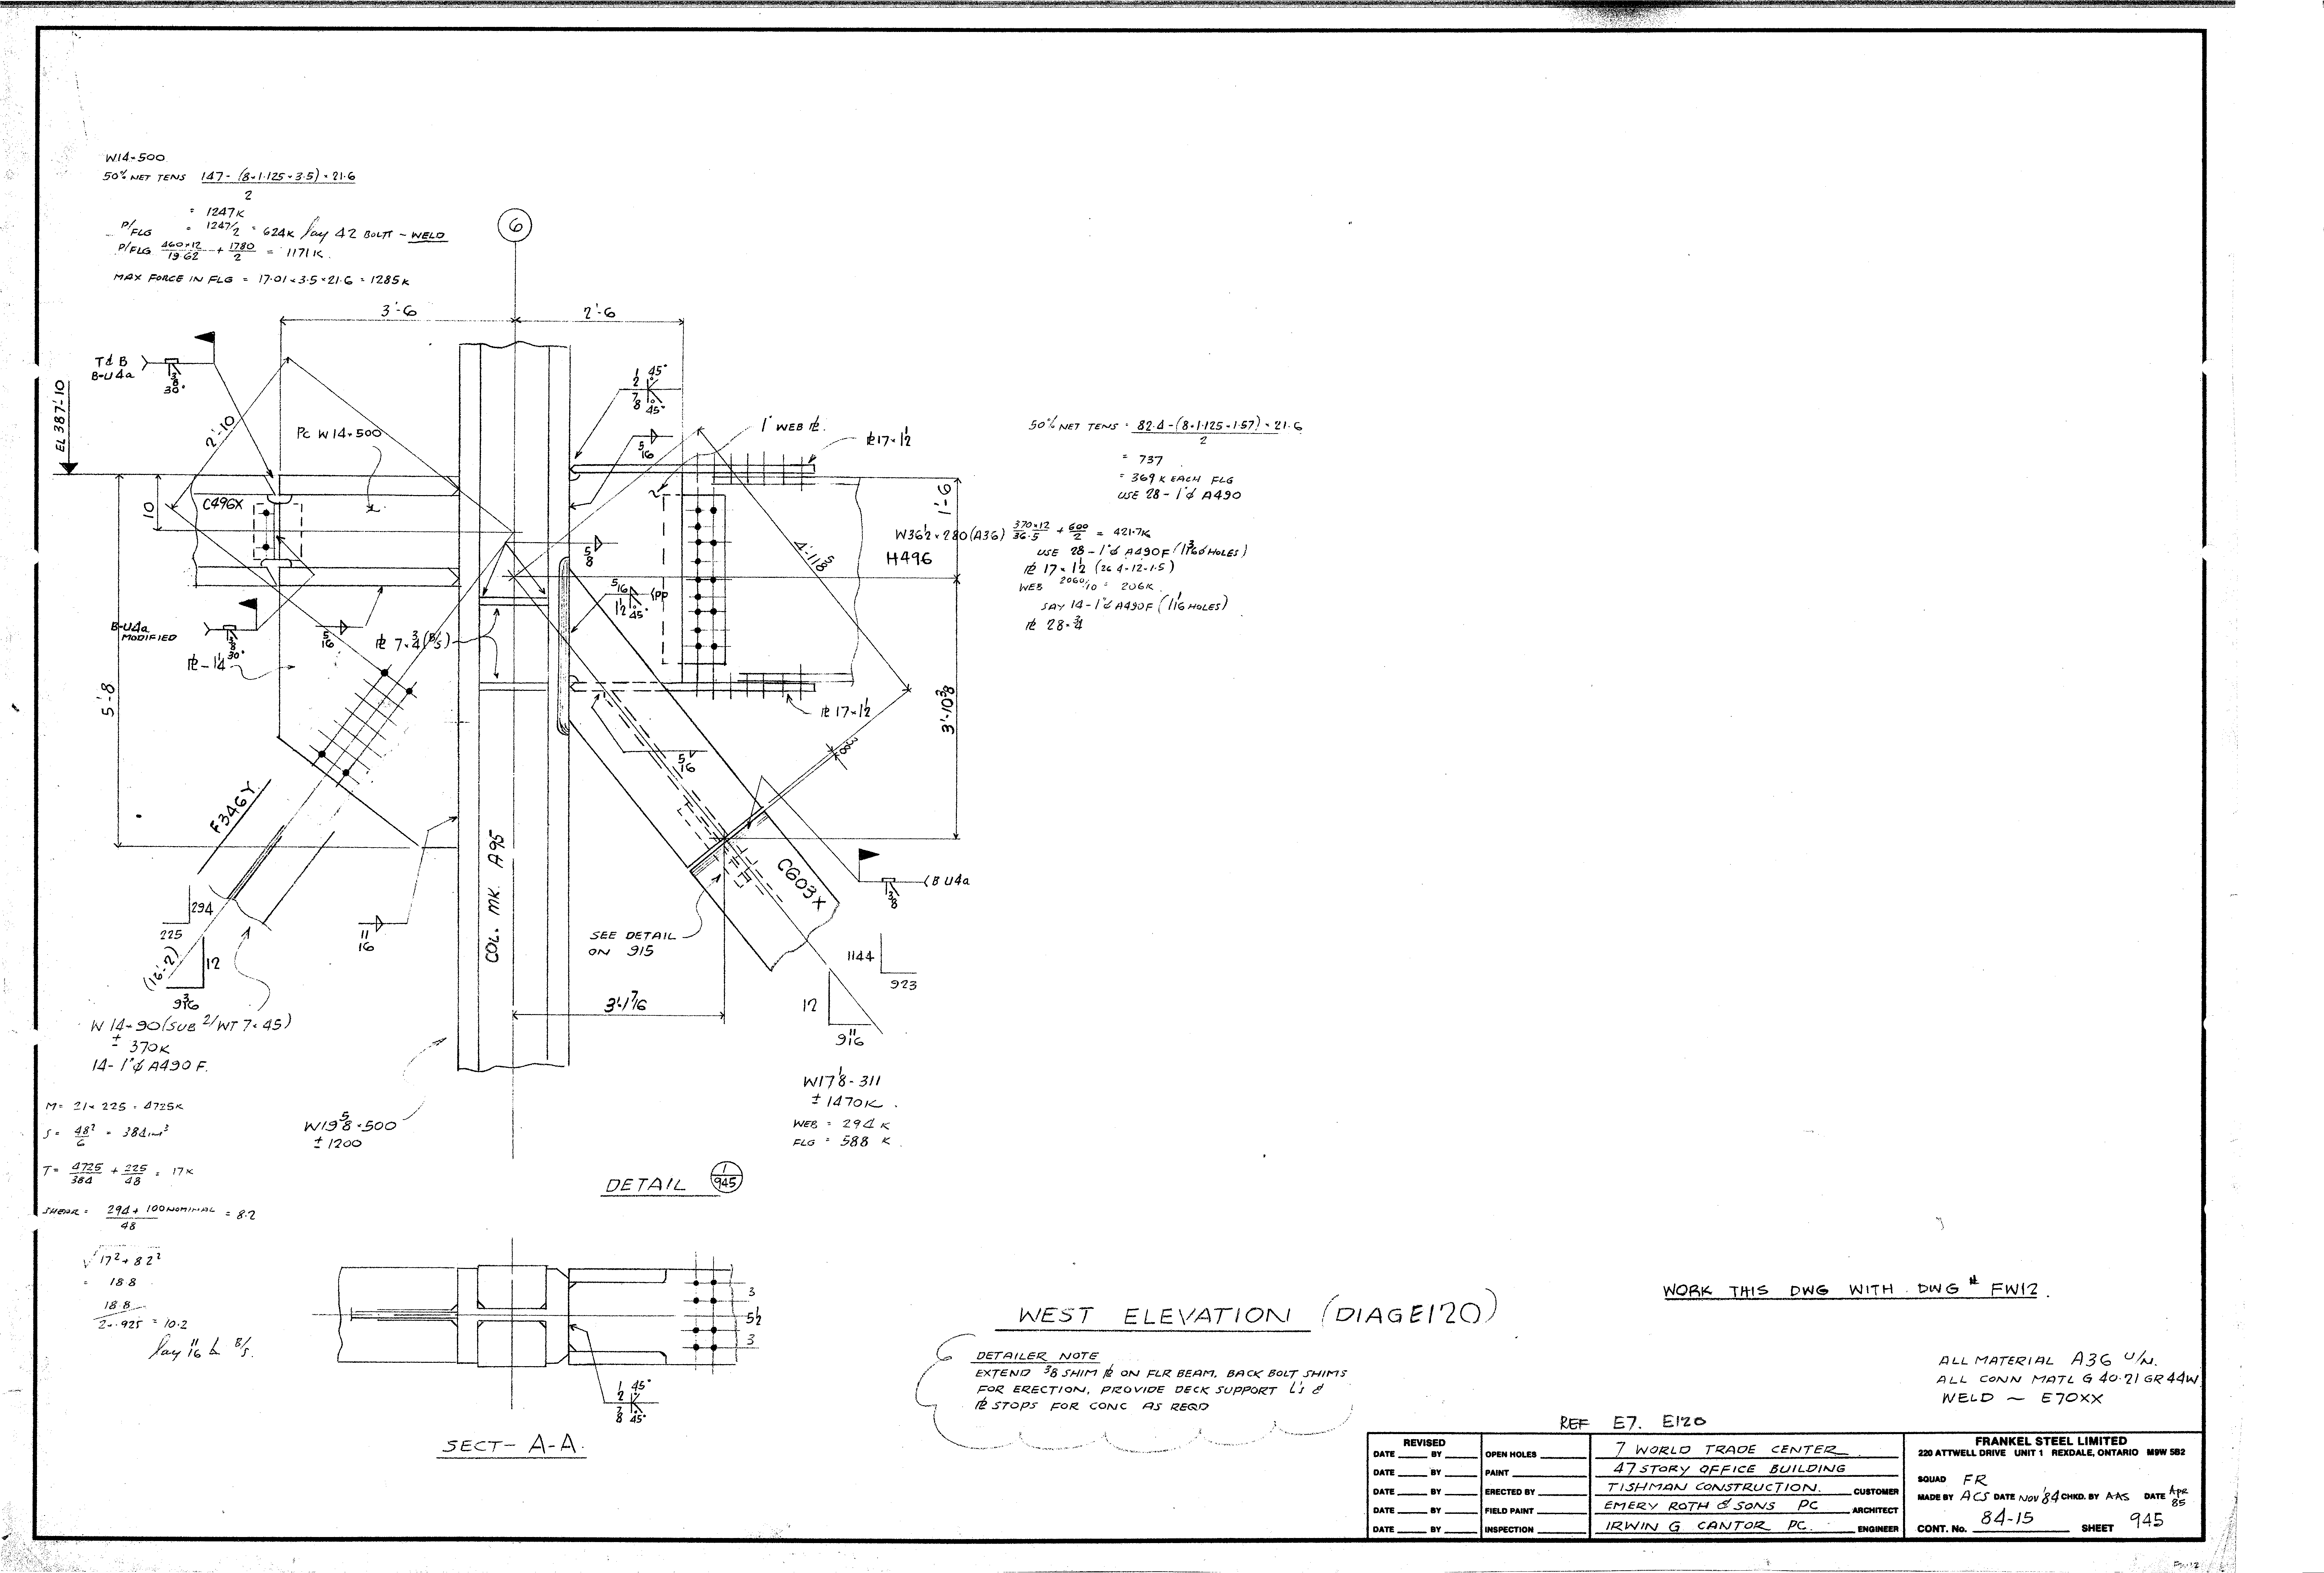
| 0945.png | 246.1 KB | 0945 | WEST ELEVATION (DIAG E120) | https://911warroom.com/model/files/WTC7/DRAWINGS/STRUCTURAL/DETAILS-PNG/0945.png |
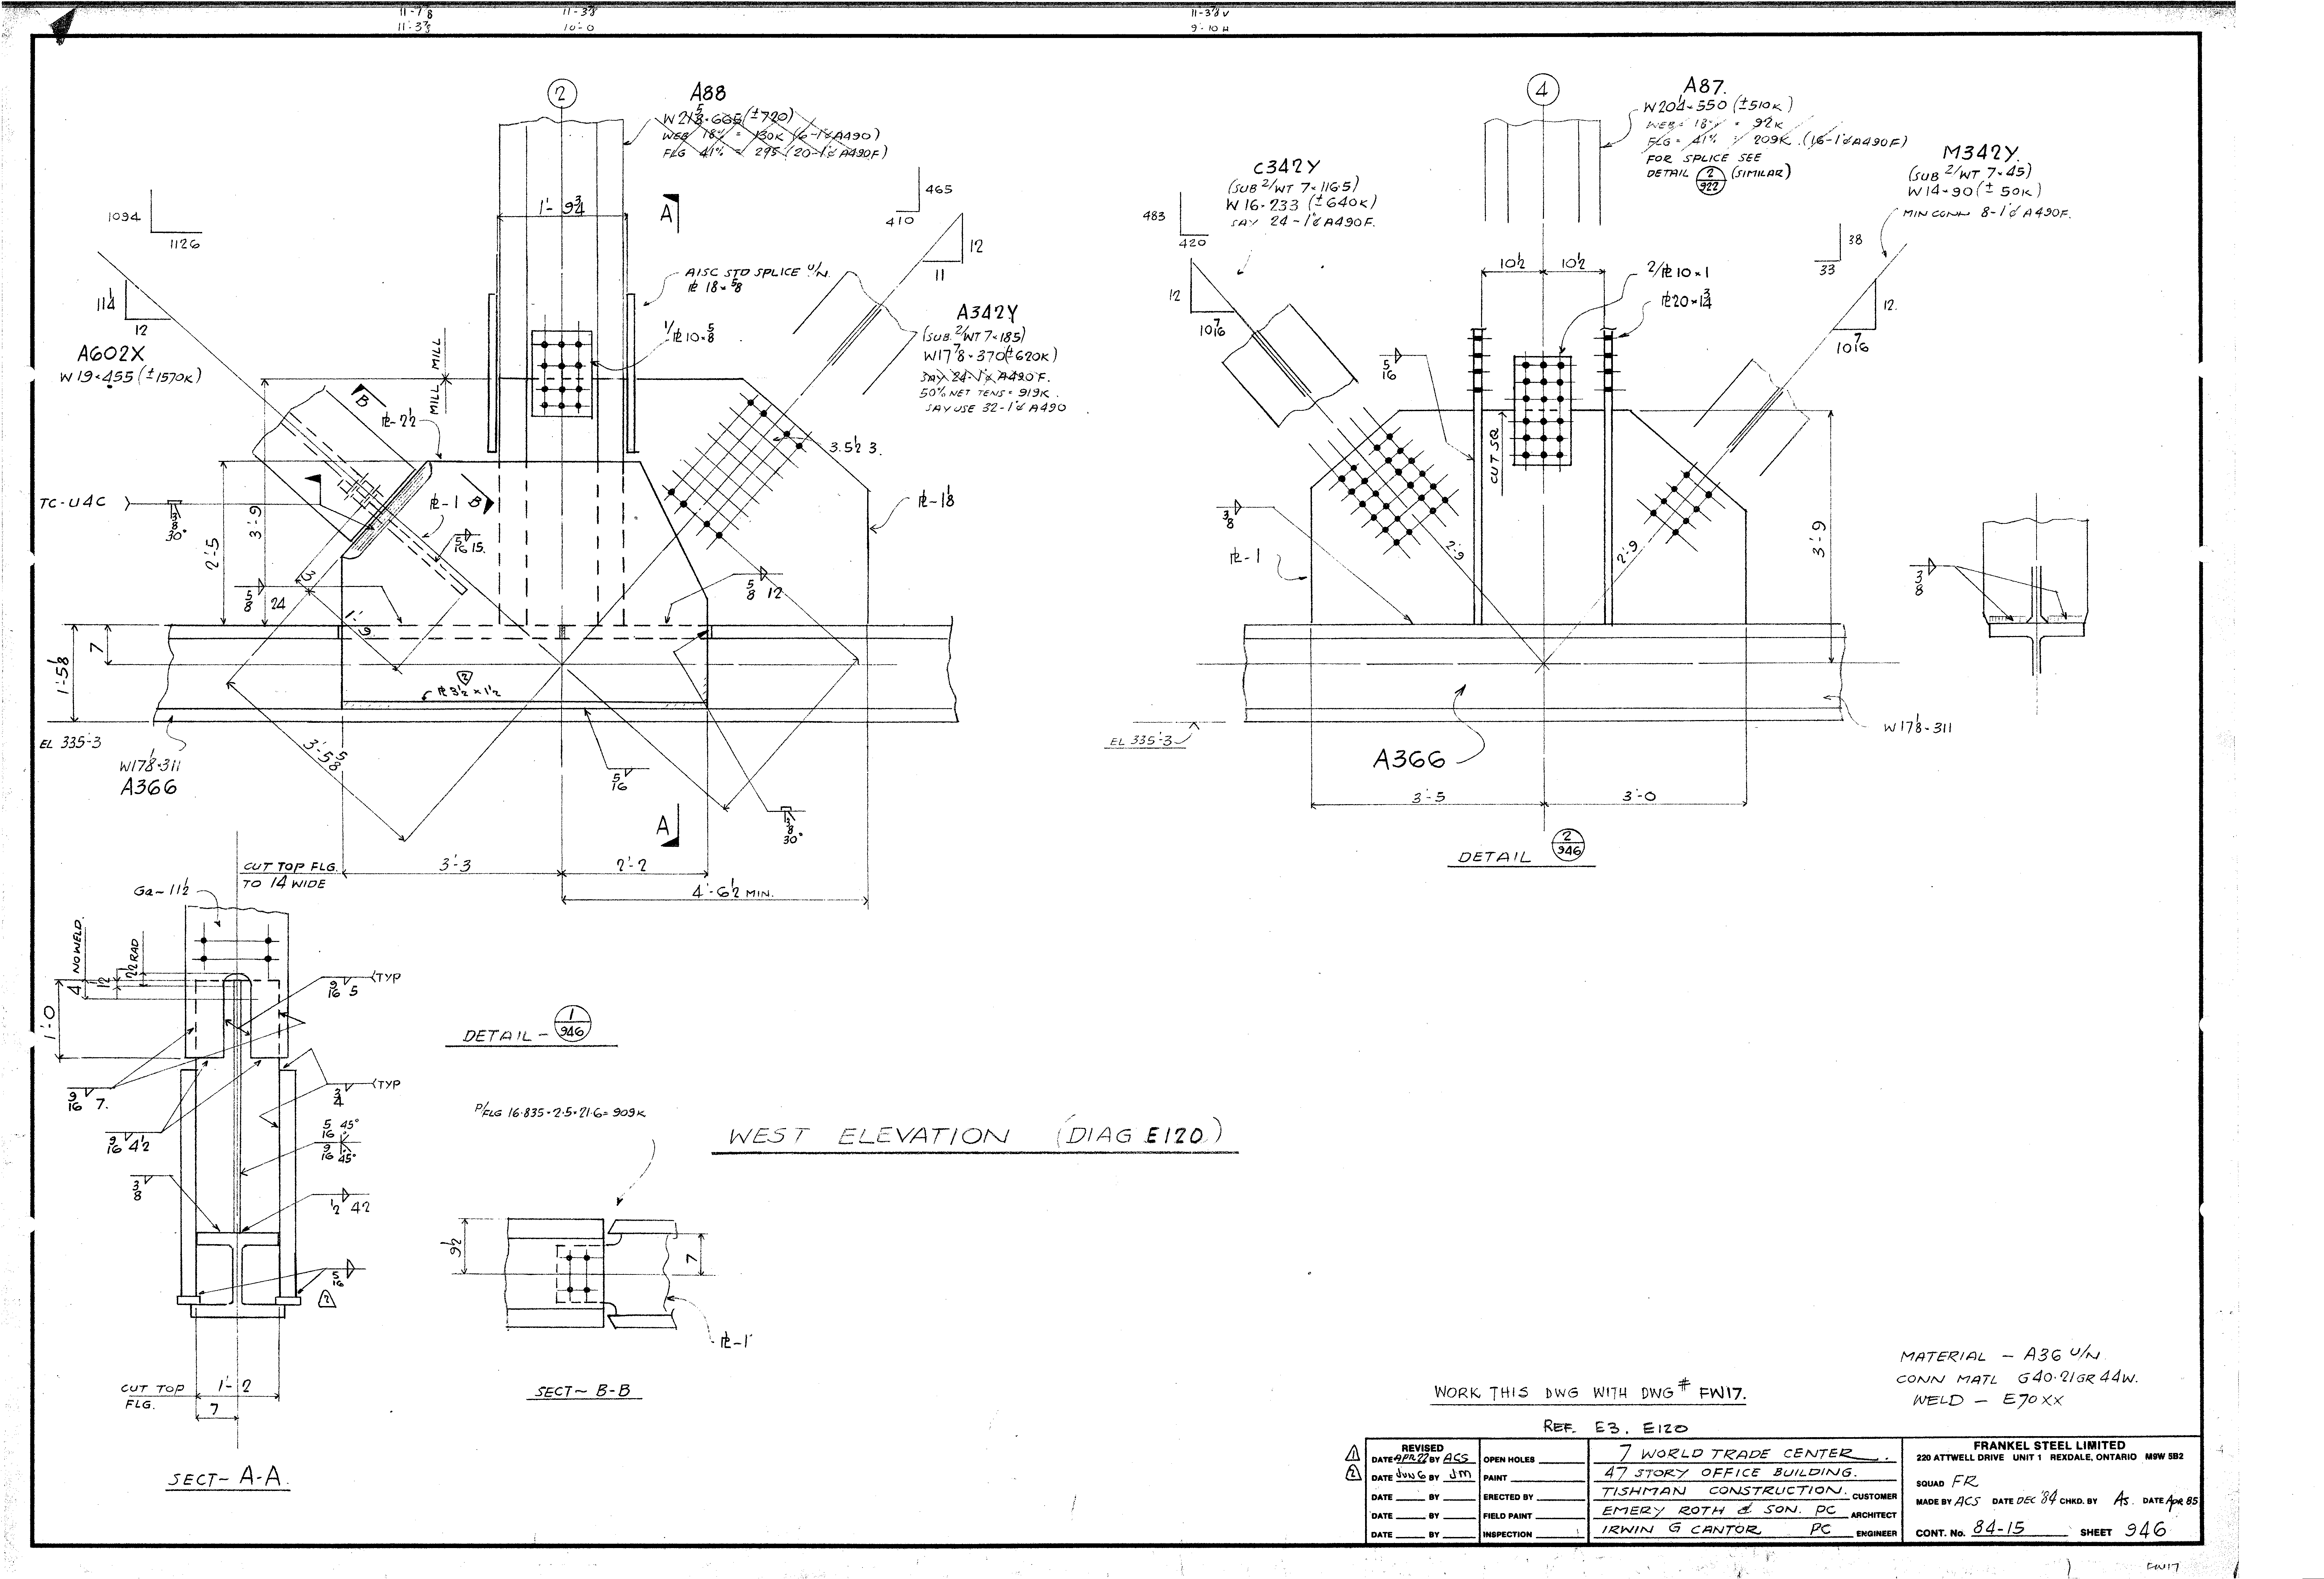
| 0946.png | 300.8 KB | 0946 | WEST ELEVATION (DIAG E120) | https://911warroom.com/model/files/WTC7/DRAWINGS/STRUCTURAL/DETAILS-PNG/0946.png |
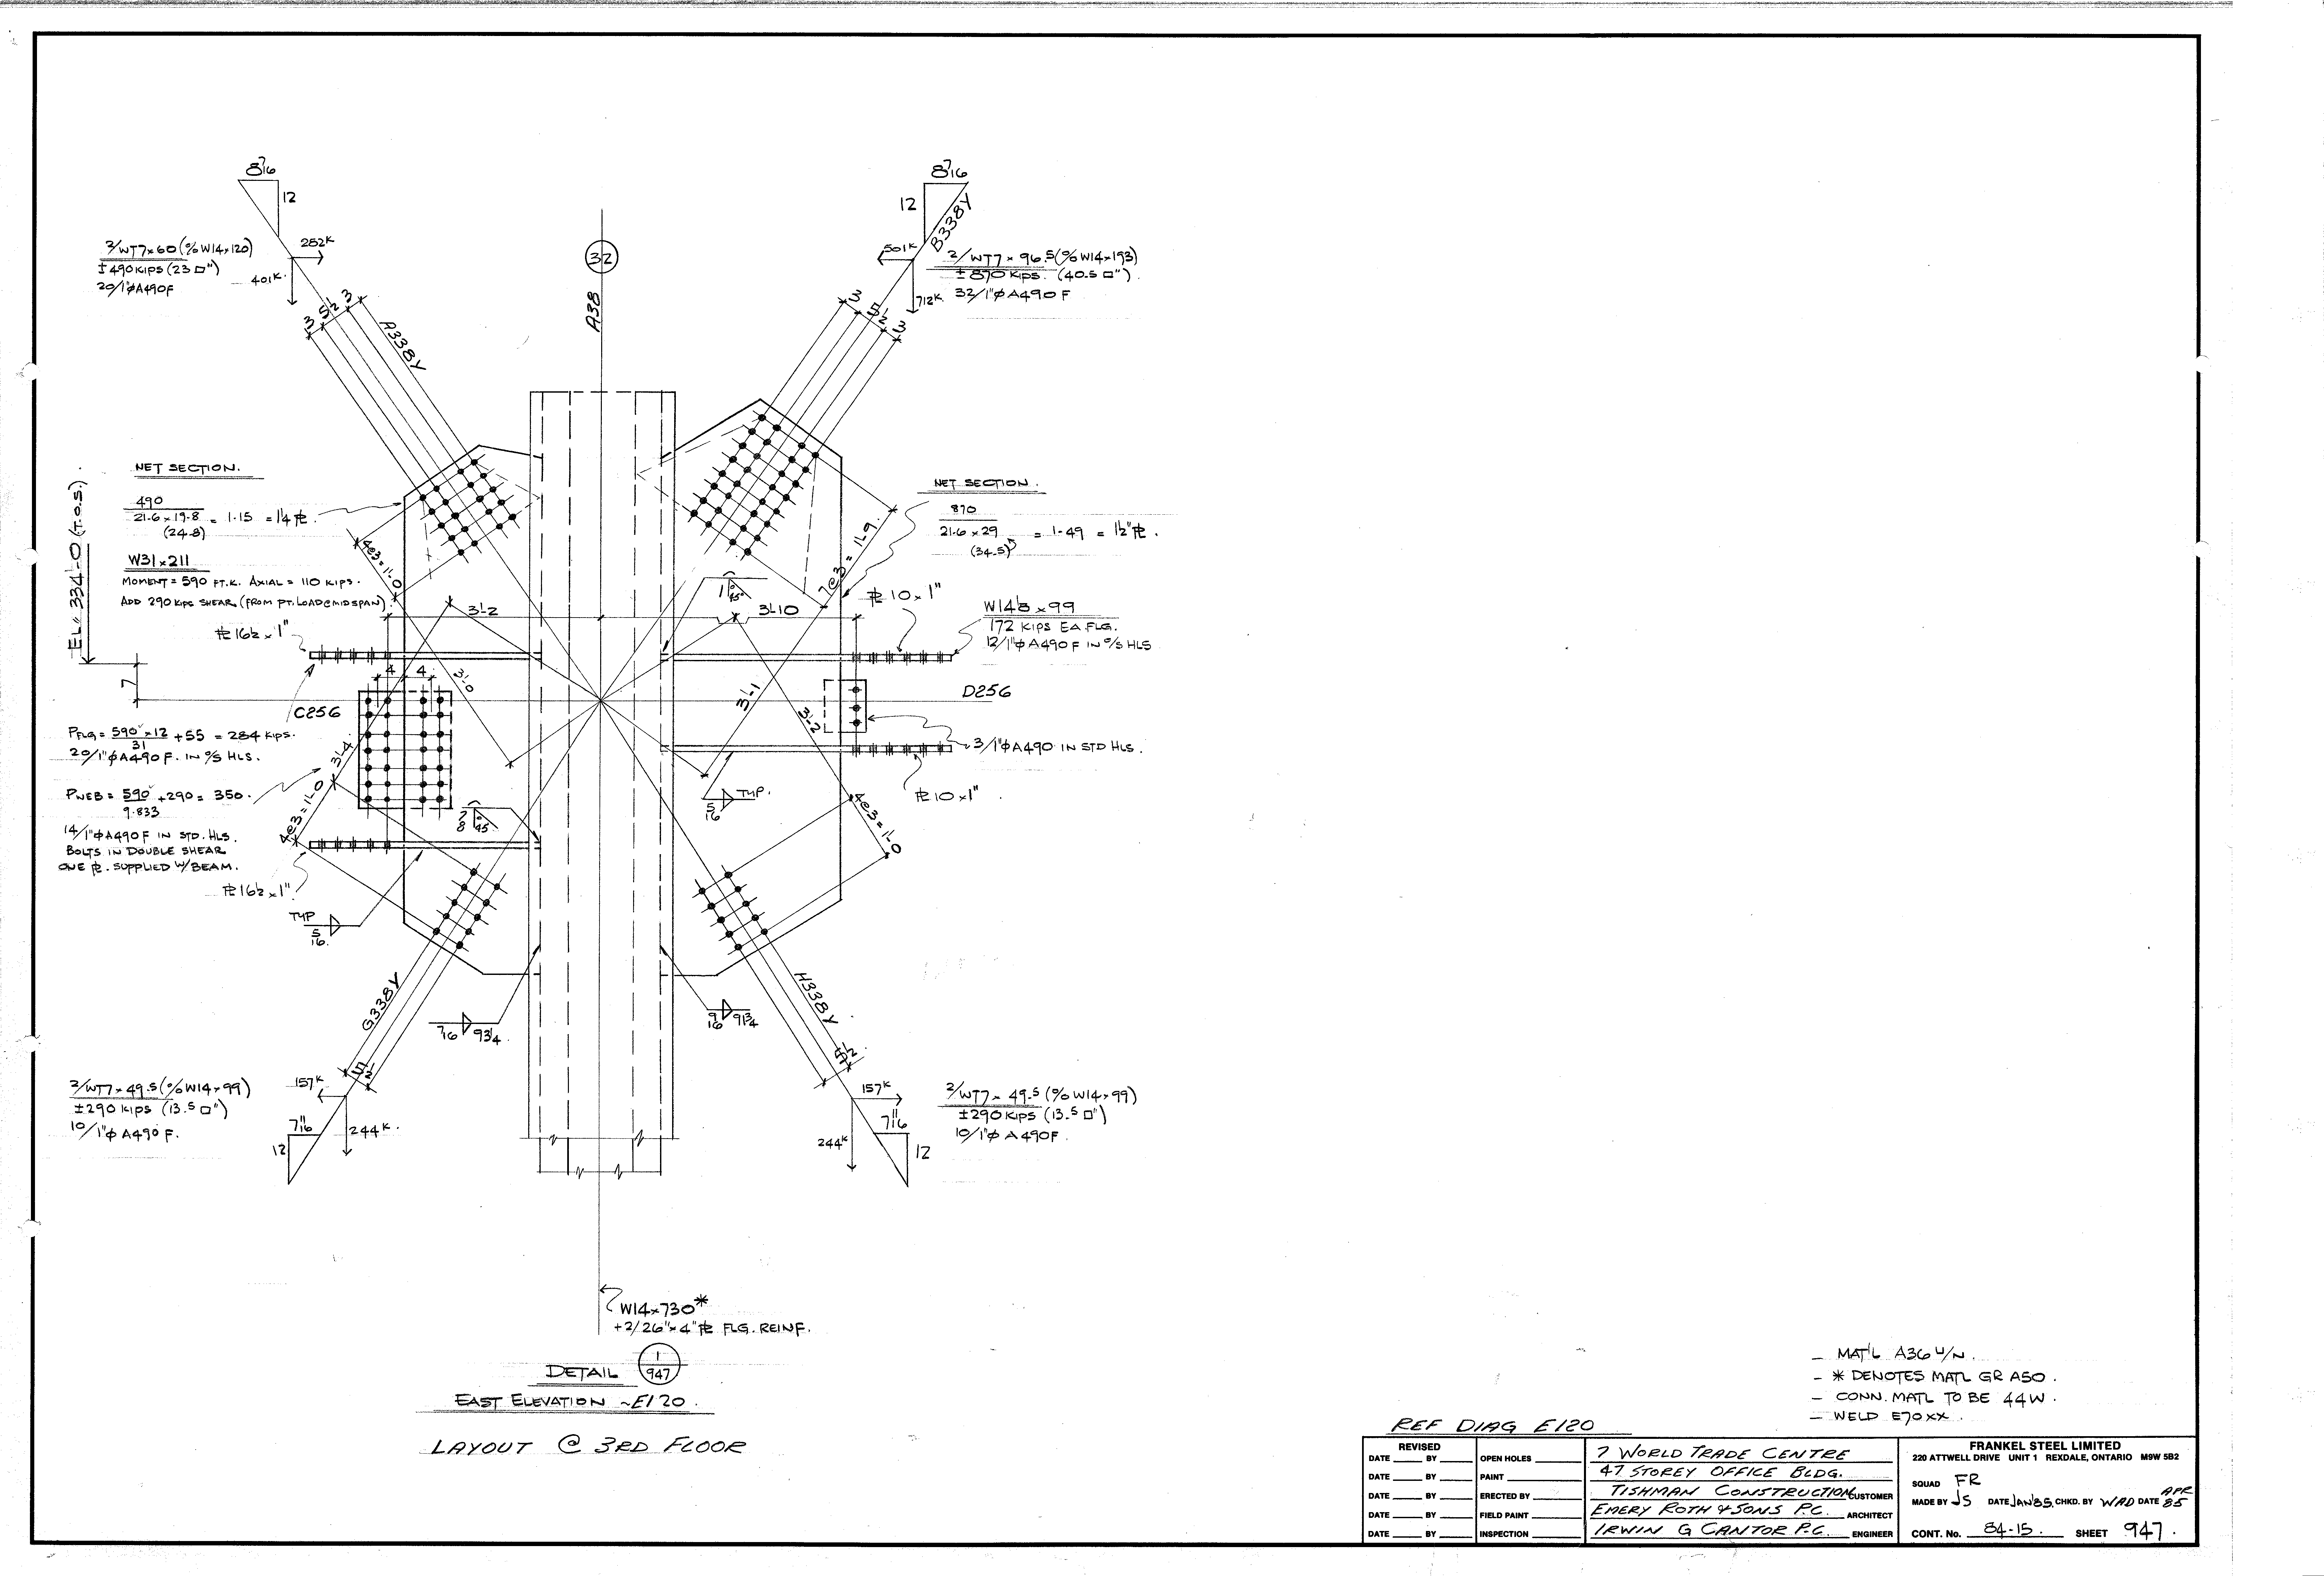
| 0947.png | 237.6 KB | 0947 | EAST ELEVATION - E120 - LAYOUT @ 3RD FLOOR | https://911warroom.com/model/files/WTC7/DRAWINGS/STRUCTURAL/DETAILS-PNG/0947.png |
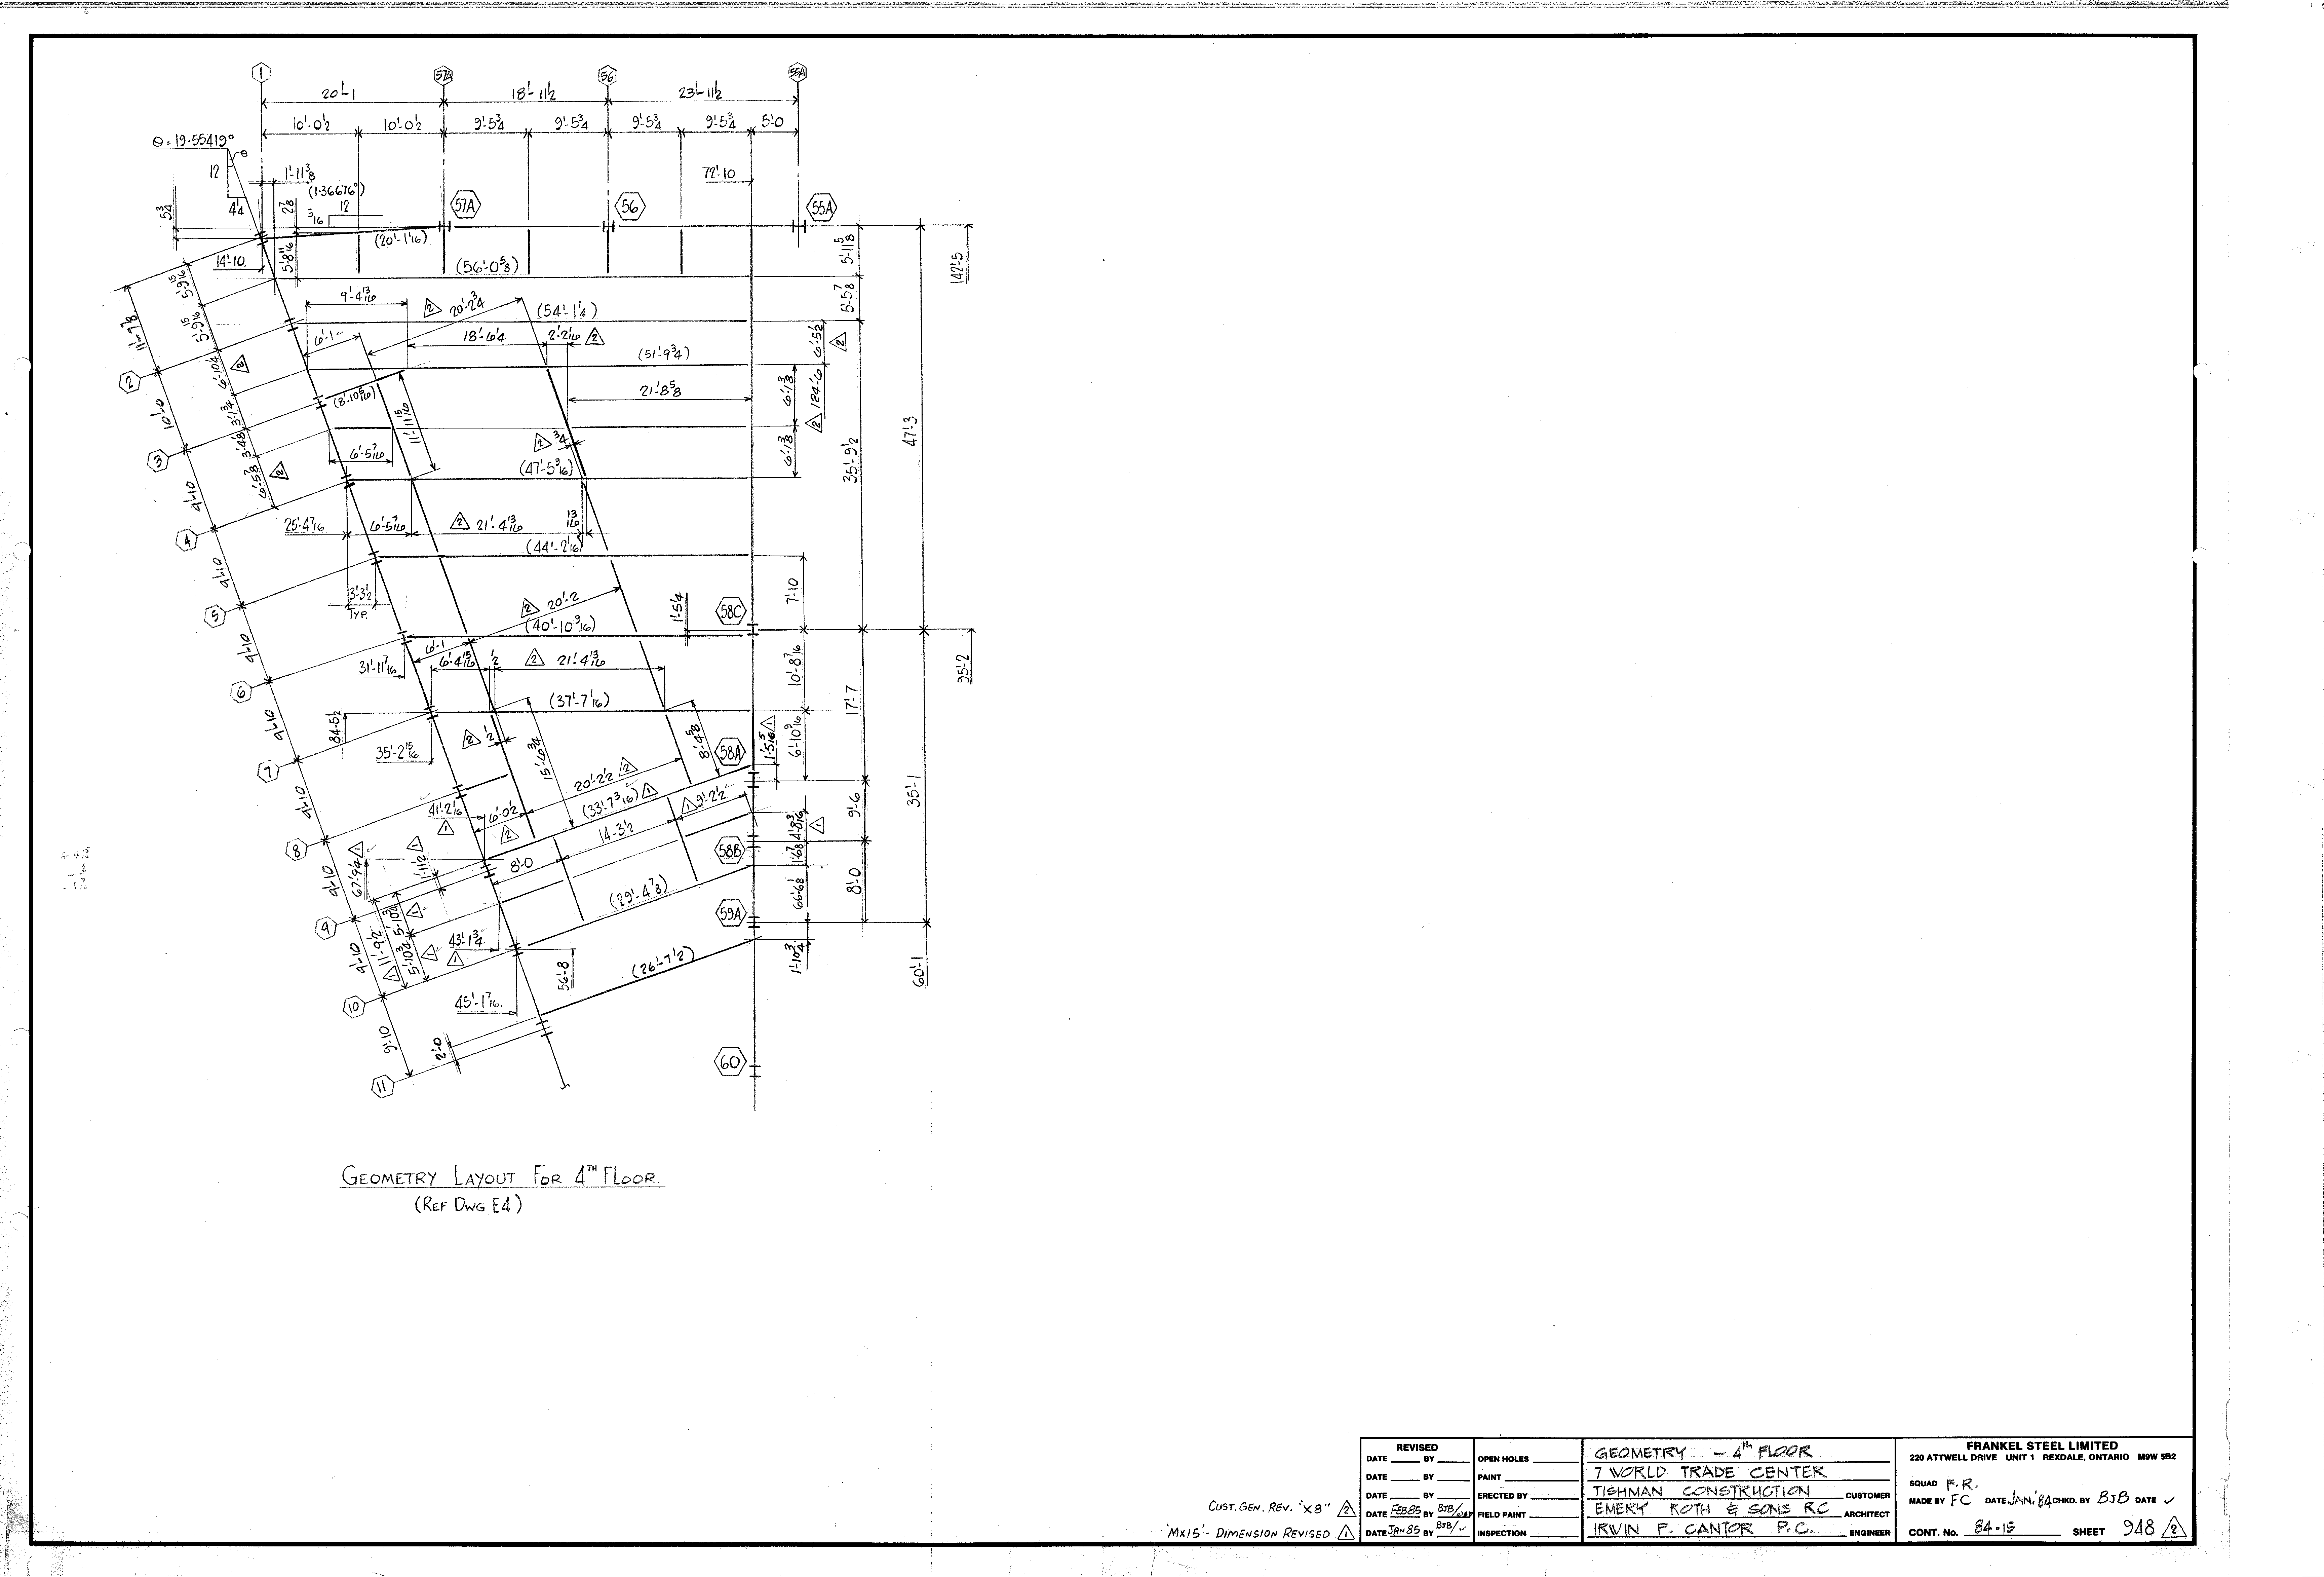
| 0948.png | 218.2 KB | 0948 | GEOMETRY - 4TH FLOOR | https://911warroom.com/model/files/WTC7/DRAWINGS/STRUCTURAL/DETAILS-PNG/0948.png |
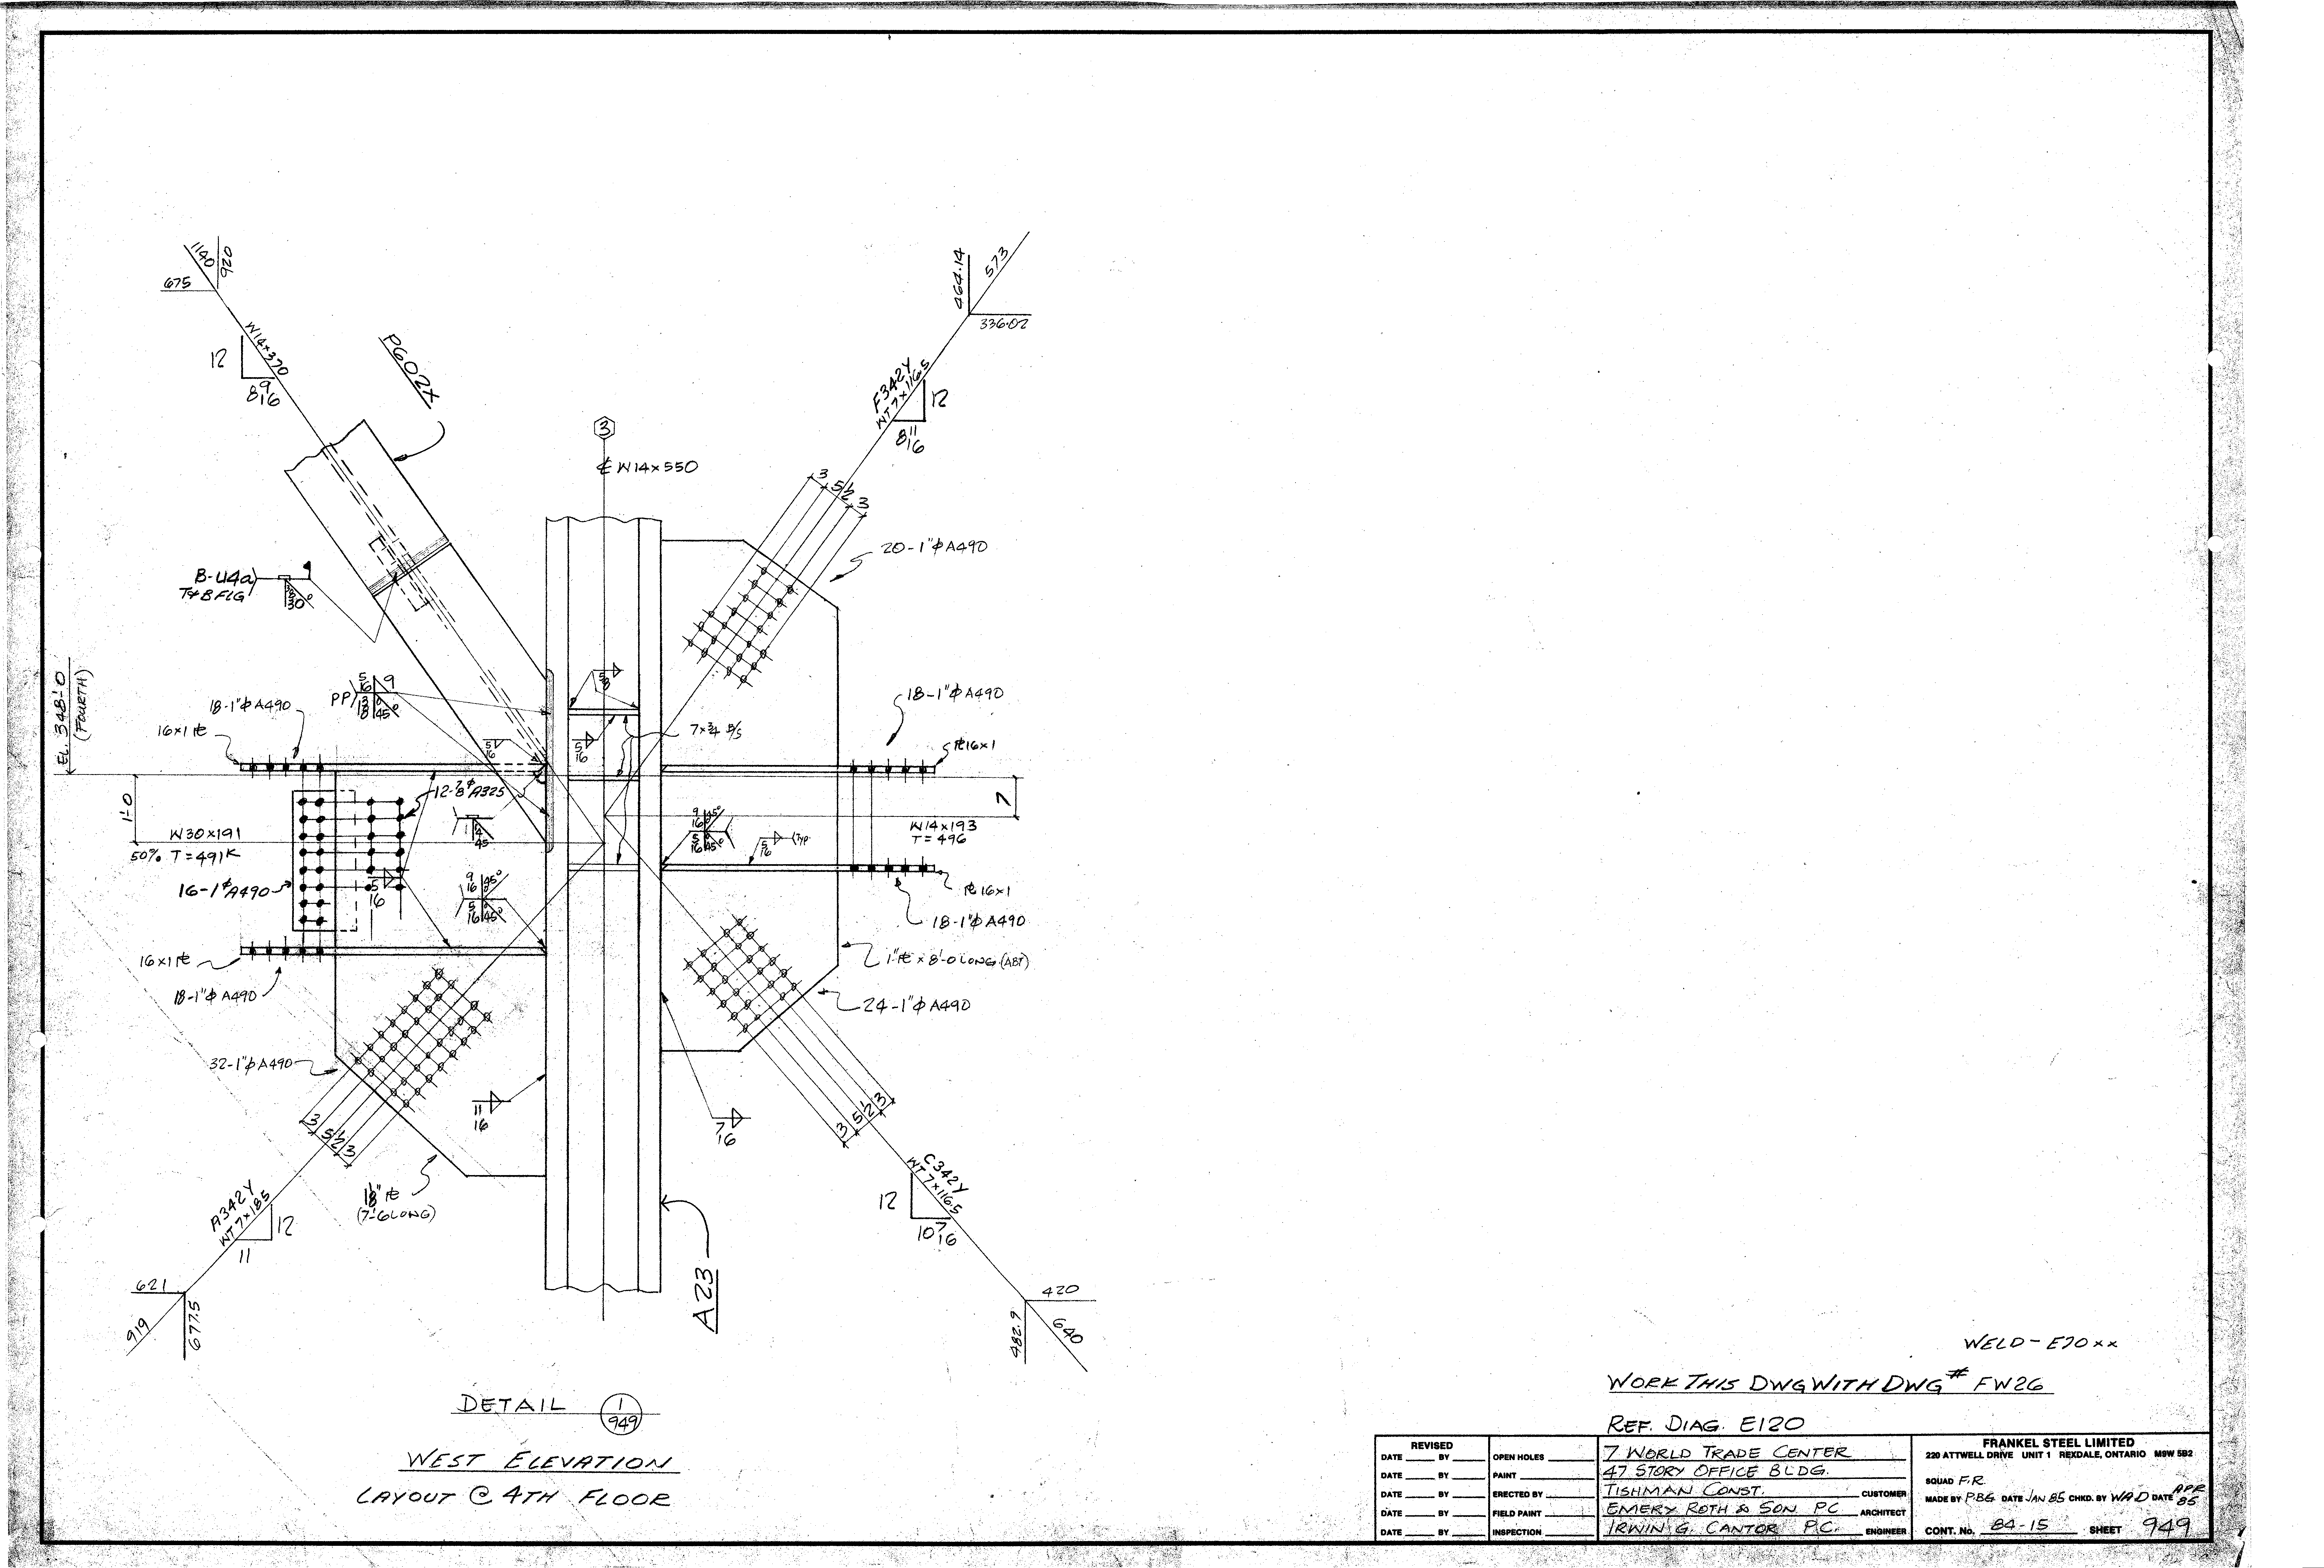
| 0949.png | 379.4 KB | 0949 | WEST ELEVATION - LAYOUT @ 4TH FLOOR | https://911warroom.com/model/files/WTC7/DRAWINGS/STRUCTURAL/DETAILS-PNG/0949.png |
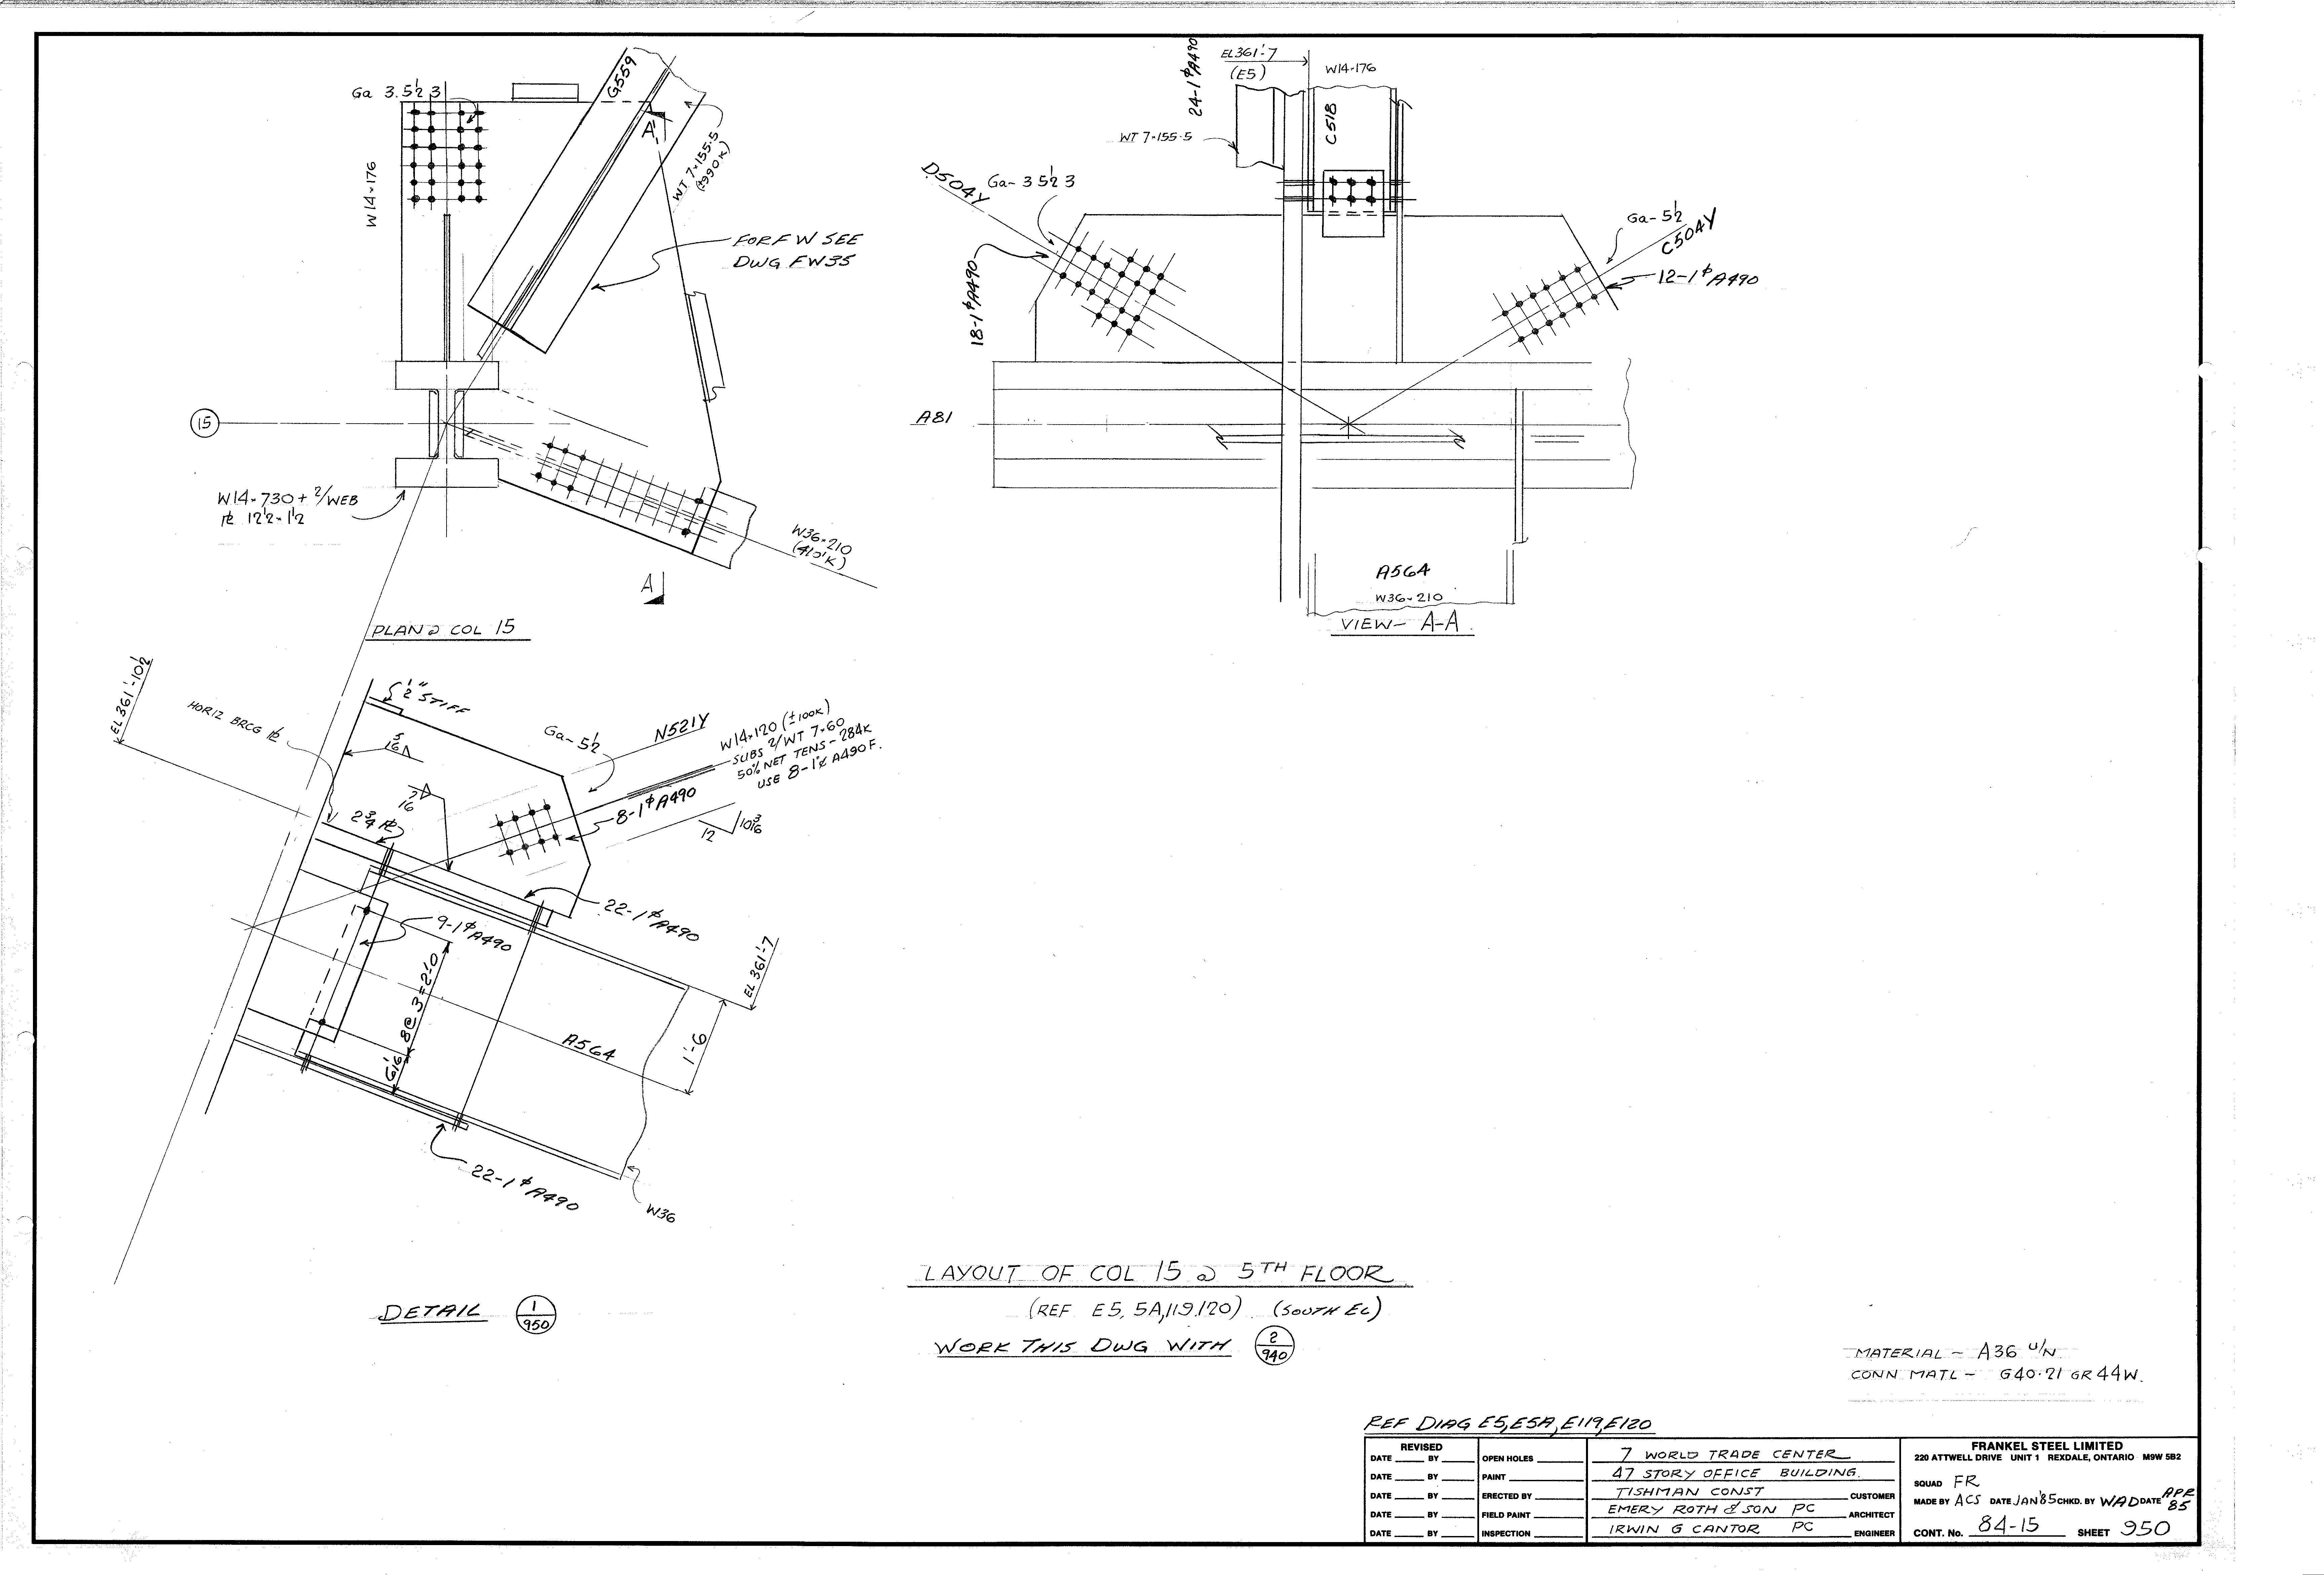
| 0950.png | 213.4 KB | 0950 | LAYOUT OF COL 15 @ 5TH FLOOR (SOUTH EL) | https://911warroom.com/model/files/WTC7/DRAWINGS/STRUCTURAL/DETAILS-PNG/0950.png |
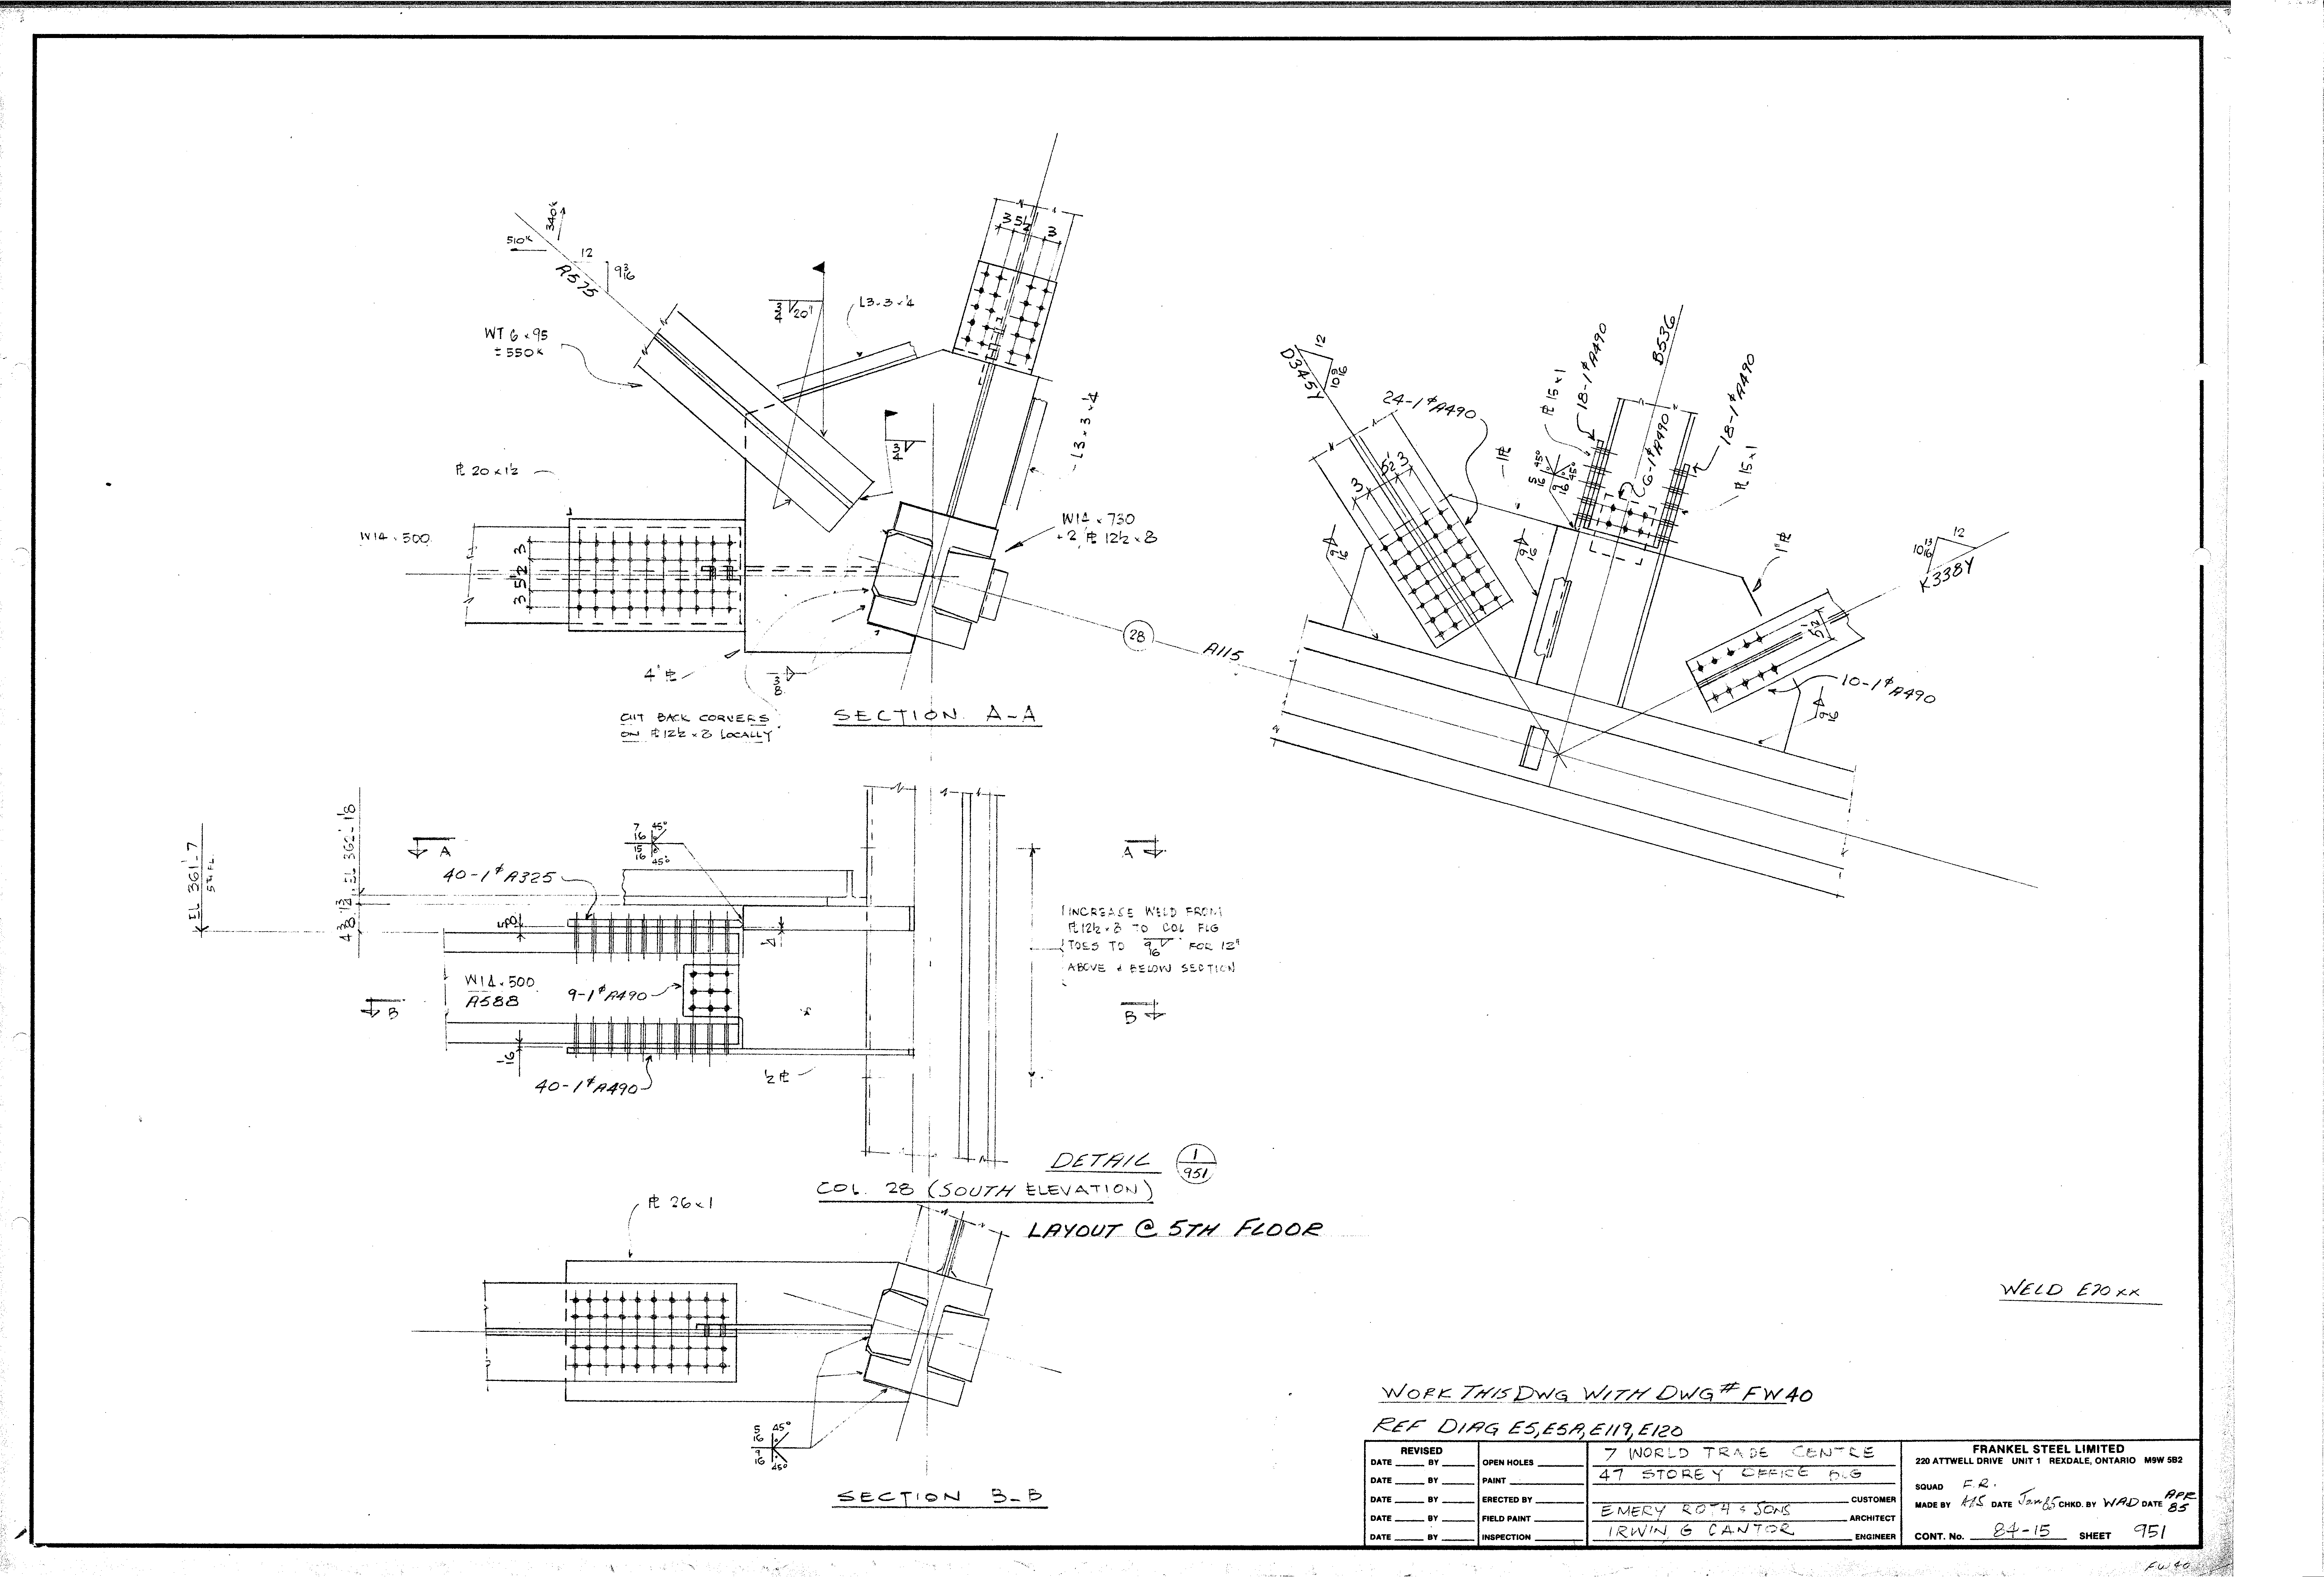
| 0951.png | 276.1 KB | 0951 | COL. 28 (SOUTH ELEVATION) - LAYOUT @ 5TH FLOOR | https://911warroom.com/model/files/WTC7/DRAWINGS/STRUCTURAL/DETAILS-PNG/0951.png |
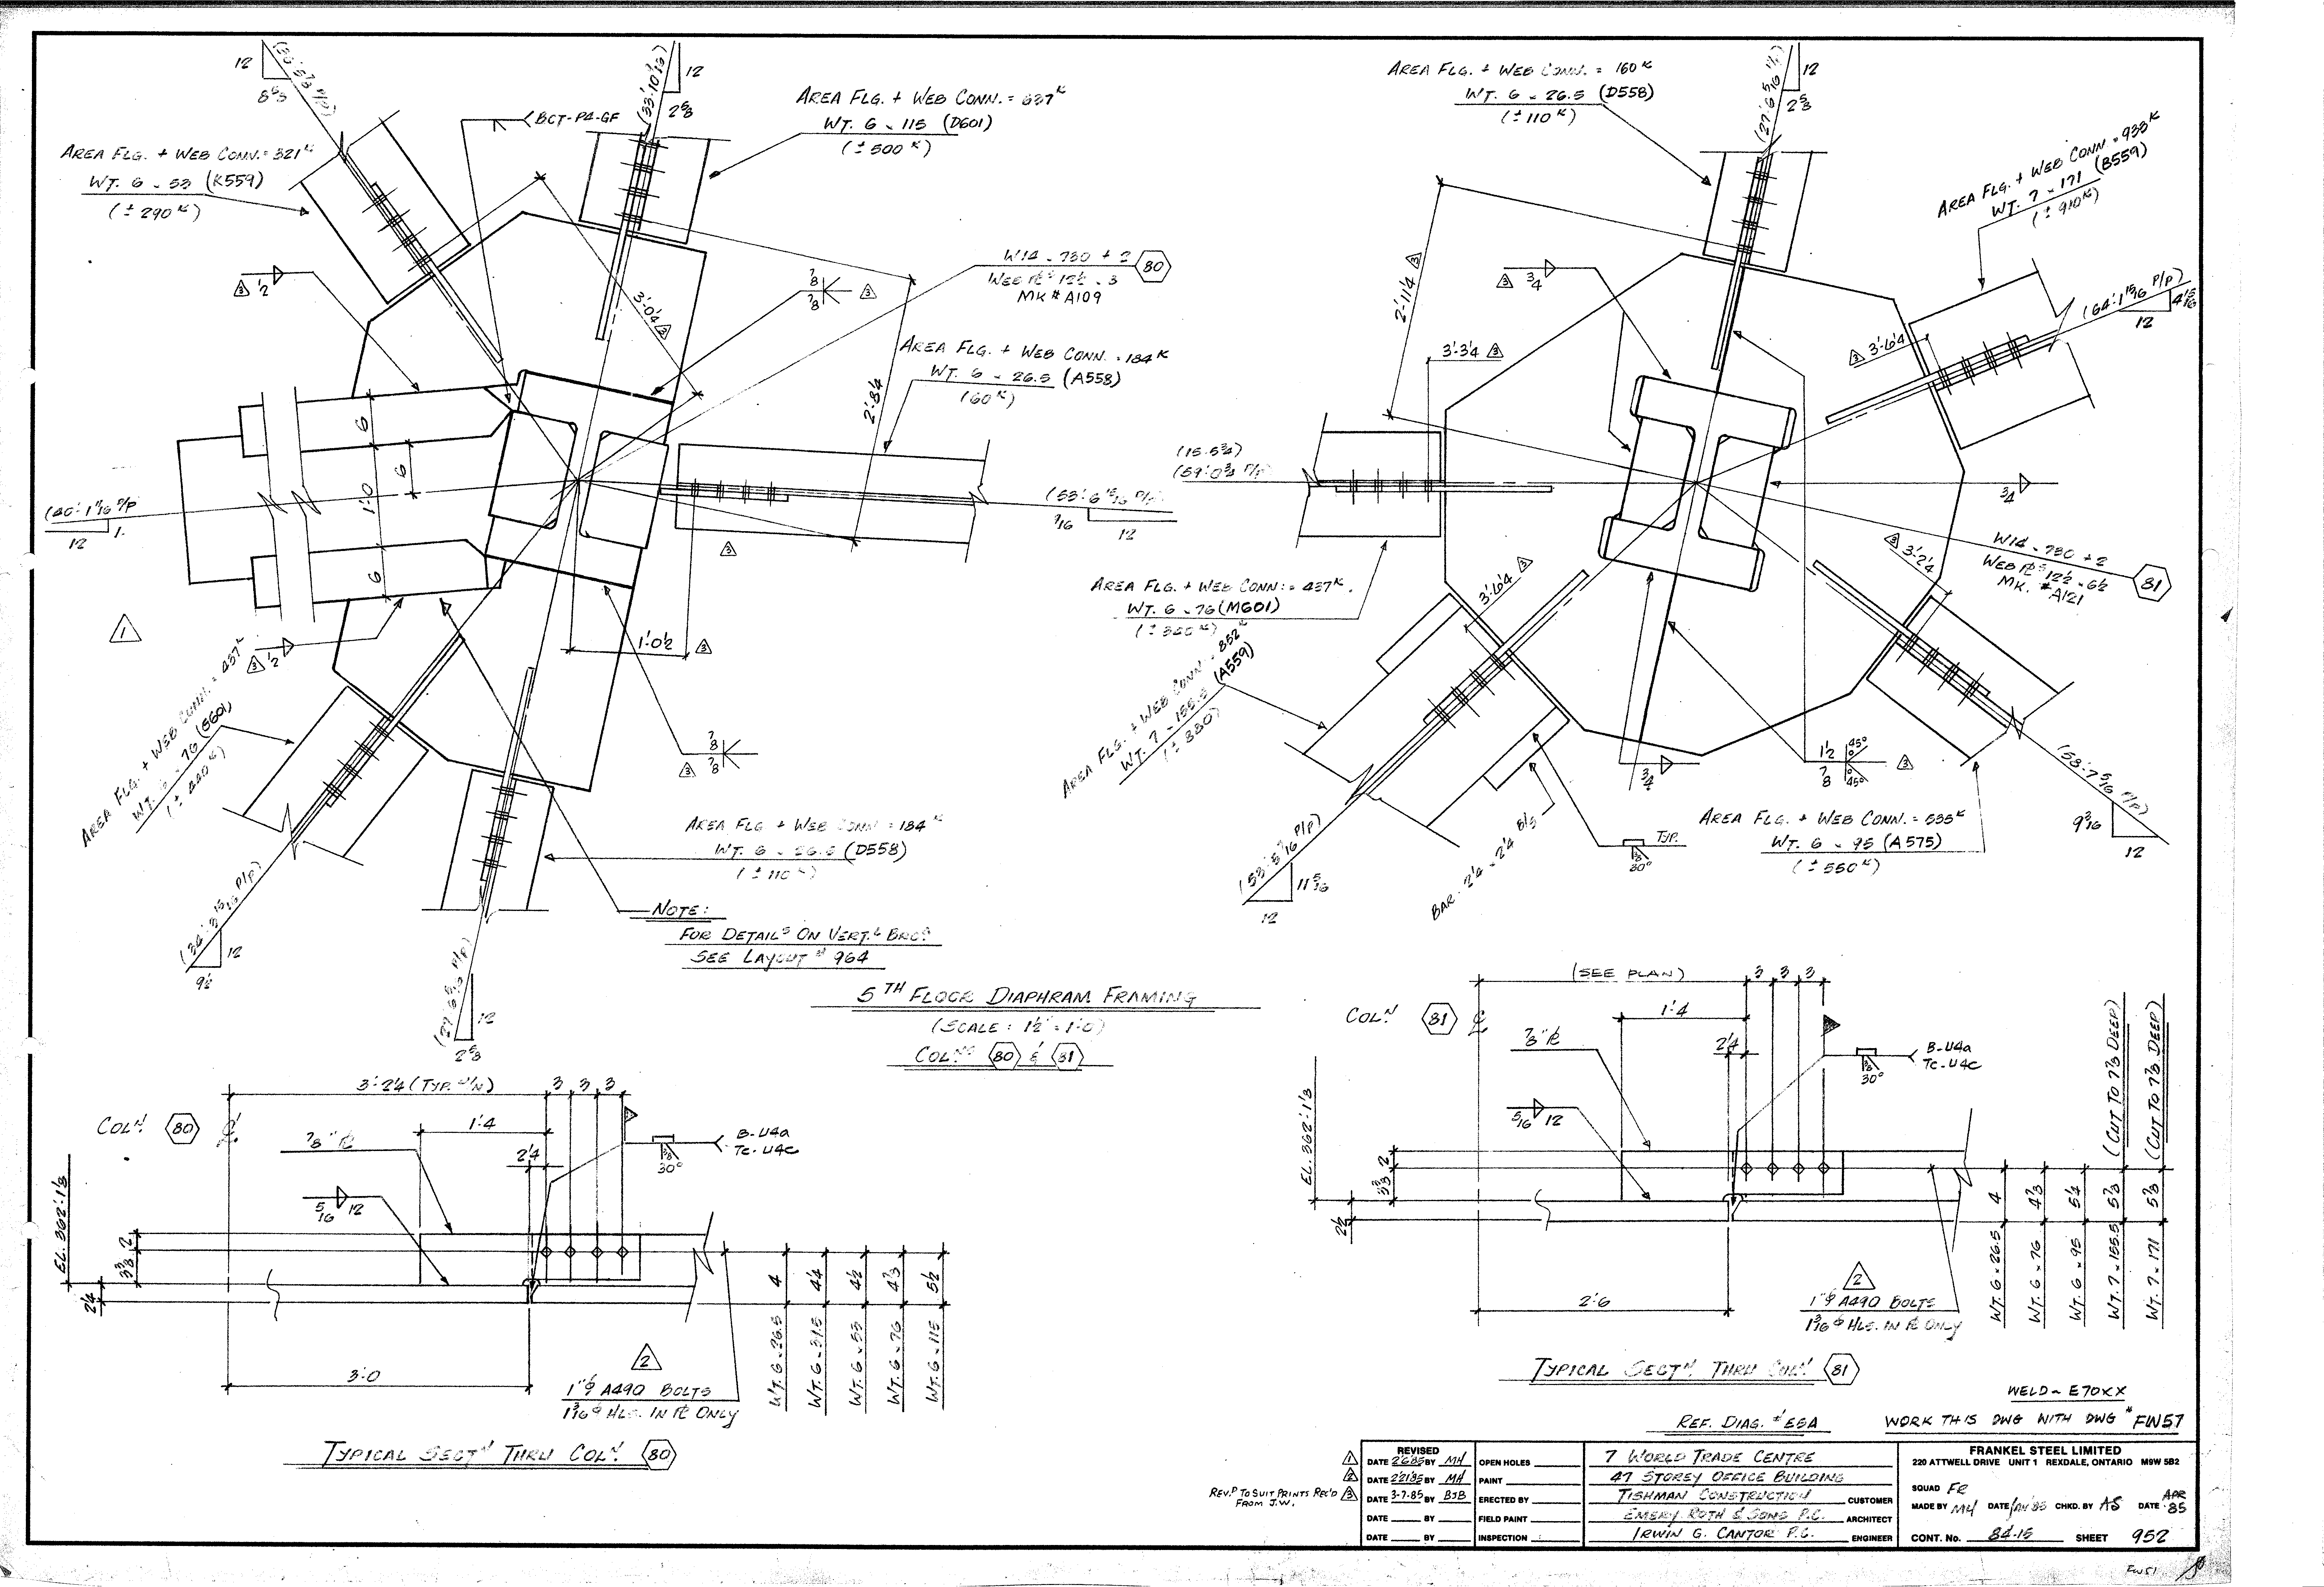
| 0952.png | 429.7 KB | 0952 | 5TH FLOOR DIAPHRAM FRAMING - COLS. 80 & 81 | https://911warroom.com/model/files/WTC7/DRAWINGS/STRUCTURAL/DETAILS-PNG/0952.png |
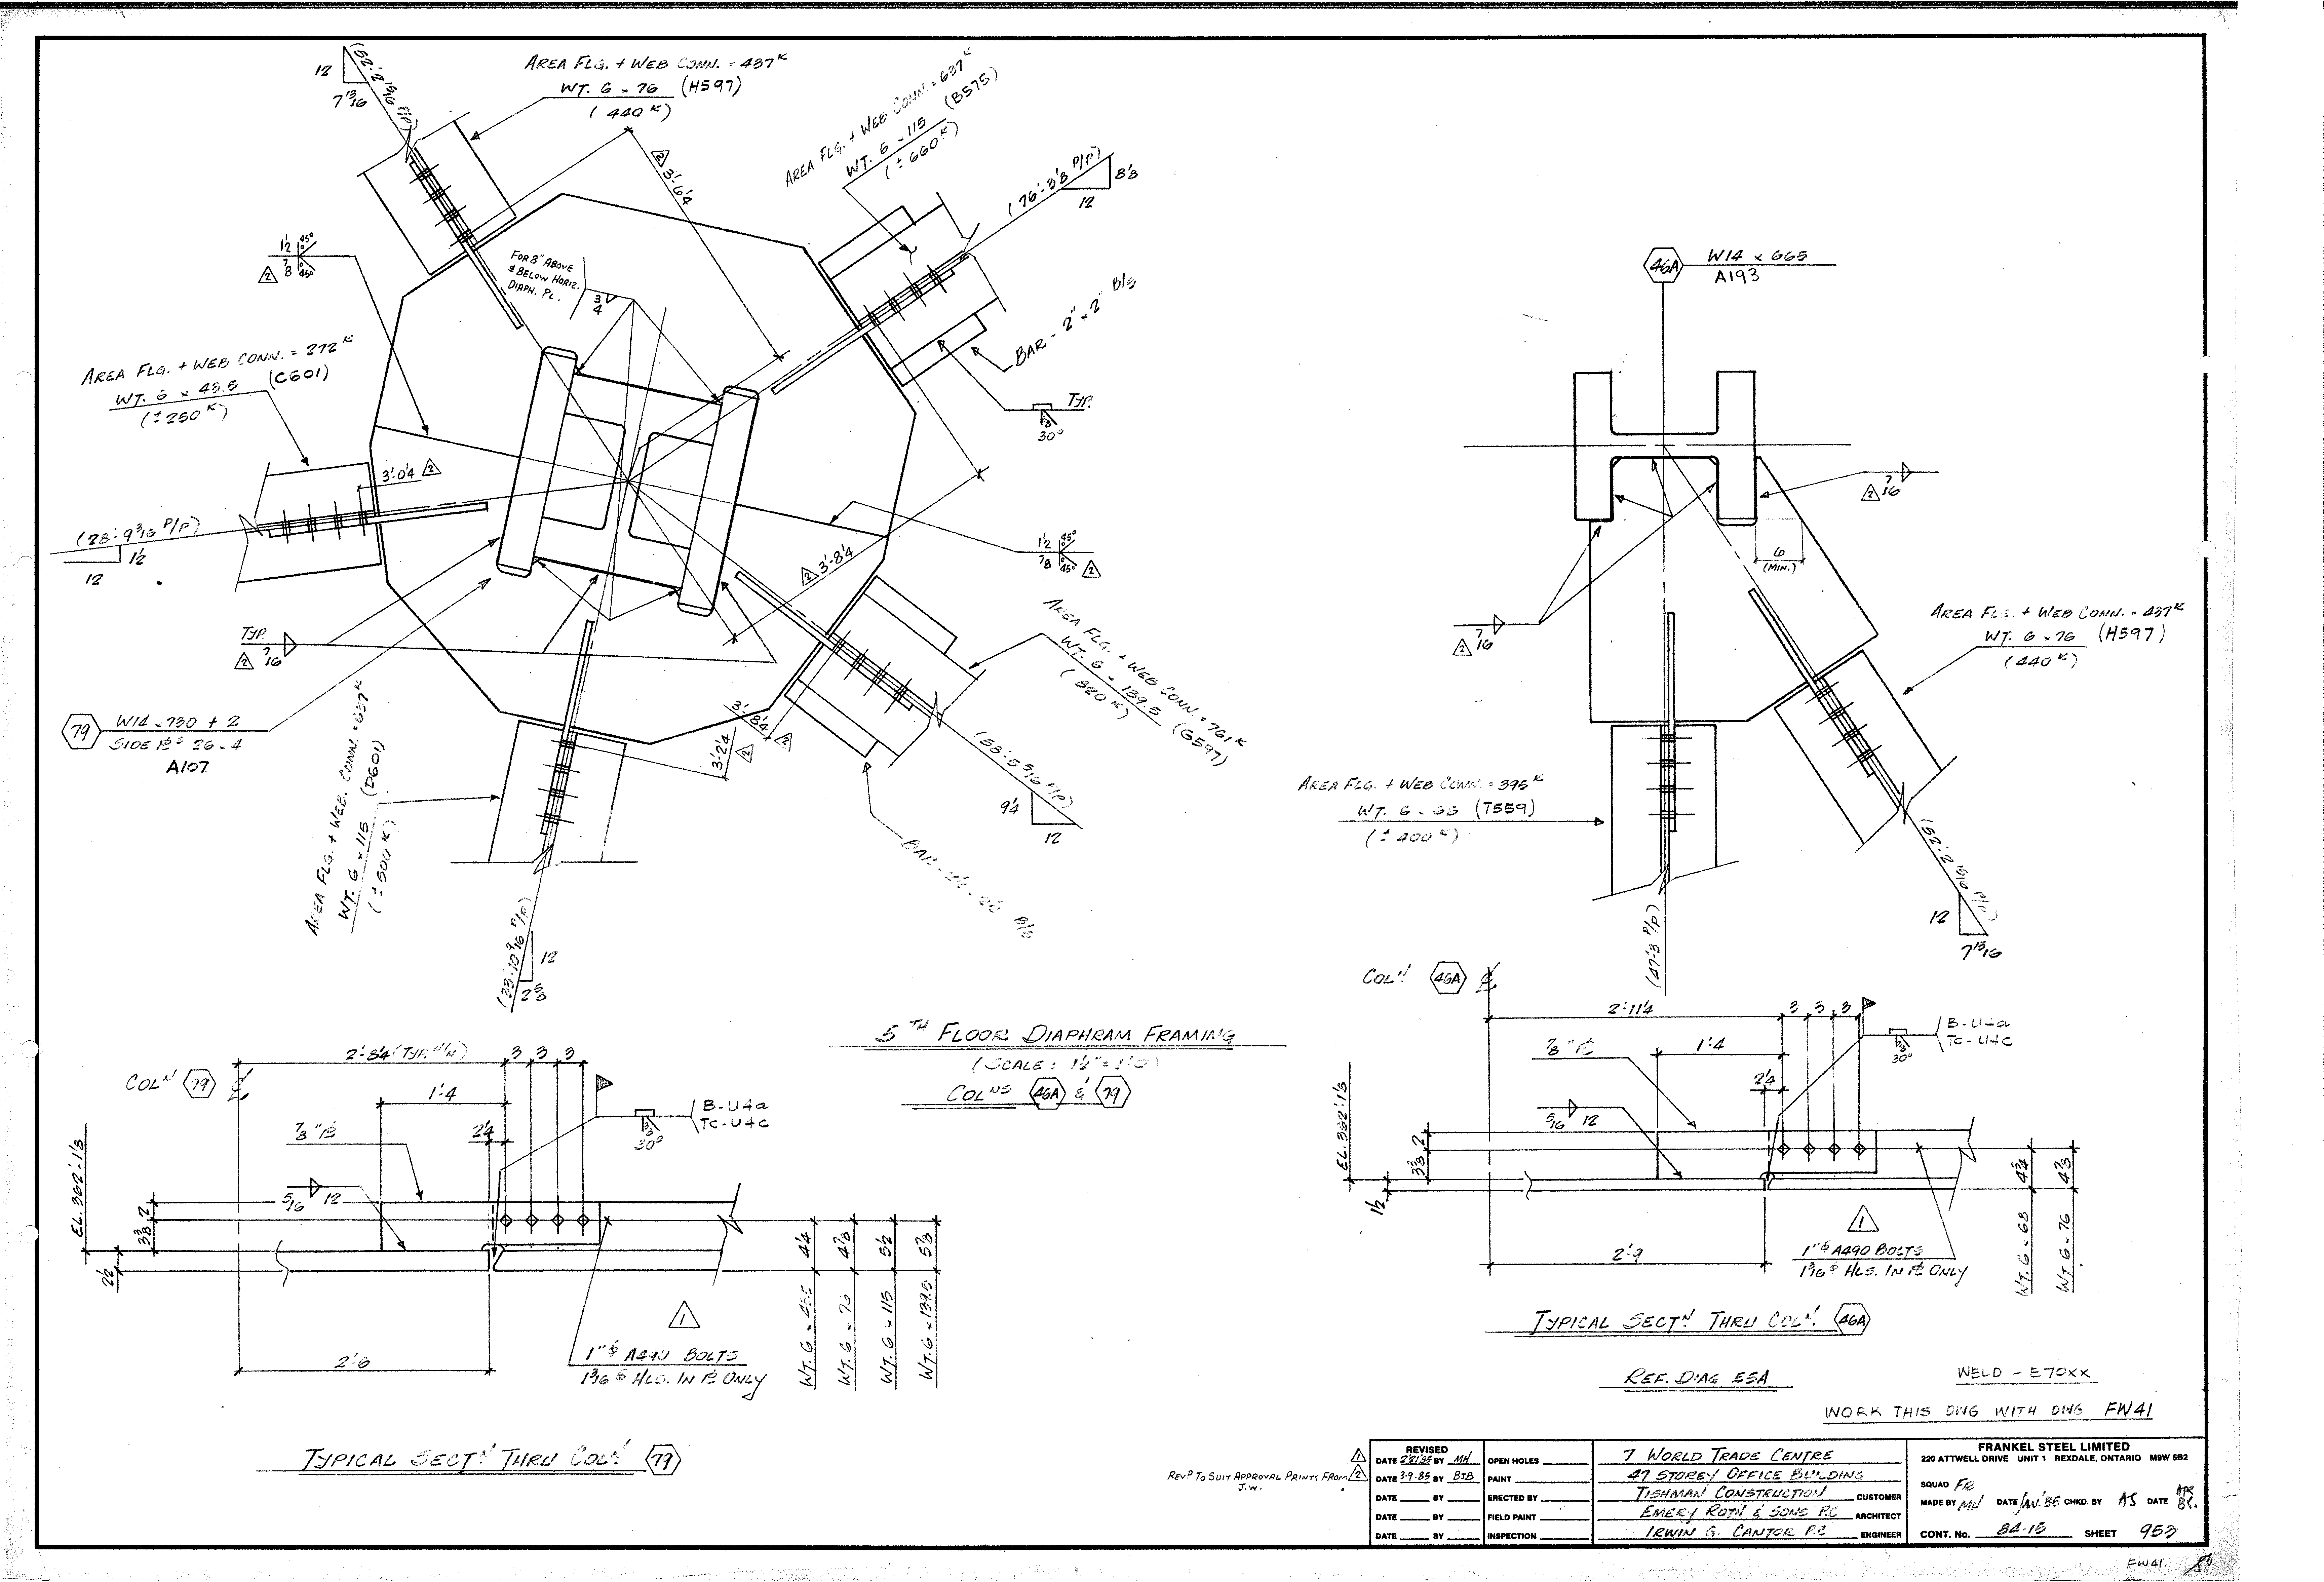
| 0953.png | 346.7 KB | 0953 | 5TH FLOOR DIAPHRAM FRAMING - COLS. 46A & 79 | https://911warroom.com/model/files/WTC7/DRAWINGS/STRUCTURAL/DETAILS-PNG/0953.png |
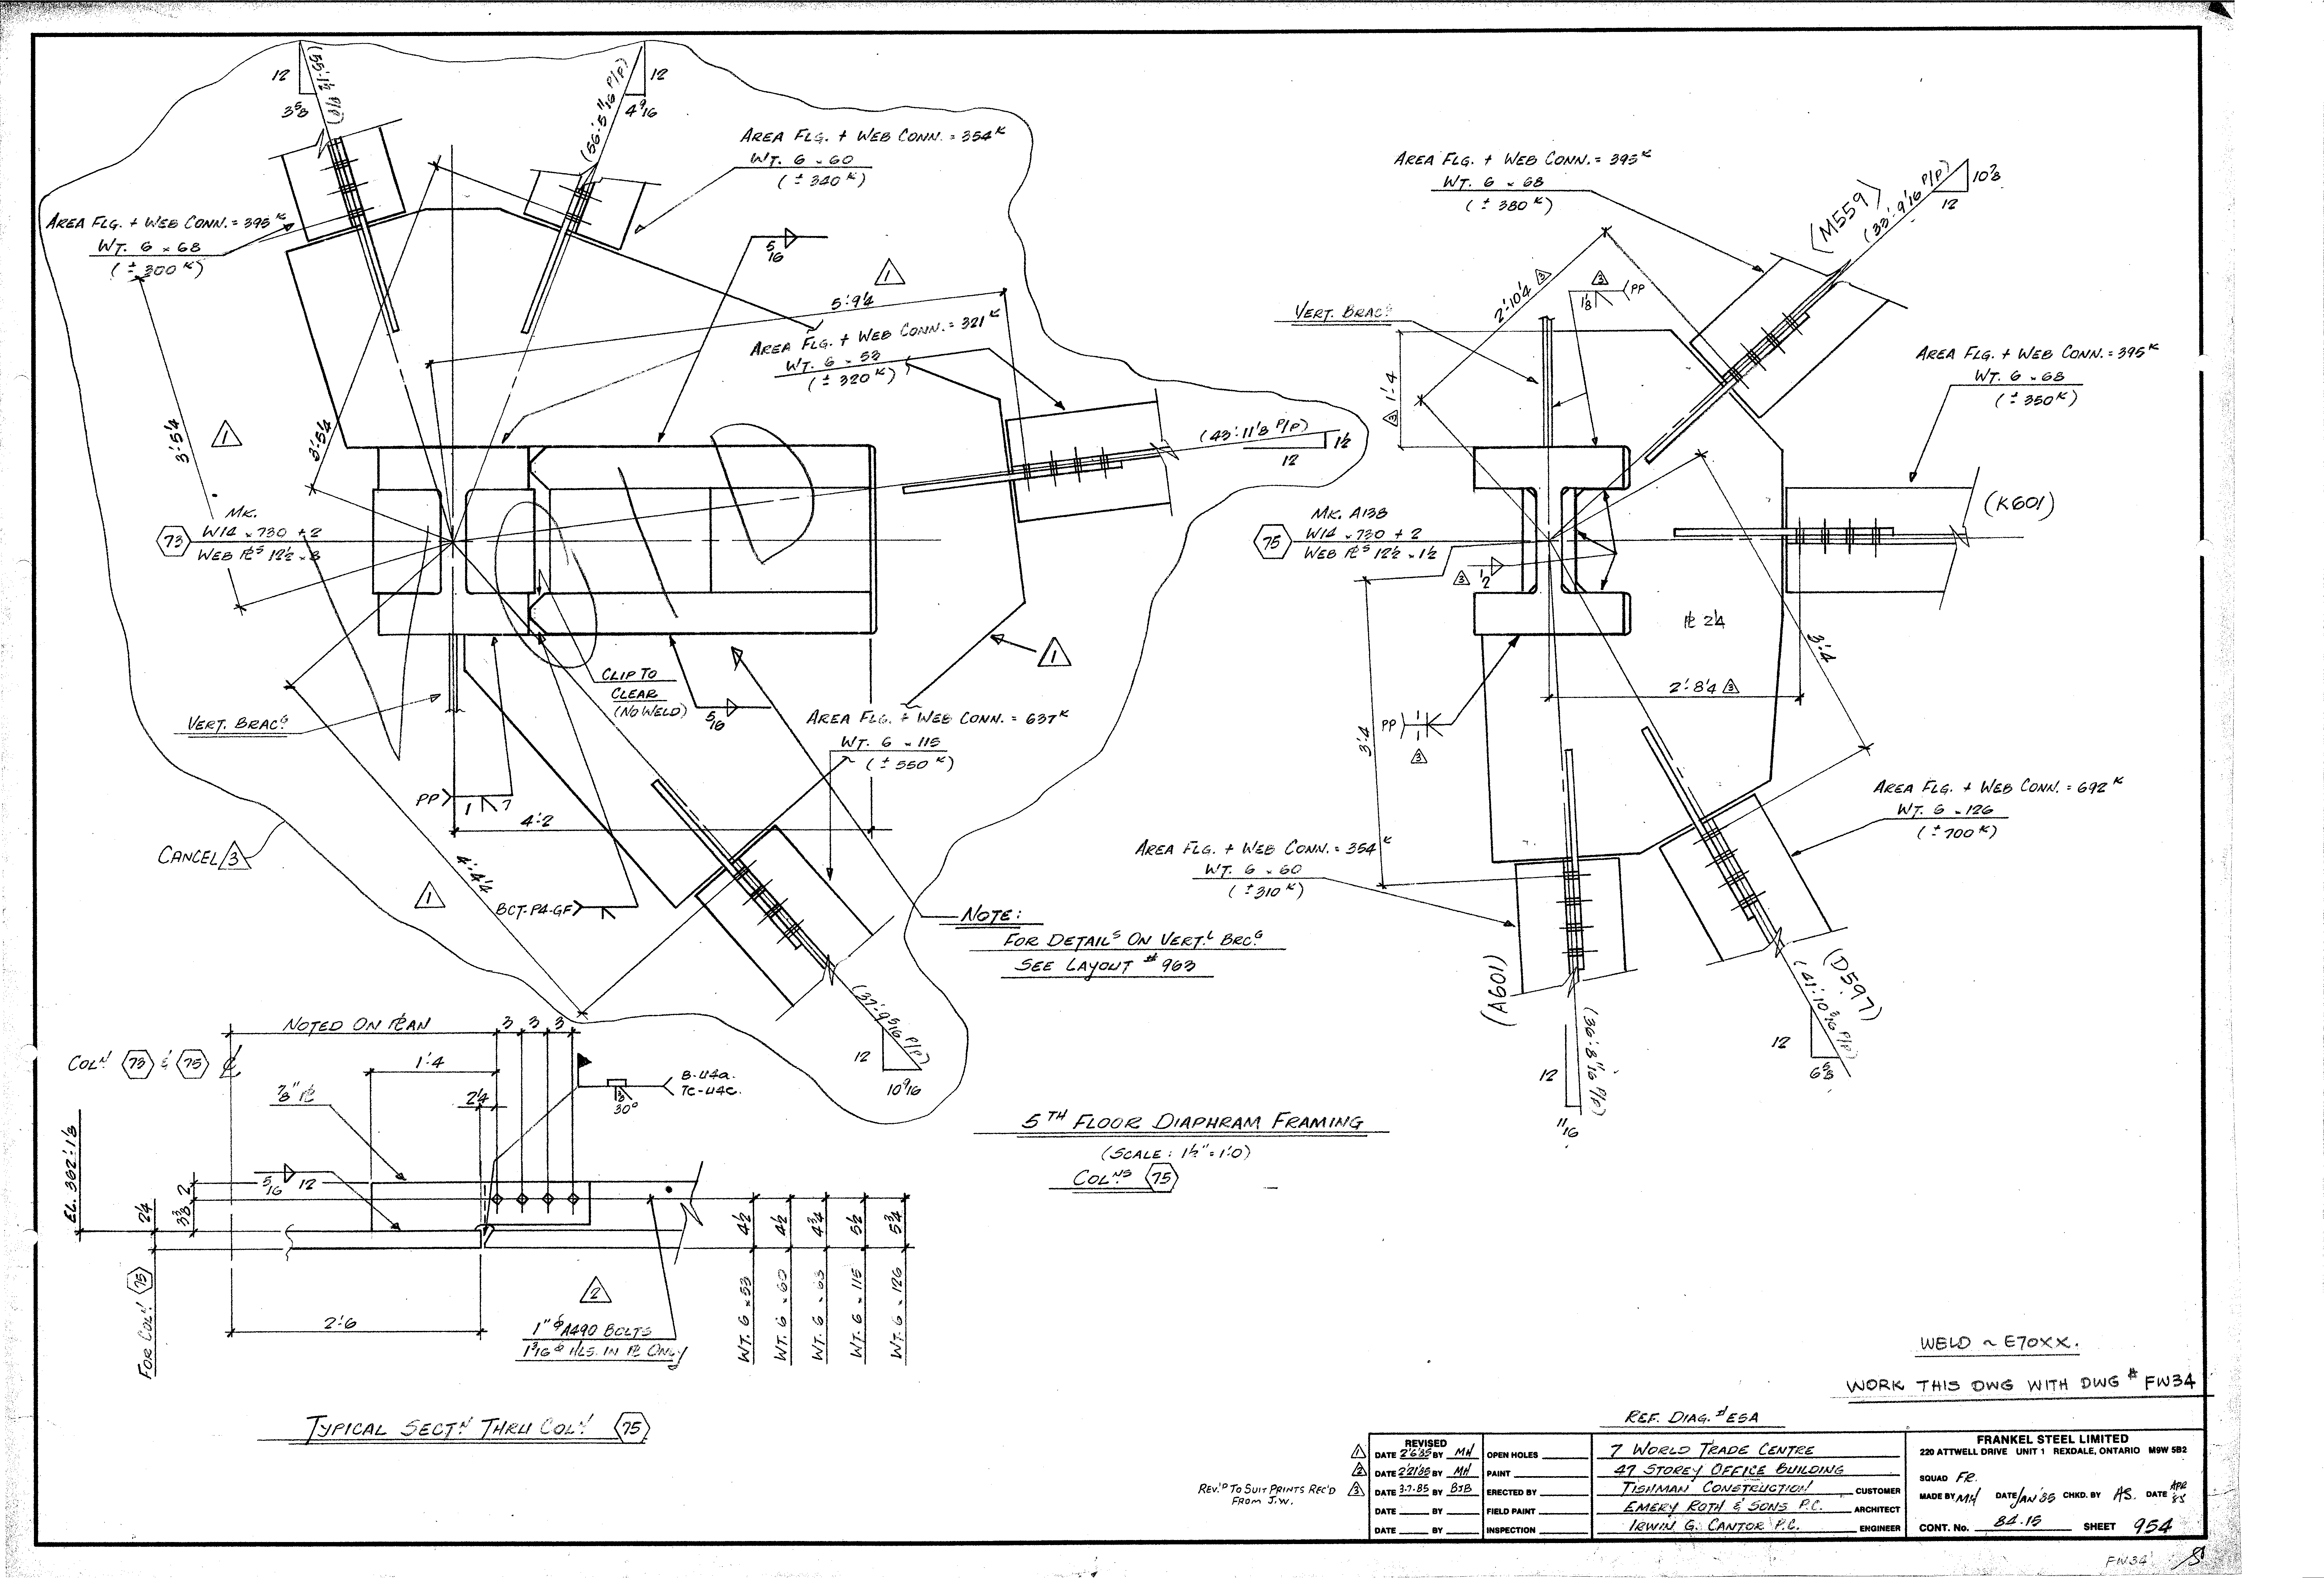
| 0954.png | 385.3 KB | 0954 | 5TH FLOOR DIAPHRAM FRAMING - COL. 75 | https://911warroom.com/model/files/WTC7/DRAWINGS/STRUCTURAL/DETAILS-PNG/0954.png |
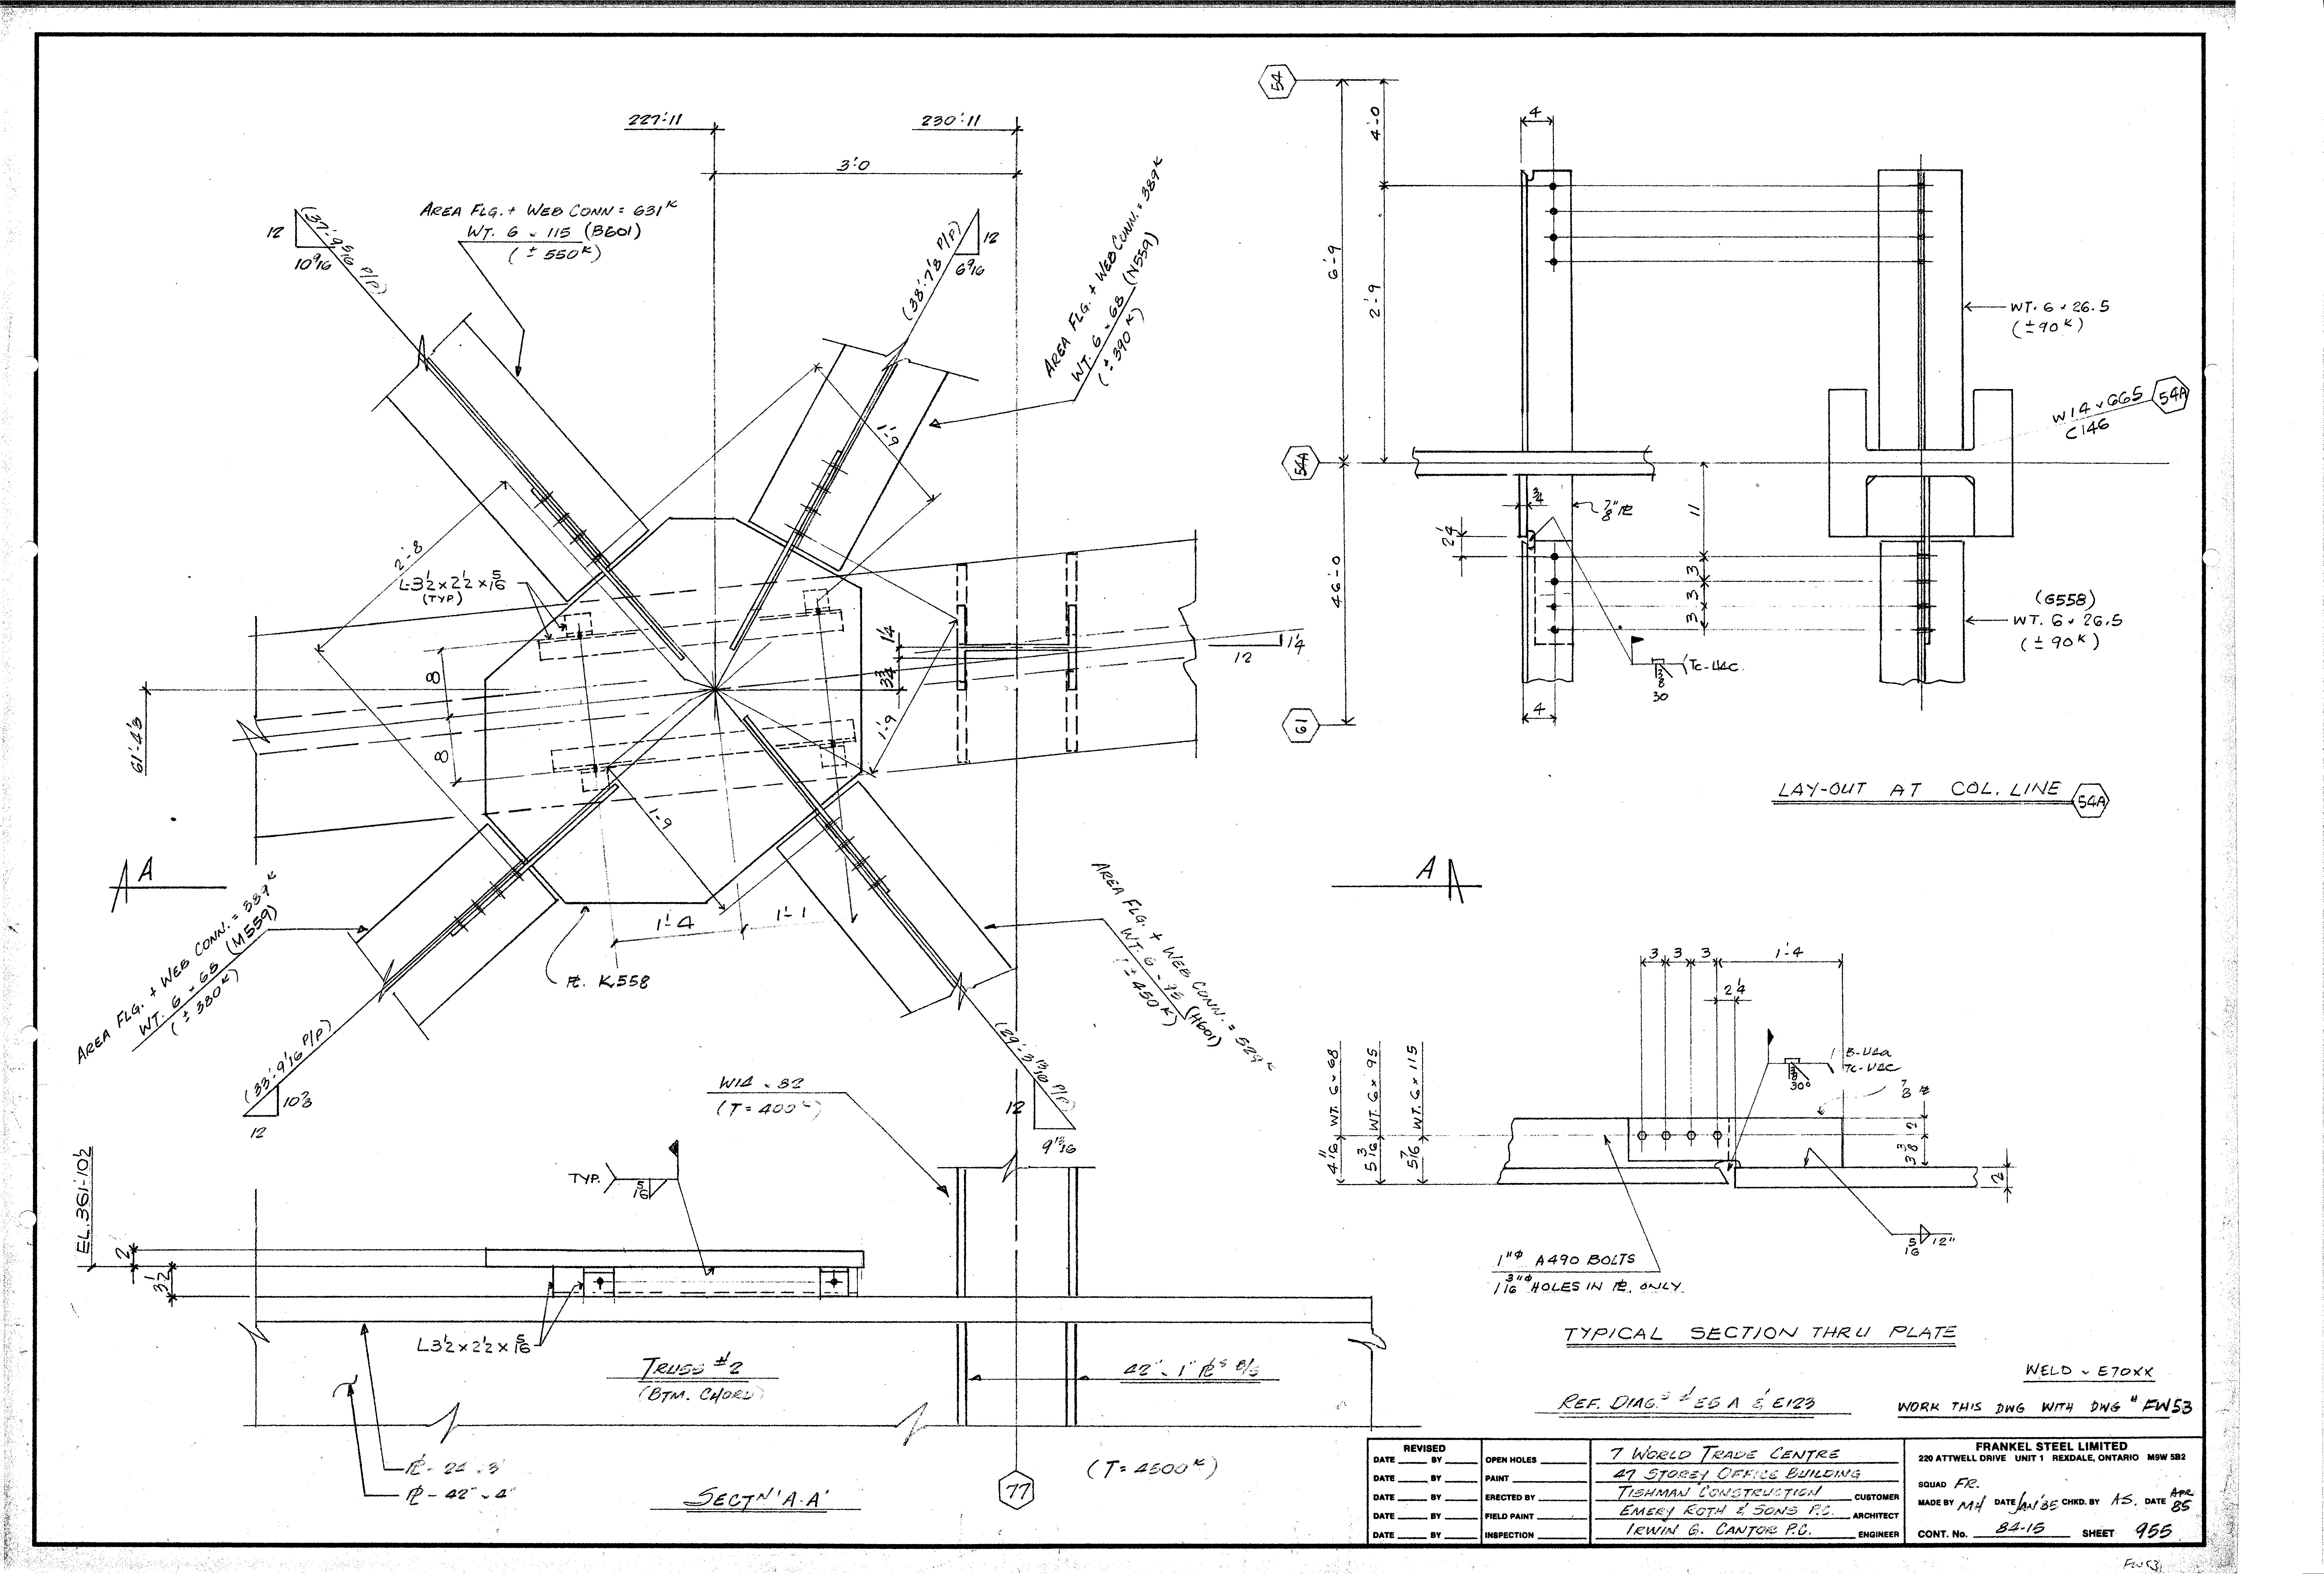
| 0955.png | 361.1 KB | 0955 | LAY-OUT AT COL. LINE 54A | https://911warroom.com/model/files/WTC7/DRAWINGS/STRUCTURAL/DETAILS-PNG/0955.png |
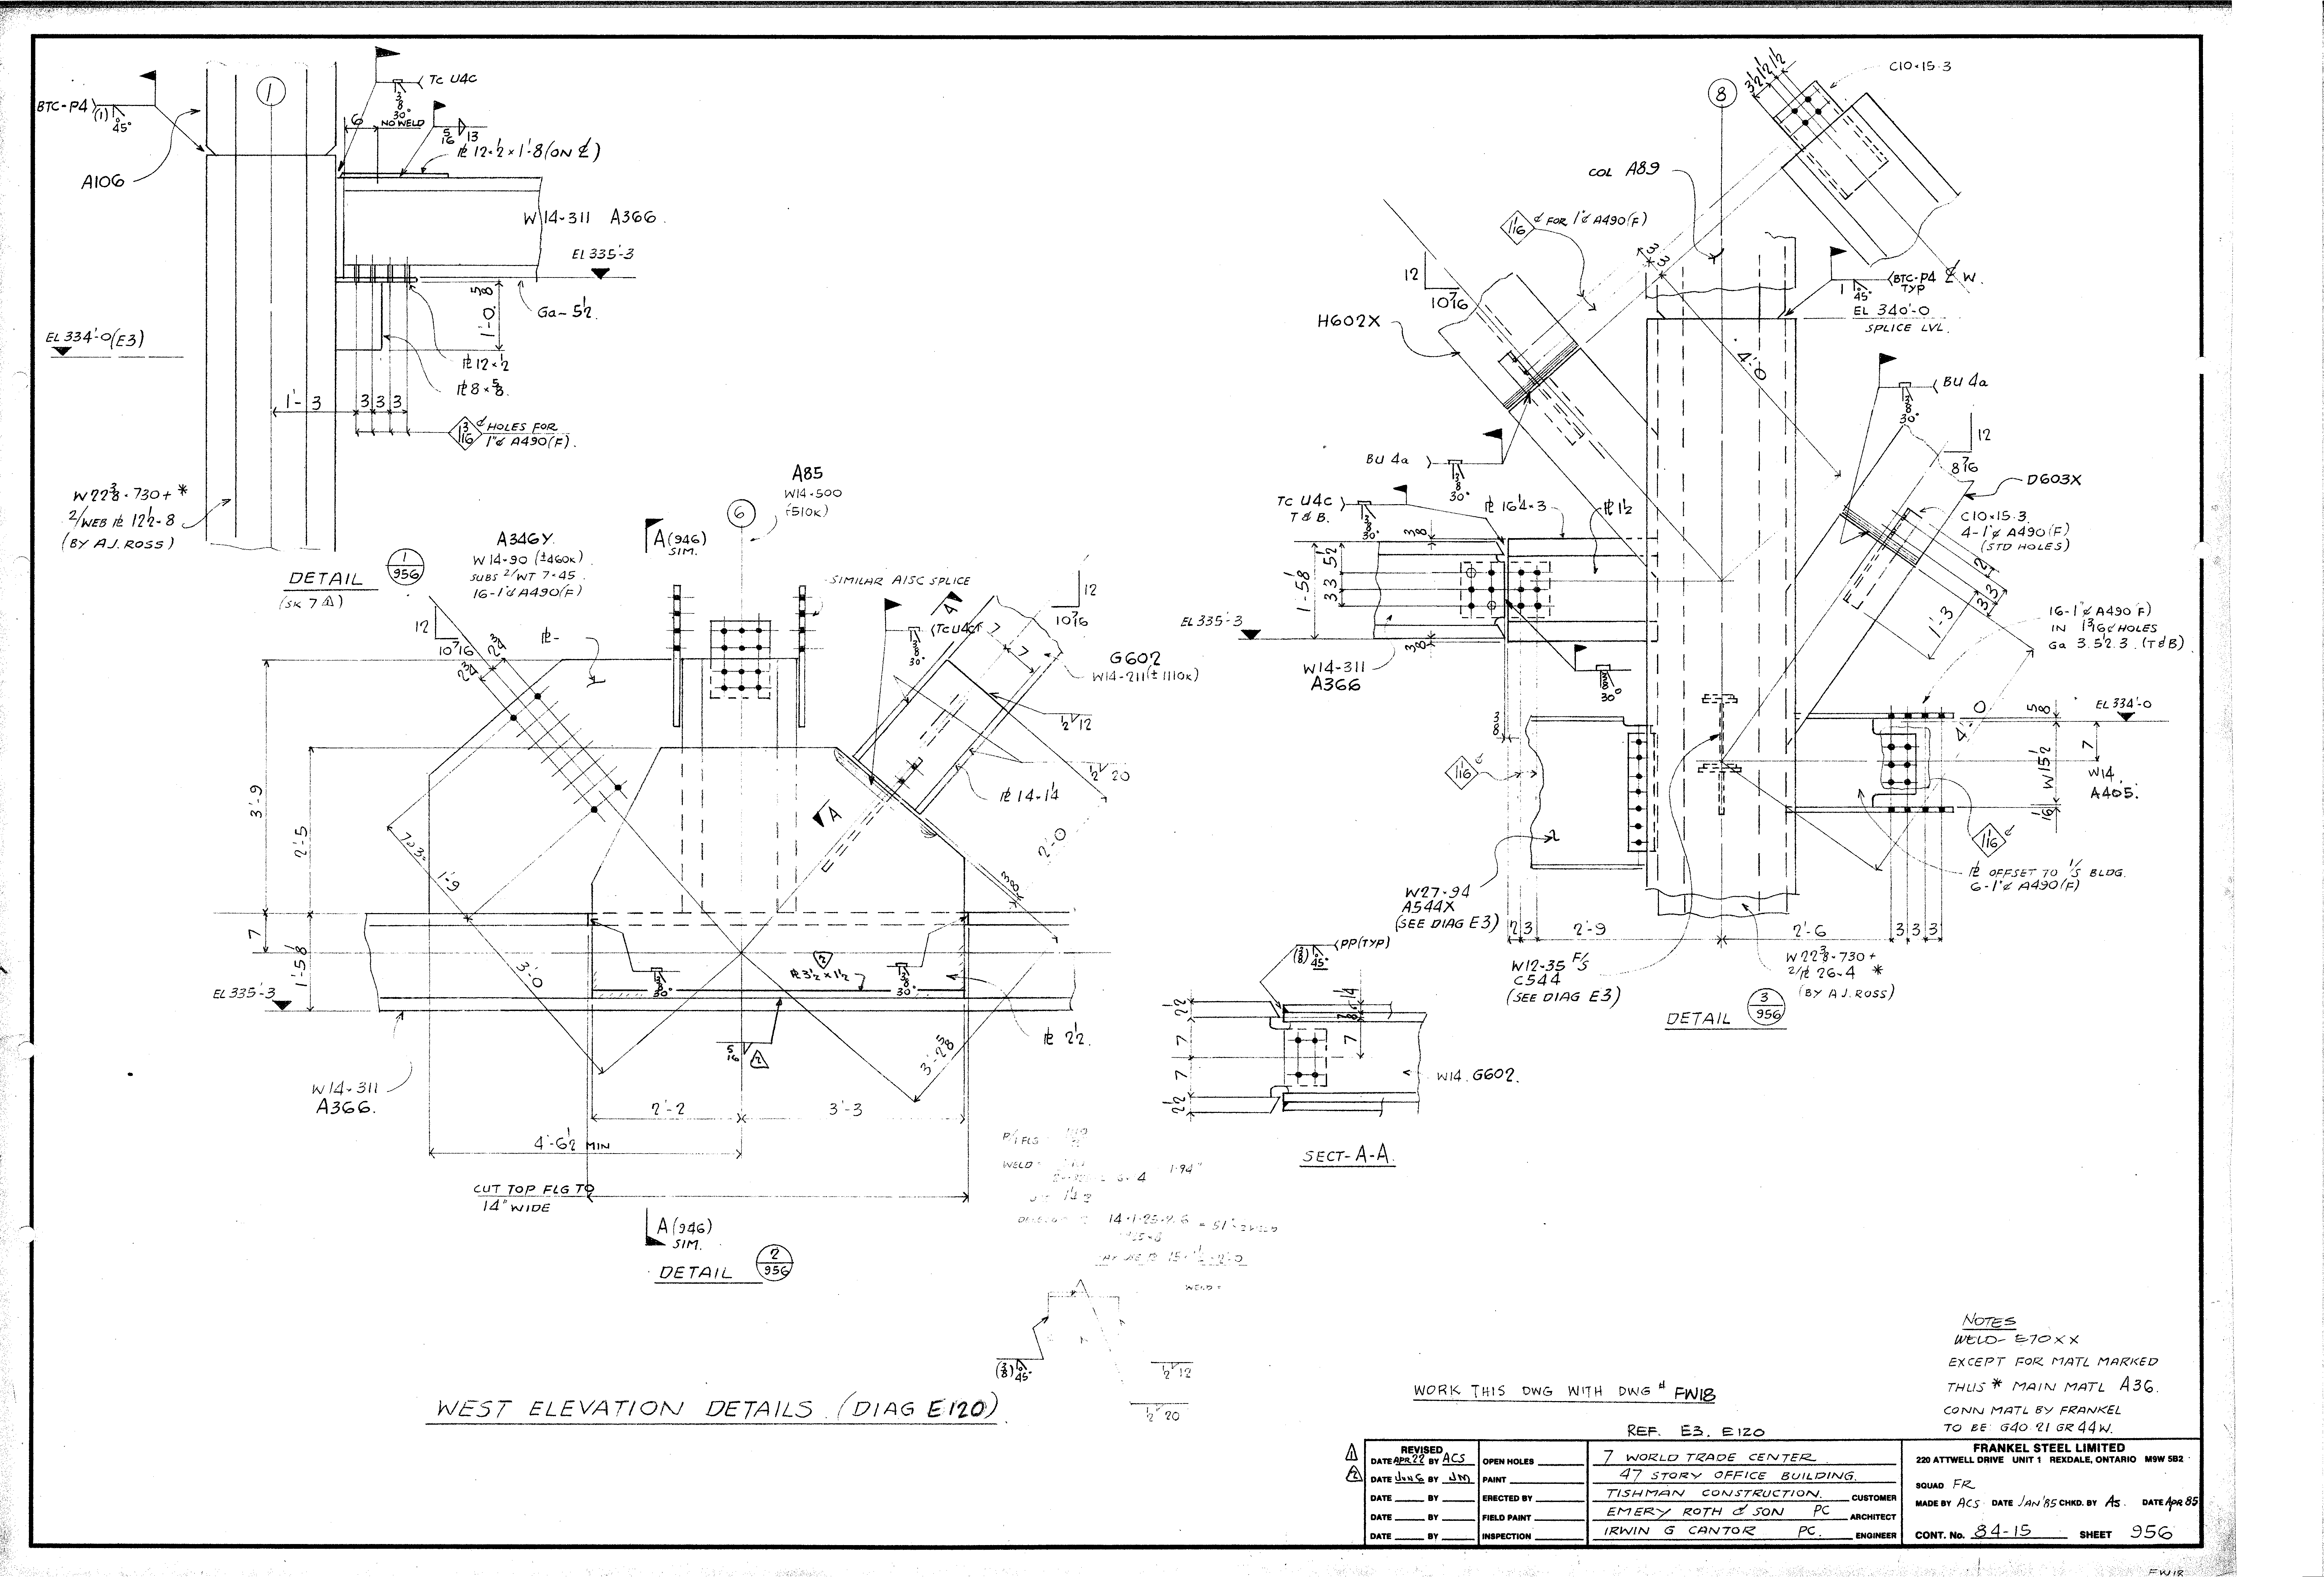
| 0956.png | 352.7 KB | 0956 | WEST ELEVATION DETAILS (DIAG E120) | https://911warroom.com/model/files/WTC7/DRAWINGS/STRUCTURAL/DETAILS-PNG/0956.png |
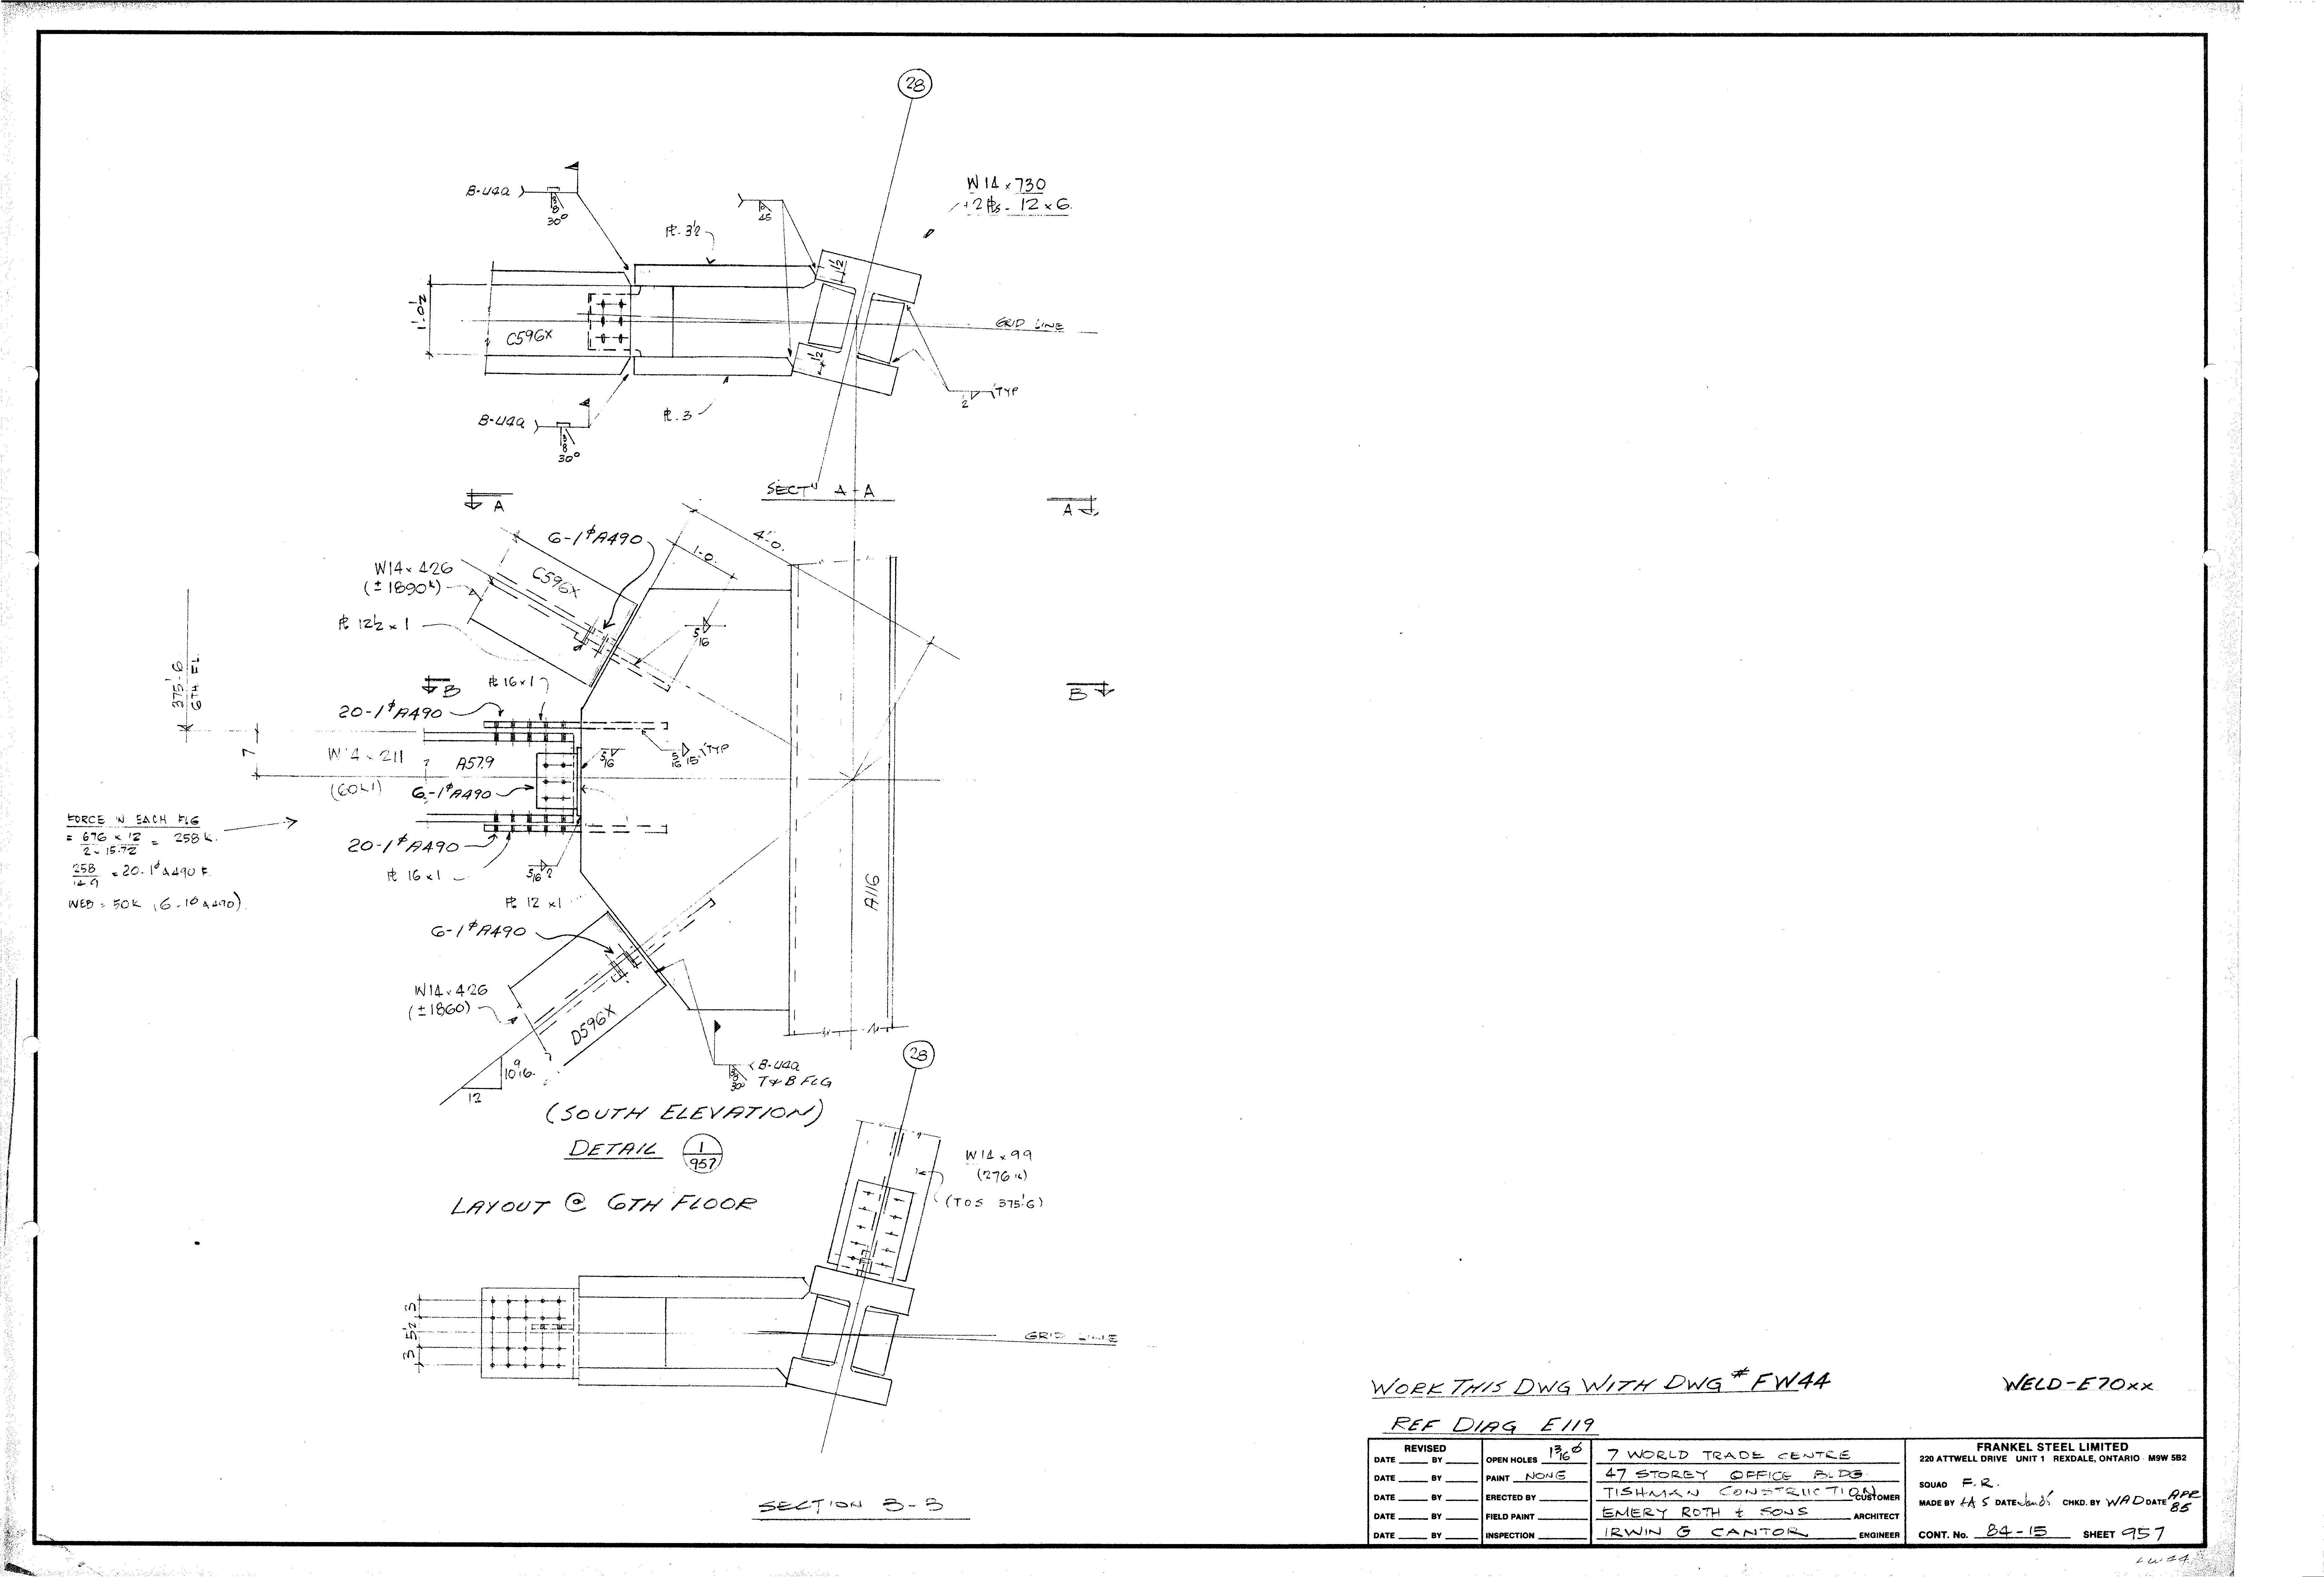
| 0957.png | 197.6 KB | 0957 | SOUTH ELEVATION - LAYOUT @ 6TH FLOOR | https://911warroom.com/model/files/WTC7/DRAWINGS/STRUCTURAL/DETAILS-PNG/0957.png |
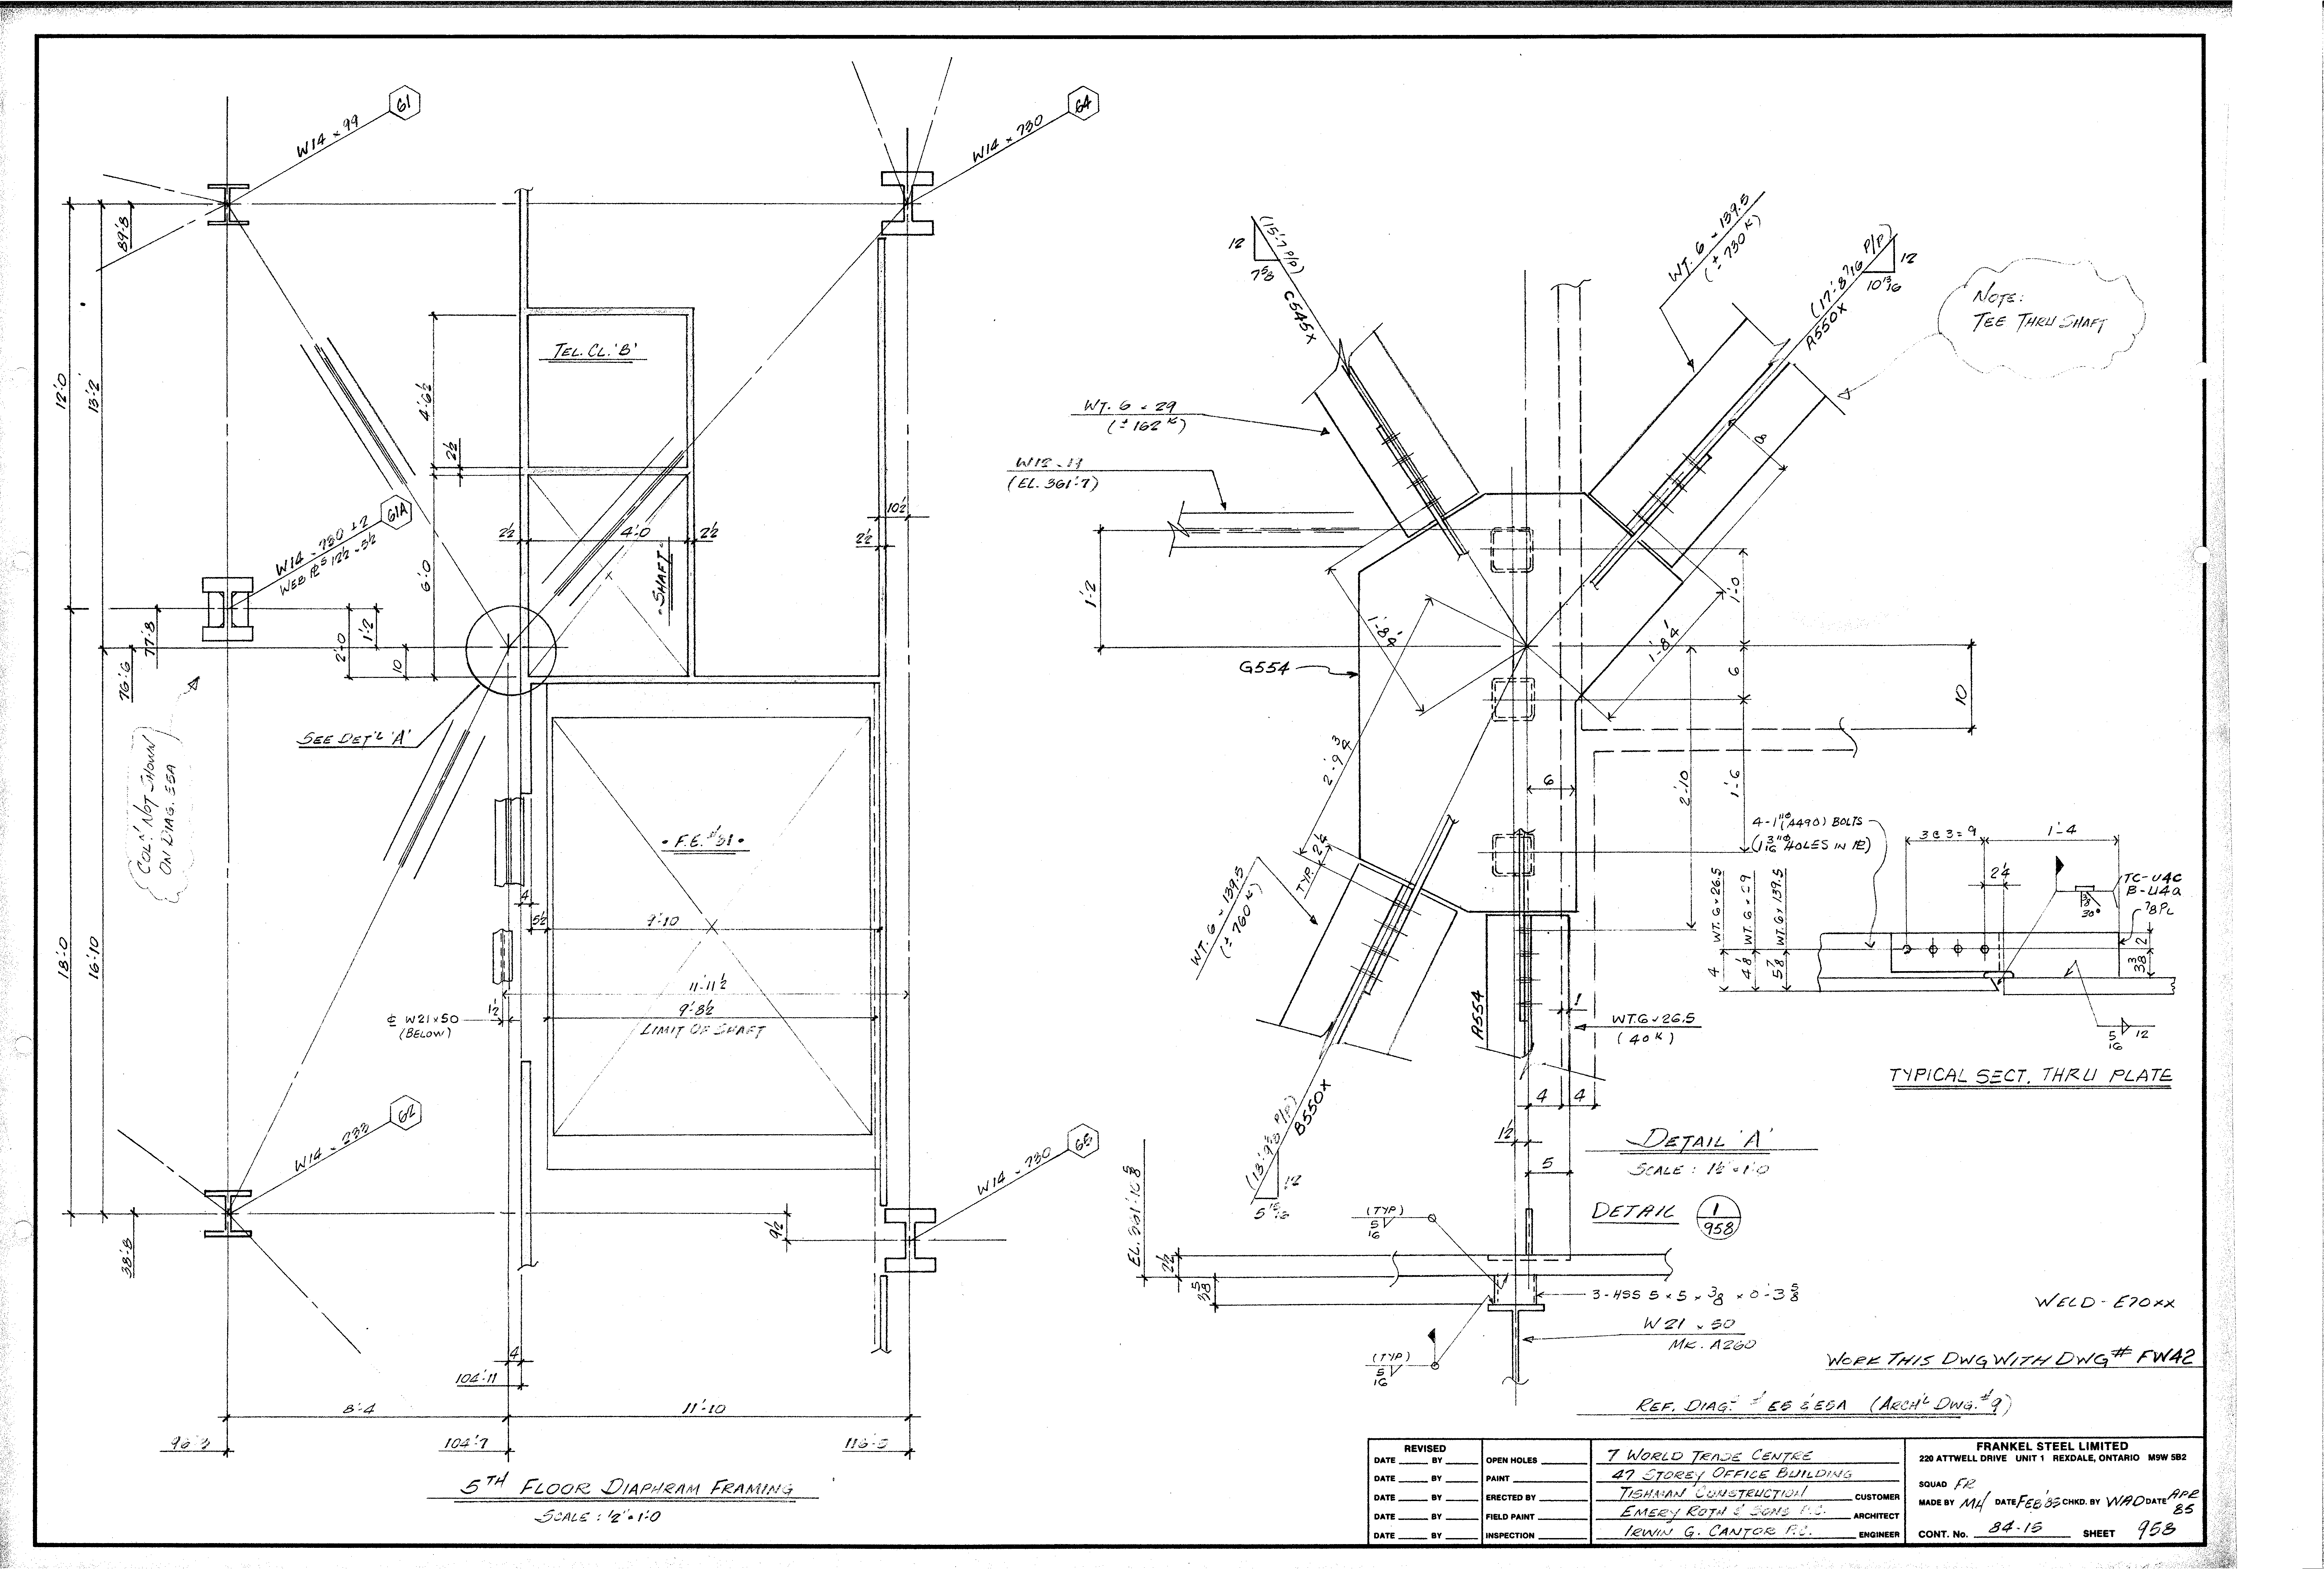
| 0958.png | 380.9 KB | 0958 | 5TH FLOOR DIAPHRAM FRAMING | https://911warroom.com/model/files/WTC7/DRAWINGS/STRUCTURAL/DETAILS-PNG/0958.png |
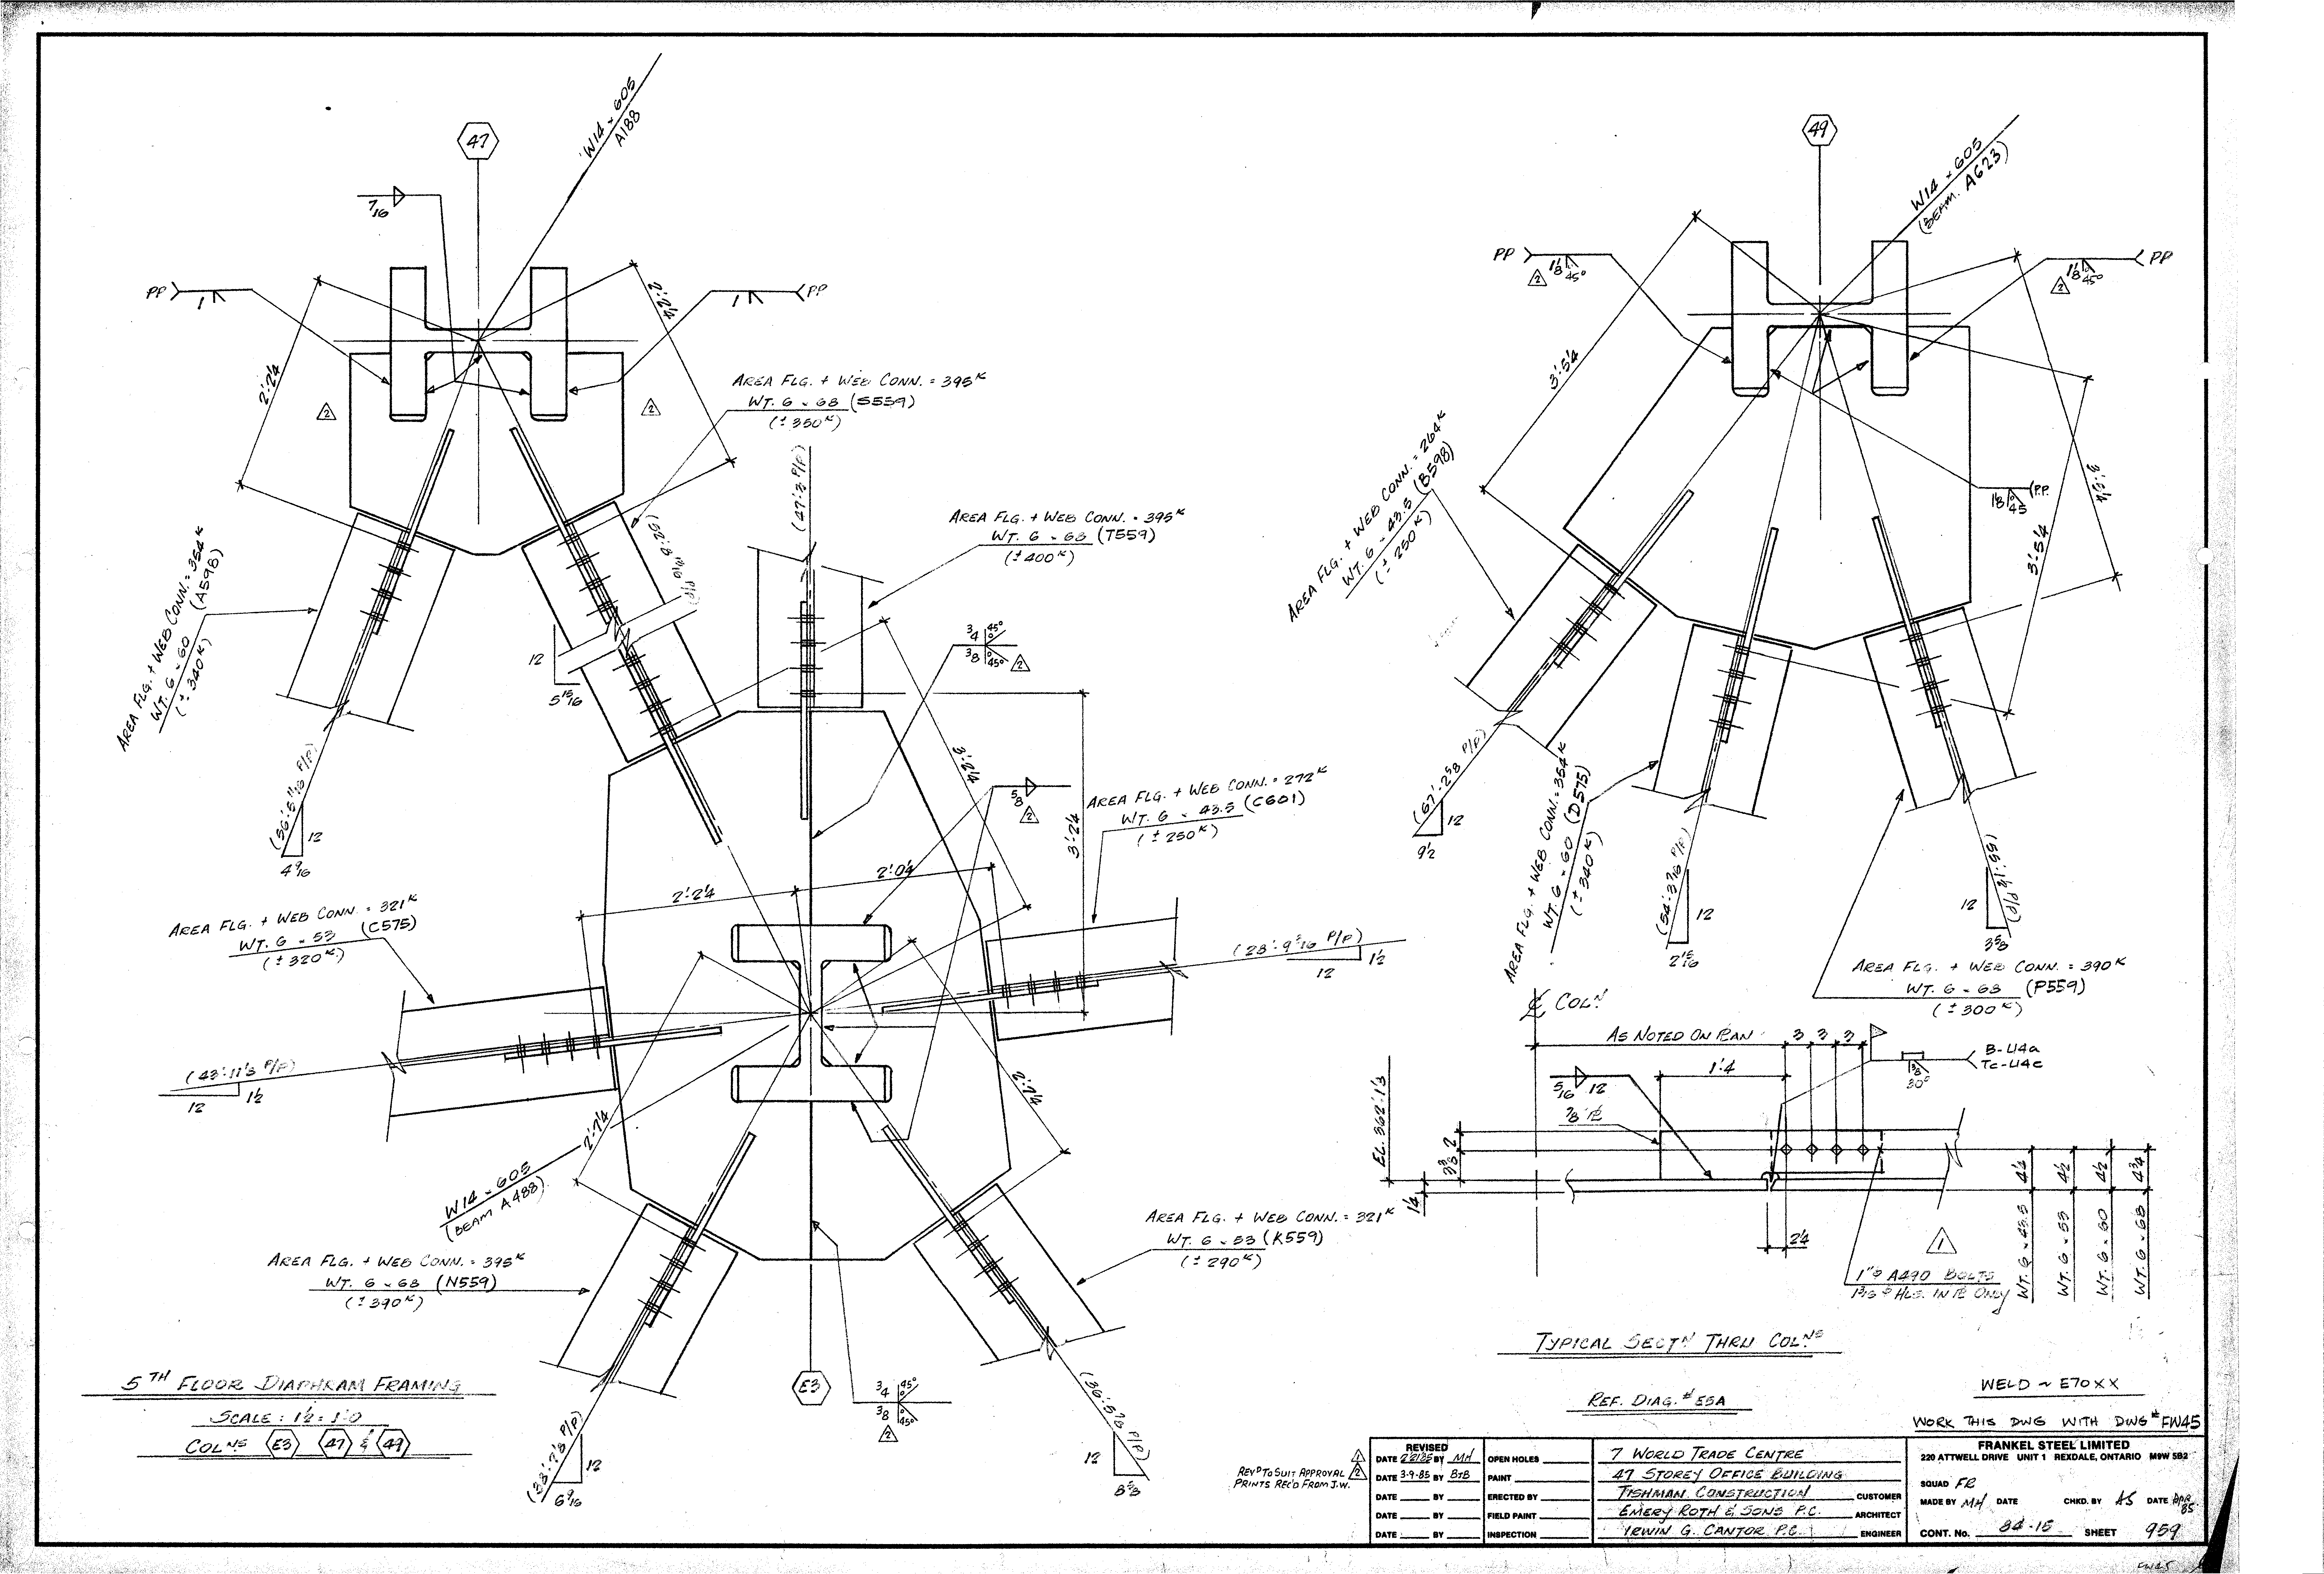
| 0959.png | 439.2 KB | 0959 | 5TH FLOOR DIAPHRAM FRAMING - COLS. E3, 47 & 49 | https://911warroom.com/model/files/WTC7/DRAWINGS/STRUCTURAL/DETAILS-PNG/0959.png |
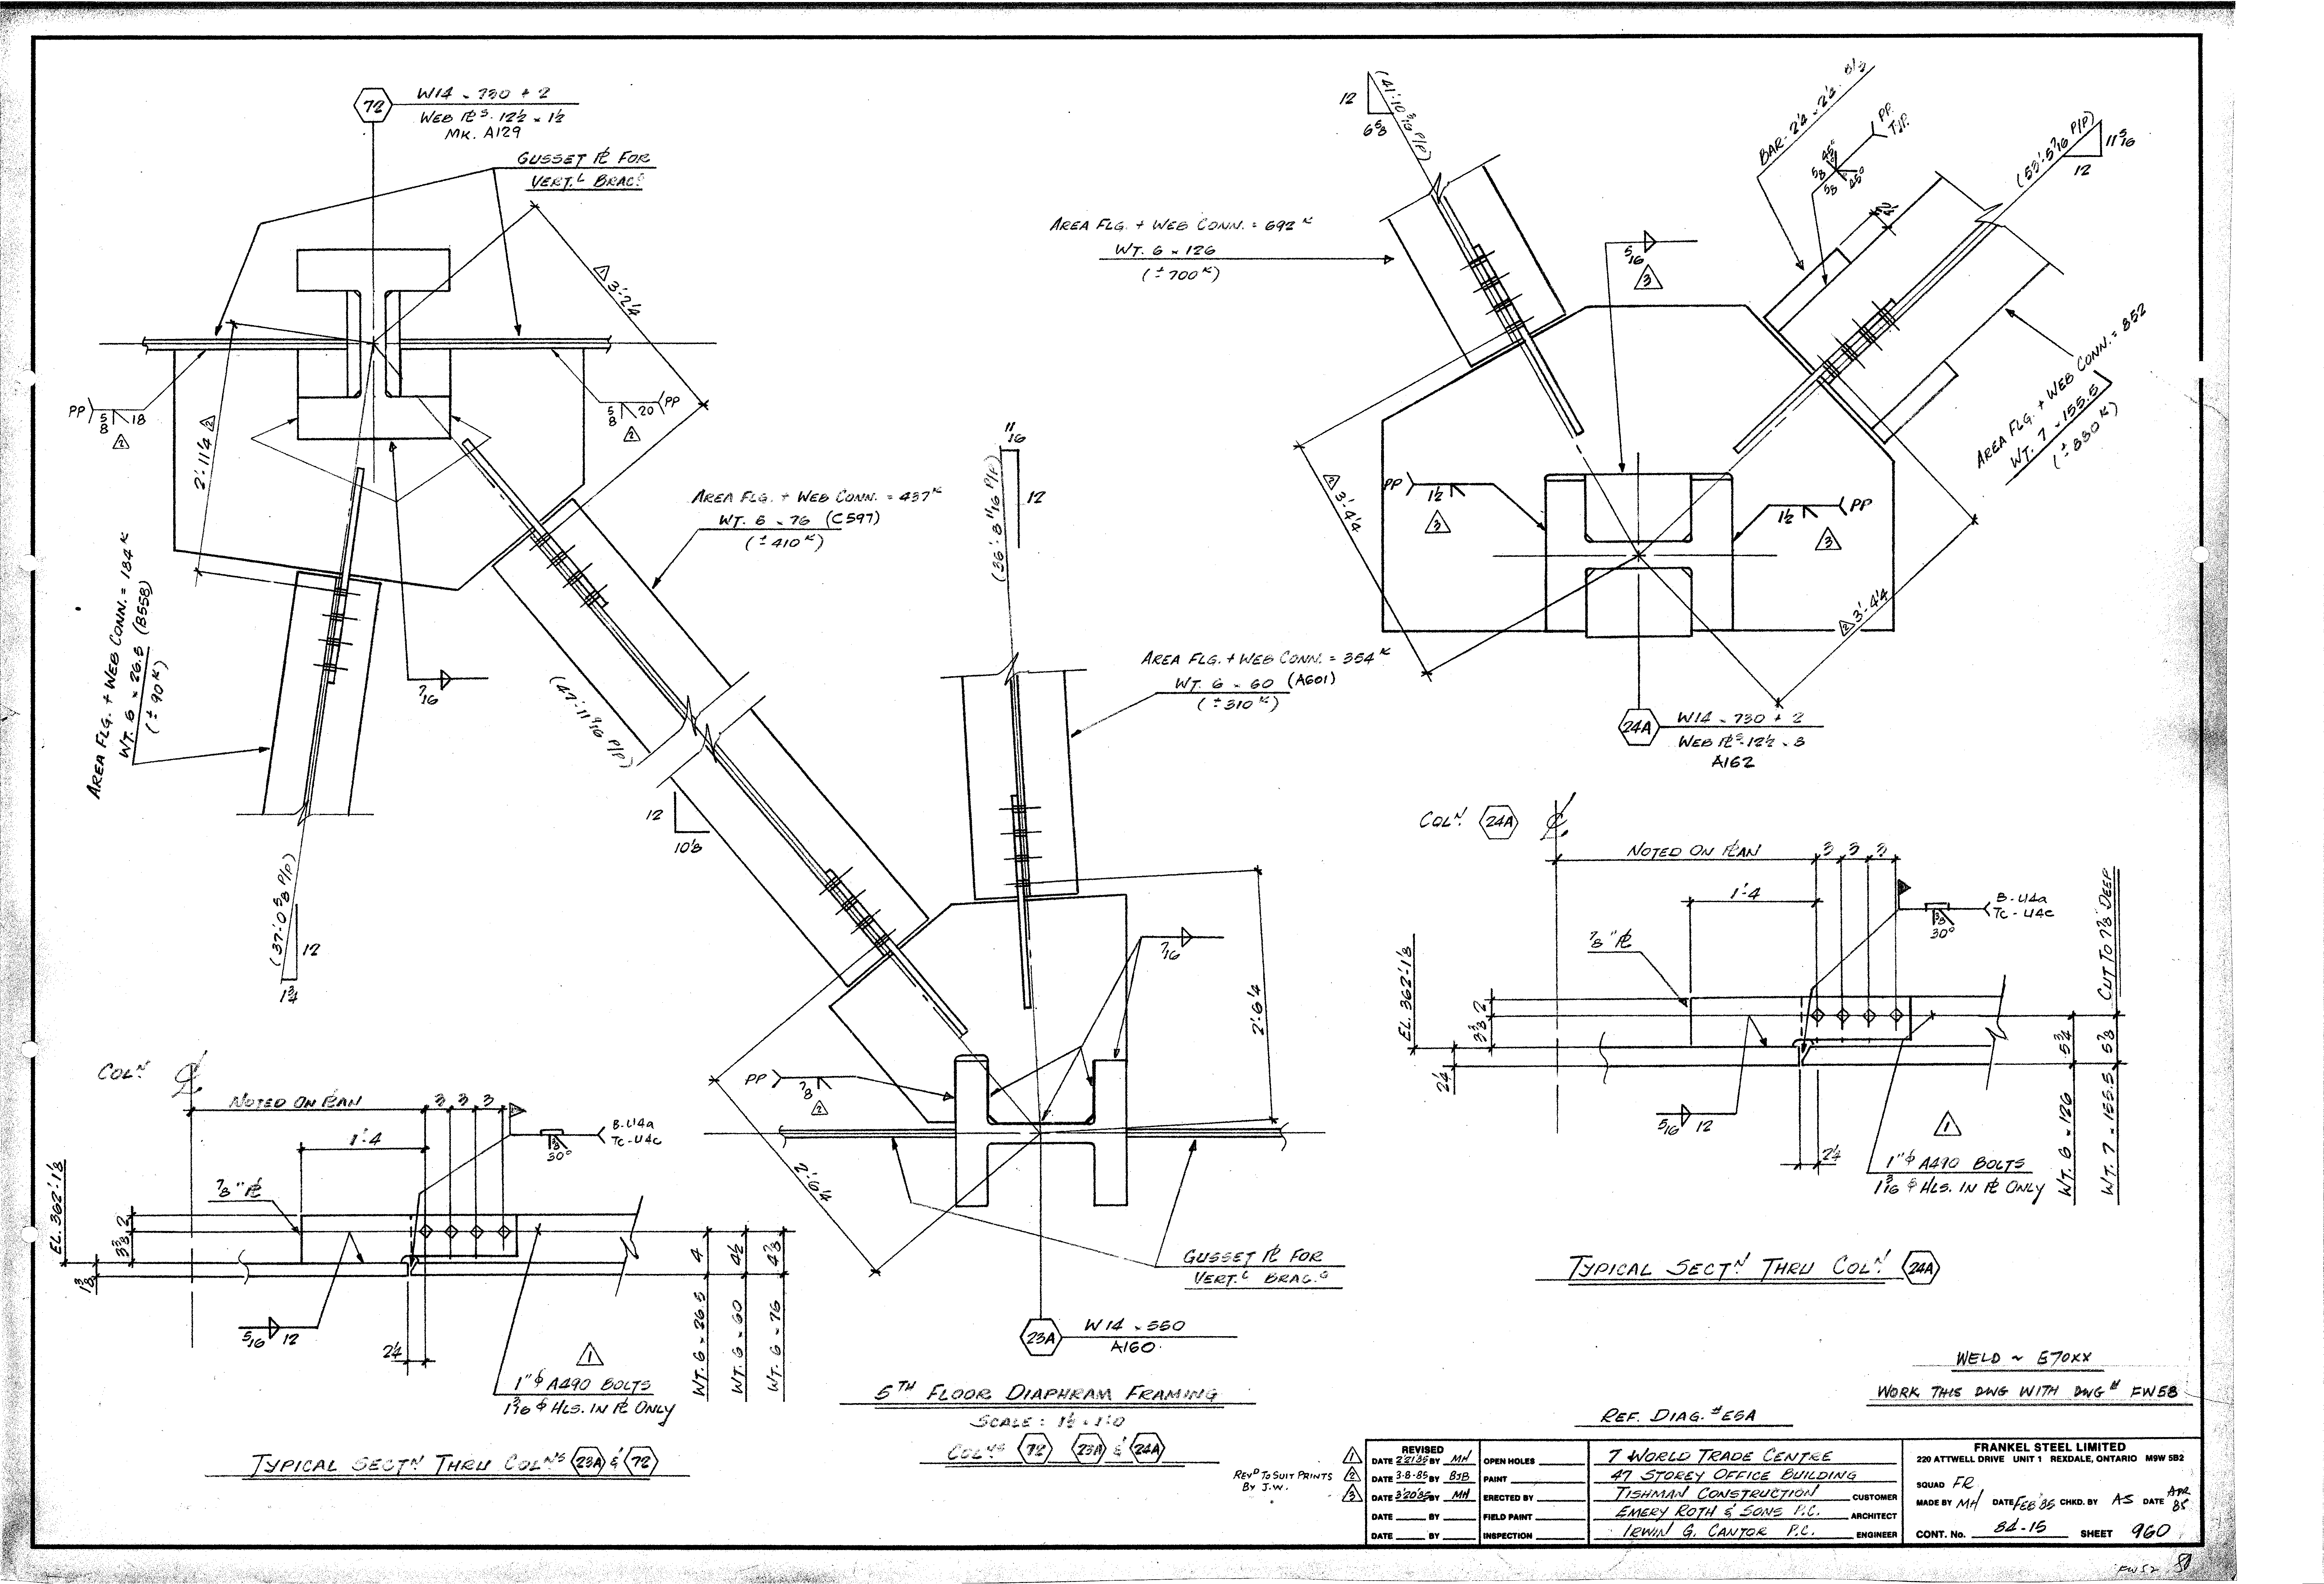
| 0960.png | 457.5 KB | 0960 | 5TH FLOOR DIAPHRAM FRAMING - COLS. 72, 23A & 24A | https://911warroom.com/model/files/WTC7/DRAWINGS/STRUCTURAL/DETAILS-PNG/0960.png |
| 0961.png | 774.9 KB | 0961 | (no detail title) — see FW6 | https://911warroom.com/model/files/WTC7/DRAWINGS/STRUCTURAL/DETAILS-PNG/0961.png |
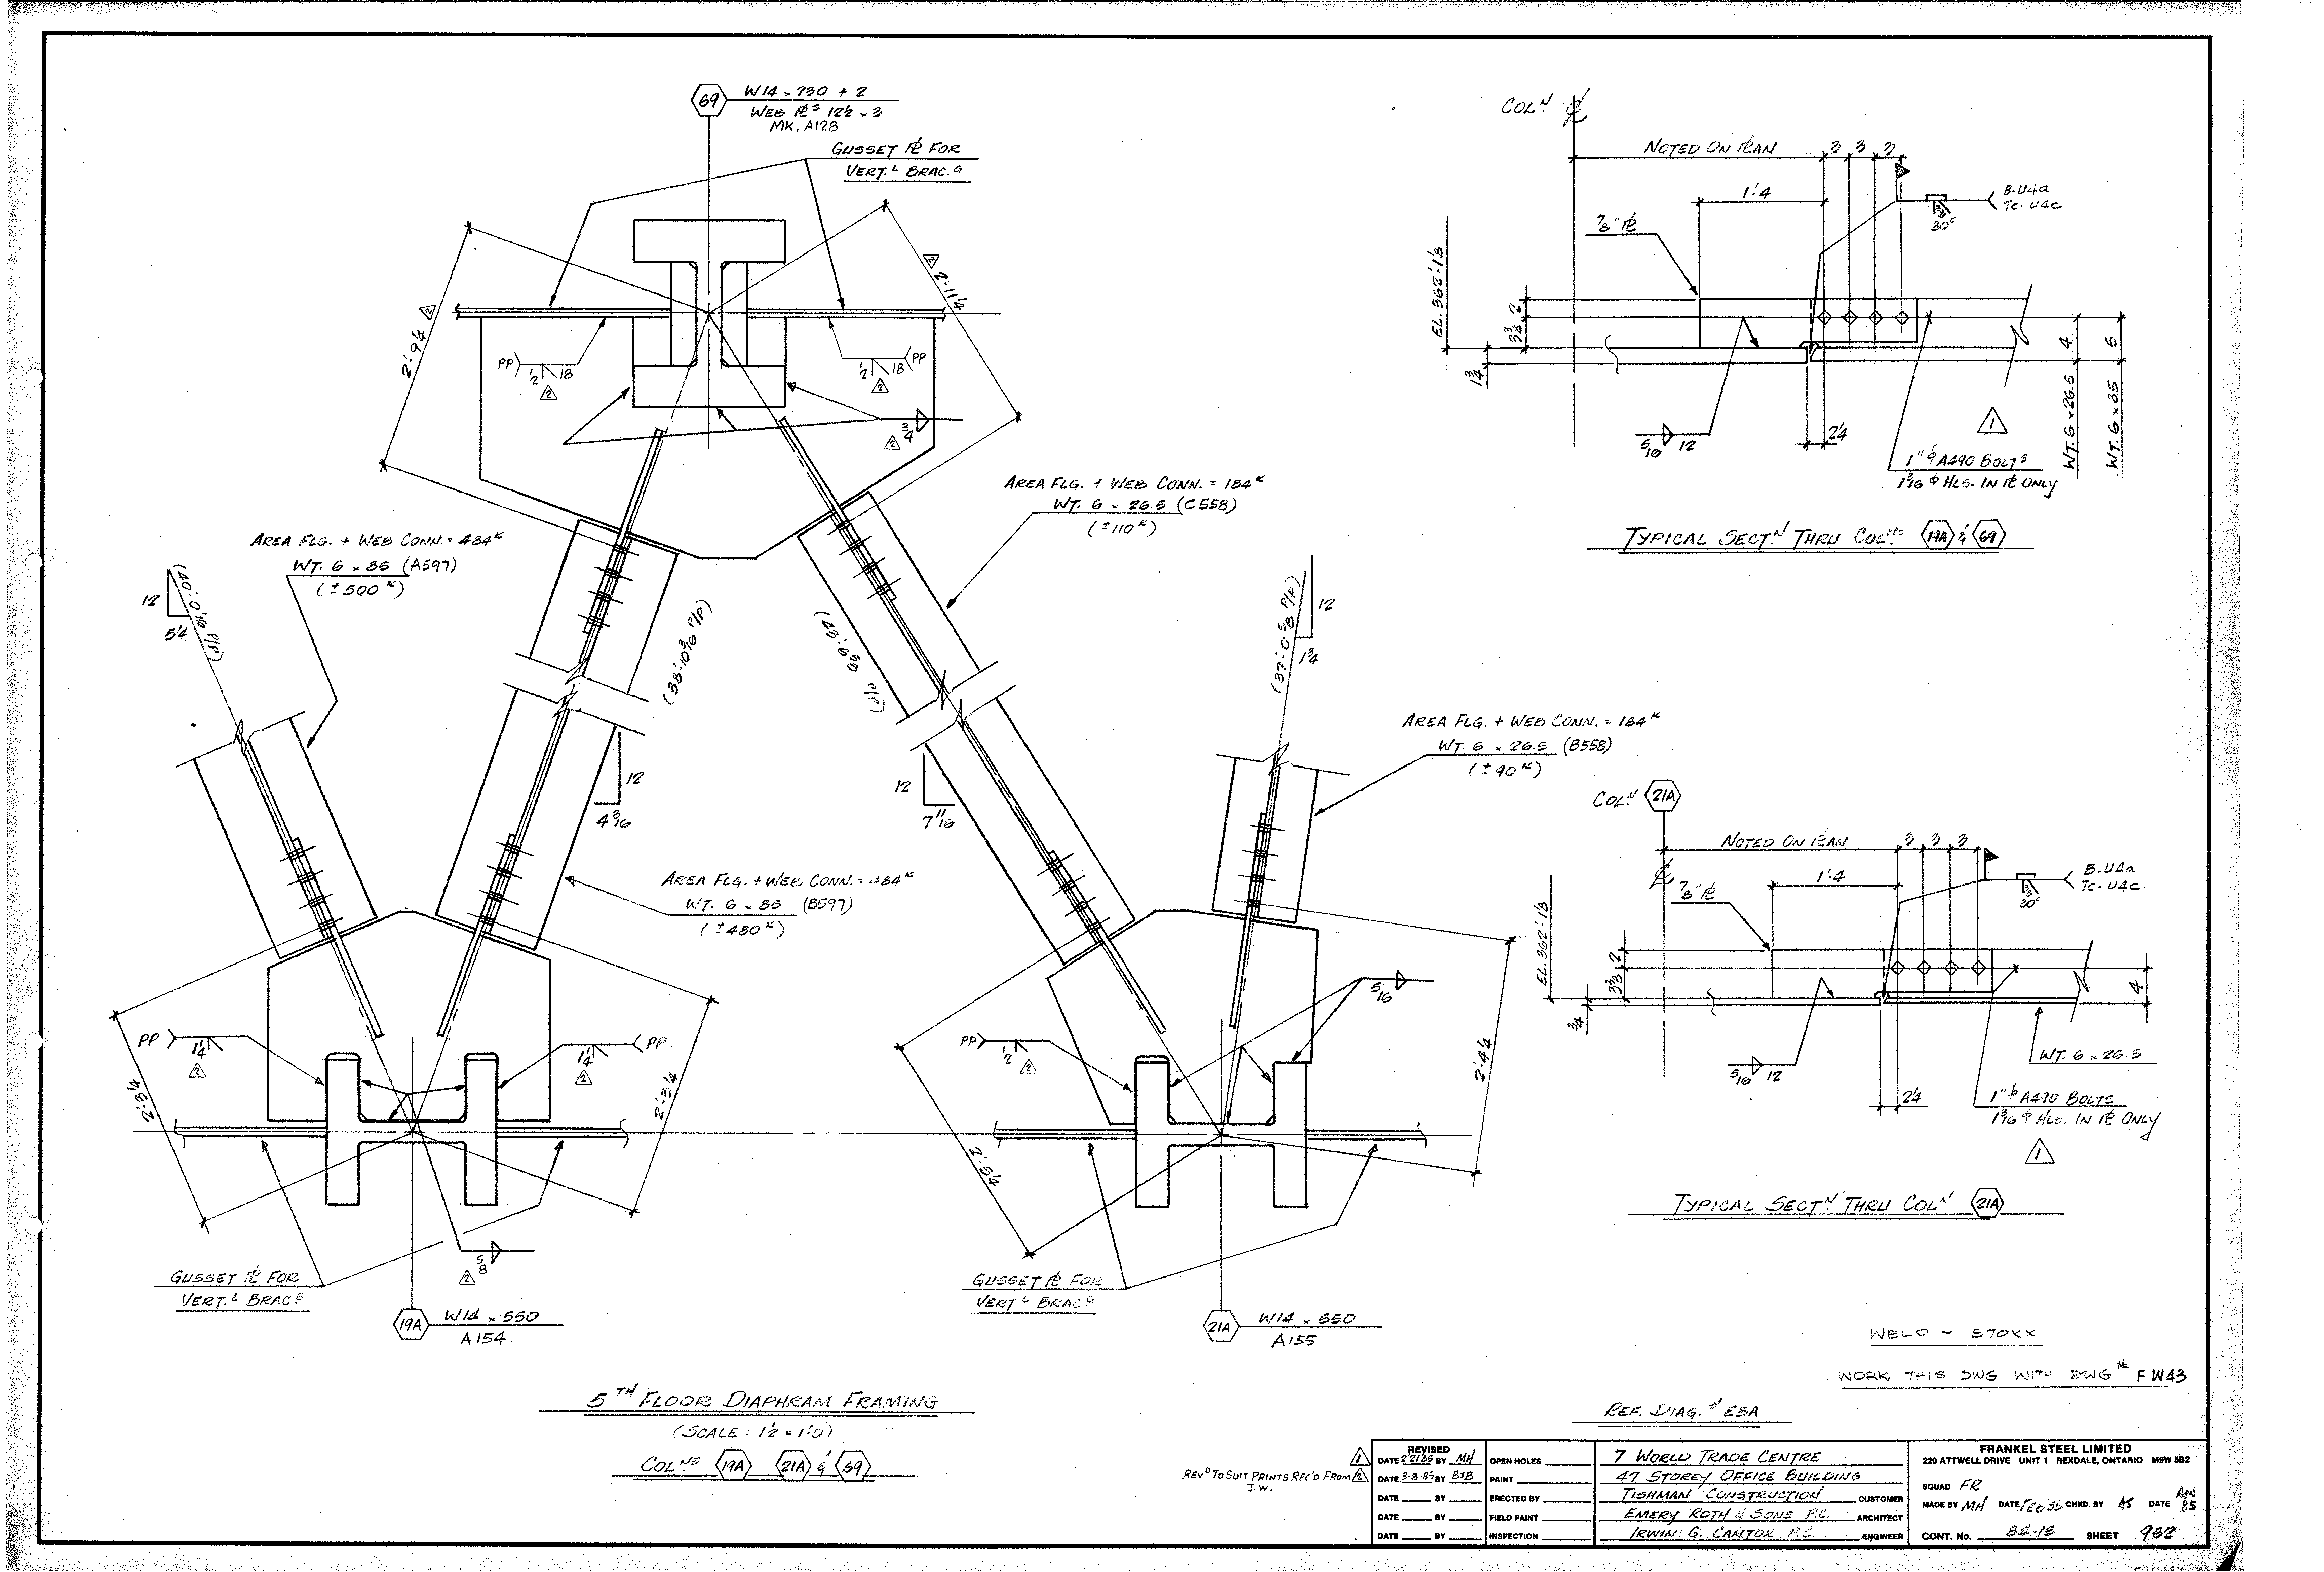
| 0962.png | 381.6 KB | 0962 | 5TH FLOOR DIAPHRAM FRAMING - COLS. 19A, 21A & 69 | https://911warroom.com/model/files/WTC7/DRAWINGS/STRUCTURAL/DETAILS-PNG/0962.png |
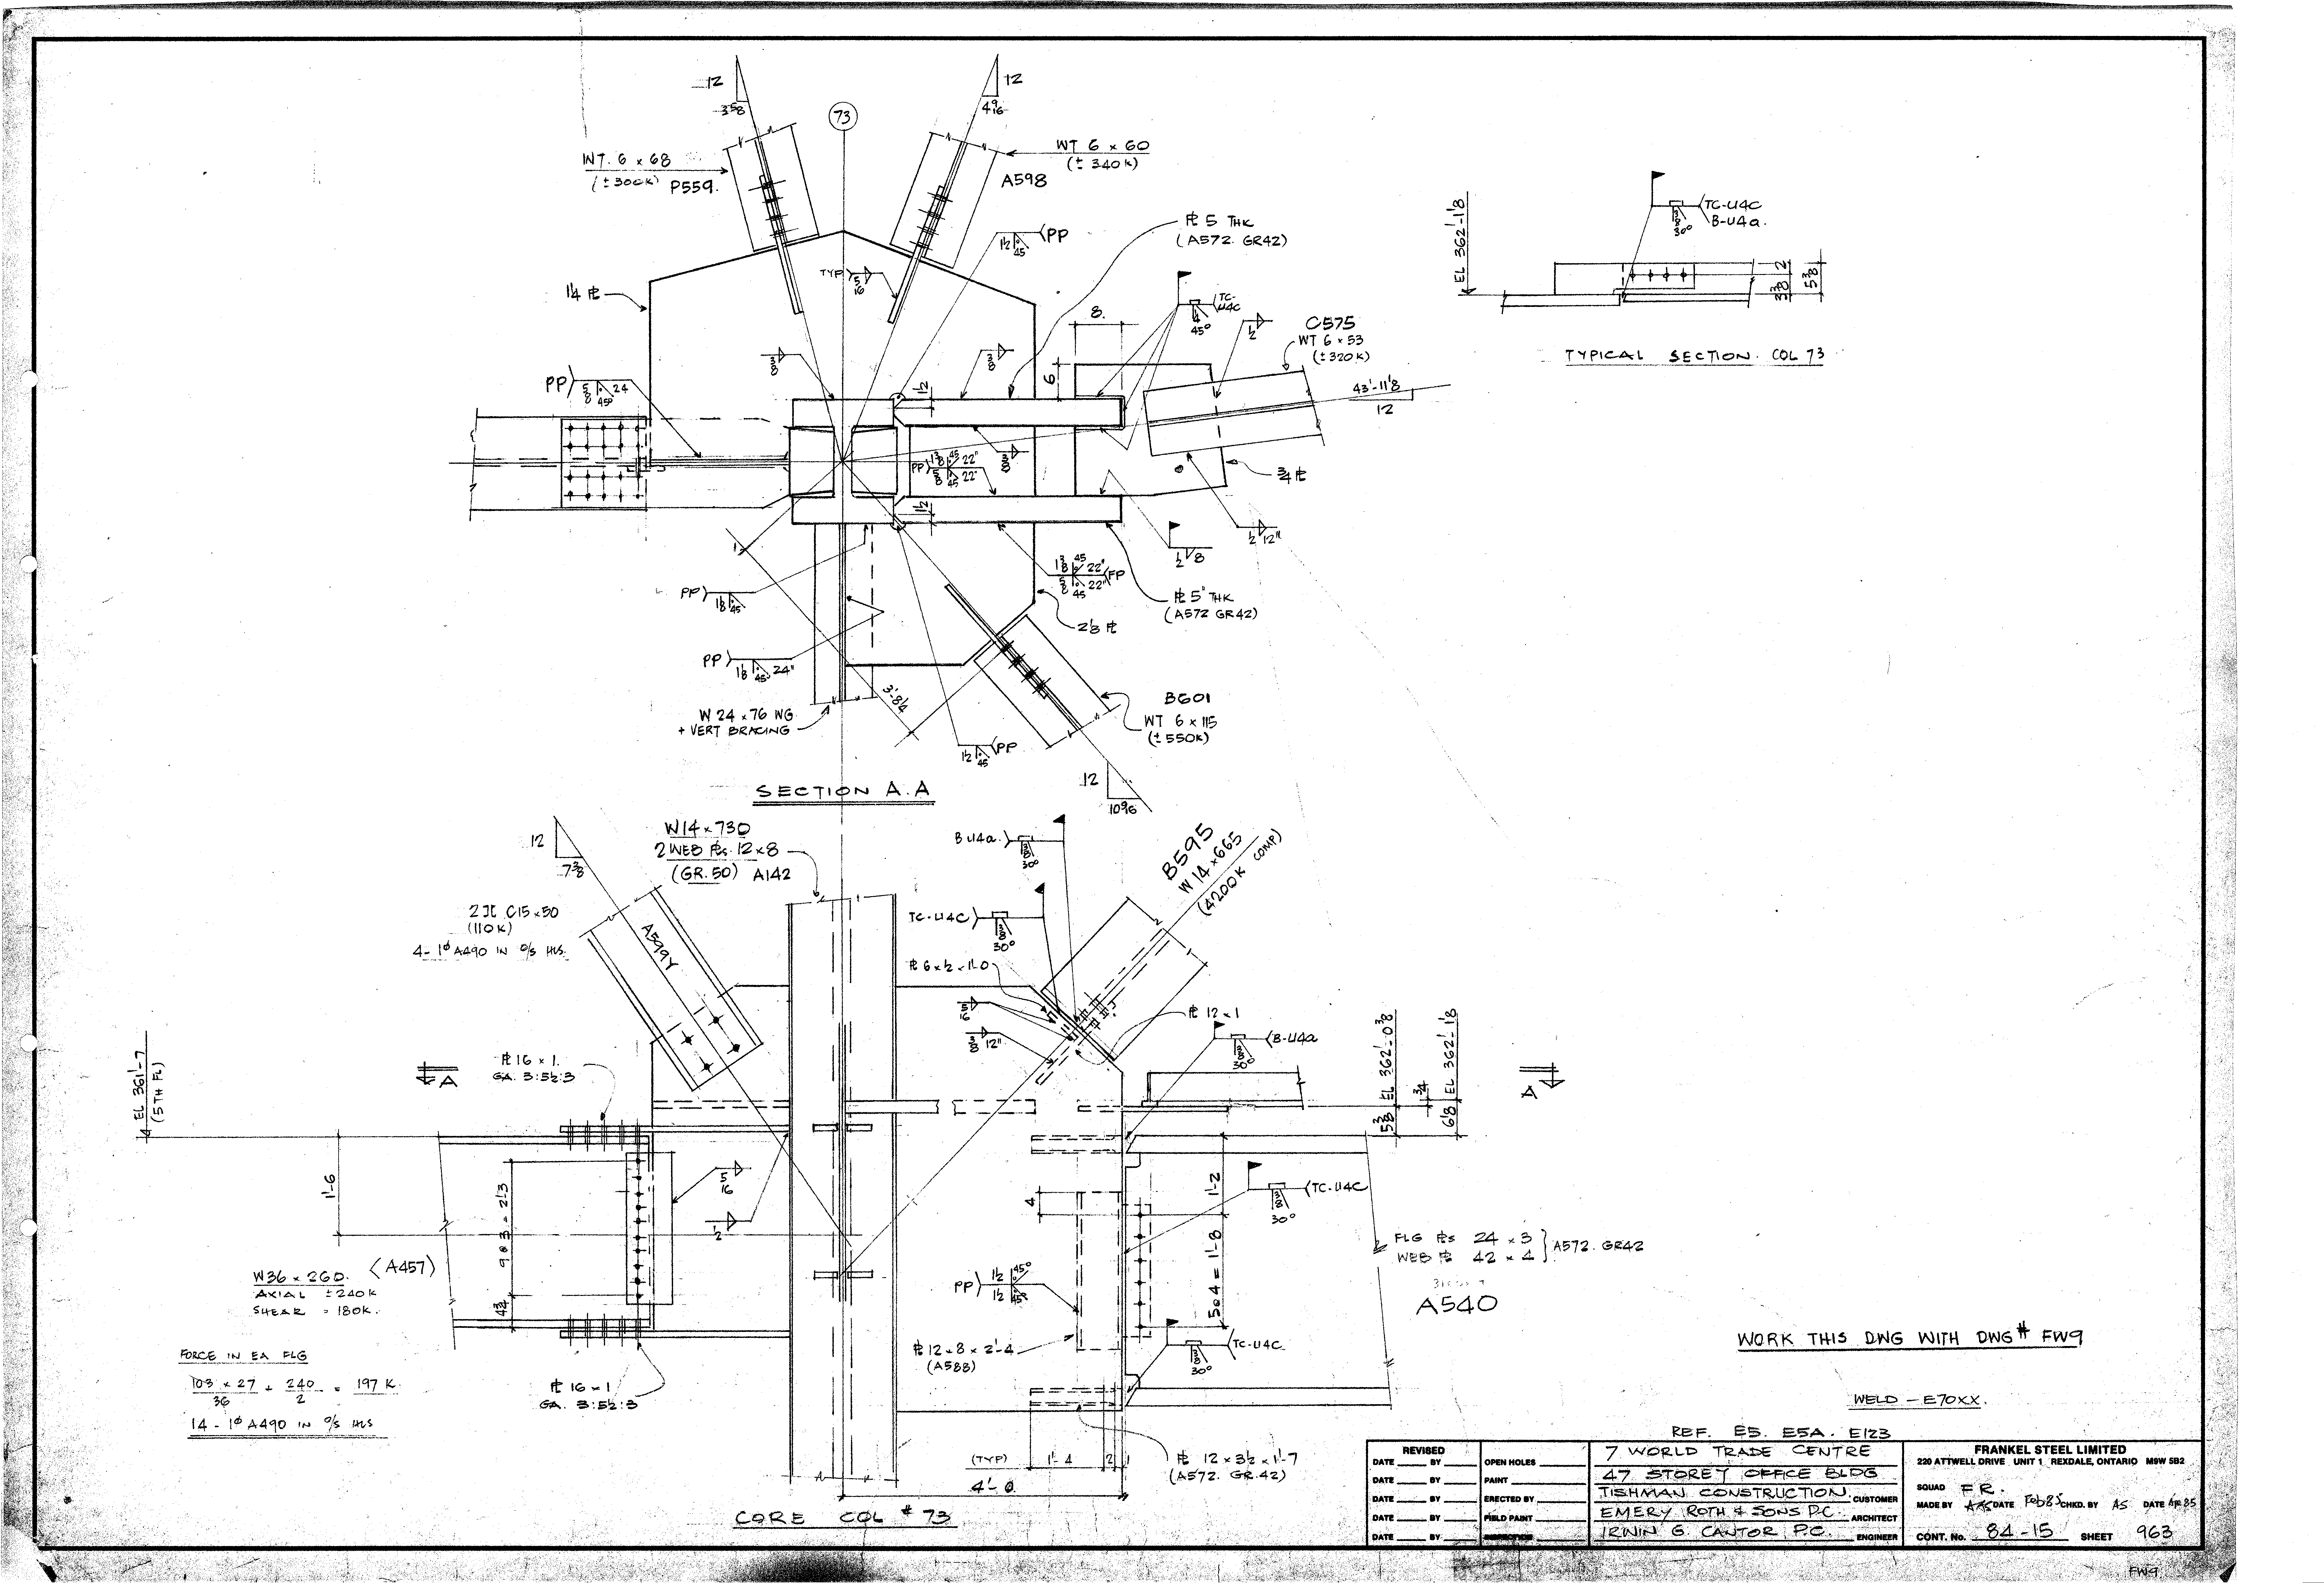
| 0963.png | 463.7 KB | 0963 | CORE COL. 73 - SECTION A-A | https://911warroom.com/model/files/WTC7/DRAWINGS/STRUCTURAL/DETAILS-PNG/0963.png |
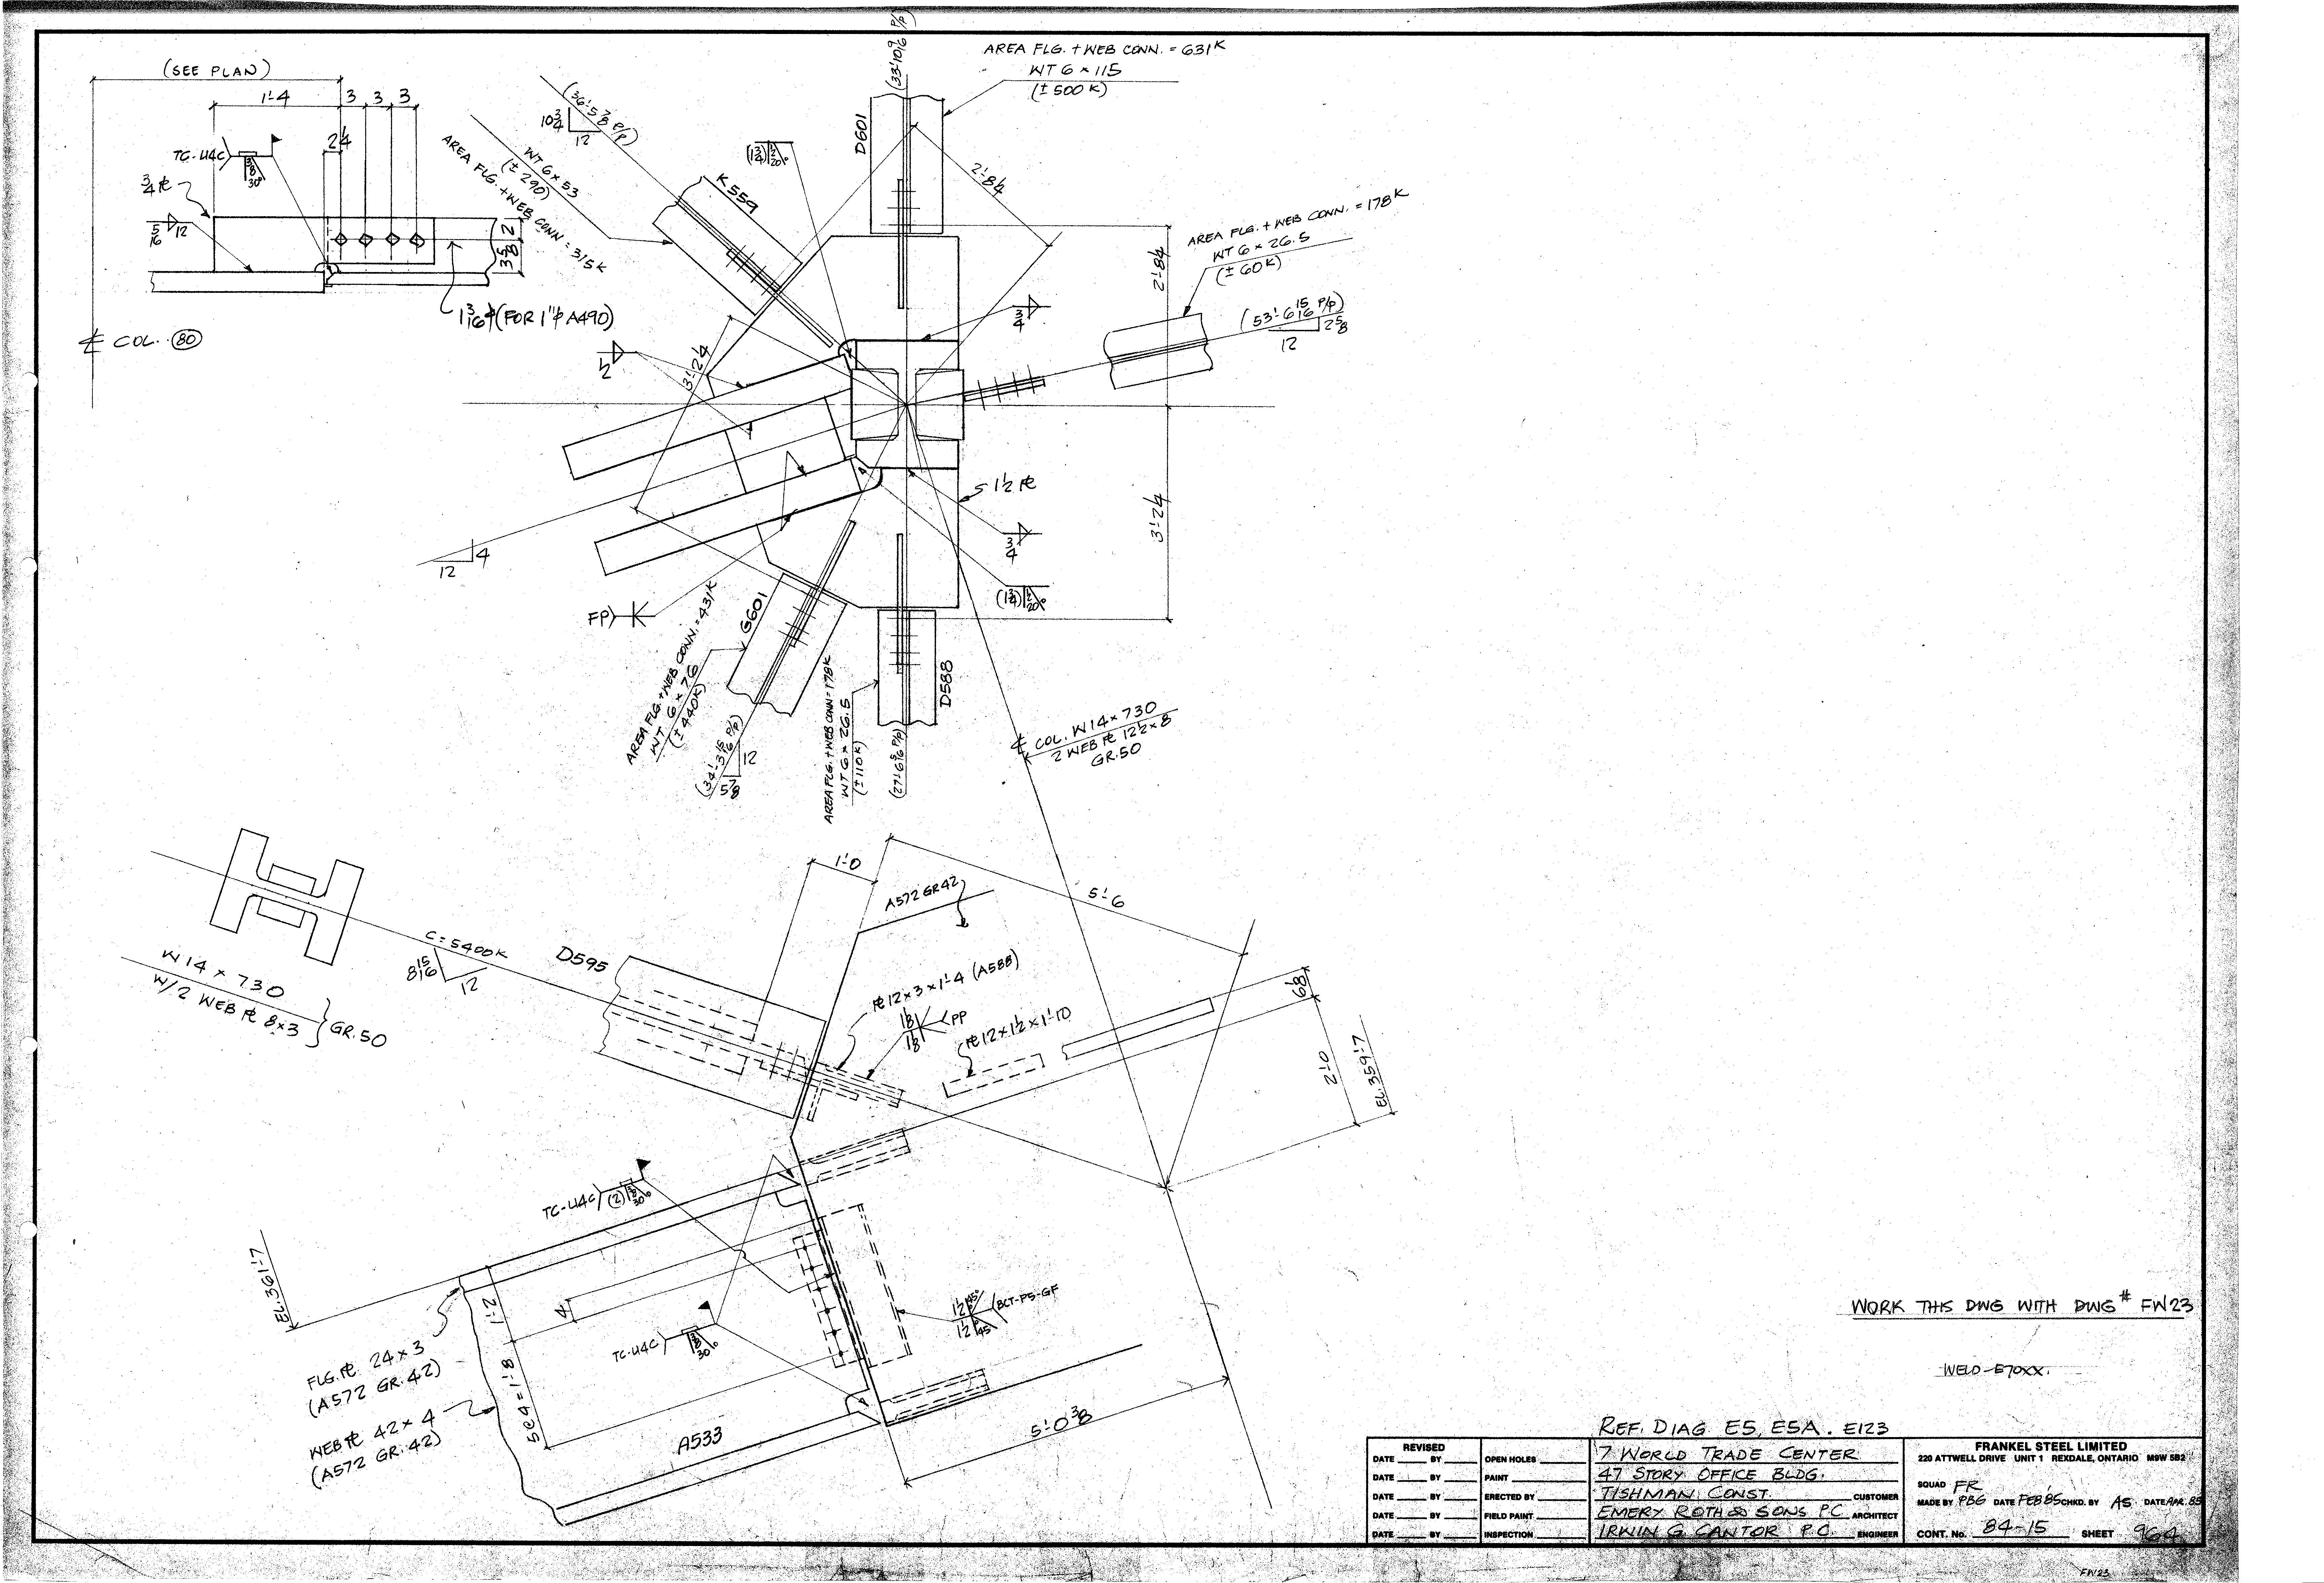
| 0964.png | 507.4 KB | 0964 | (no detail title) — ref. diag E5, E5A, E123 | https://911warroom.com/model/files/WTC7/DRAWINGS/STRUCTURAL/DETAILS-PNG/0964.png |
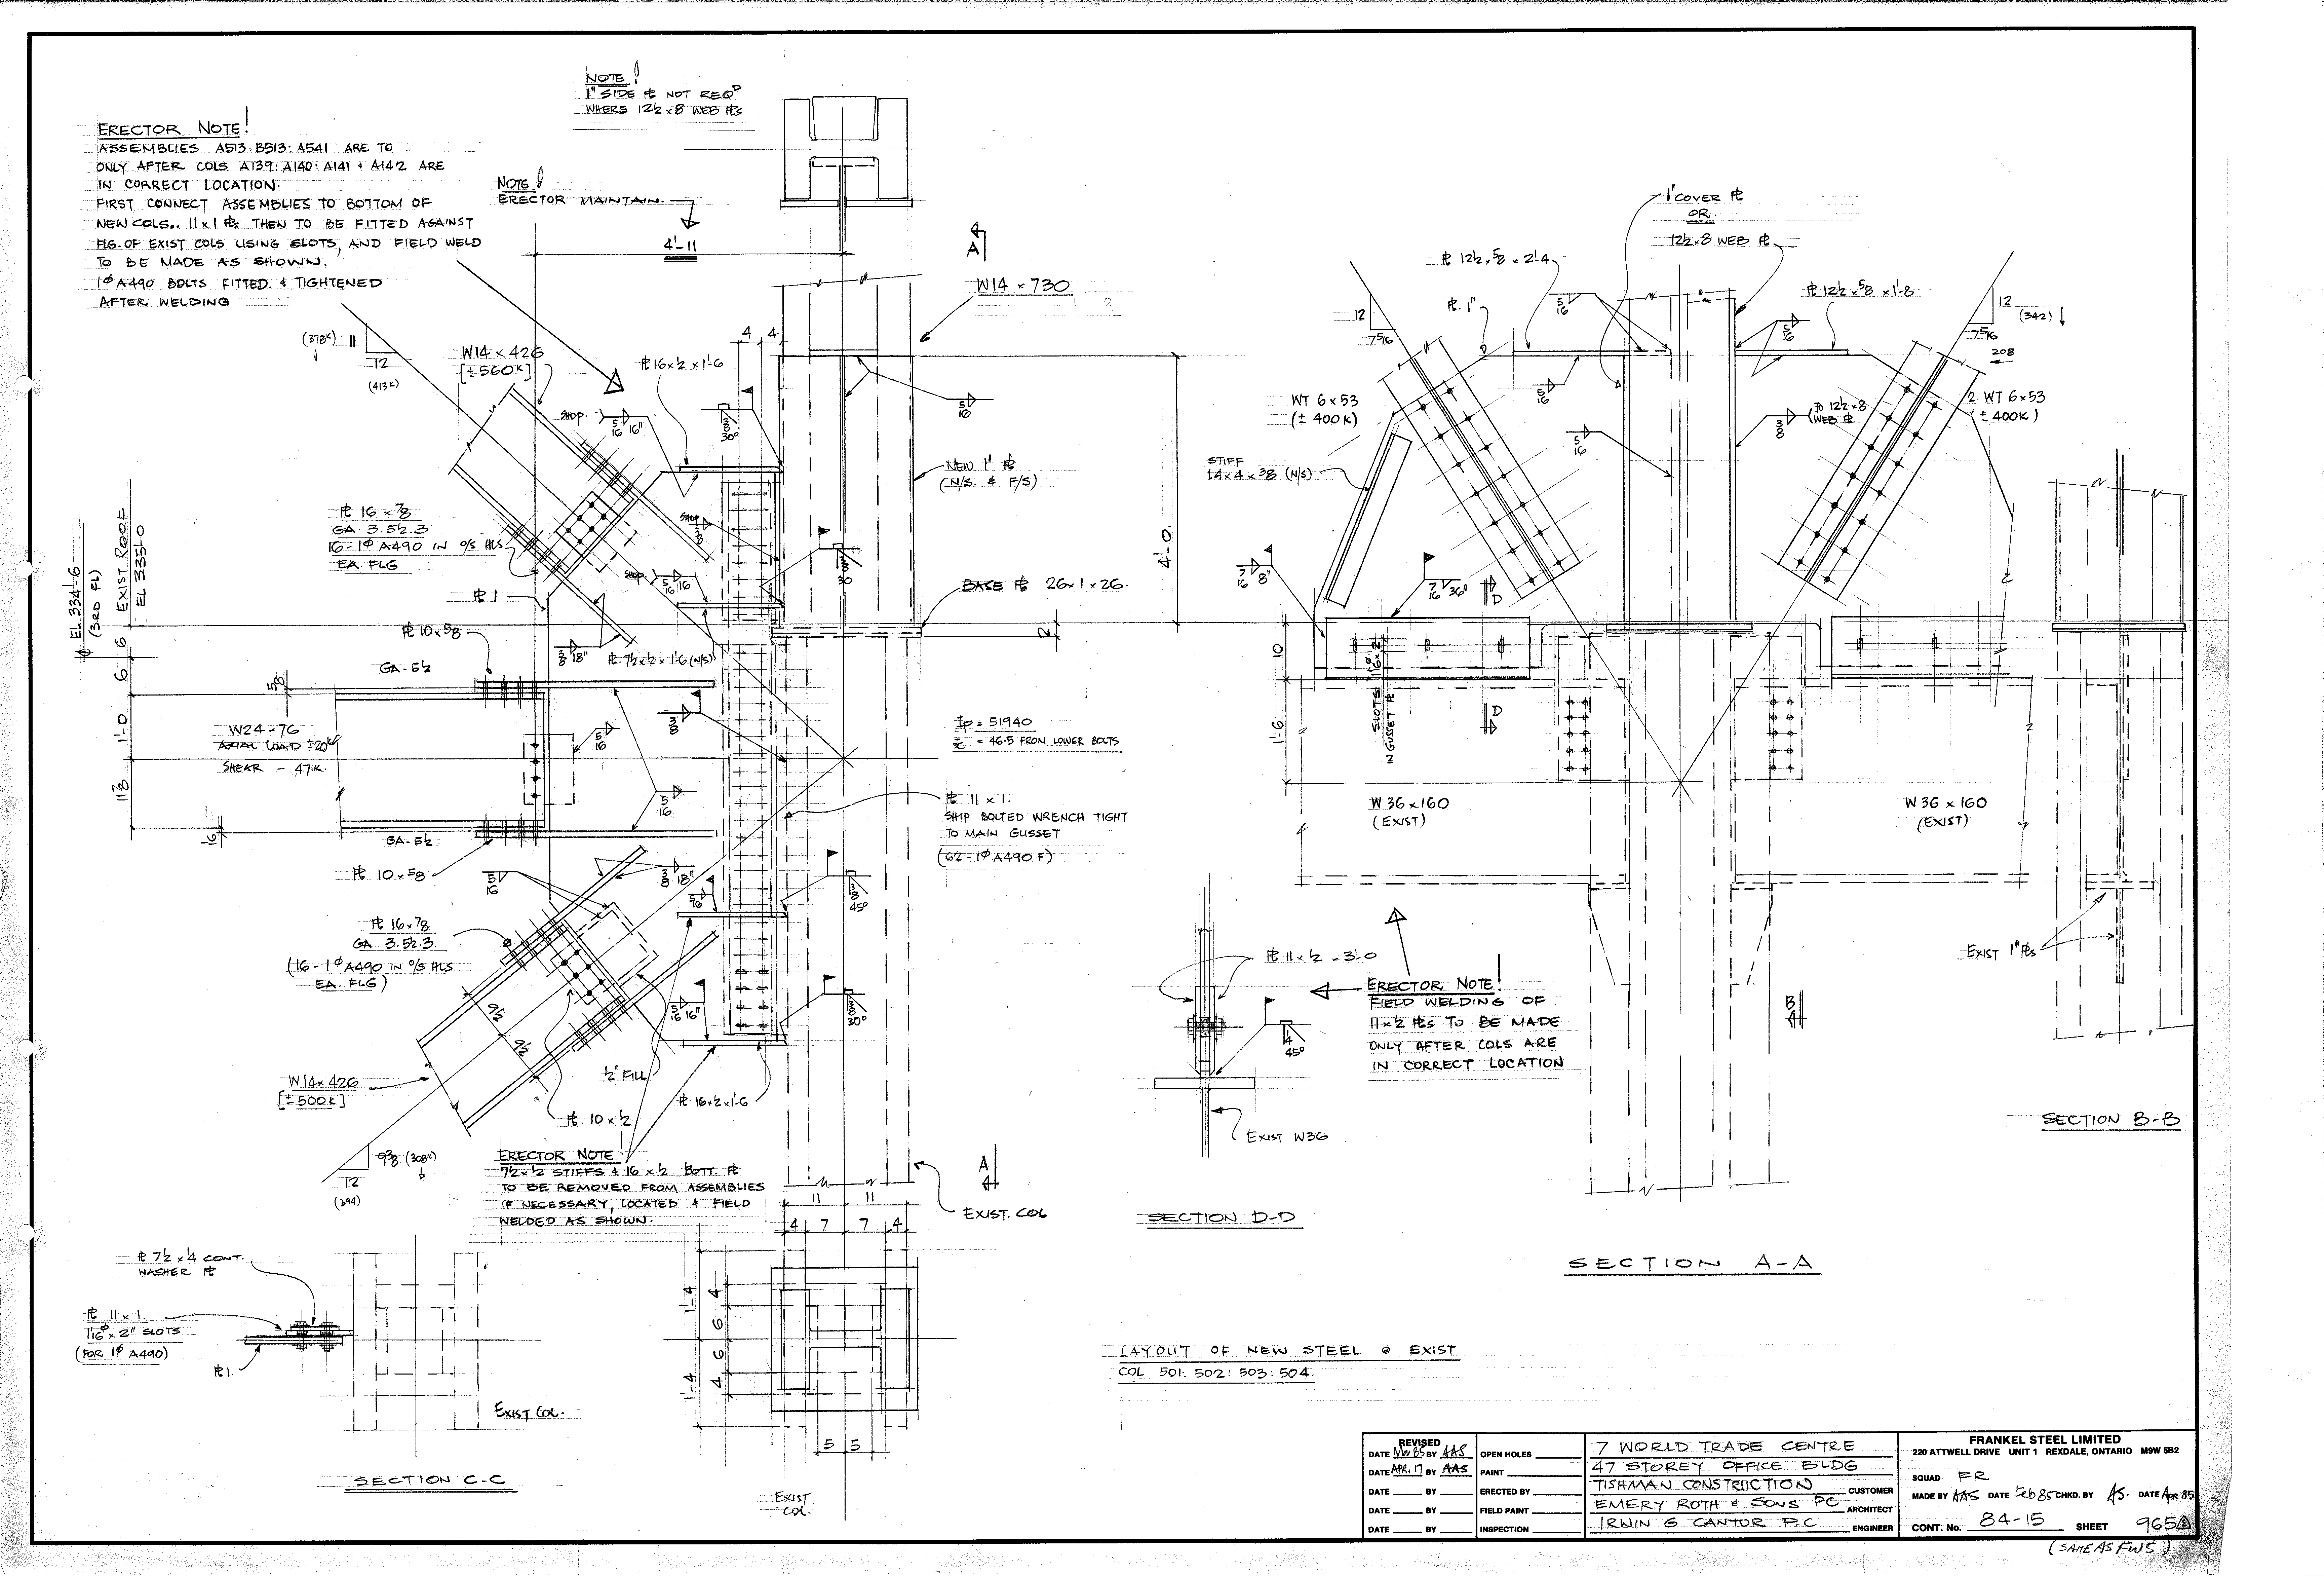
| 0965.png | 458.4 KB | 0965 | LAYOUT OF NEW STEEL @ EXIST. COL. 501, 502, 503, 504 | https://911warroom.com/model/files/WTC7/DRAWINGS/STRUCTURAL/DETAILS-PNG/0965.png |
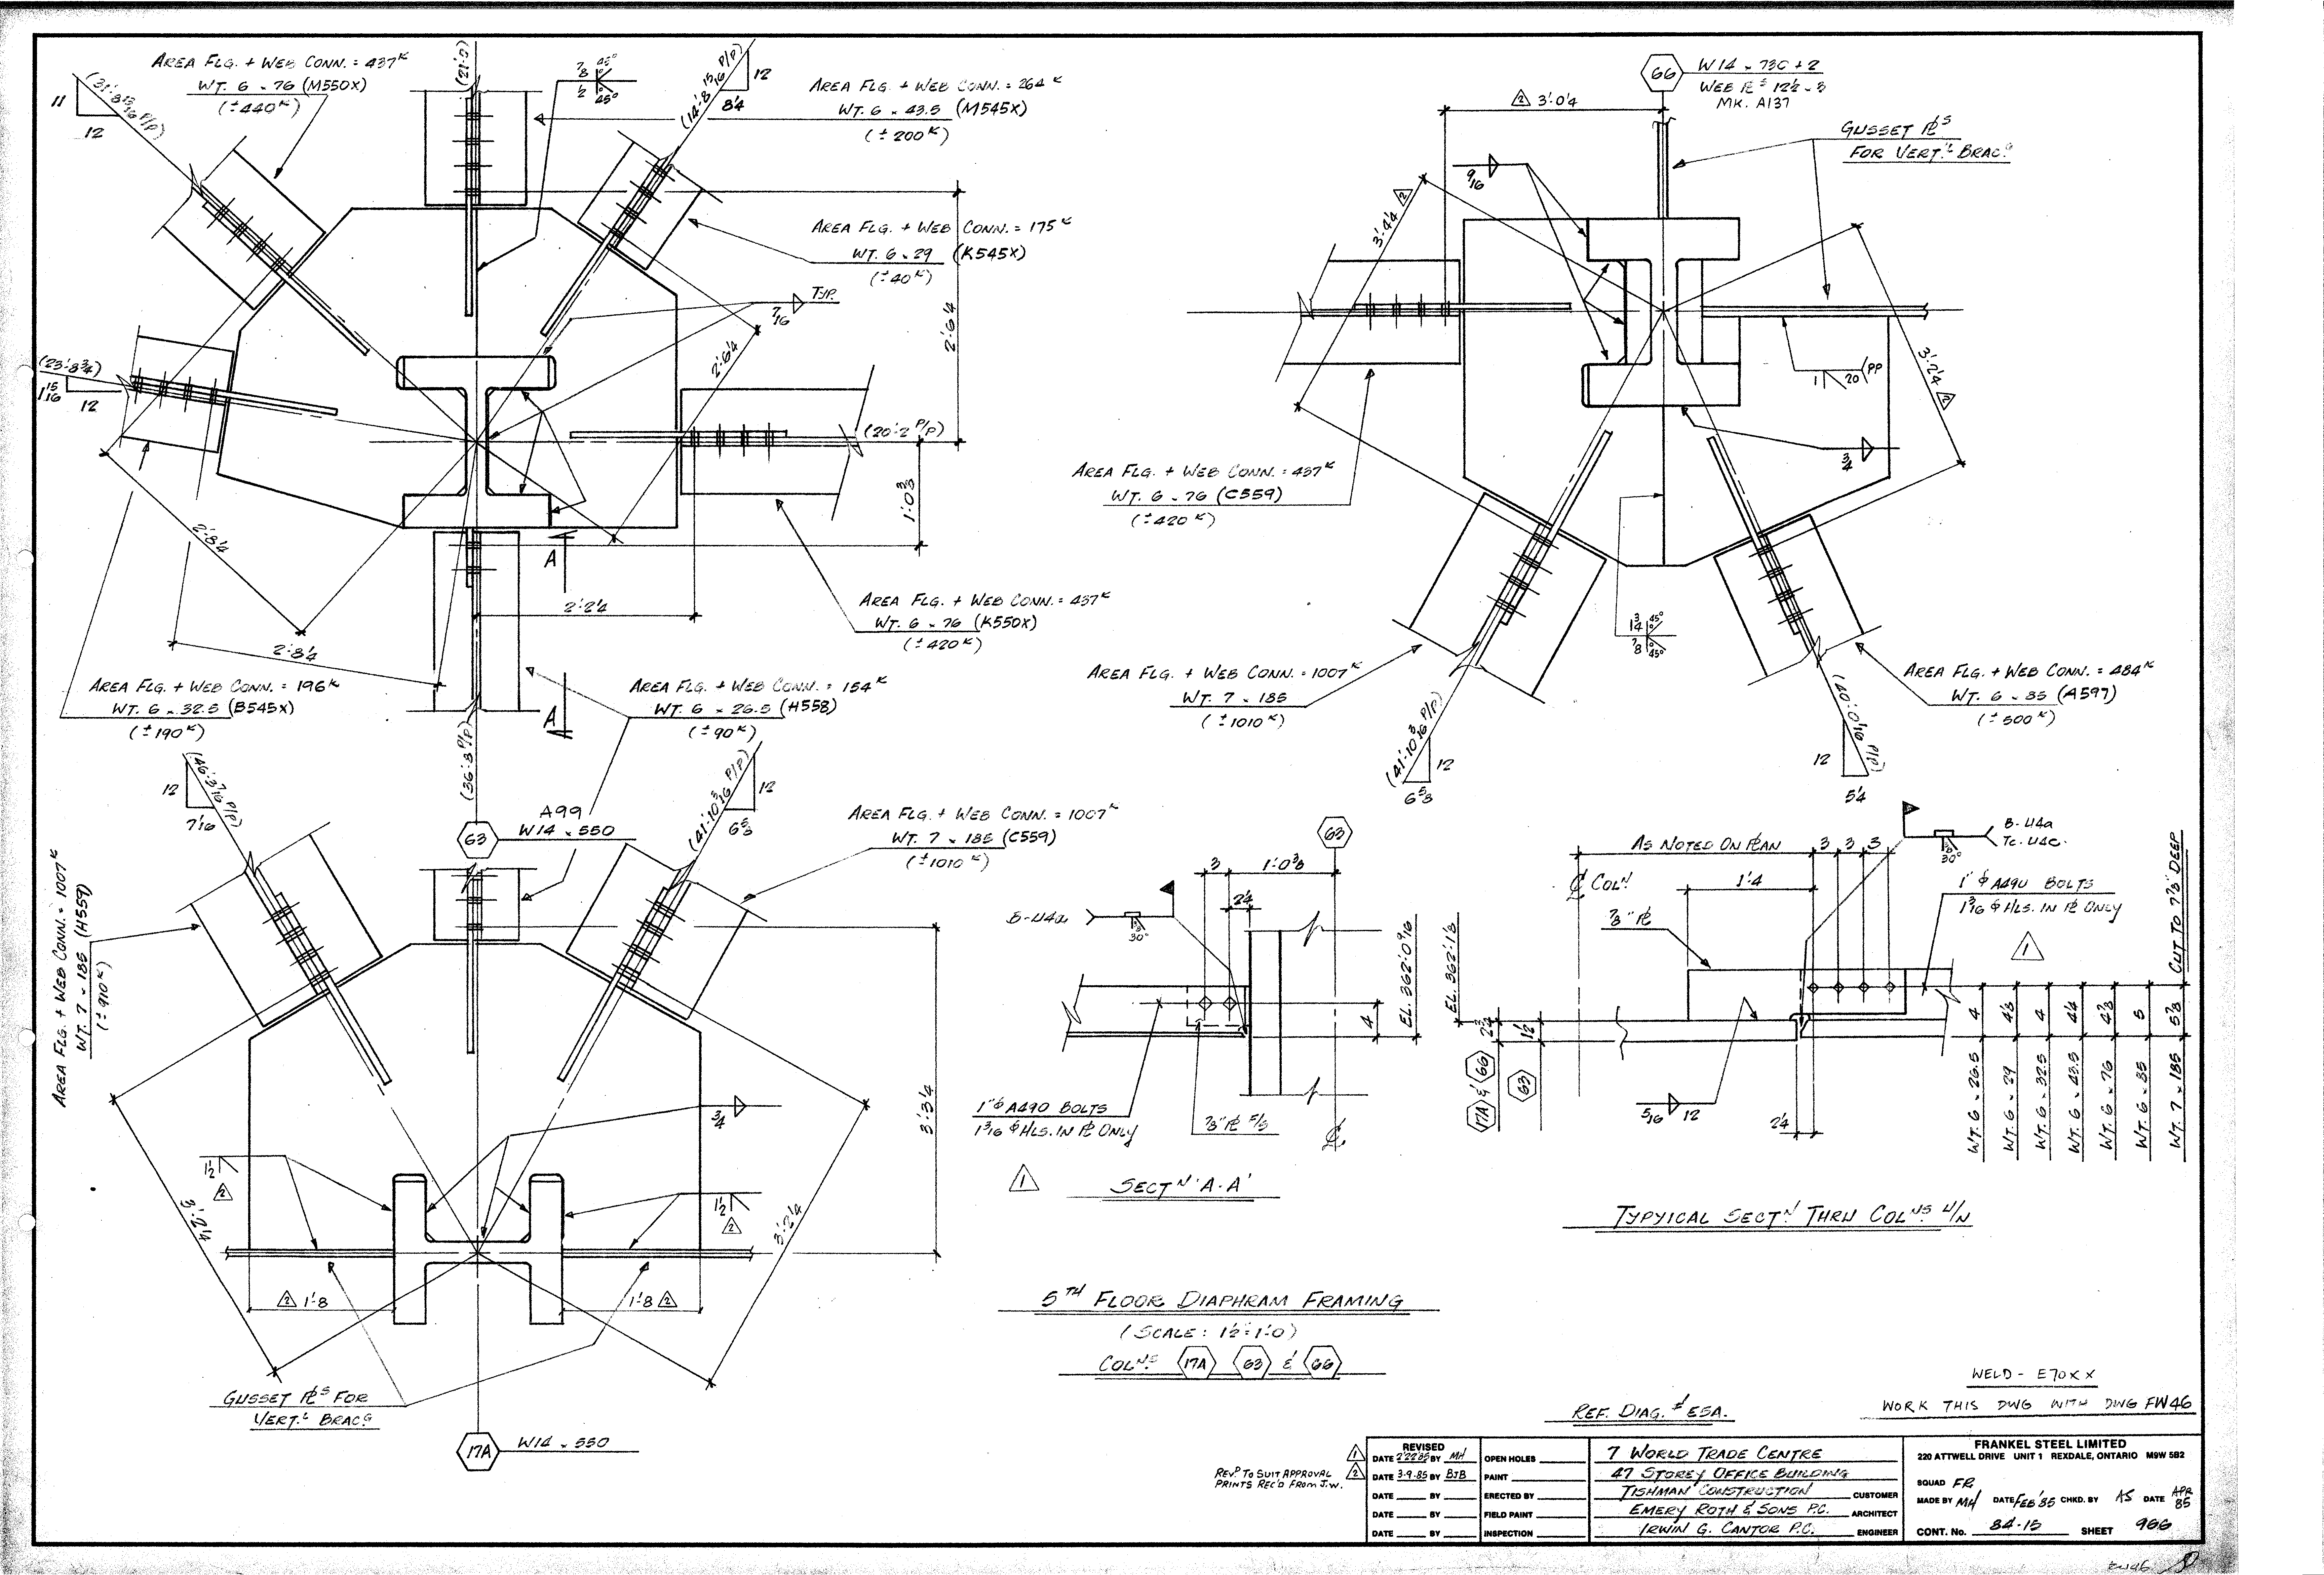
| 0966.png | 480.7 KB | 0966 | 5TH FLOOR DIAPHRAM FRAMING - COLS. 17A, 63 & 66 | https://911warroom.com/model/files/WTC7/DRAWINGS/STRUCTURAL/DETAILS-PNG/0966.png |
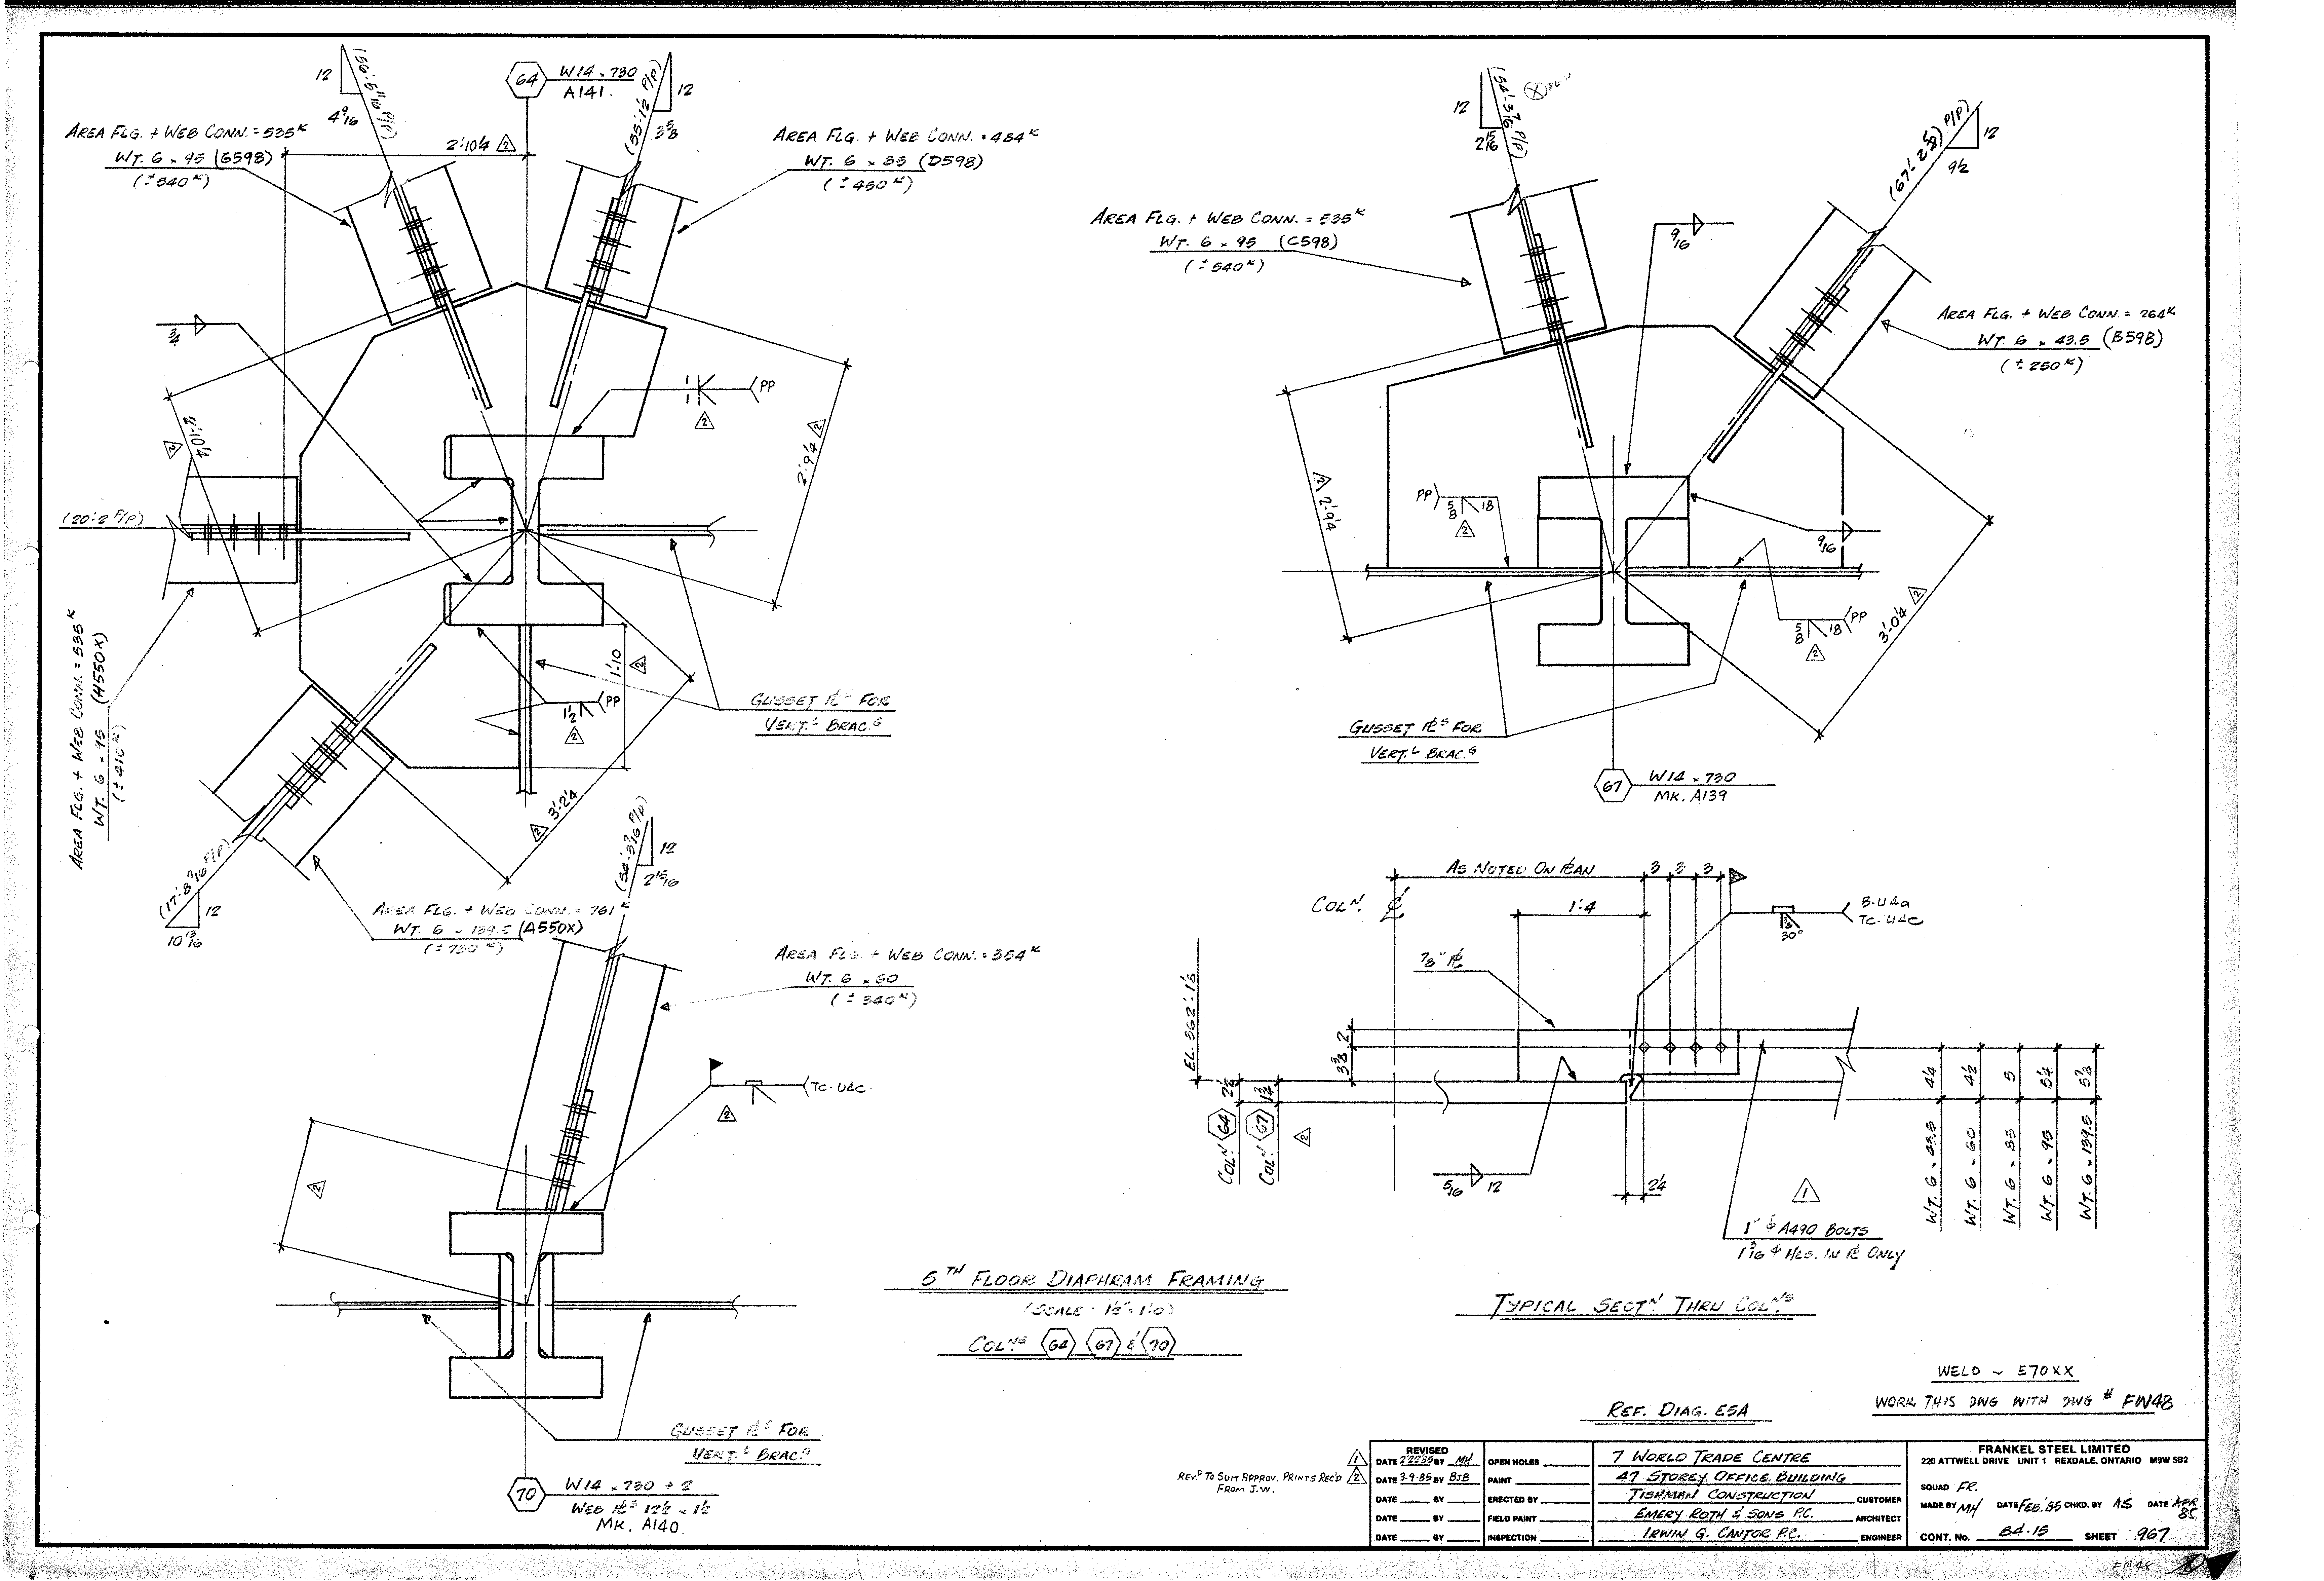
| 0967.png | 398.1 KB | 0967 | 5TH FLOOR DIAPHRAM FRAMING - COLS. 64, 67 & 70 | https://911warroom.com/model/files/WTC7/DRAWINGS/STRUCTURAL/DETAILS-PNG/0967.png |
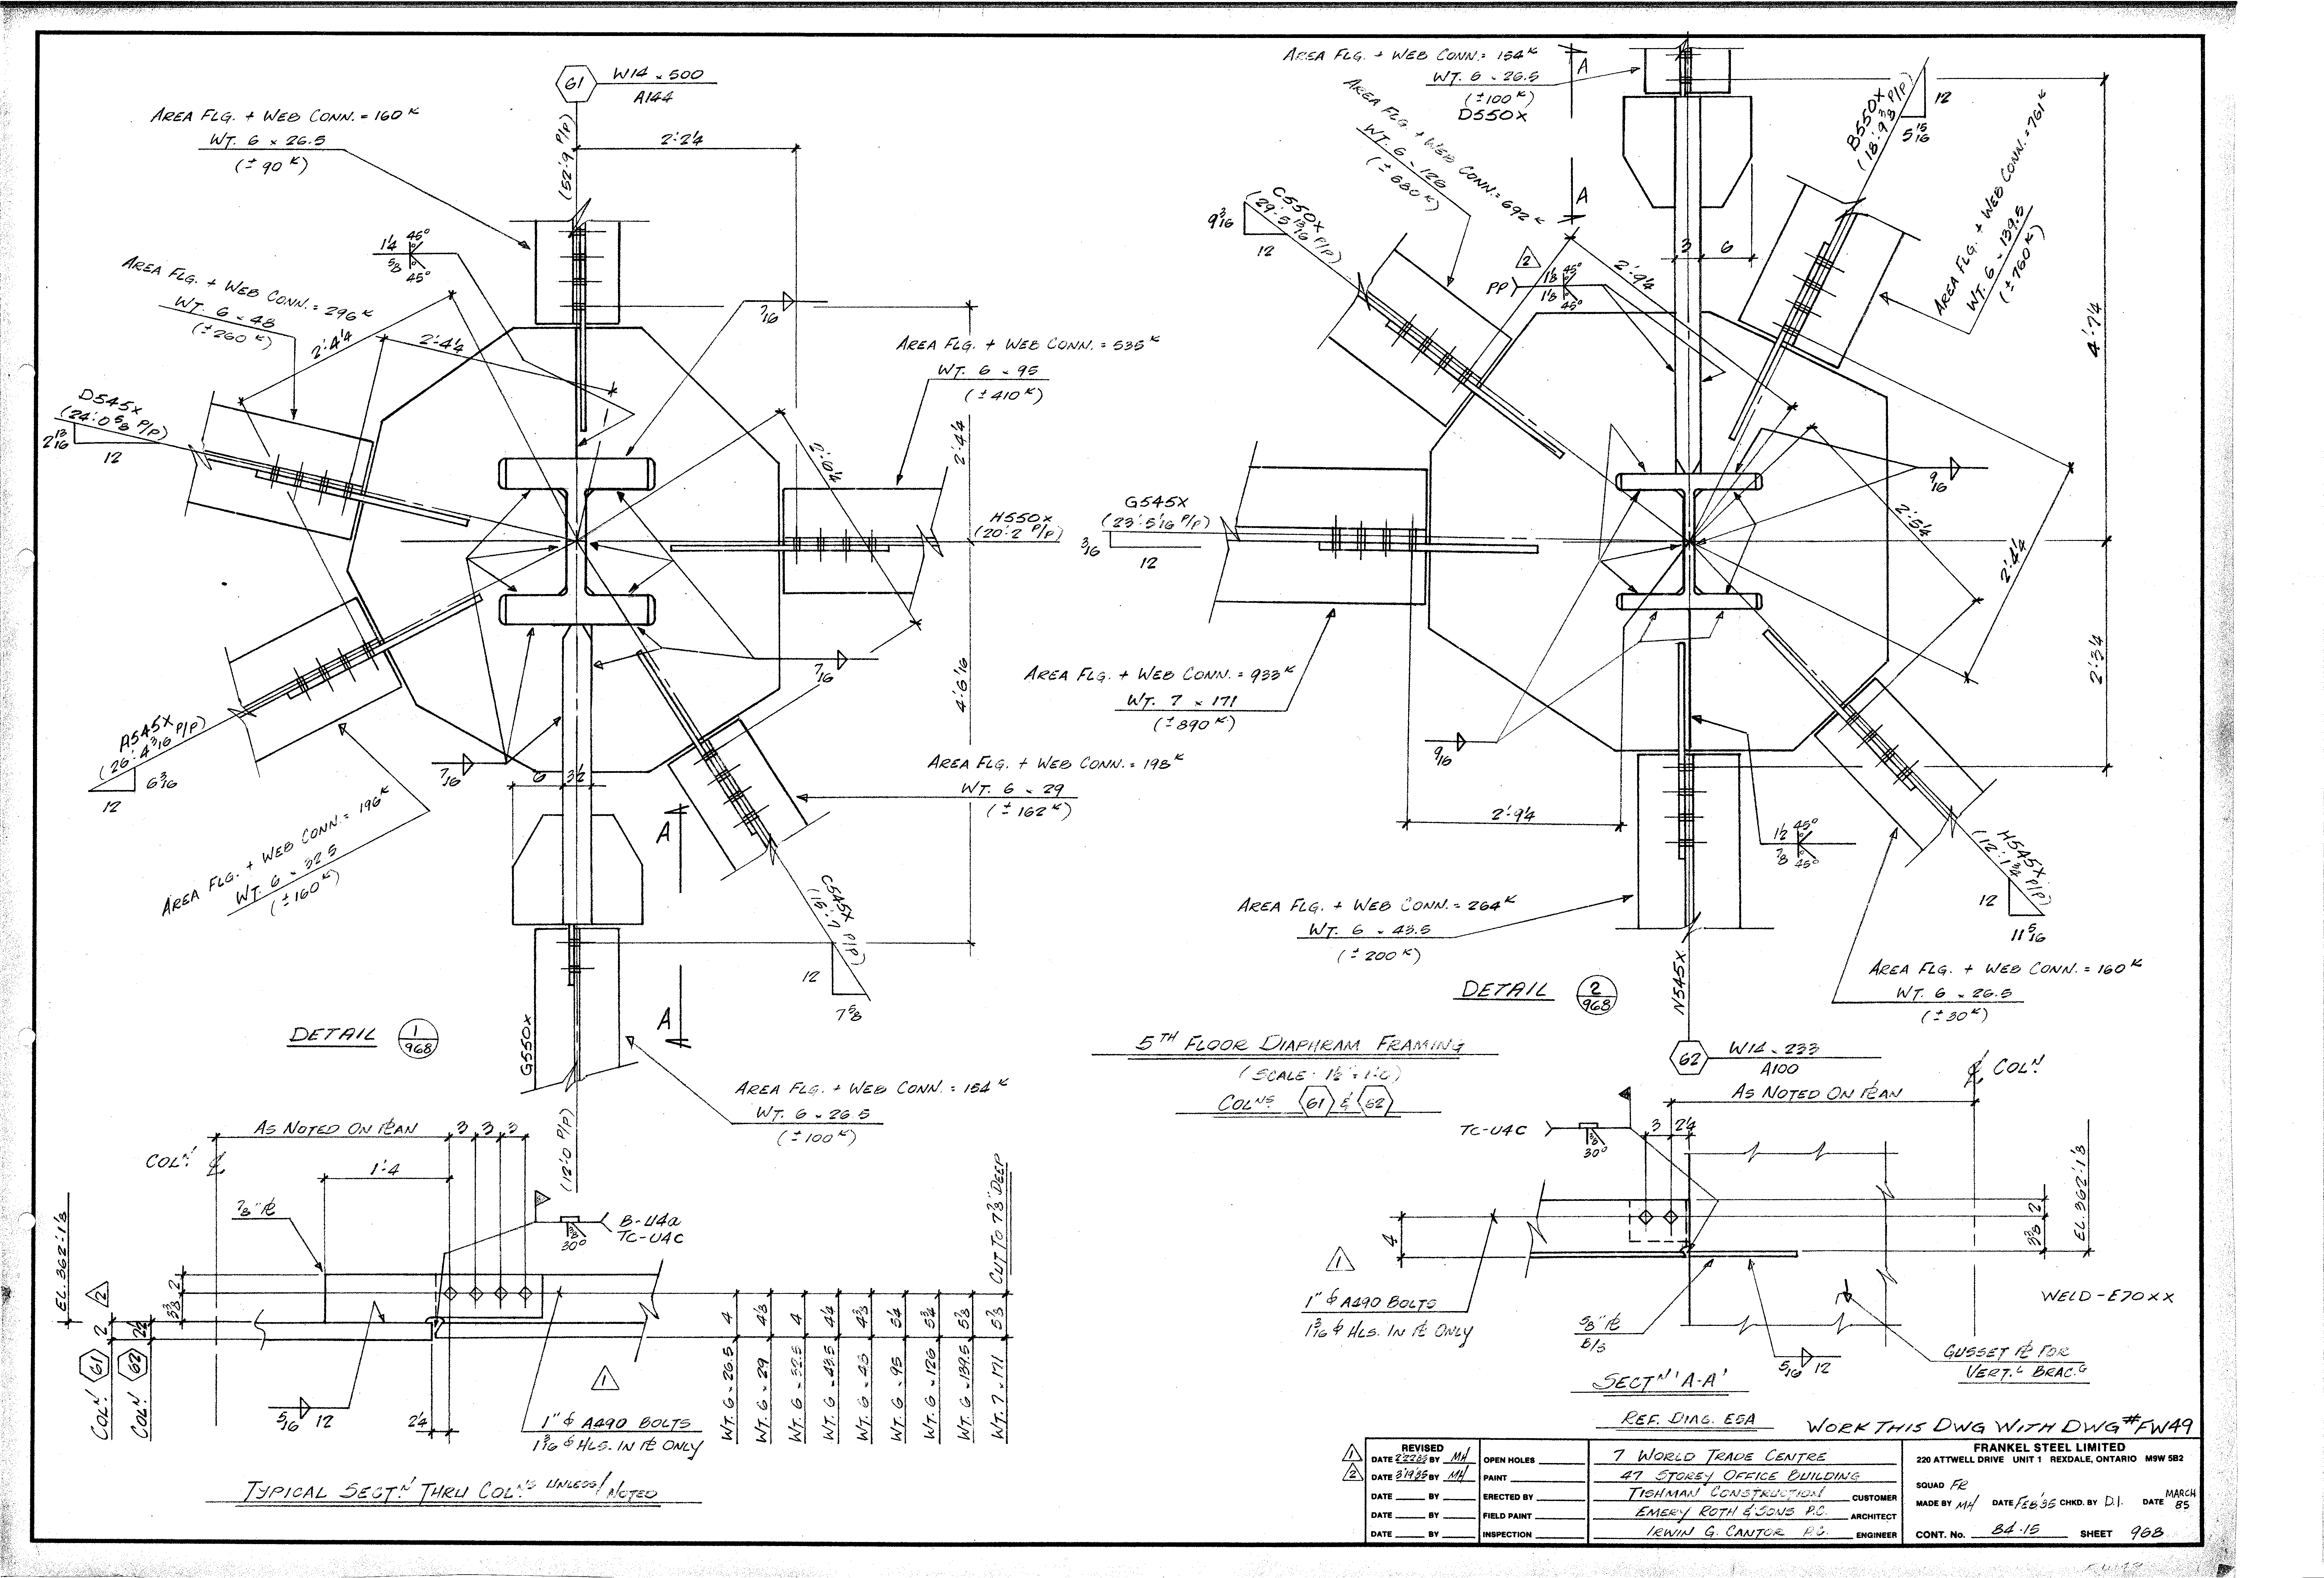
| 0968.png | 464.4 KB | 0968 | 5TH FLOOR DIAPHRAM FRAMING - COLS. 61 & 62 | https://911warroom.com/model/files/WTC7/DRAWINGS/STRUCTURAL/DETAILS-PNG/0968.png |
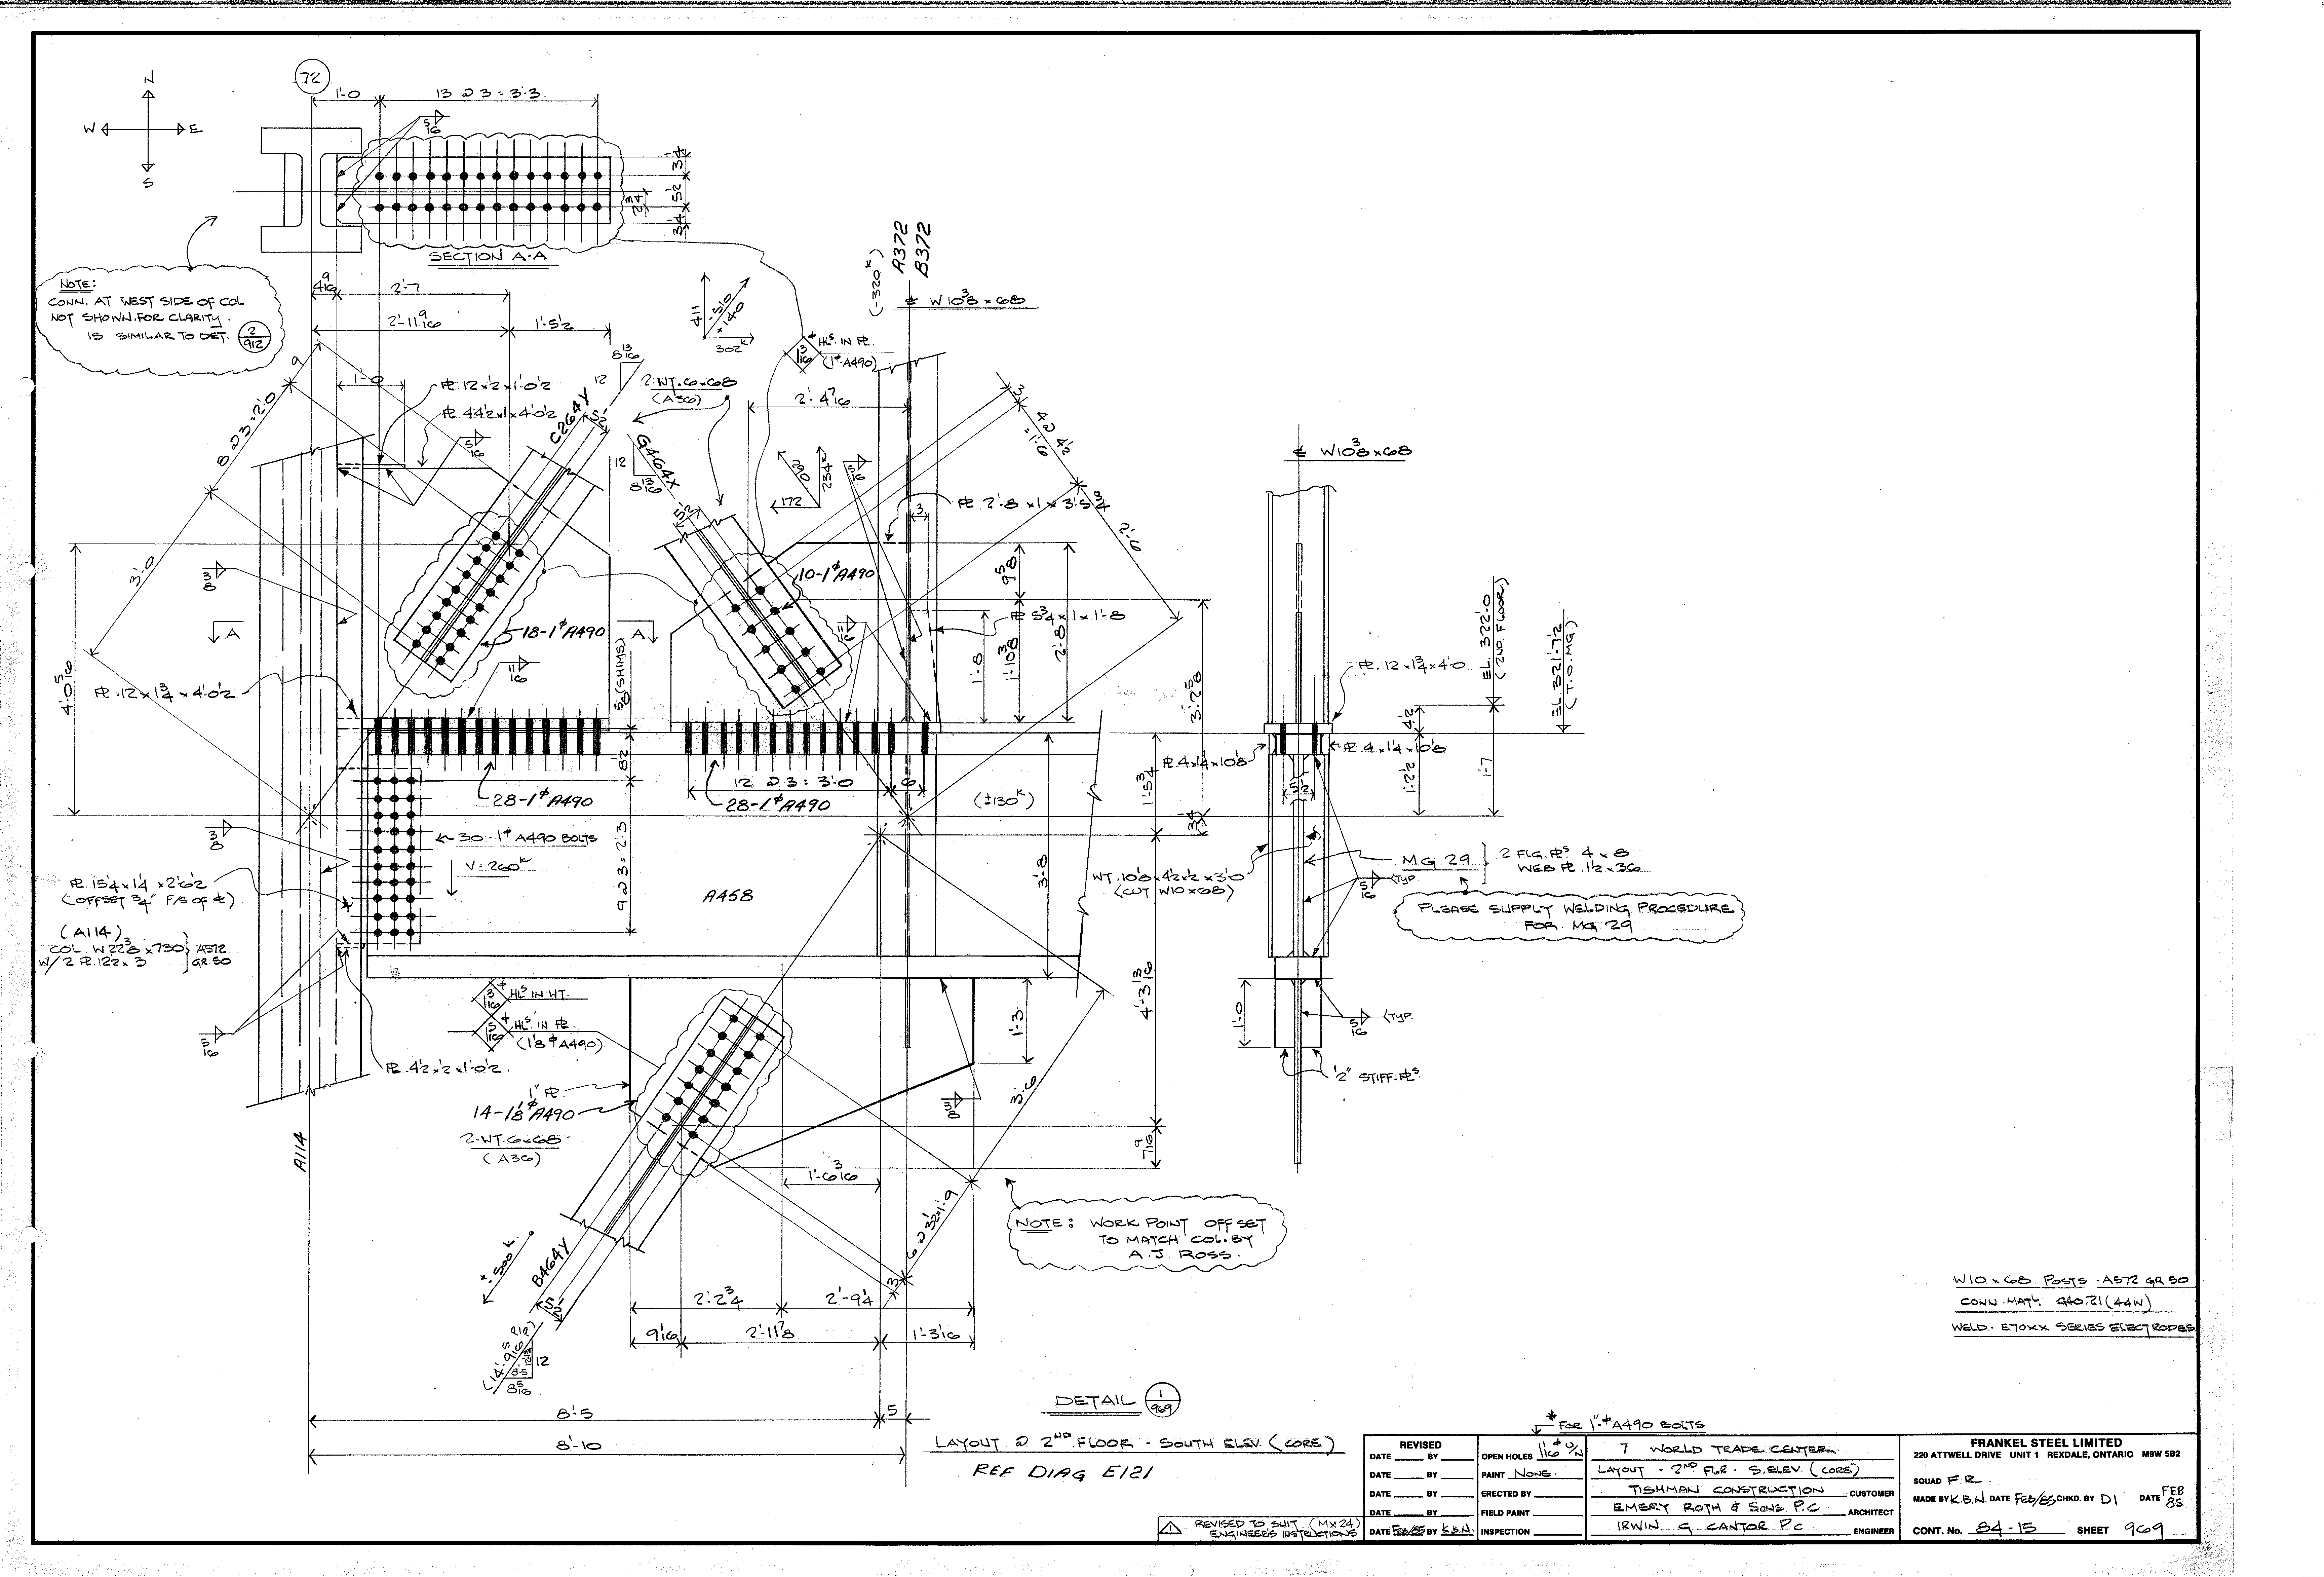
| 0969.png | 382.0 KB | 0969 | LAYOUT @ 2ND FLOOR - SOUTH ELEV. (CORE) | https://911warroom.com/model/files/WTC7/DRAWINGS/STRUCTURAL/DETAILS-PNG/0969.png |
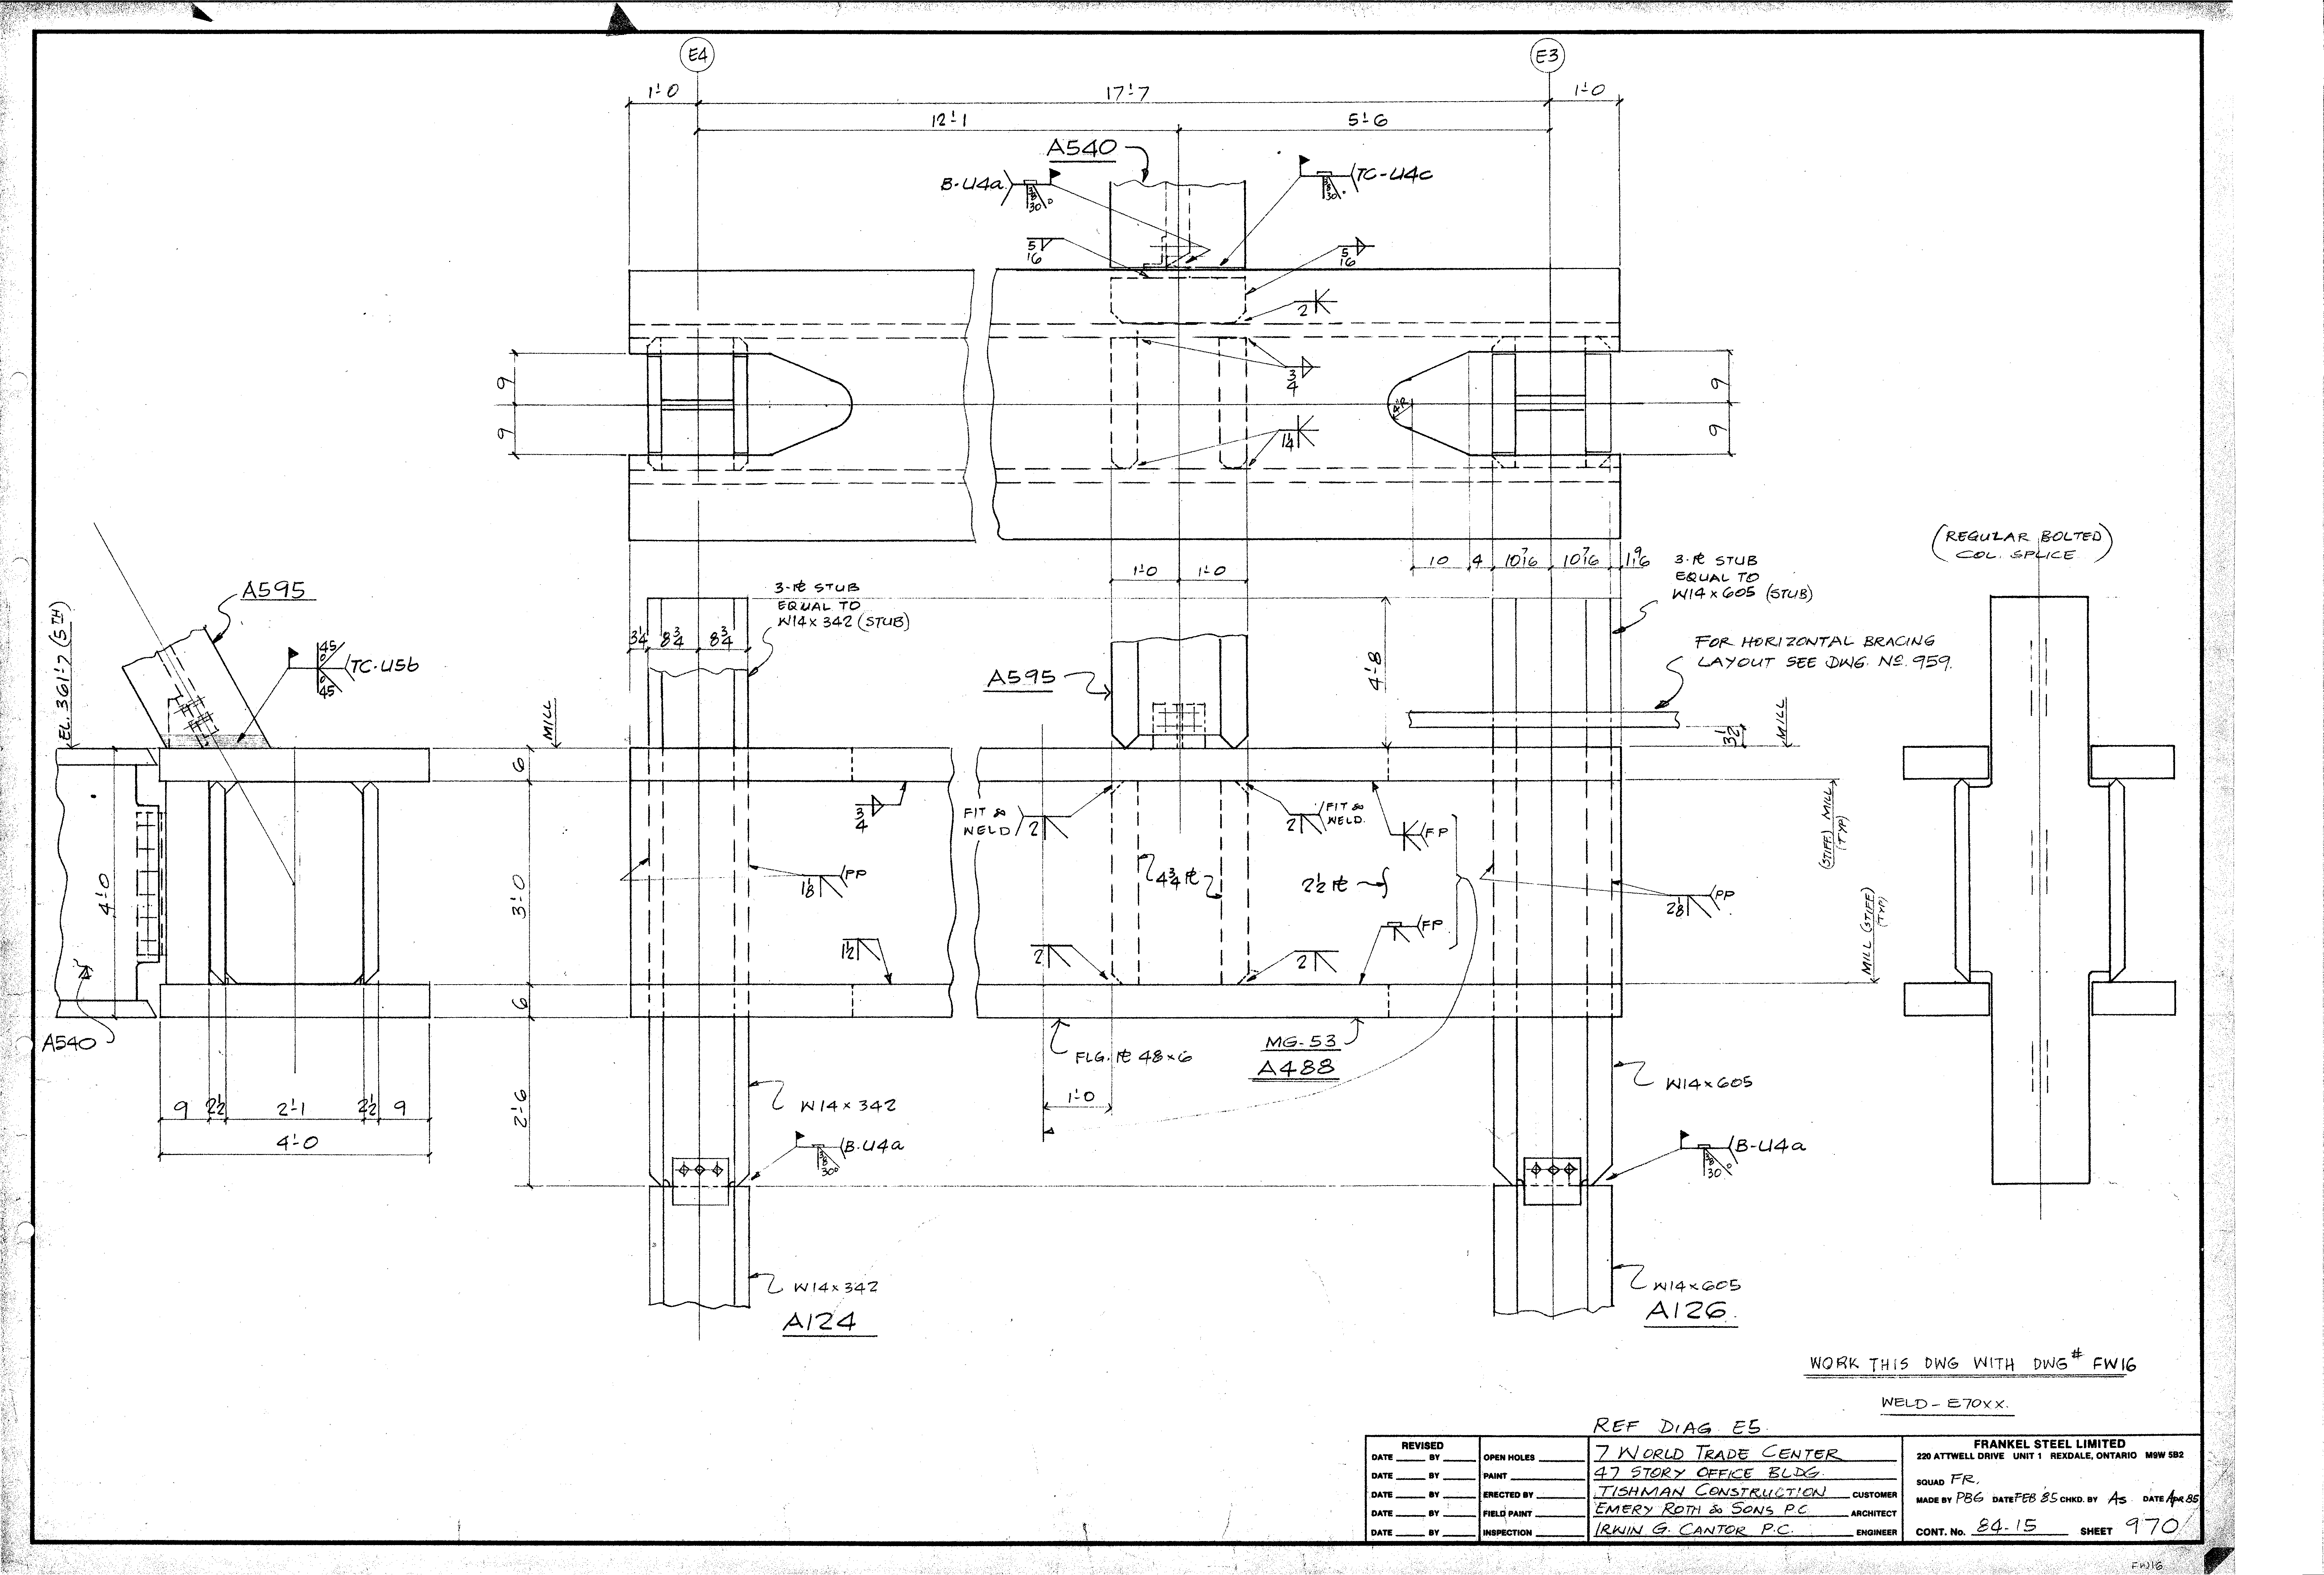
| 0970.png | 357.1 KB | 0970 | (no detail title) — ref. diag E6 | https://911warroom.com/model/files/WTC7/DRAWINGS/STRUCTURAL/DETAILS-PNG/0970.png |
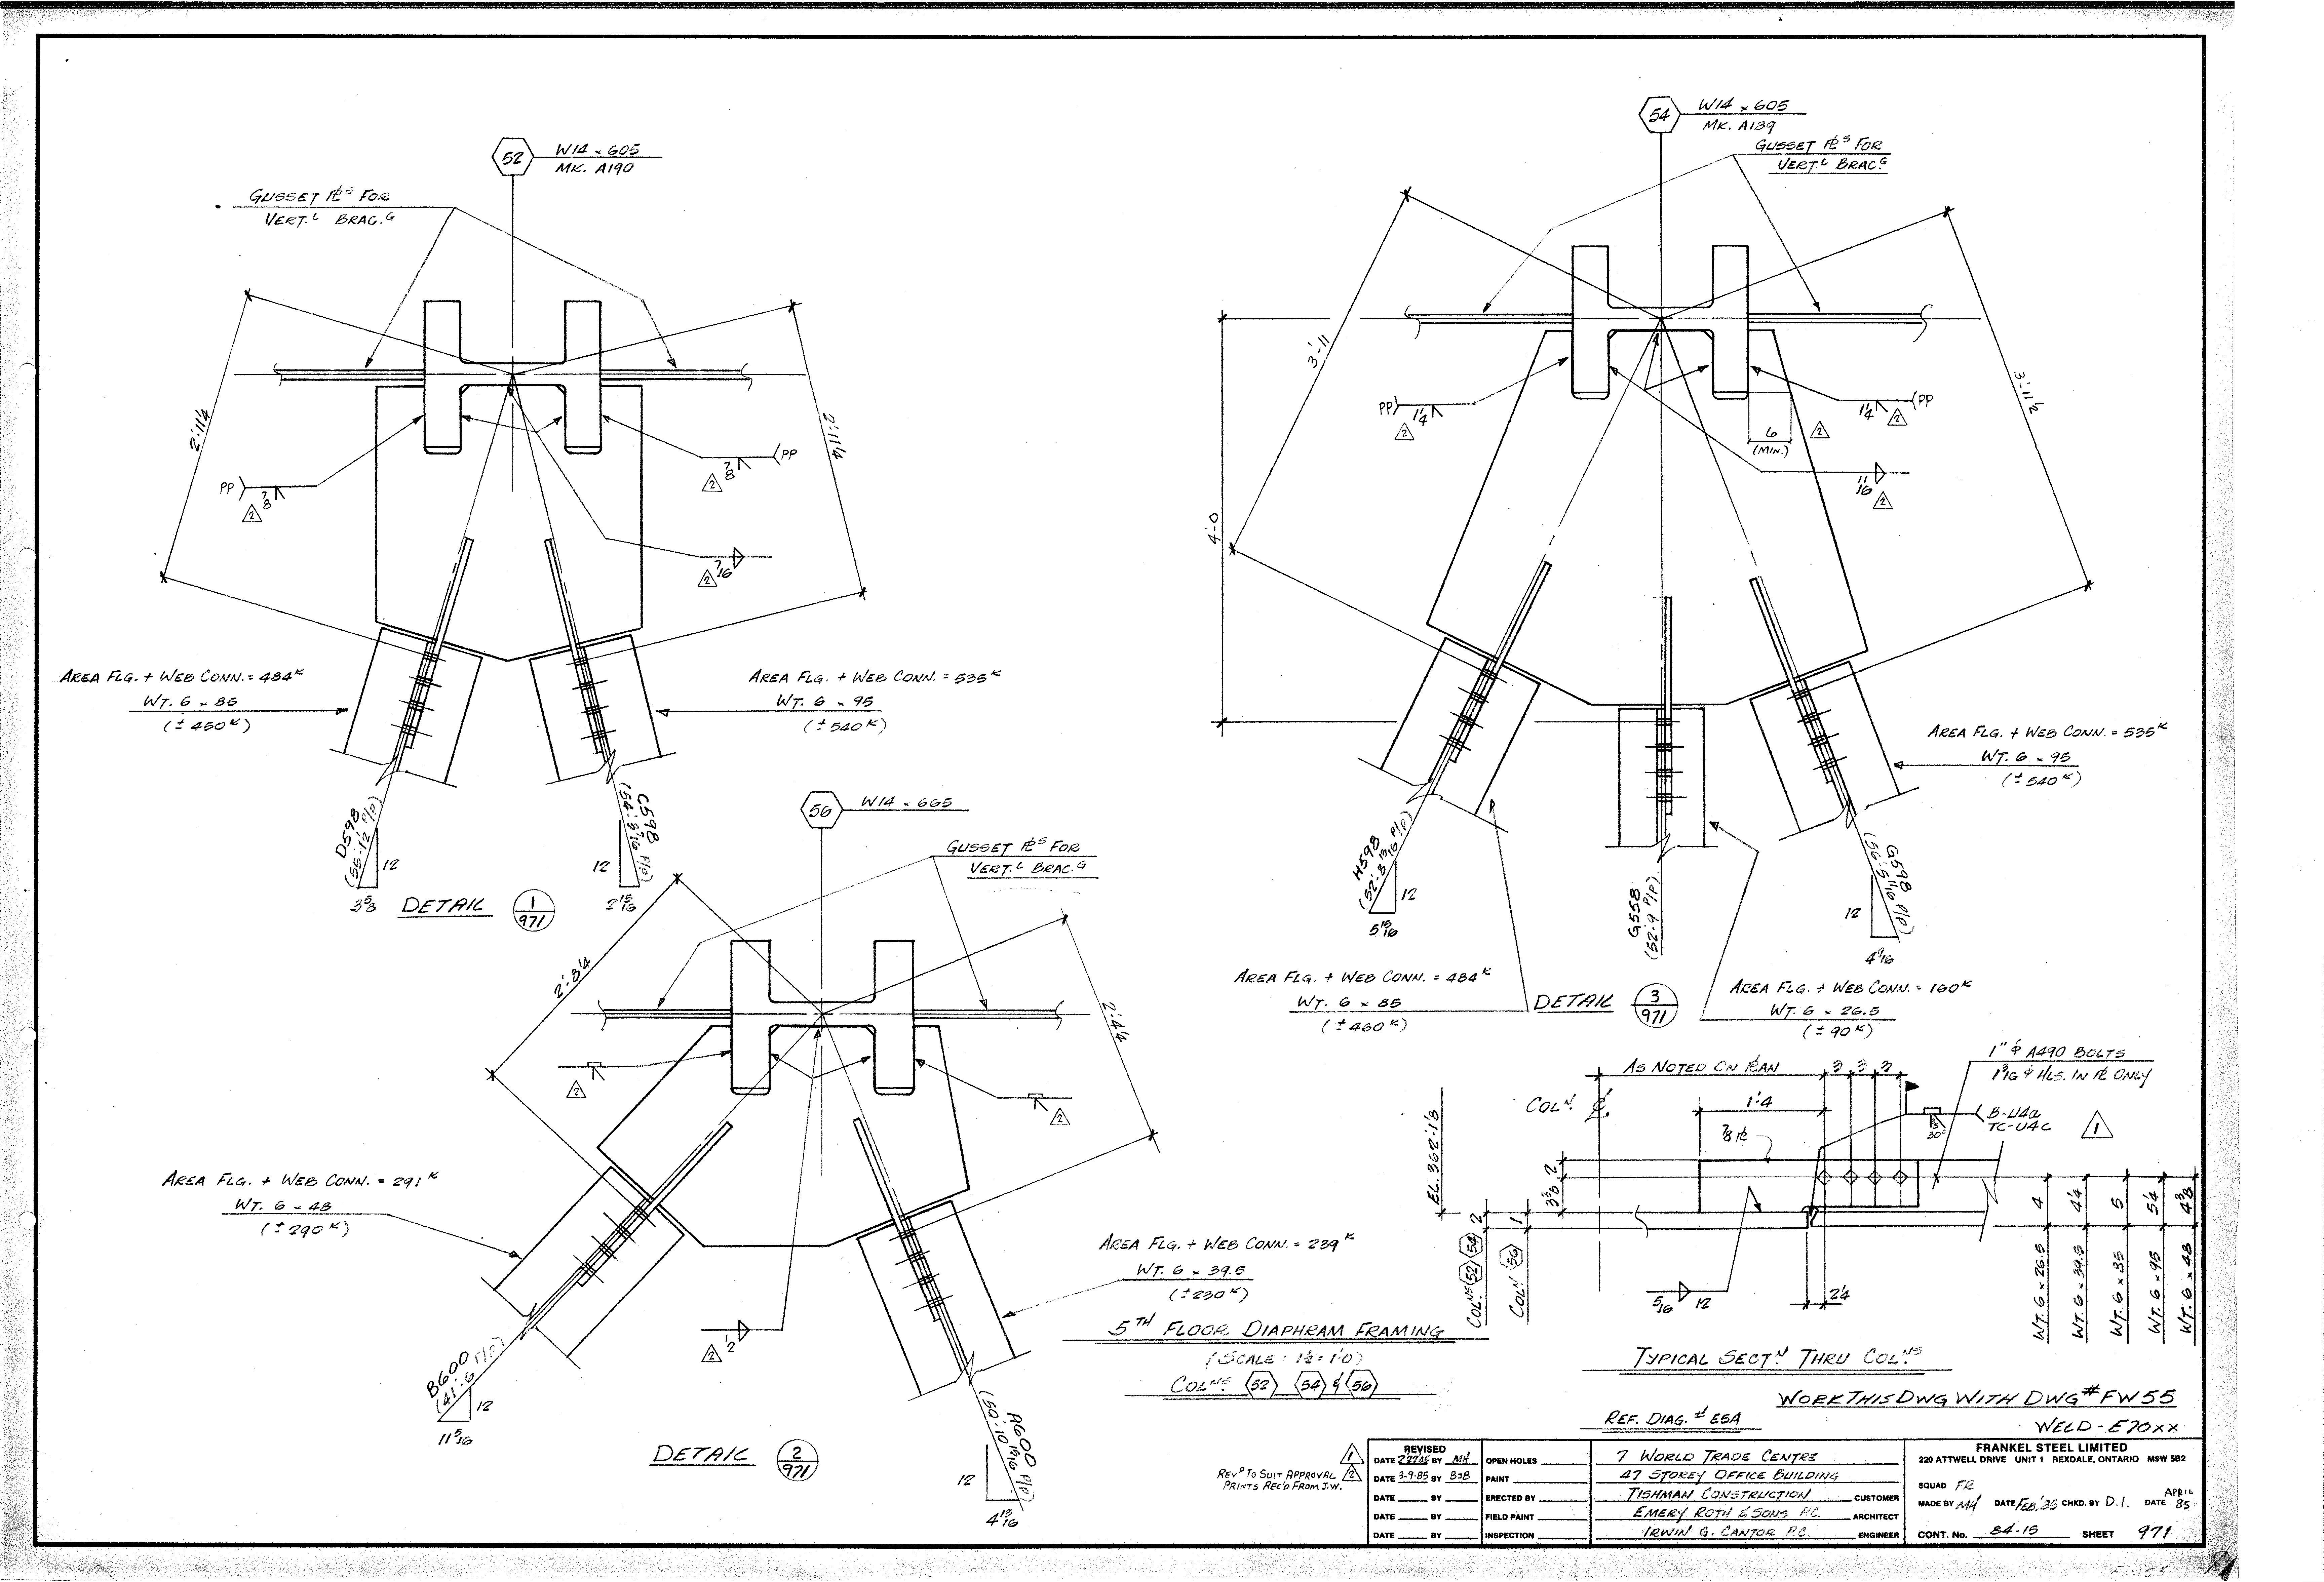
| 0971.png | 403.2 KB | 0971 | 5TH FLOOR DIAPHRAM FRAMING - COLS. 52, 54 & 56 | https://911warroom.com/model/files/WTC7/DRAWINGS/STRUCTURAL/DETAILS-PNG/0971.png |
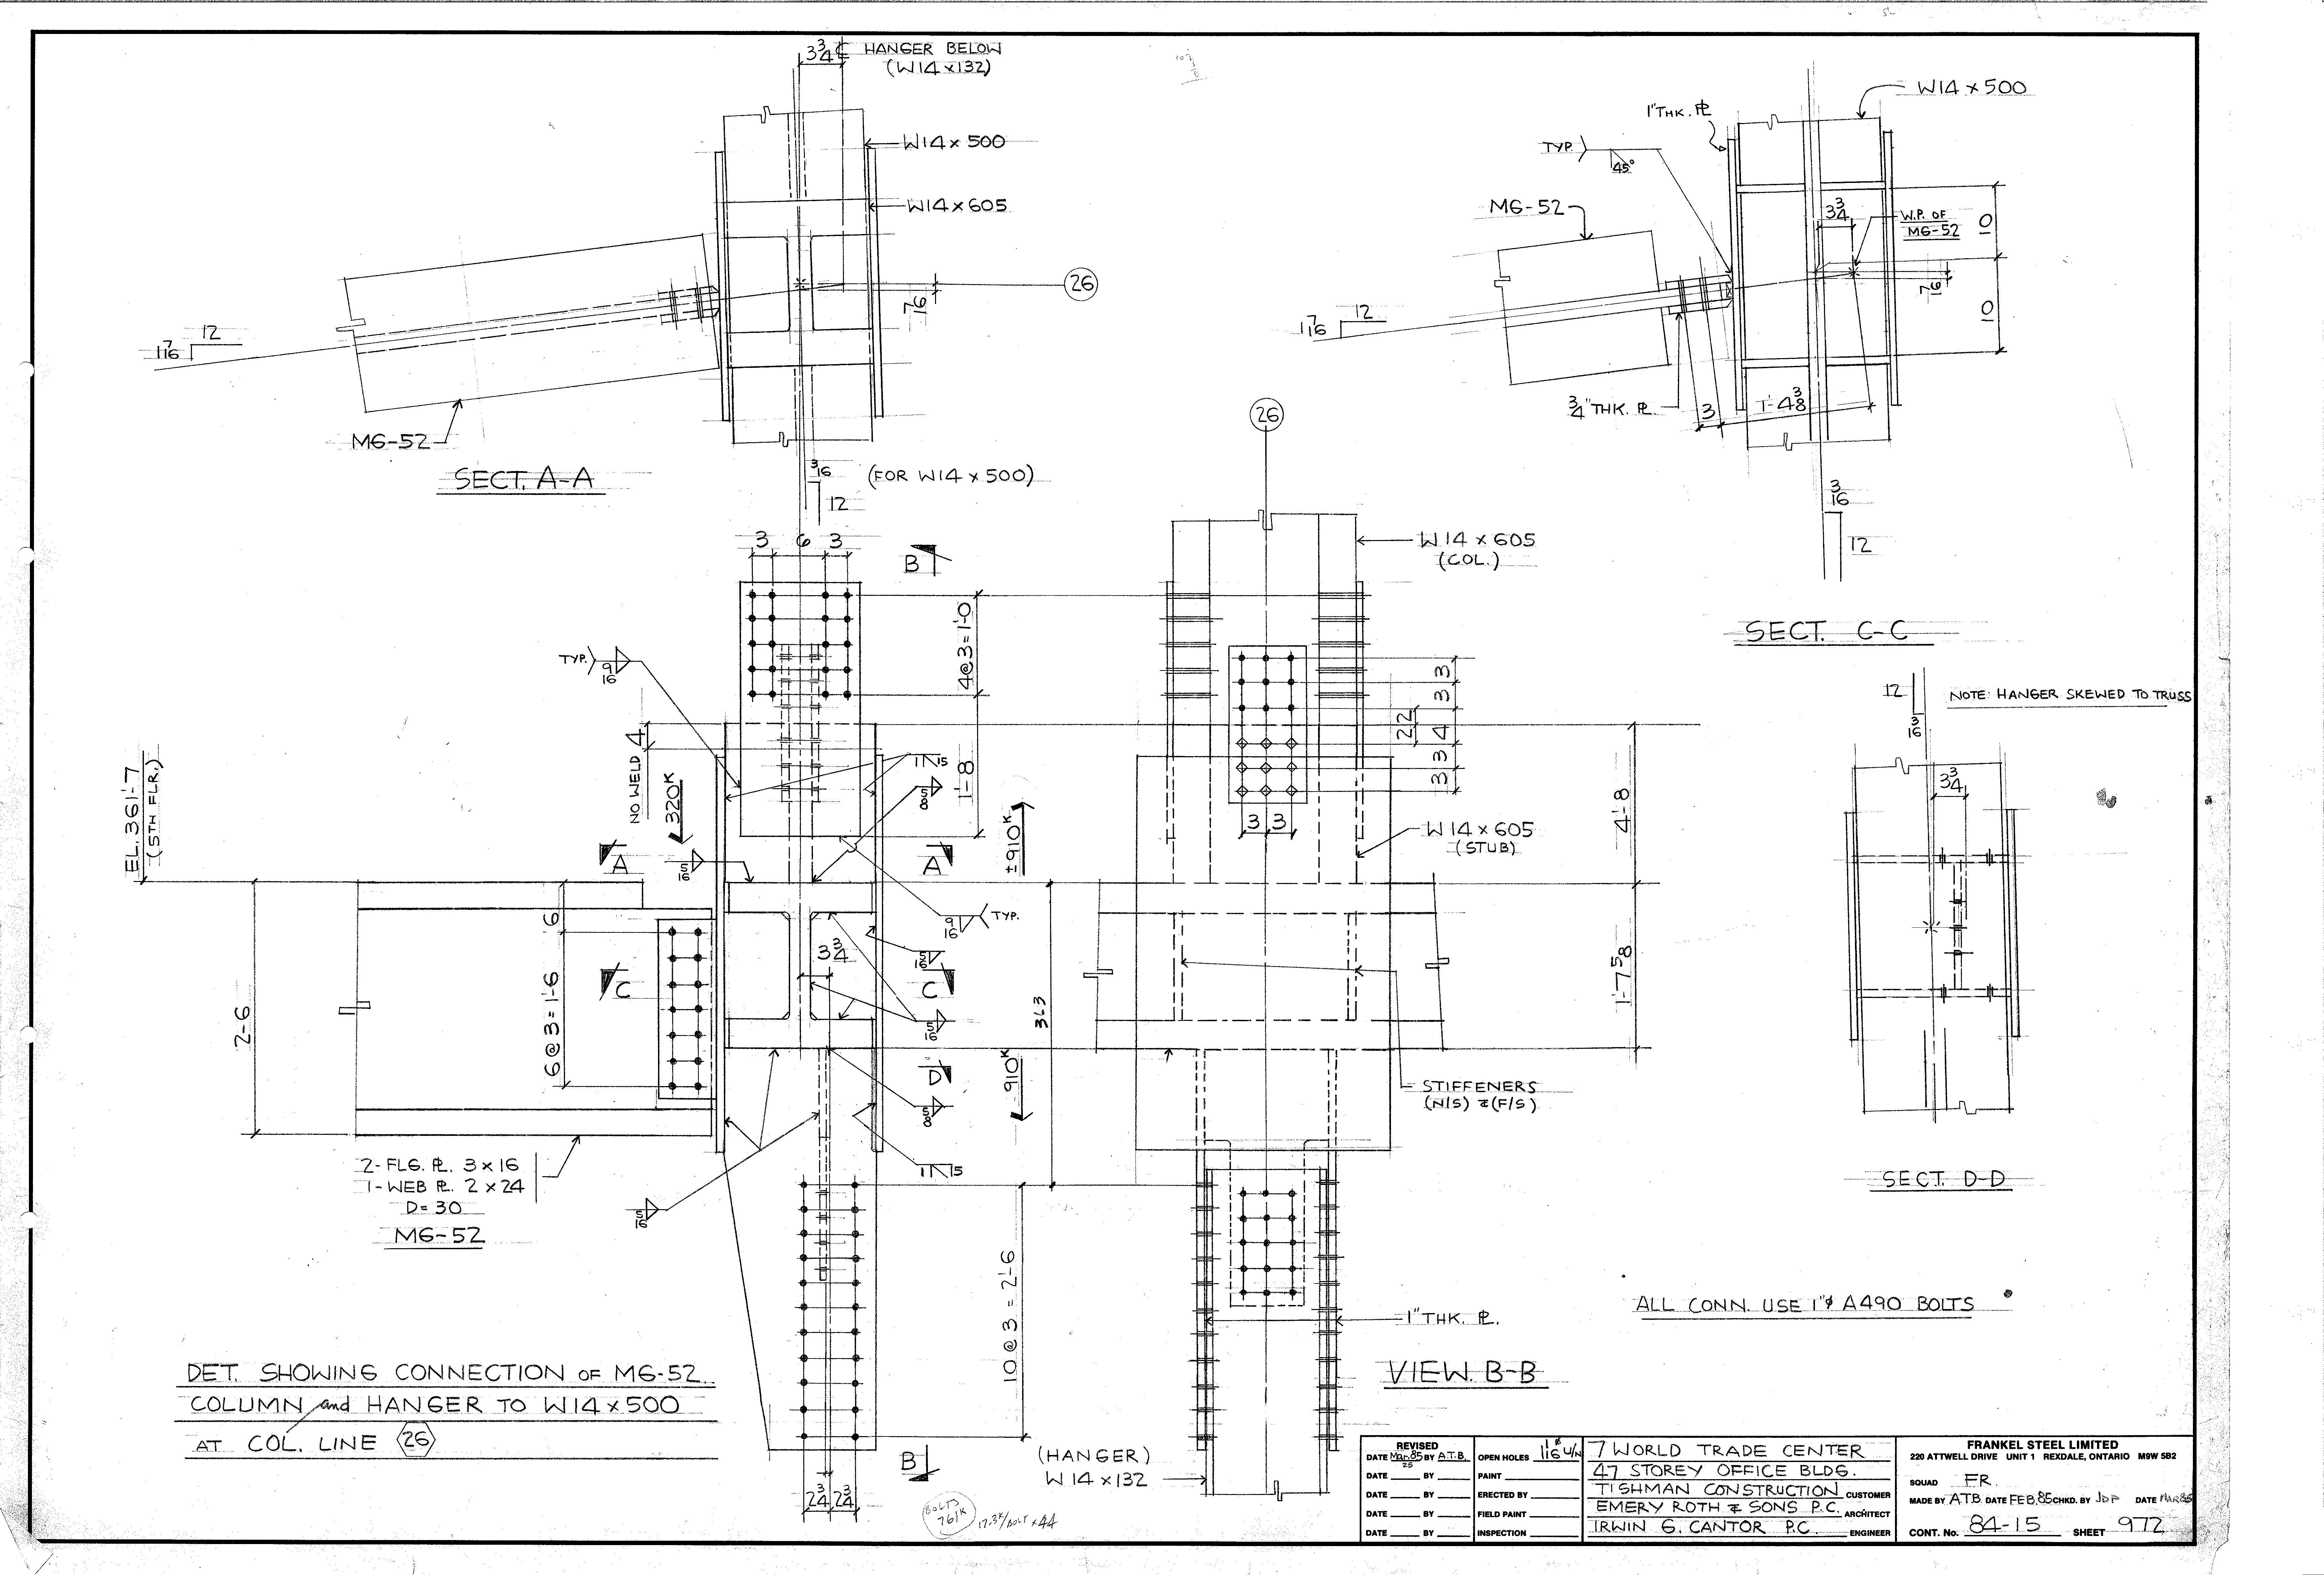
| 0972.png | 357.1 KB | 0972 | DET. SHOWING CONNECTION OF MG-52, COLUMN AND HANGER TO W14x500 AT COL. LINE 26 | https://911warroom.com/model/files/WTC7/DRAWINGS/STRUCTURAL/DETAILS-PNG/0972.png |
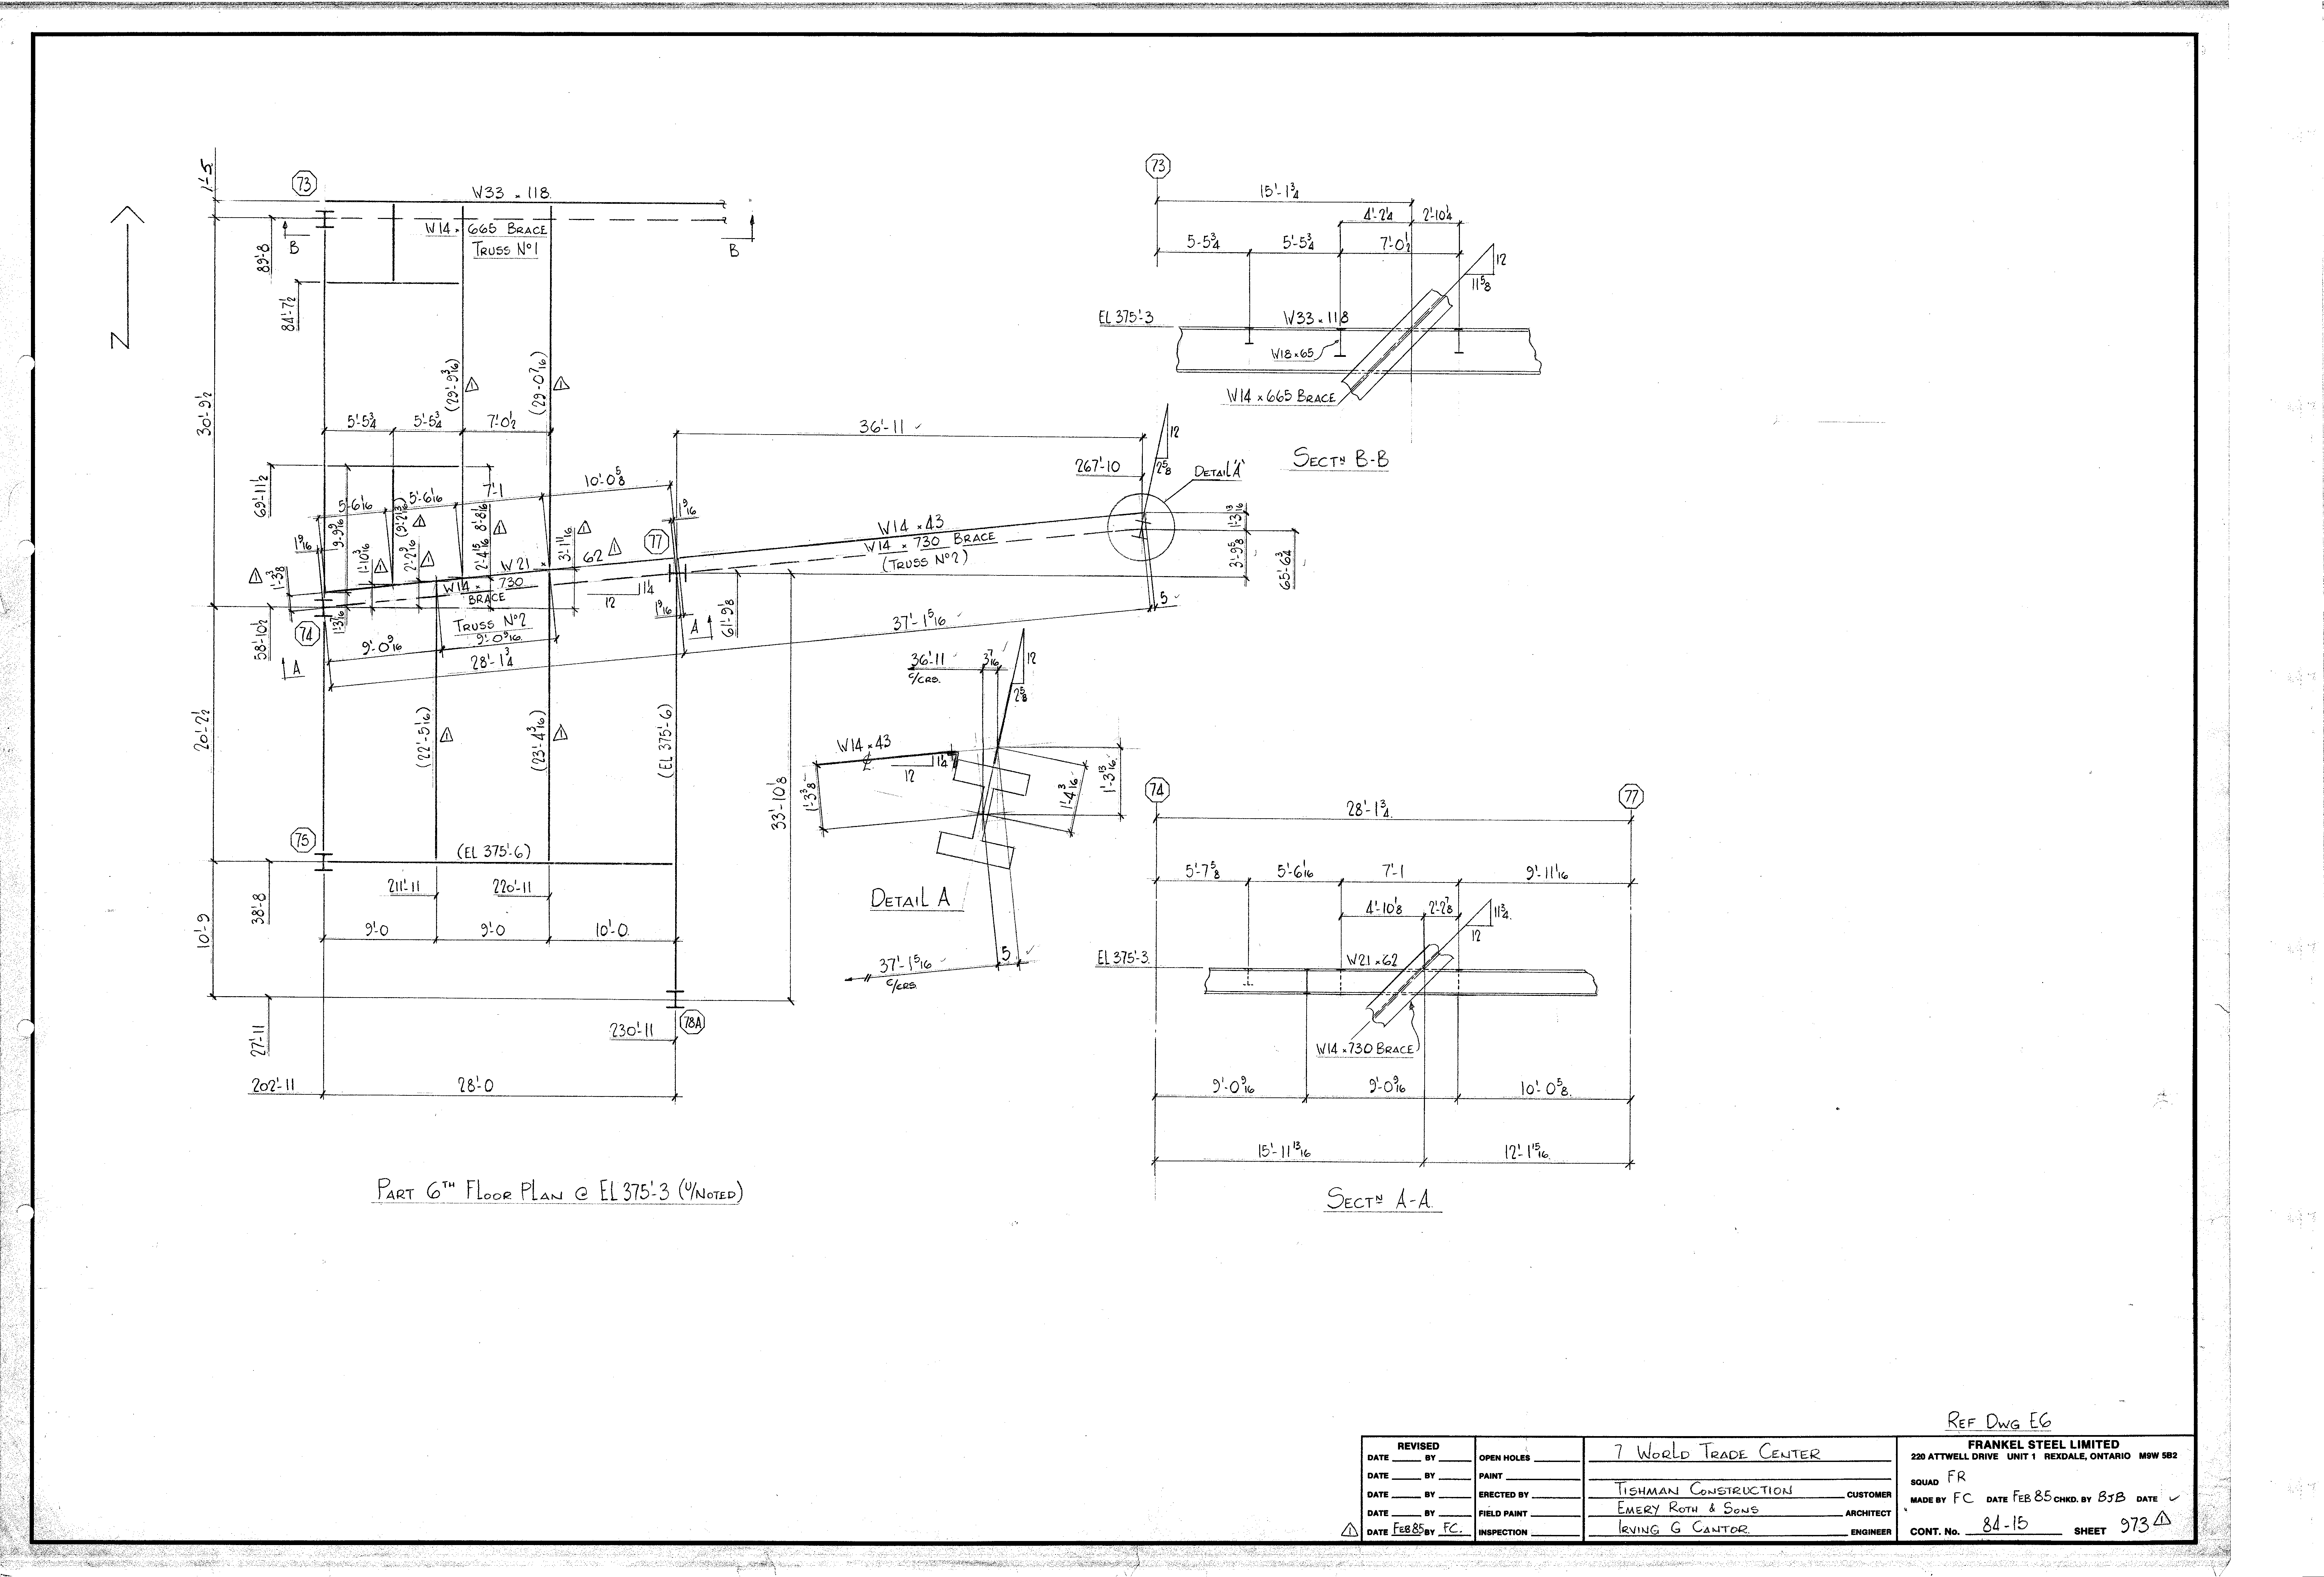
| 0973.png | 244.4 KB | 0973 | PART 6TH FLOOR PLAN @ EL 375'-3 (U/NOTED) | https://911warroom.com/model/files/WTC7/DRAWINGS/STRUCTURAL/DETAILS-PNG/0973.png |
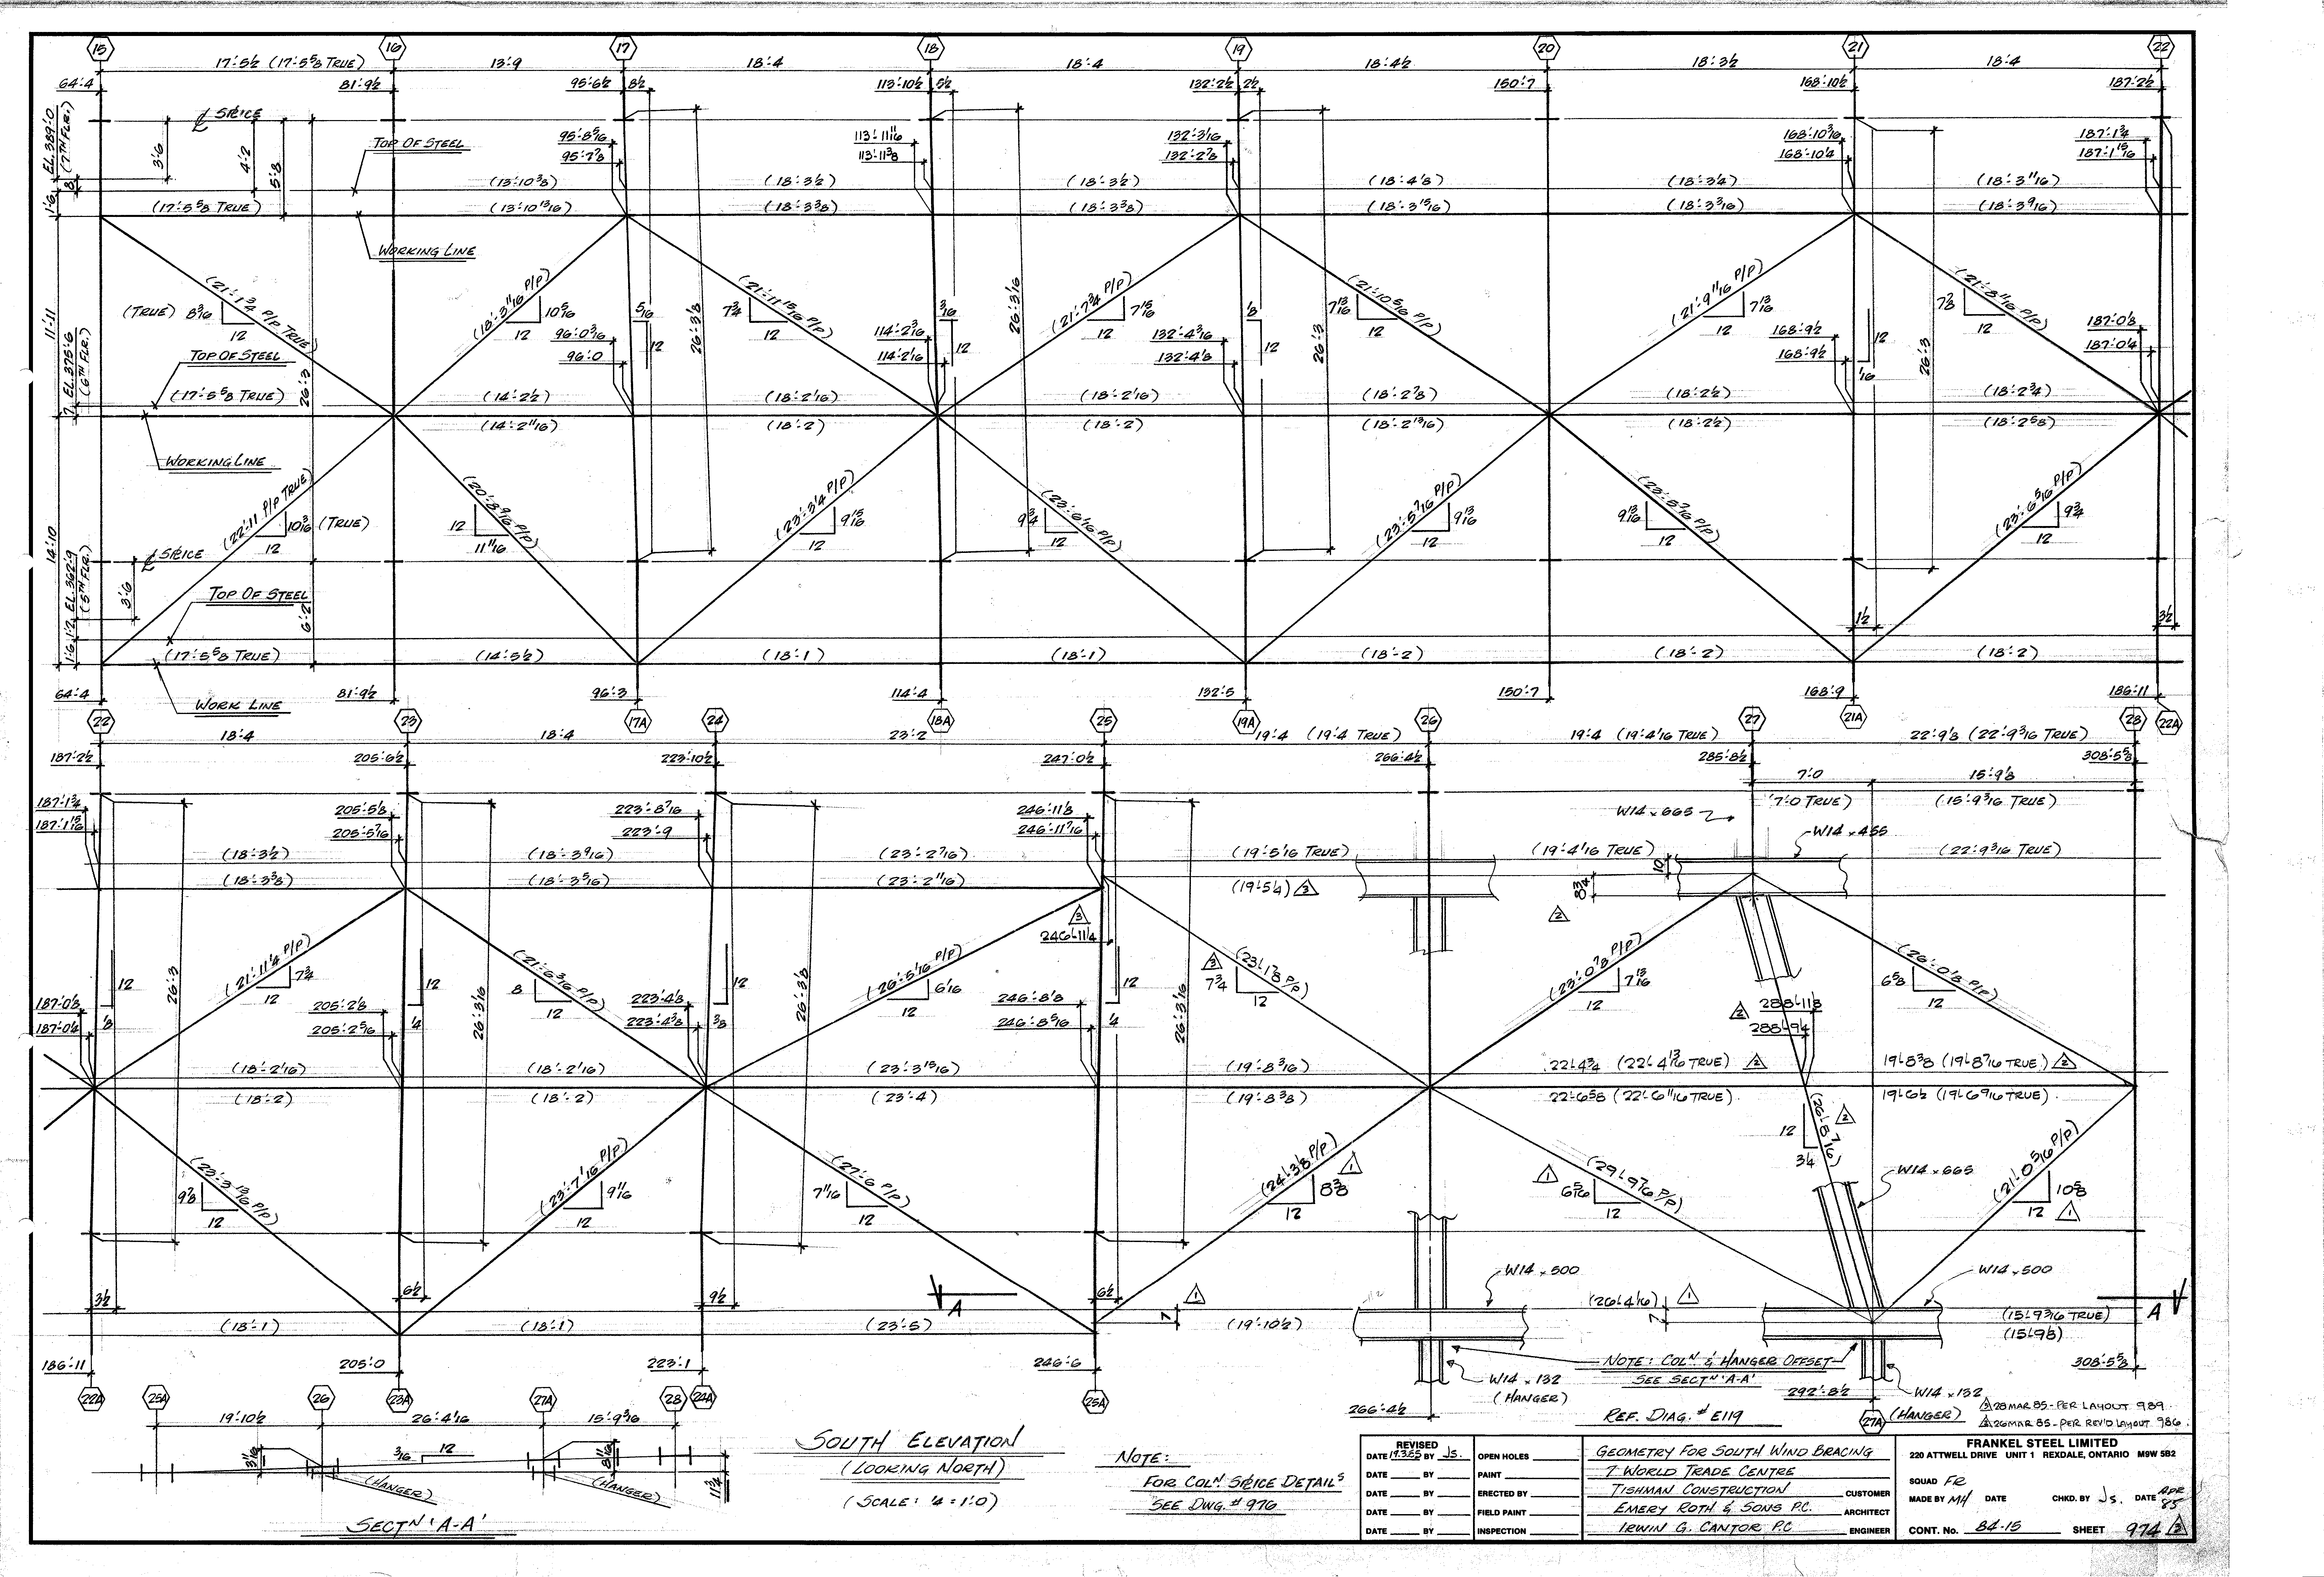
| 0974.png | 539.3 KB | 0974 | GEOMETRY FOR SOUTH WIND BRACING | https://911warroom.com/model/files/WTC7/DRAWINGS/STRUCTURAL/DETAILS-PNG/0974.png |
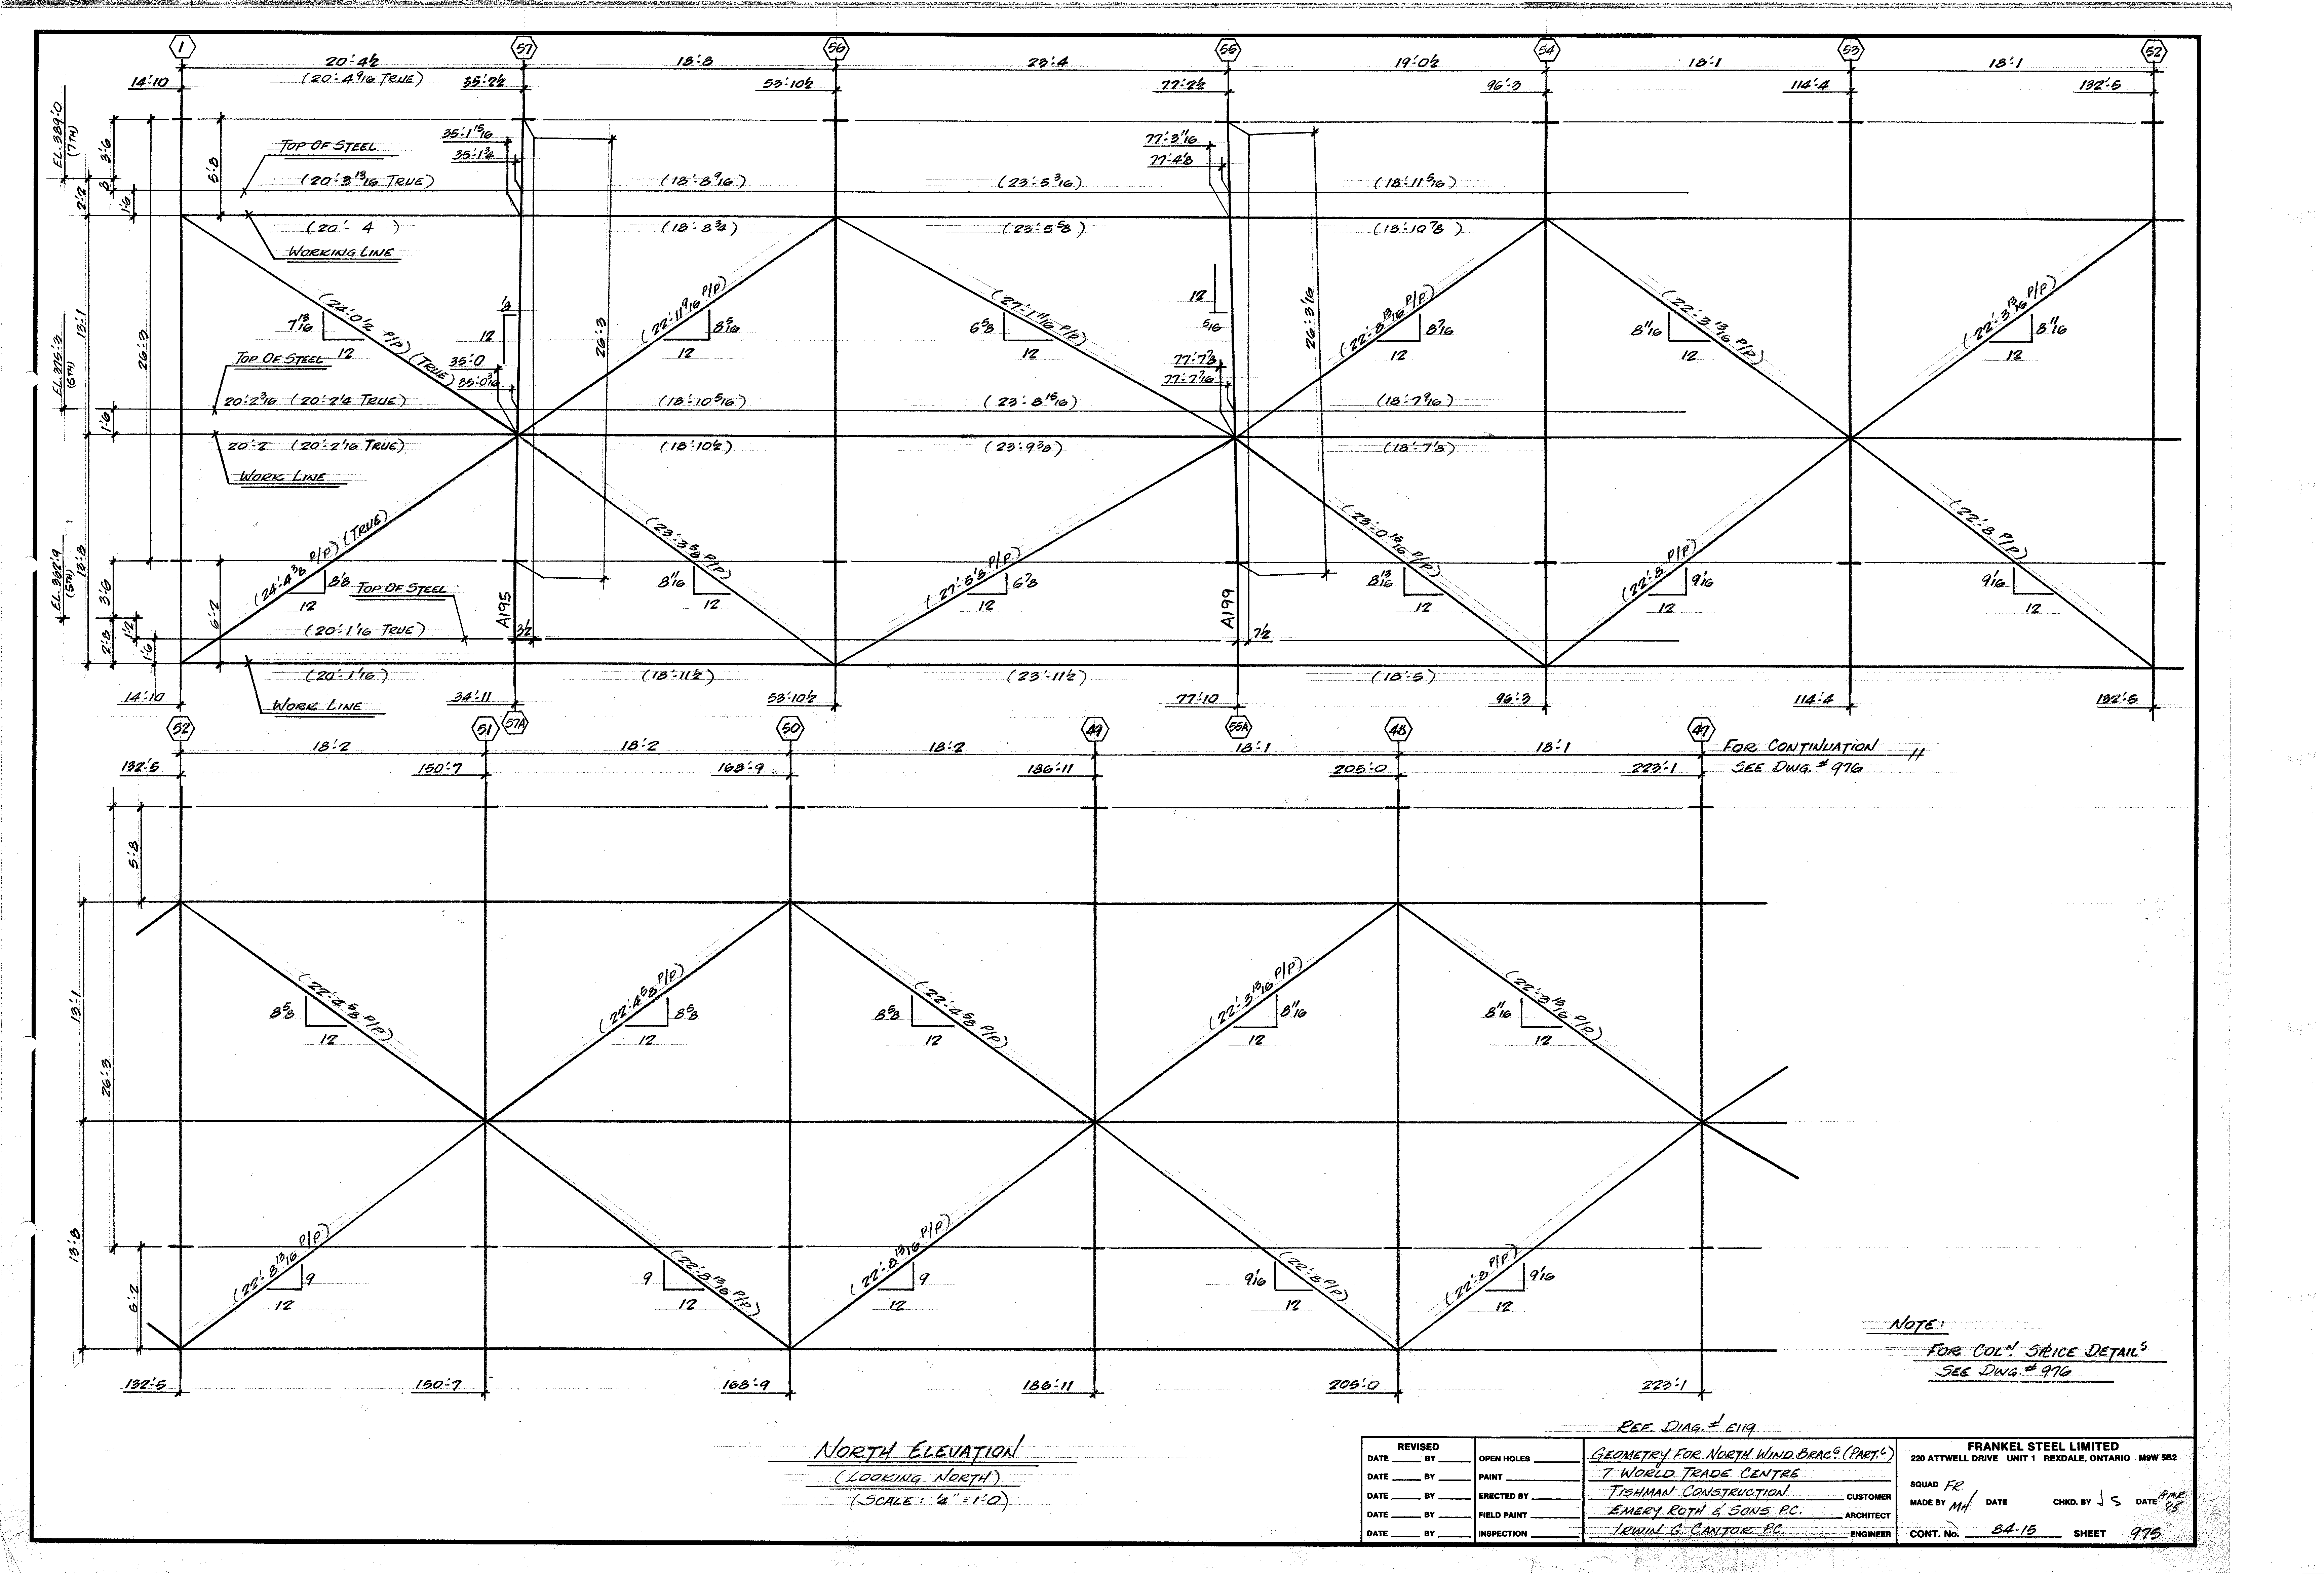
| 0975.png | 362.5 KB | 0975 | GEOMETRY FOR NORTH WIND BRAC'G (PART'L) | https://911warroom.com/model/files/WTC7/DRAWINGS/STRUCTURAL/DETAILS-PNG/0975.png |
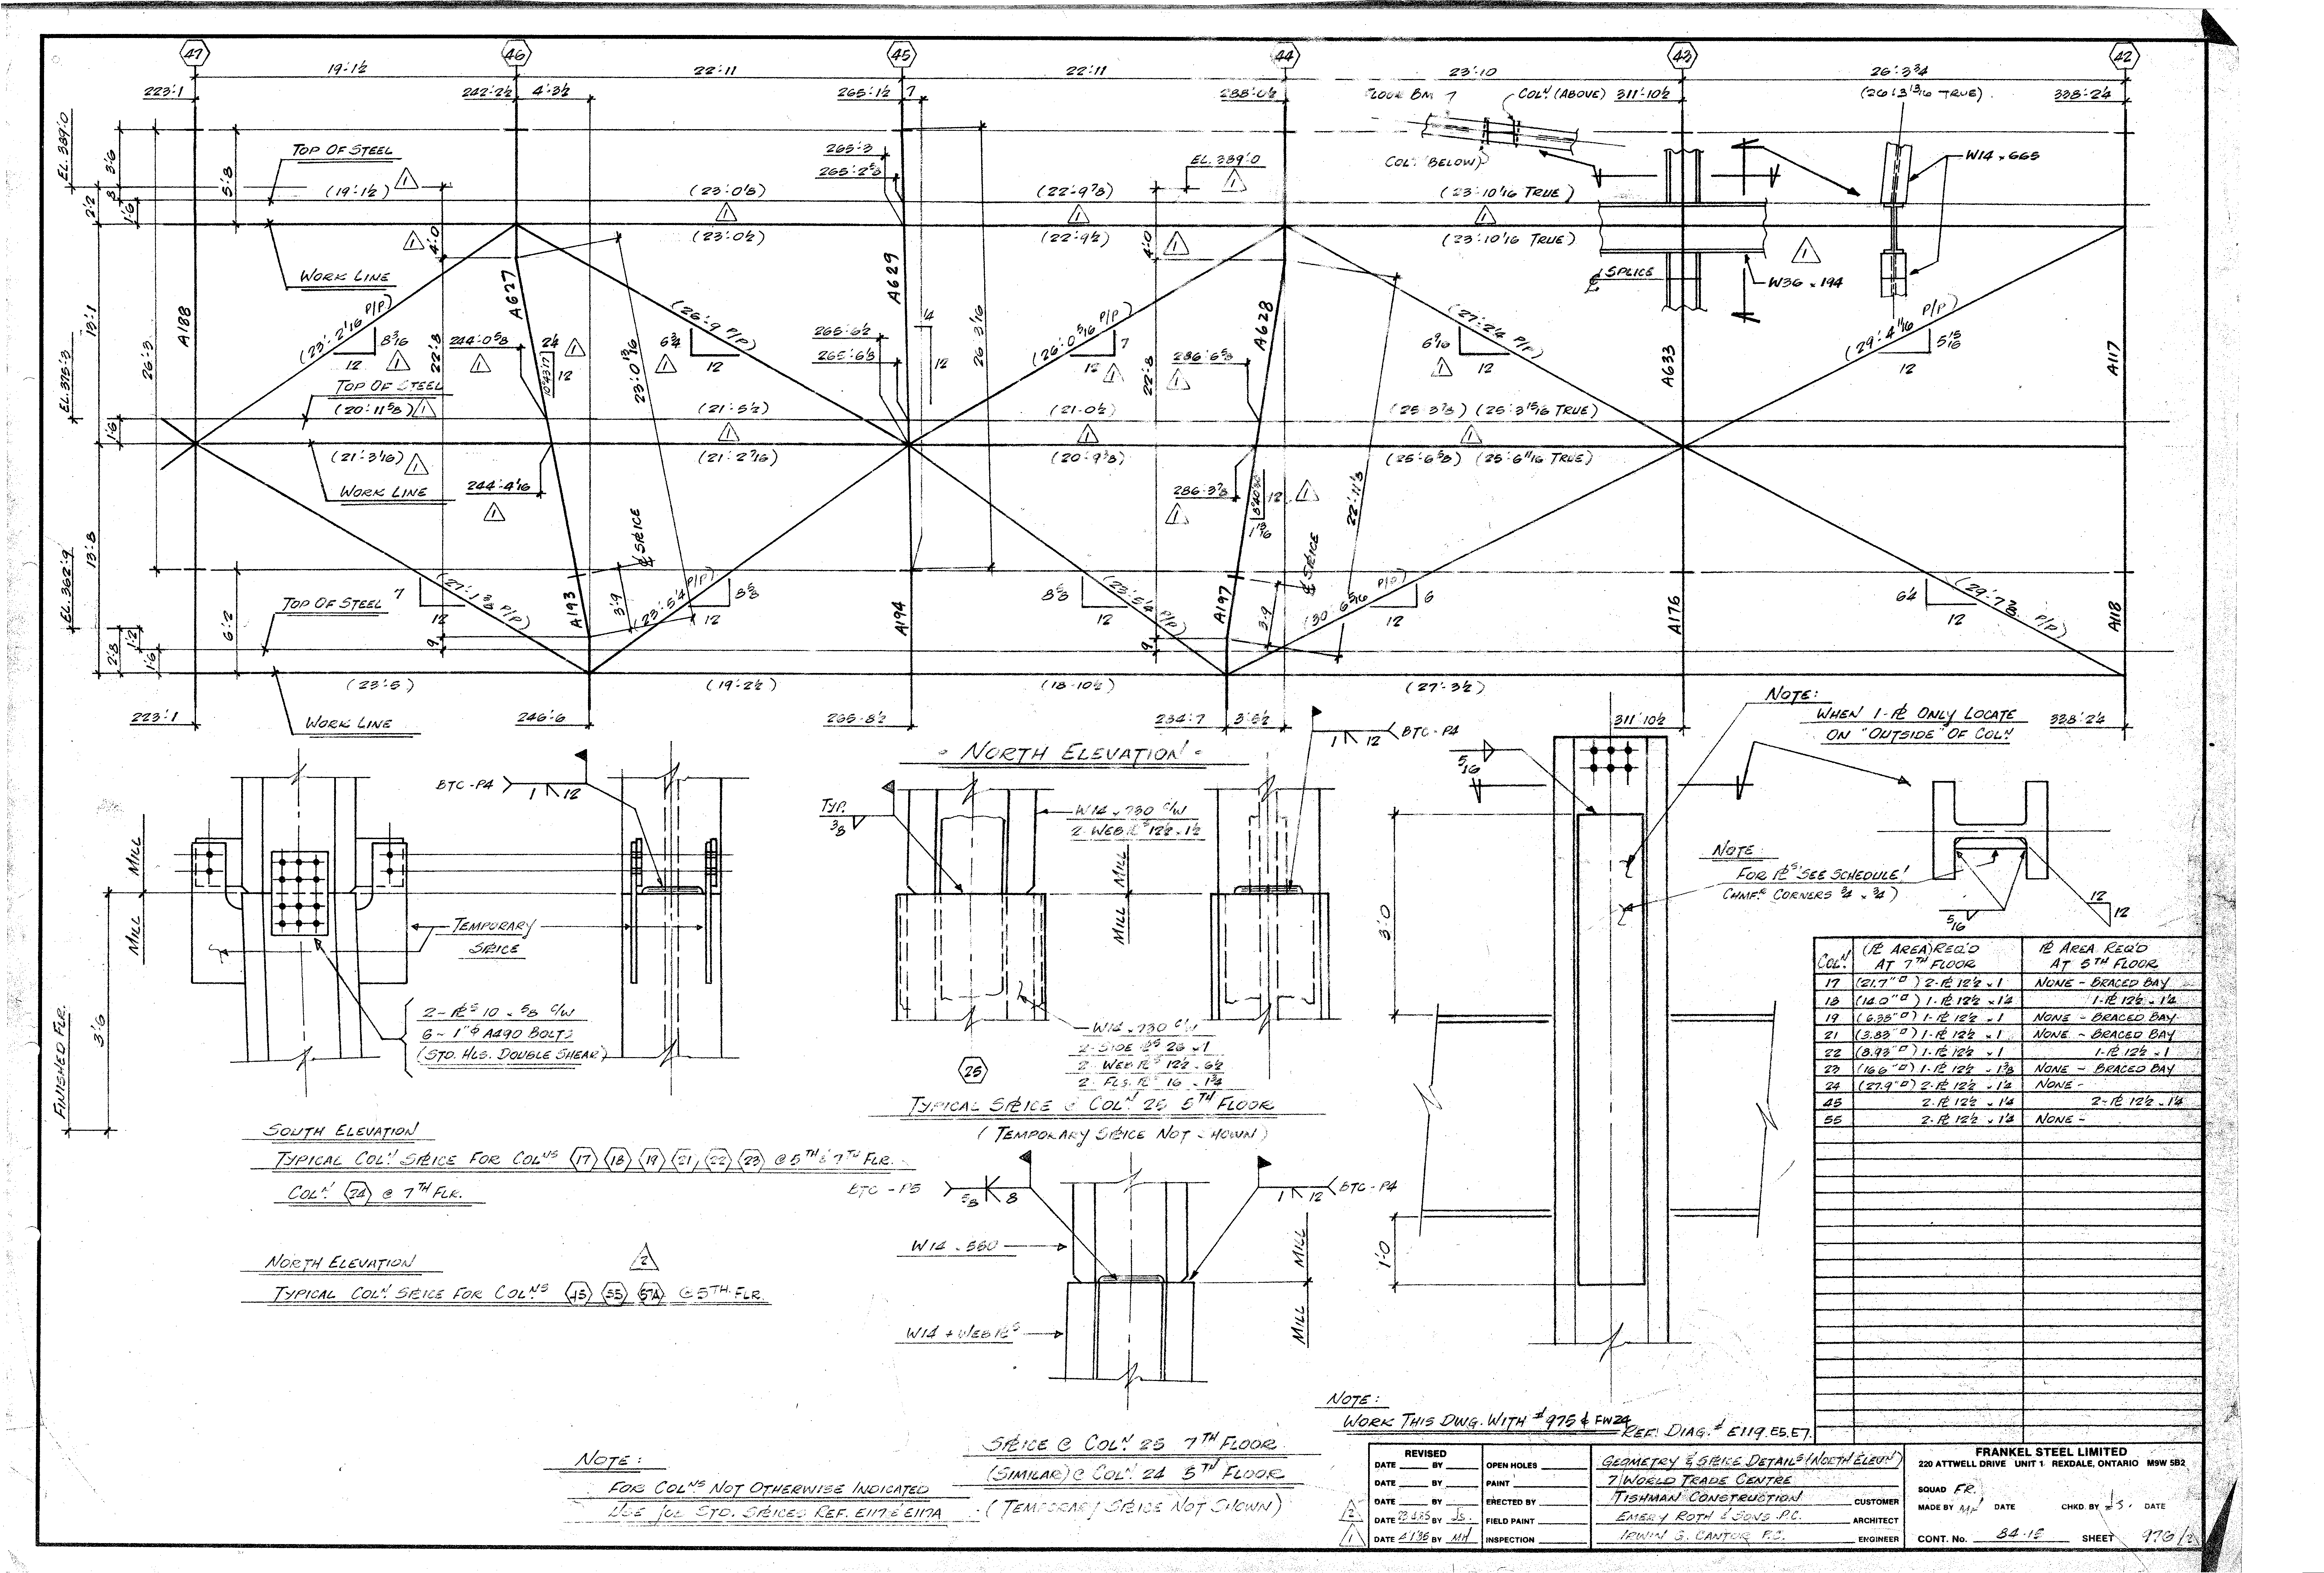
| 0976.png | 567.4 KB | 0976 | GEOMETRY & SPLICE DETAILS (NORTH ELEV'N) | https://911warroom.com/model/files/WTC7/DRAWINGS/STRUCTURAL/DETAILS-PNG/0976.png |
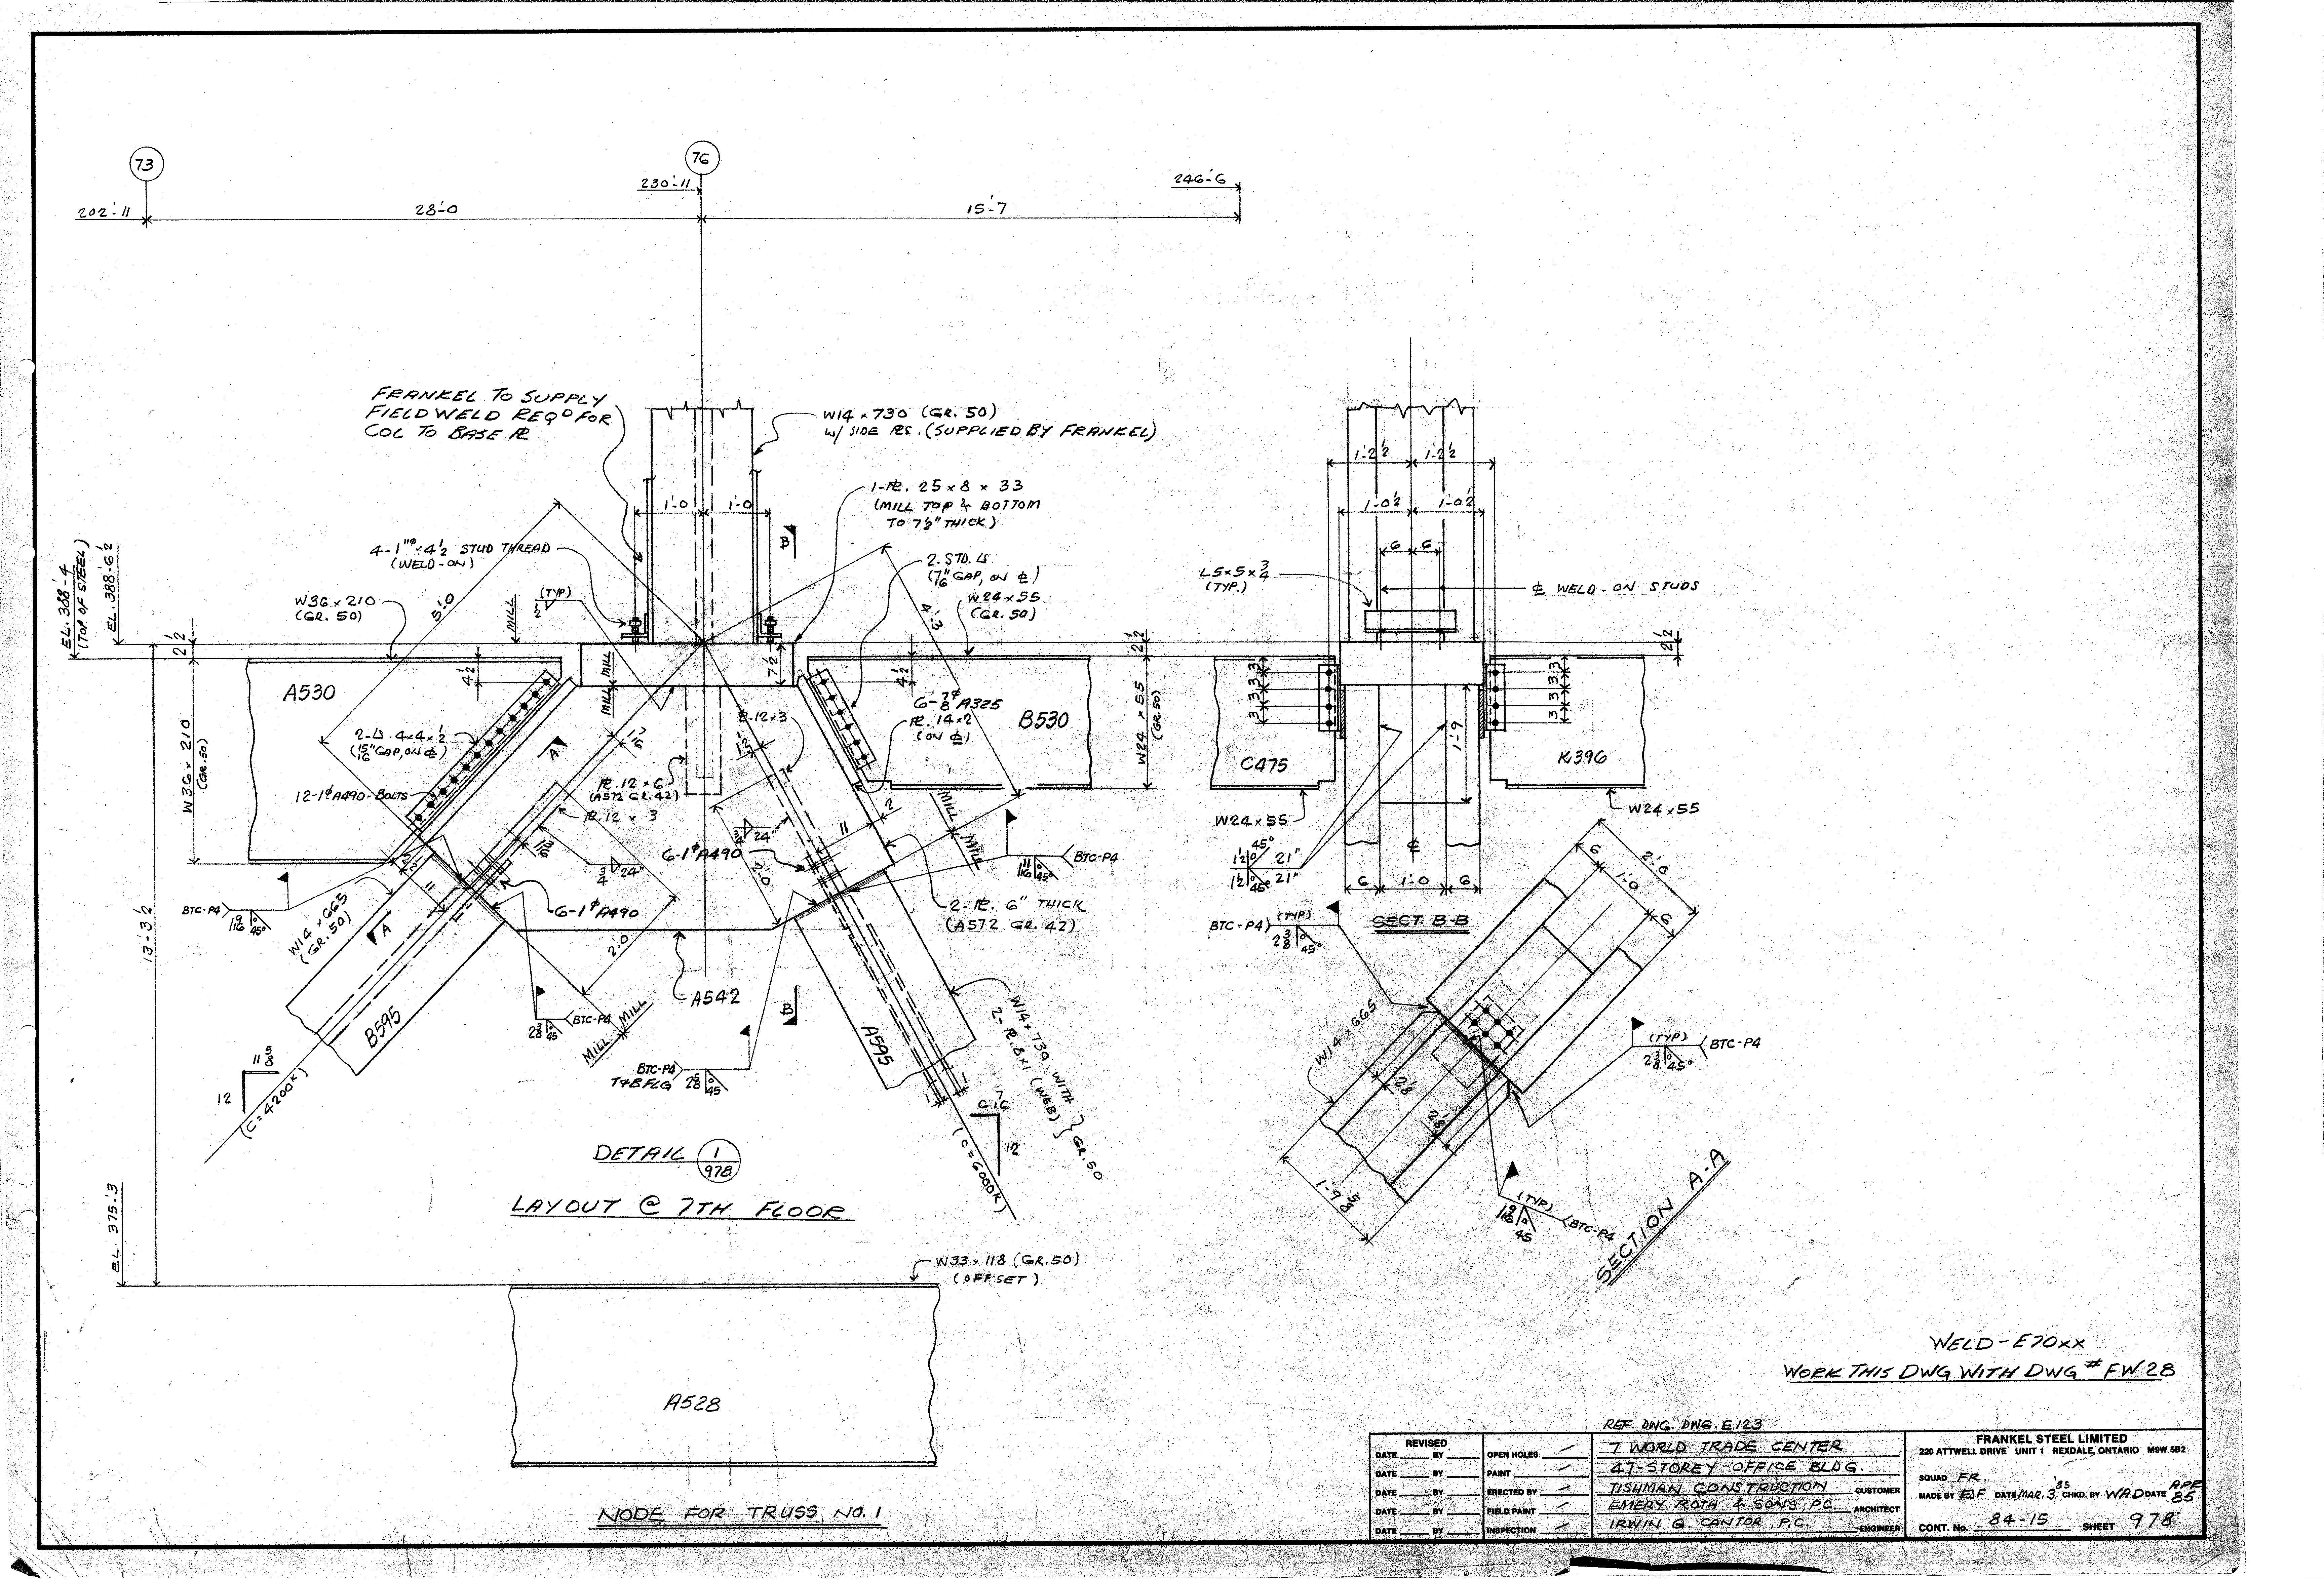
| 0978.png | 666.6 KB | 0978 | NODE FOR TRUSS NO. 1 - LAYOUT @ 7TH FLOOR | https://911warroom.com/model/files/WTC7/DRAWINGS/STRUCTURAL/DETAILS-PNG/0978.png |
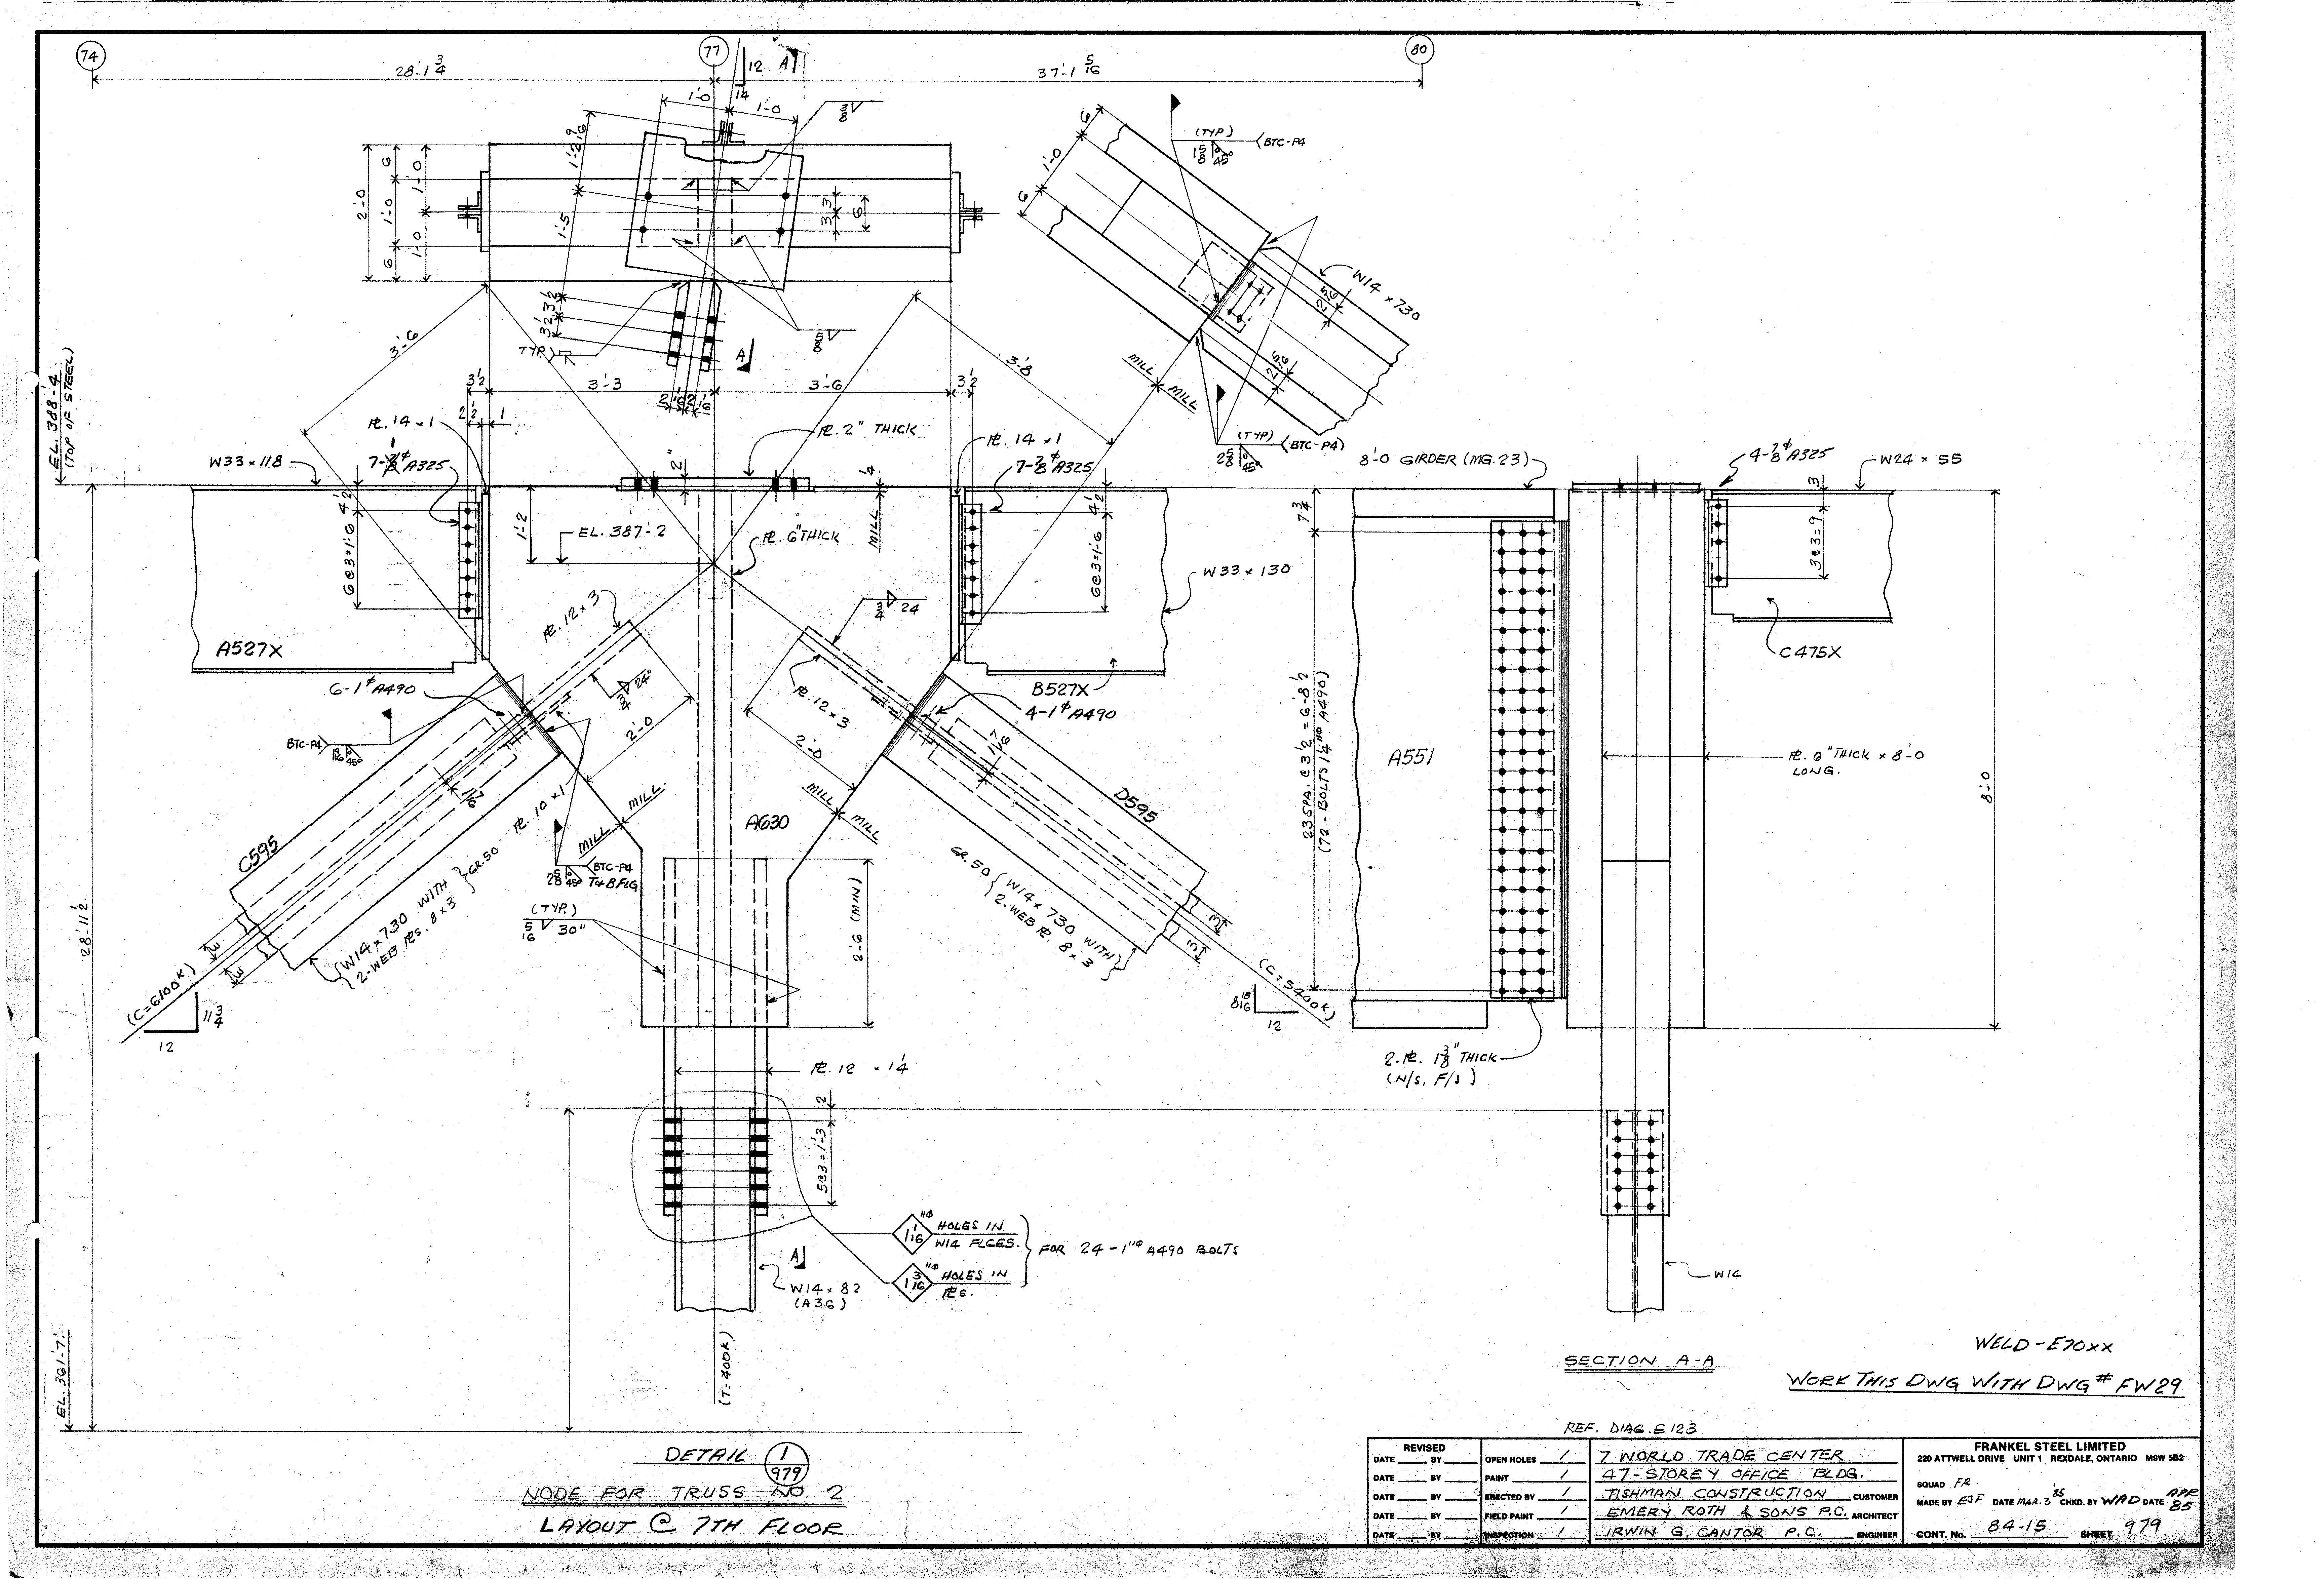
| 0979.png | 480.0 KB | 0979 | NODE FOR TRUSS NO. 2 - LAYOUT @ 7TH FLOOR | https://911warroom.com/model/files/WTC7/DRAWINGS/STRUCTURAL/DETAILS-PNG/0979.png |
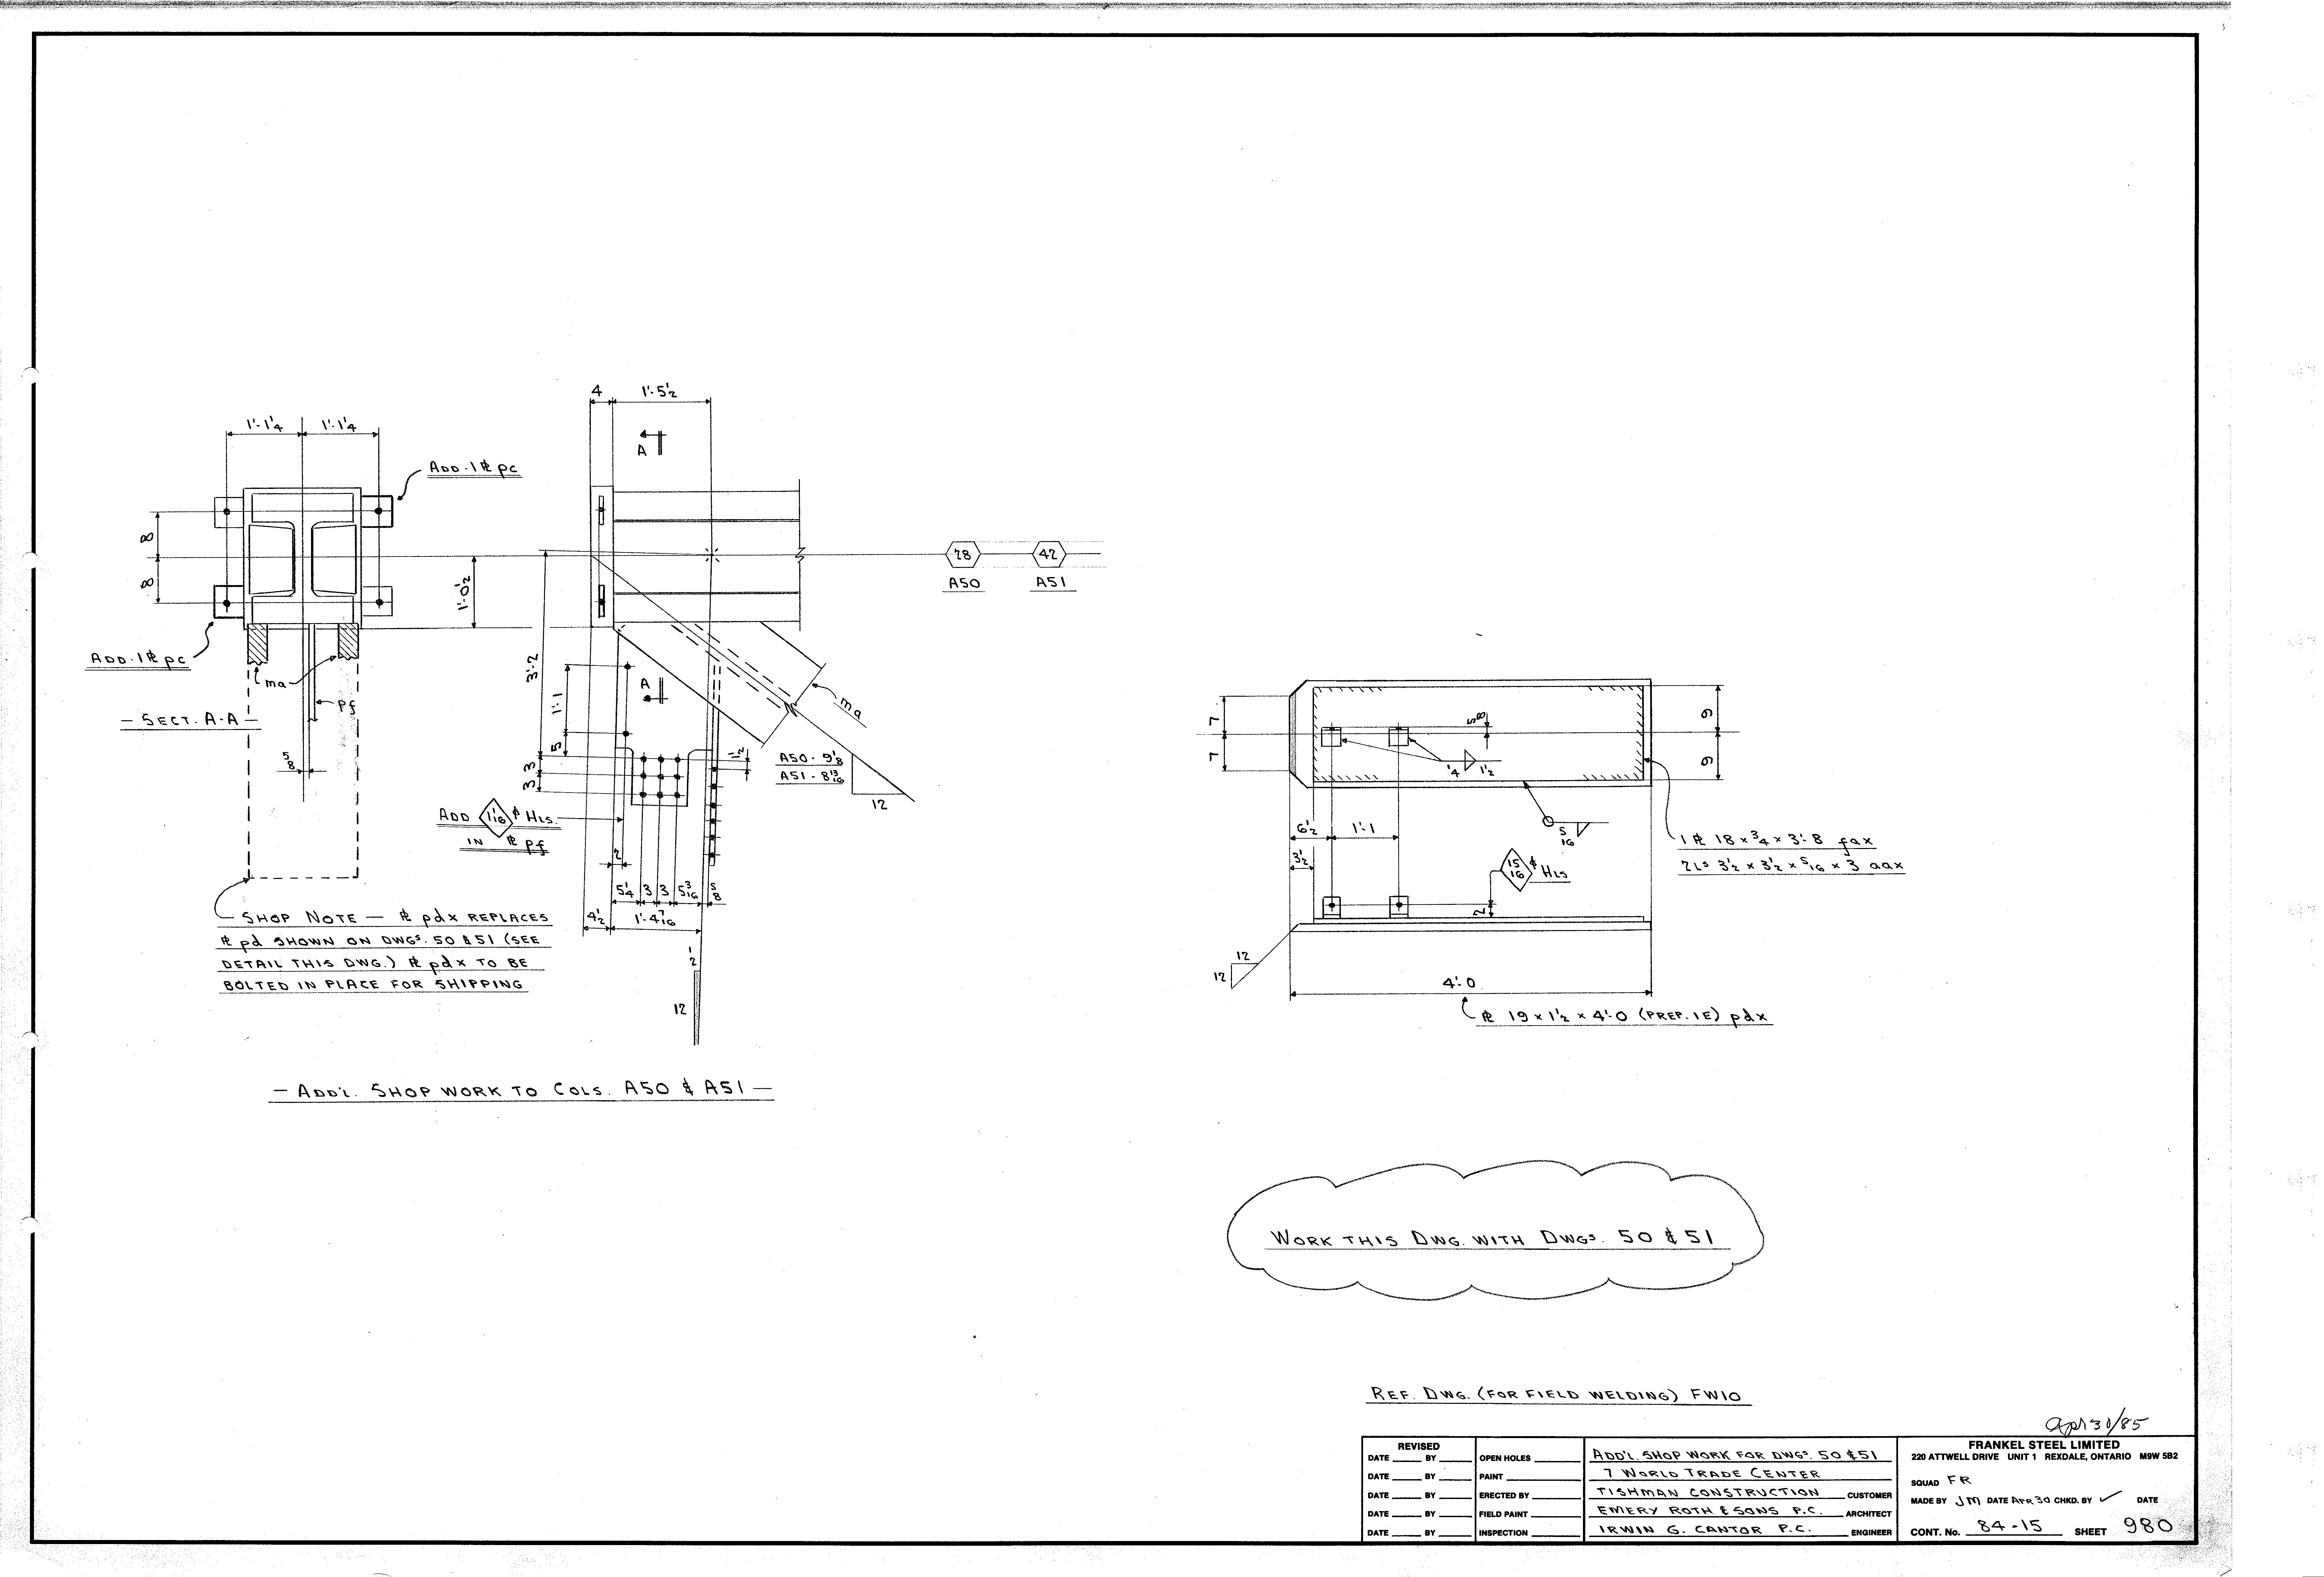
| 0980.png | 175.8 KB | 0980 | ADD'L SHOP WORK FOR DWGS. 50 & 51 | https://911warroom.com/model/files/WTC7/DRAWINGS/STRUCTURAL/DETAILS-PNG/0980.png |
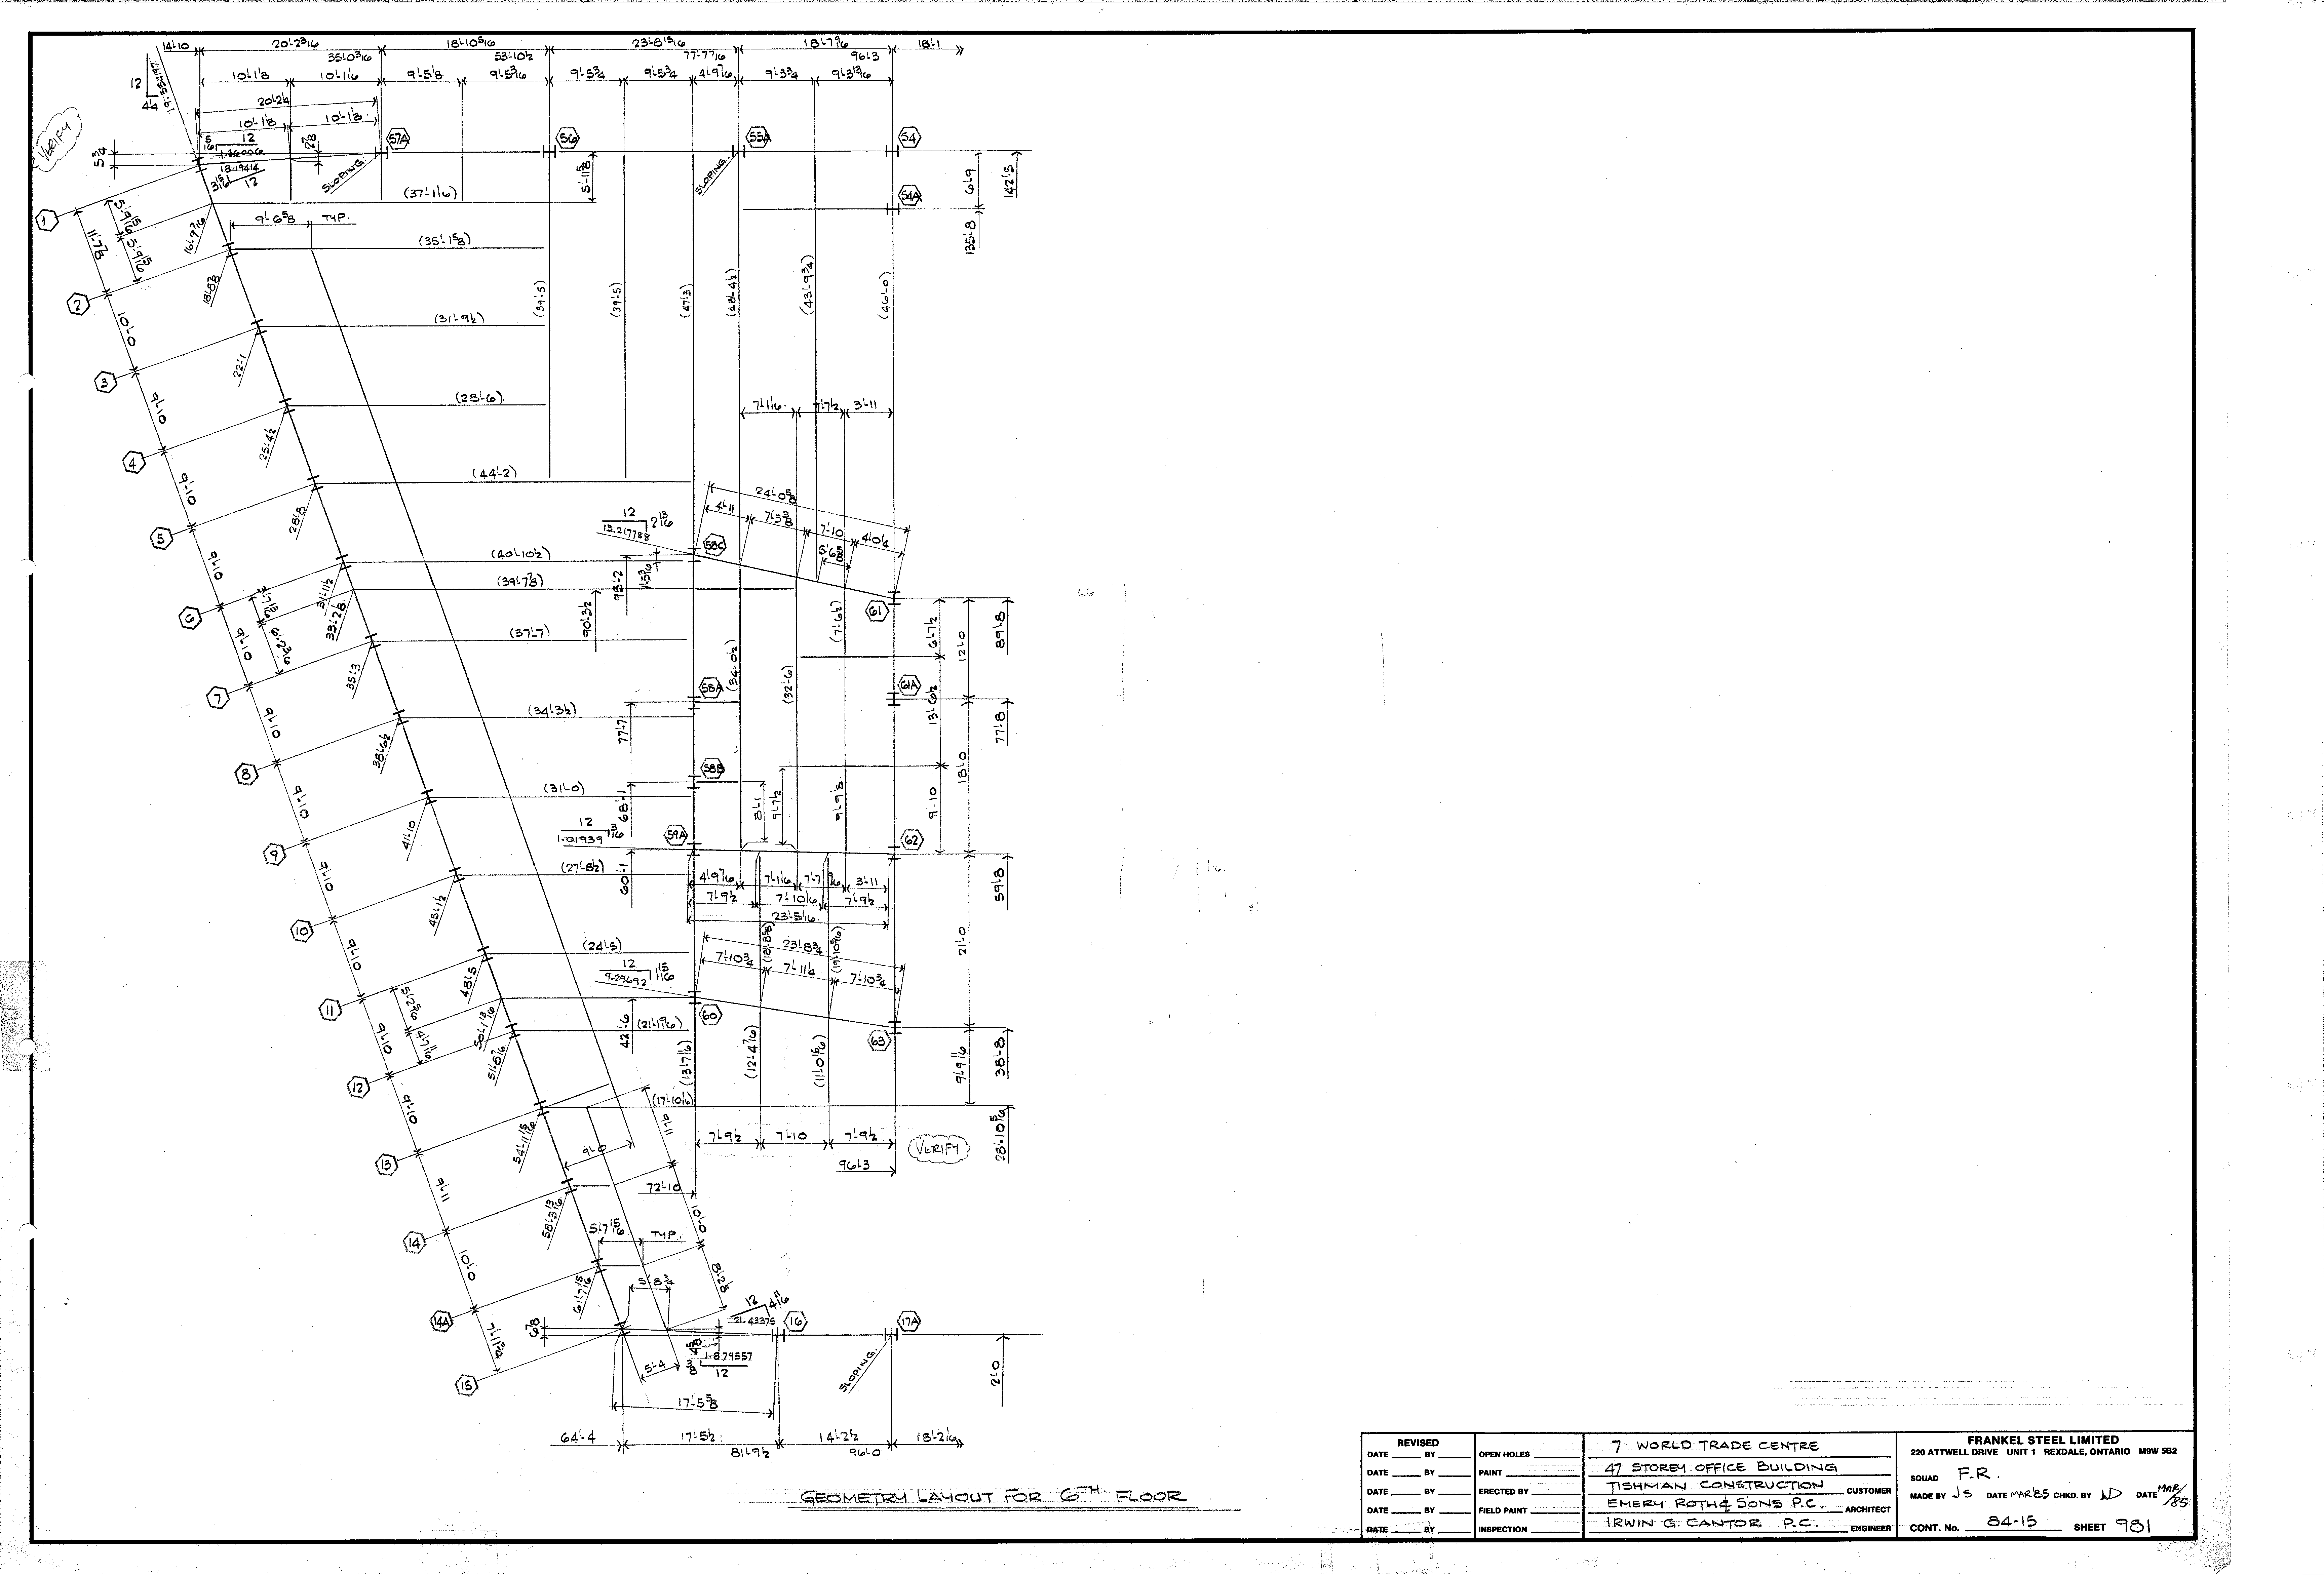
| 0981.png | 247.5 KB | 0981 | GEOMETRY LAYOUT FOR 6TH FLOOR | https://911warroom.com/model/files/WTC7/DRAWINGS/STRUCTURAL/DETAILS-PNG/0981.png |
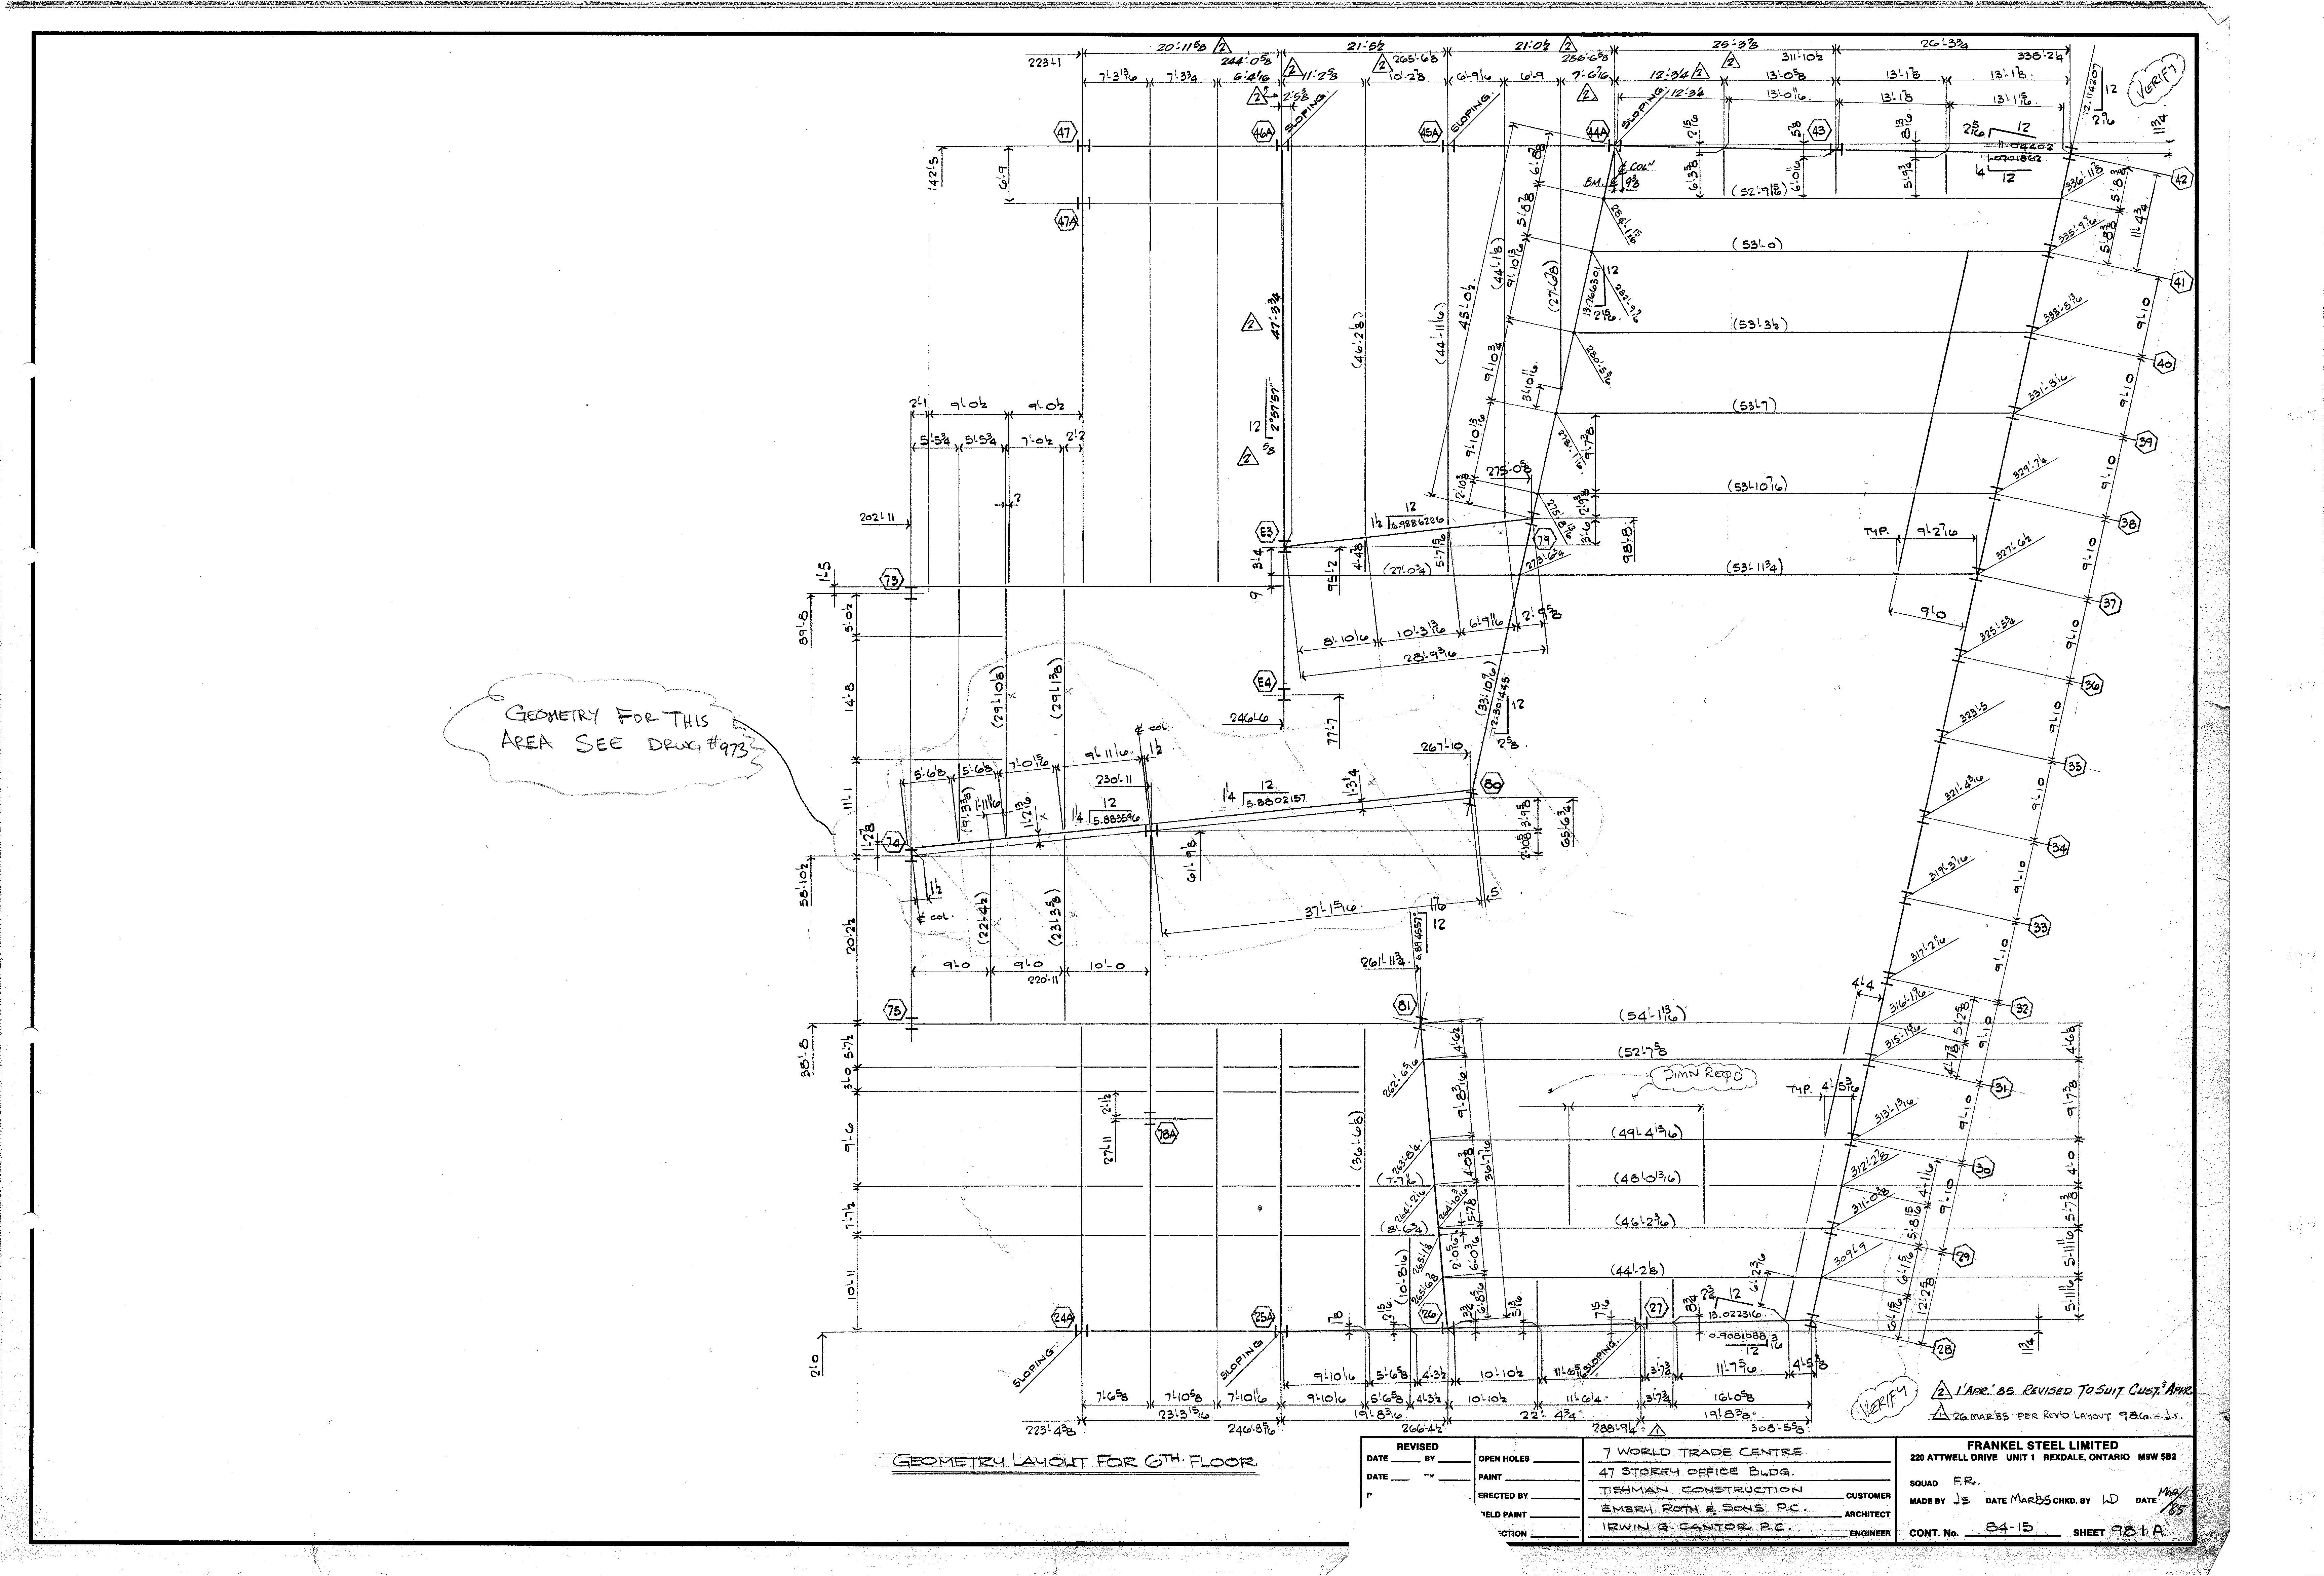
| 0981A.png | 397.8 KB | 0981A | GEOMETRY LAYOUT FOR 6TH FLOOR | https://911warroom.com/model/files/WTC7/DRAWINGS/STRUCTURAL/DETAILS-PNG/0981A.png |
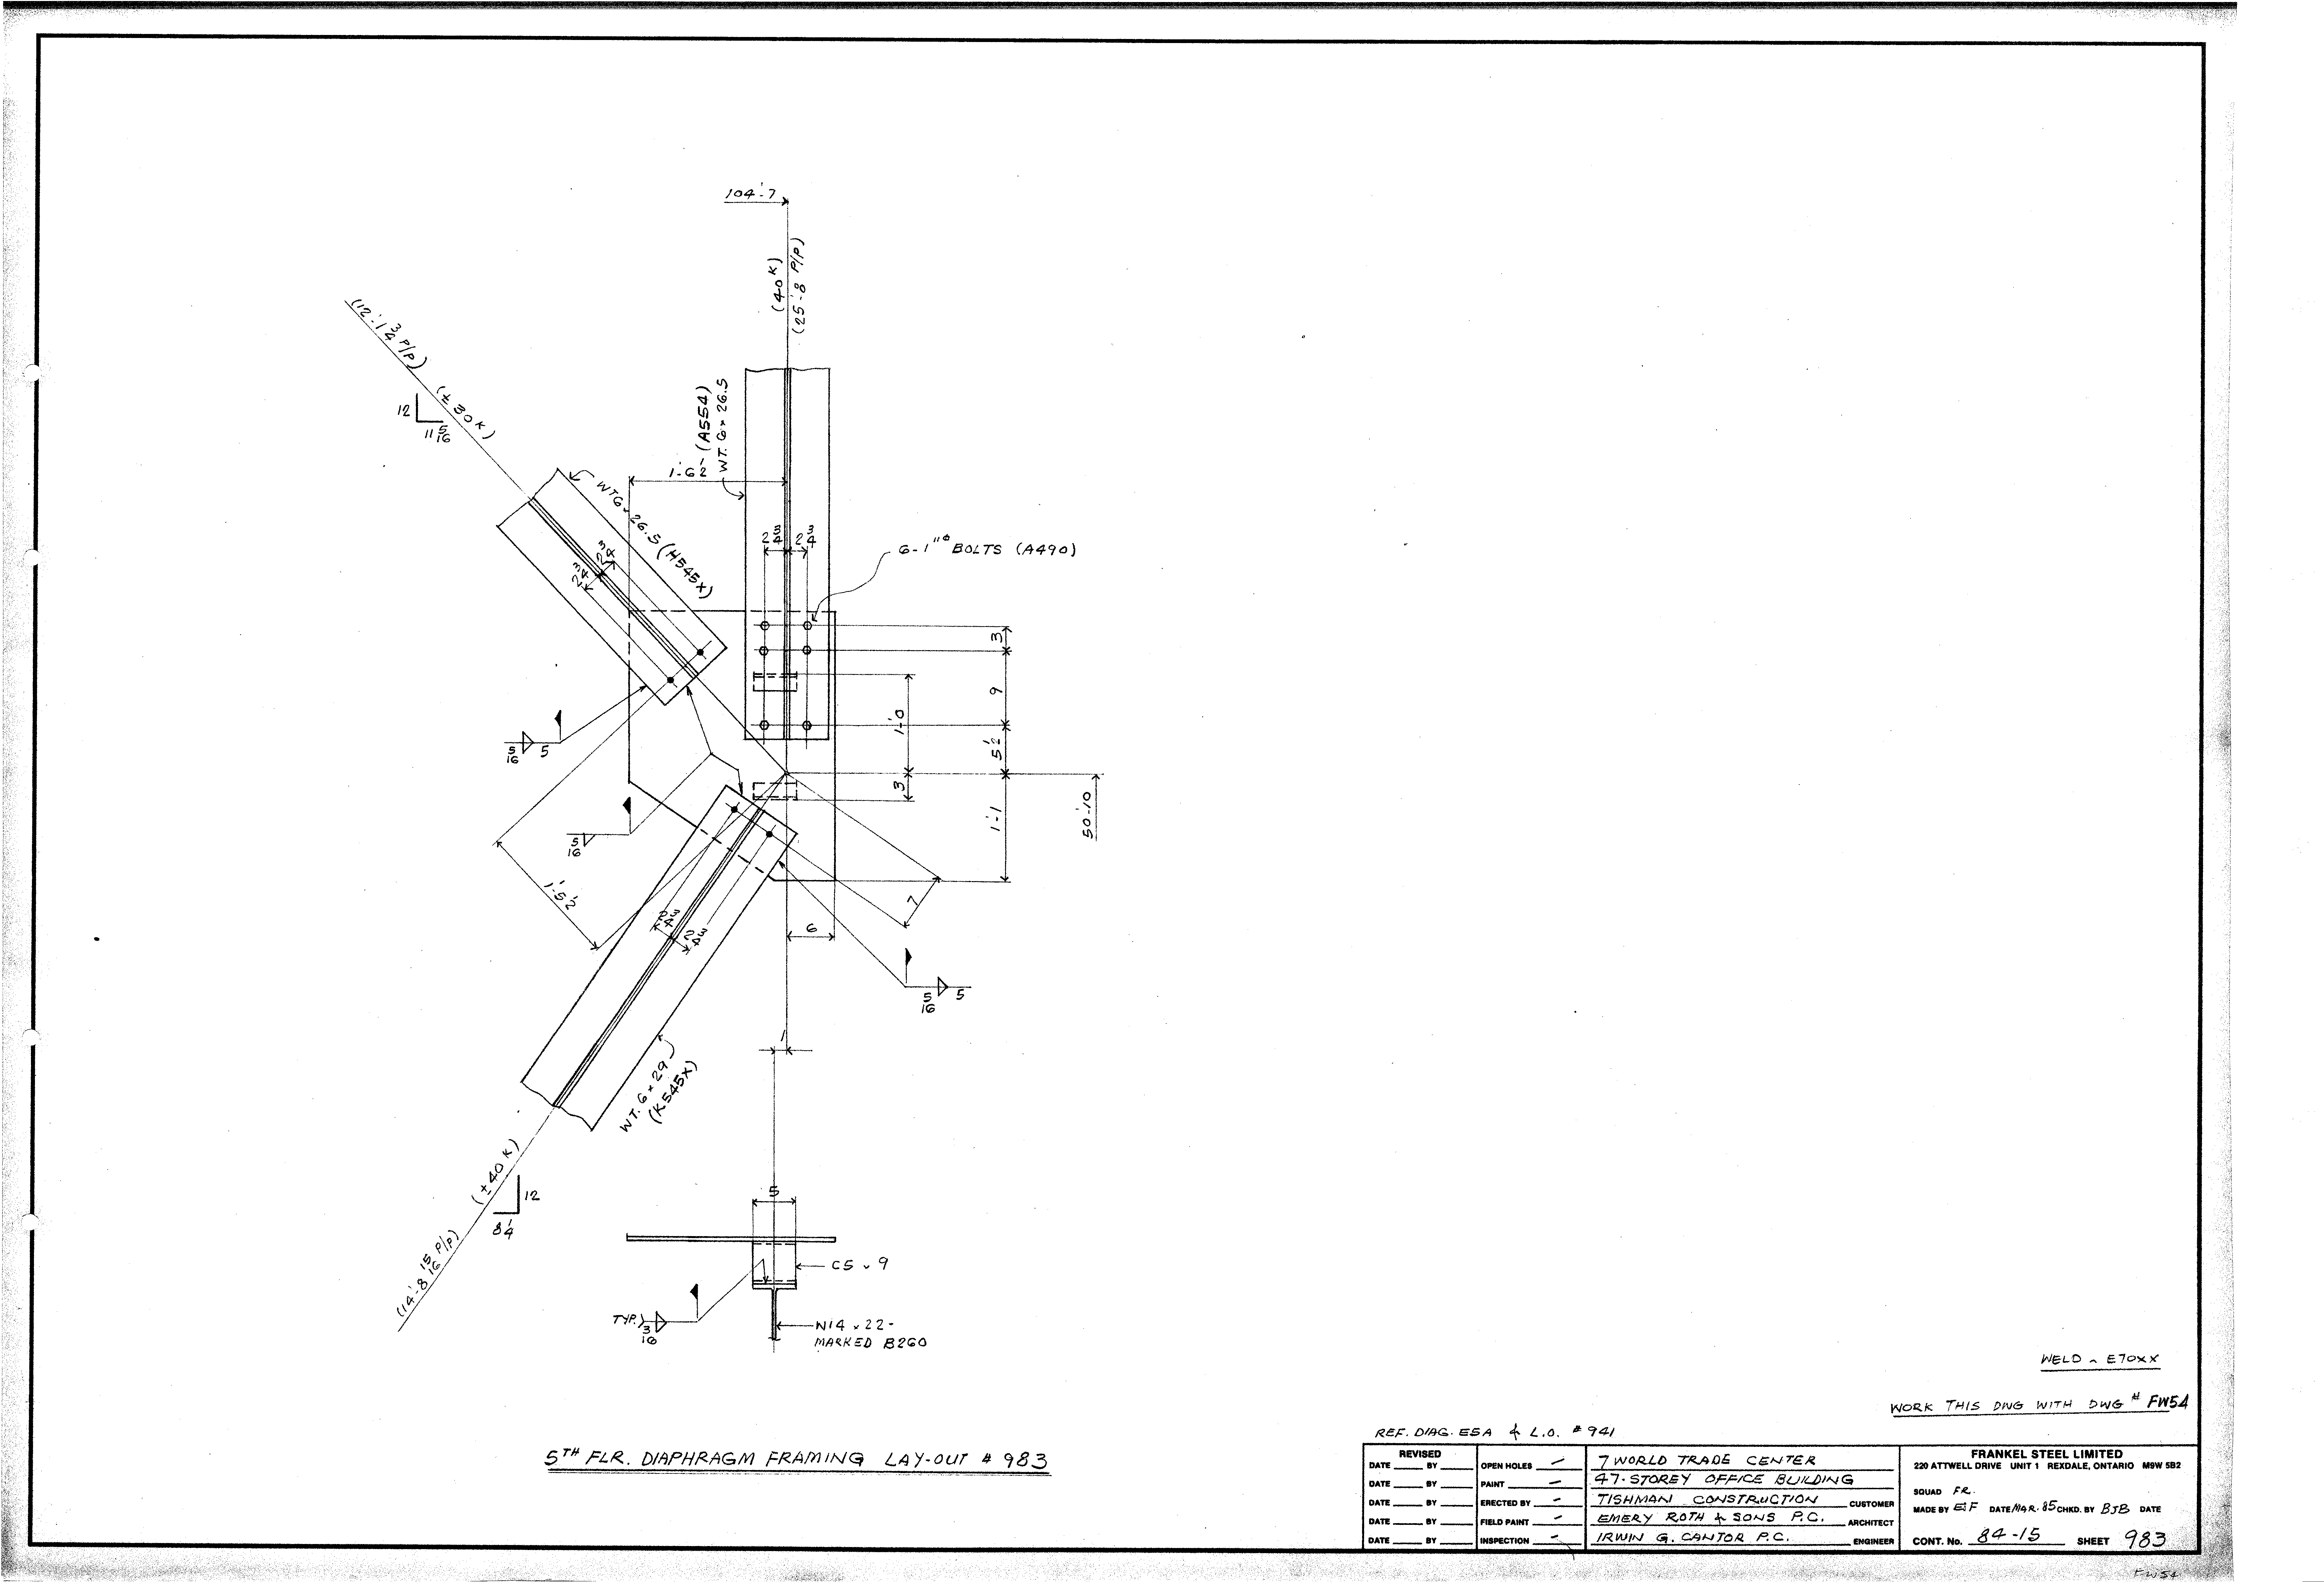
| 0983.png | 225.8 KB | 0983 | 5TH FLR. DIAPHRAGM FRAMING LAY-OUT # 983 | https://911warroom.com/model/files/WTC7/DRAWINGS/STRUCTURAL/DETAILS-PNG/0983.png |
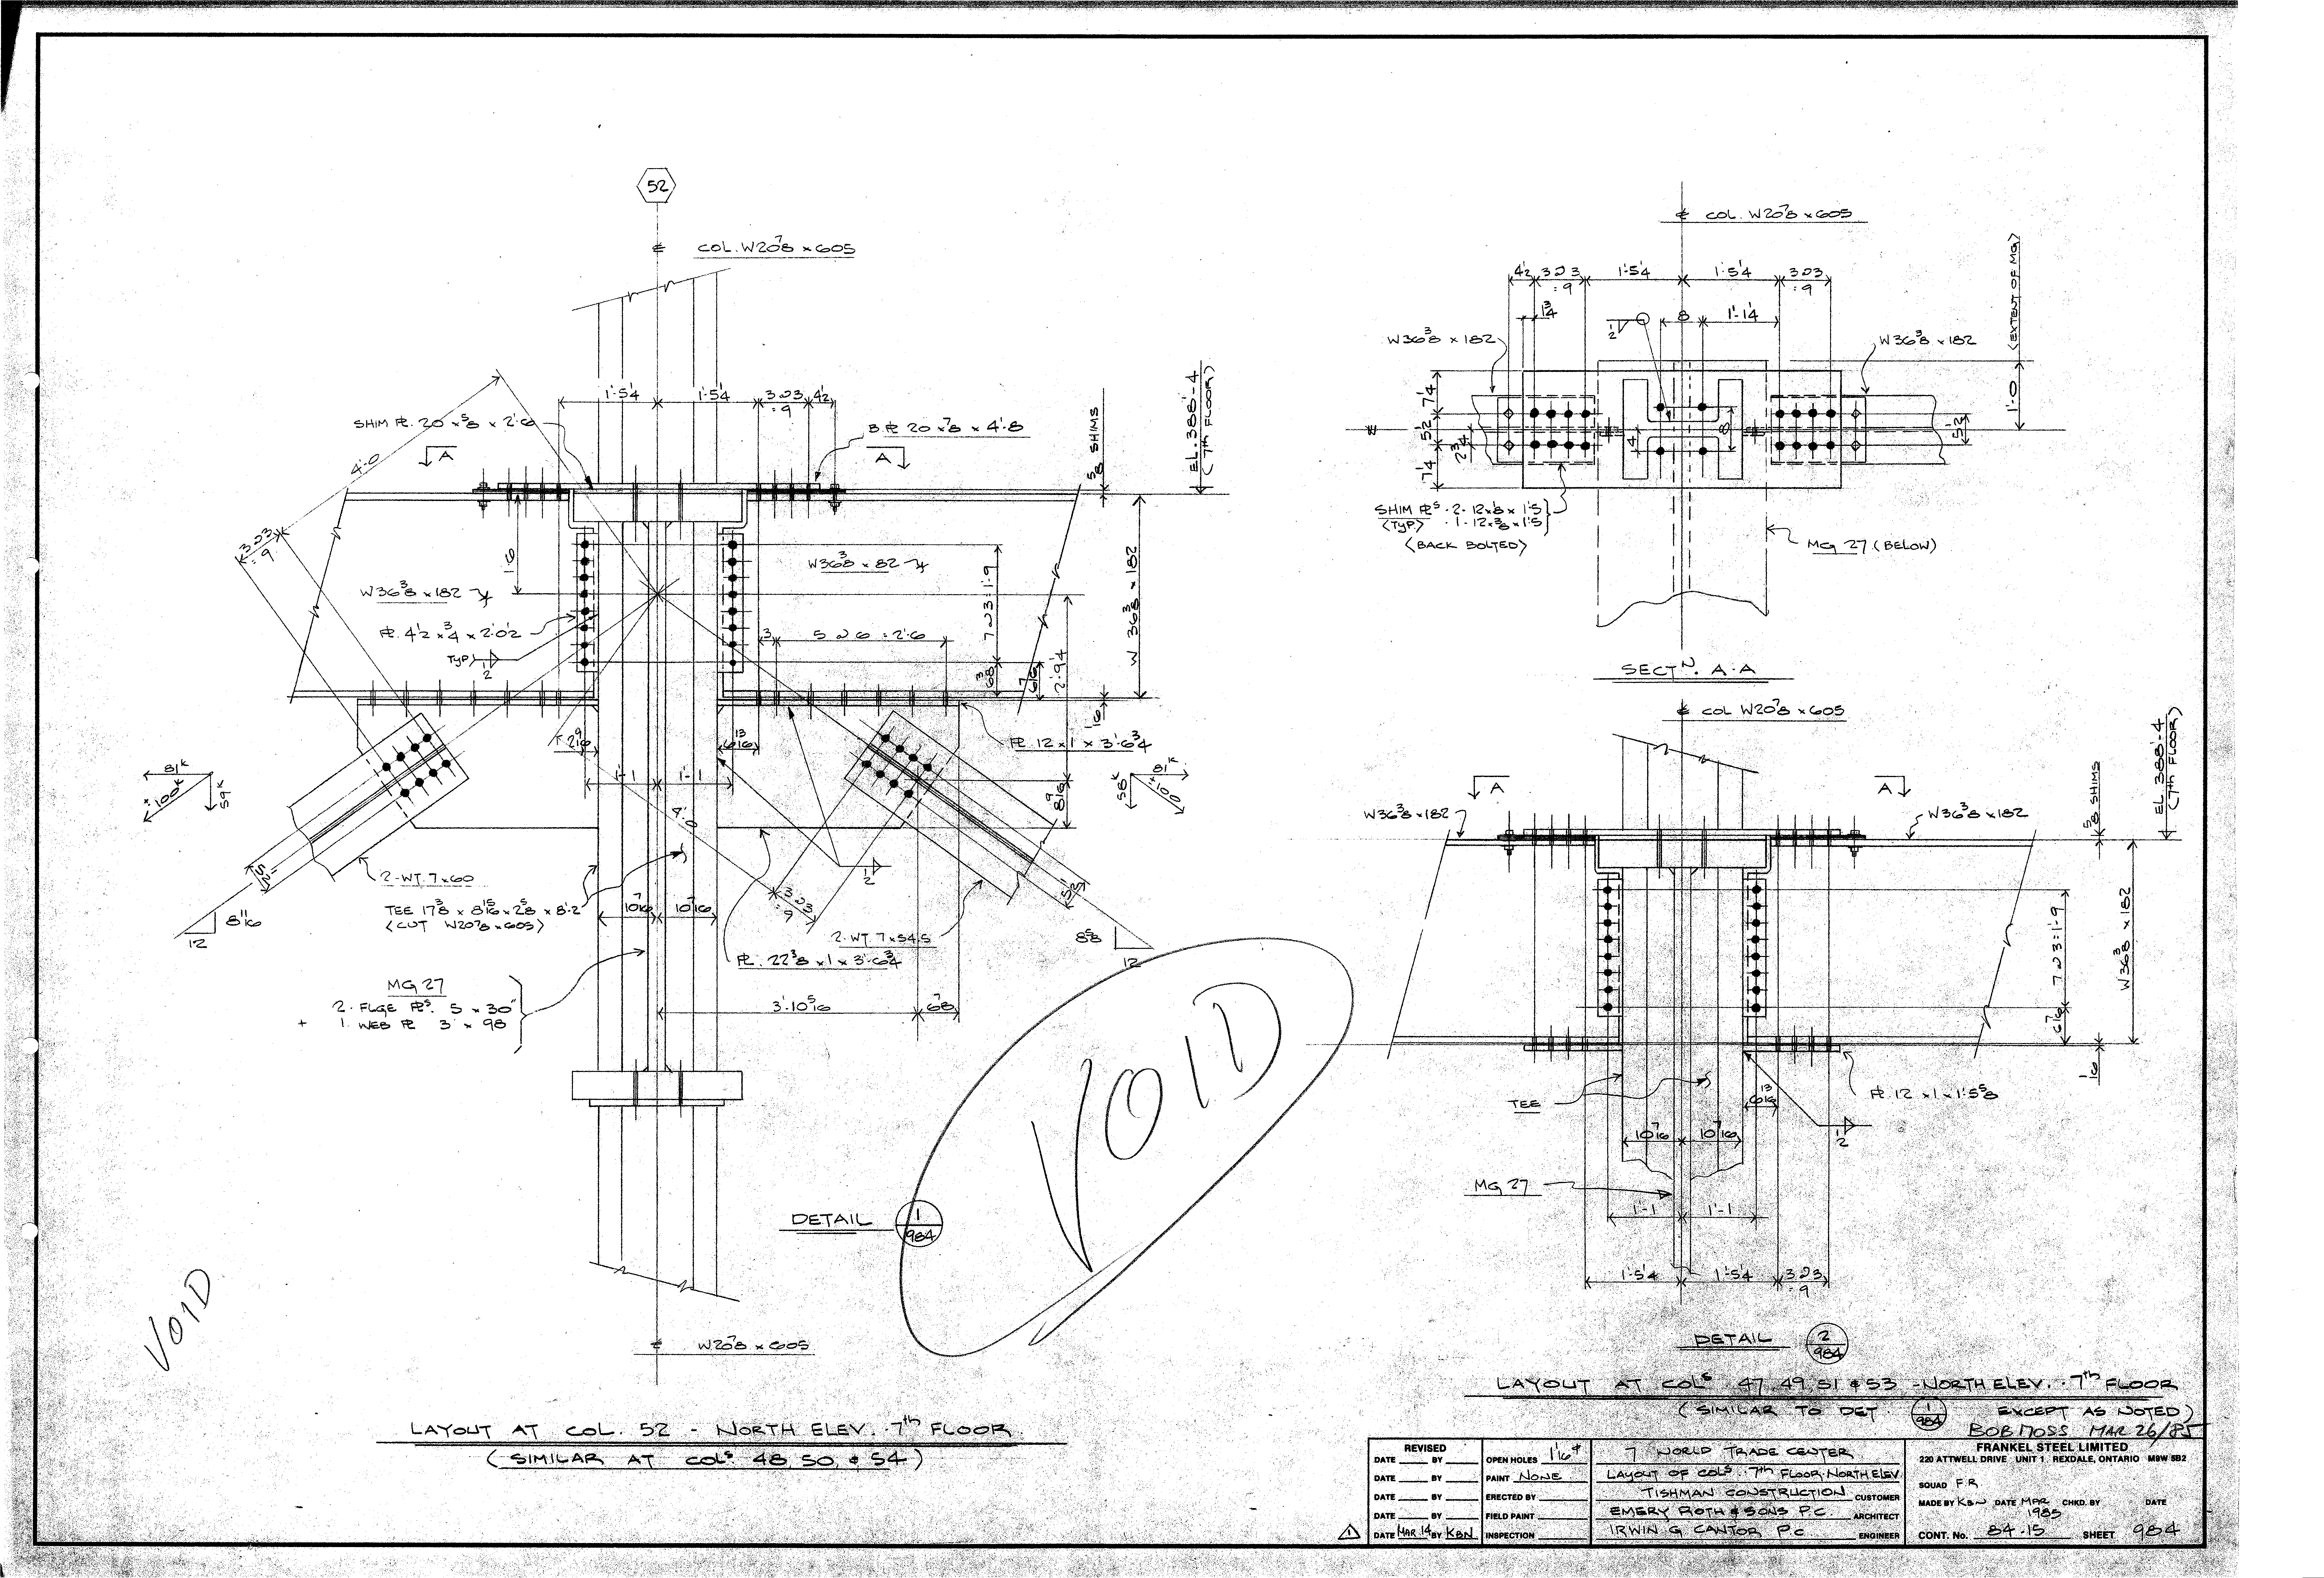
| 0984.png | 759.3 KB | 0984 | LAYOUT OF COLS. 7TH FLOOR NORTH ELEV. | https://911warroom.com/model/files/WTC7/DRAWINGS/STRUCTURAL/DETAILS-PNG/0984.png |
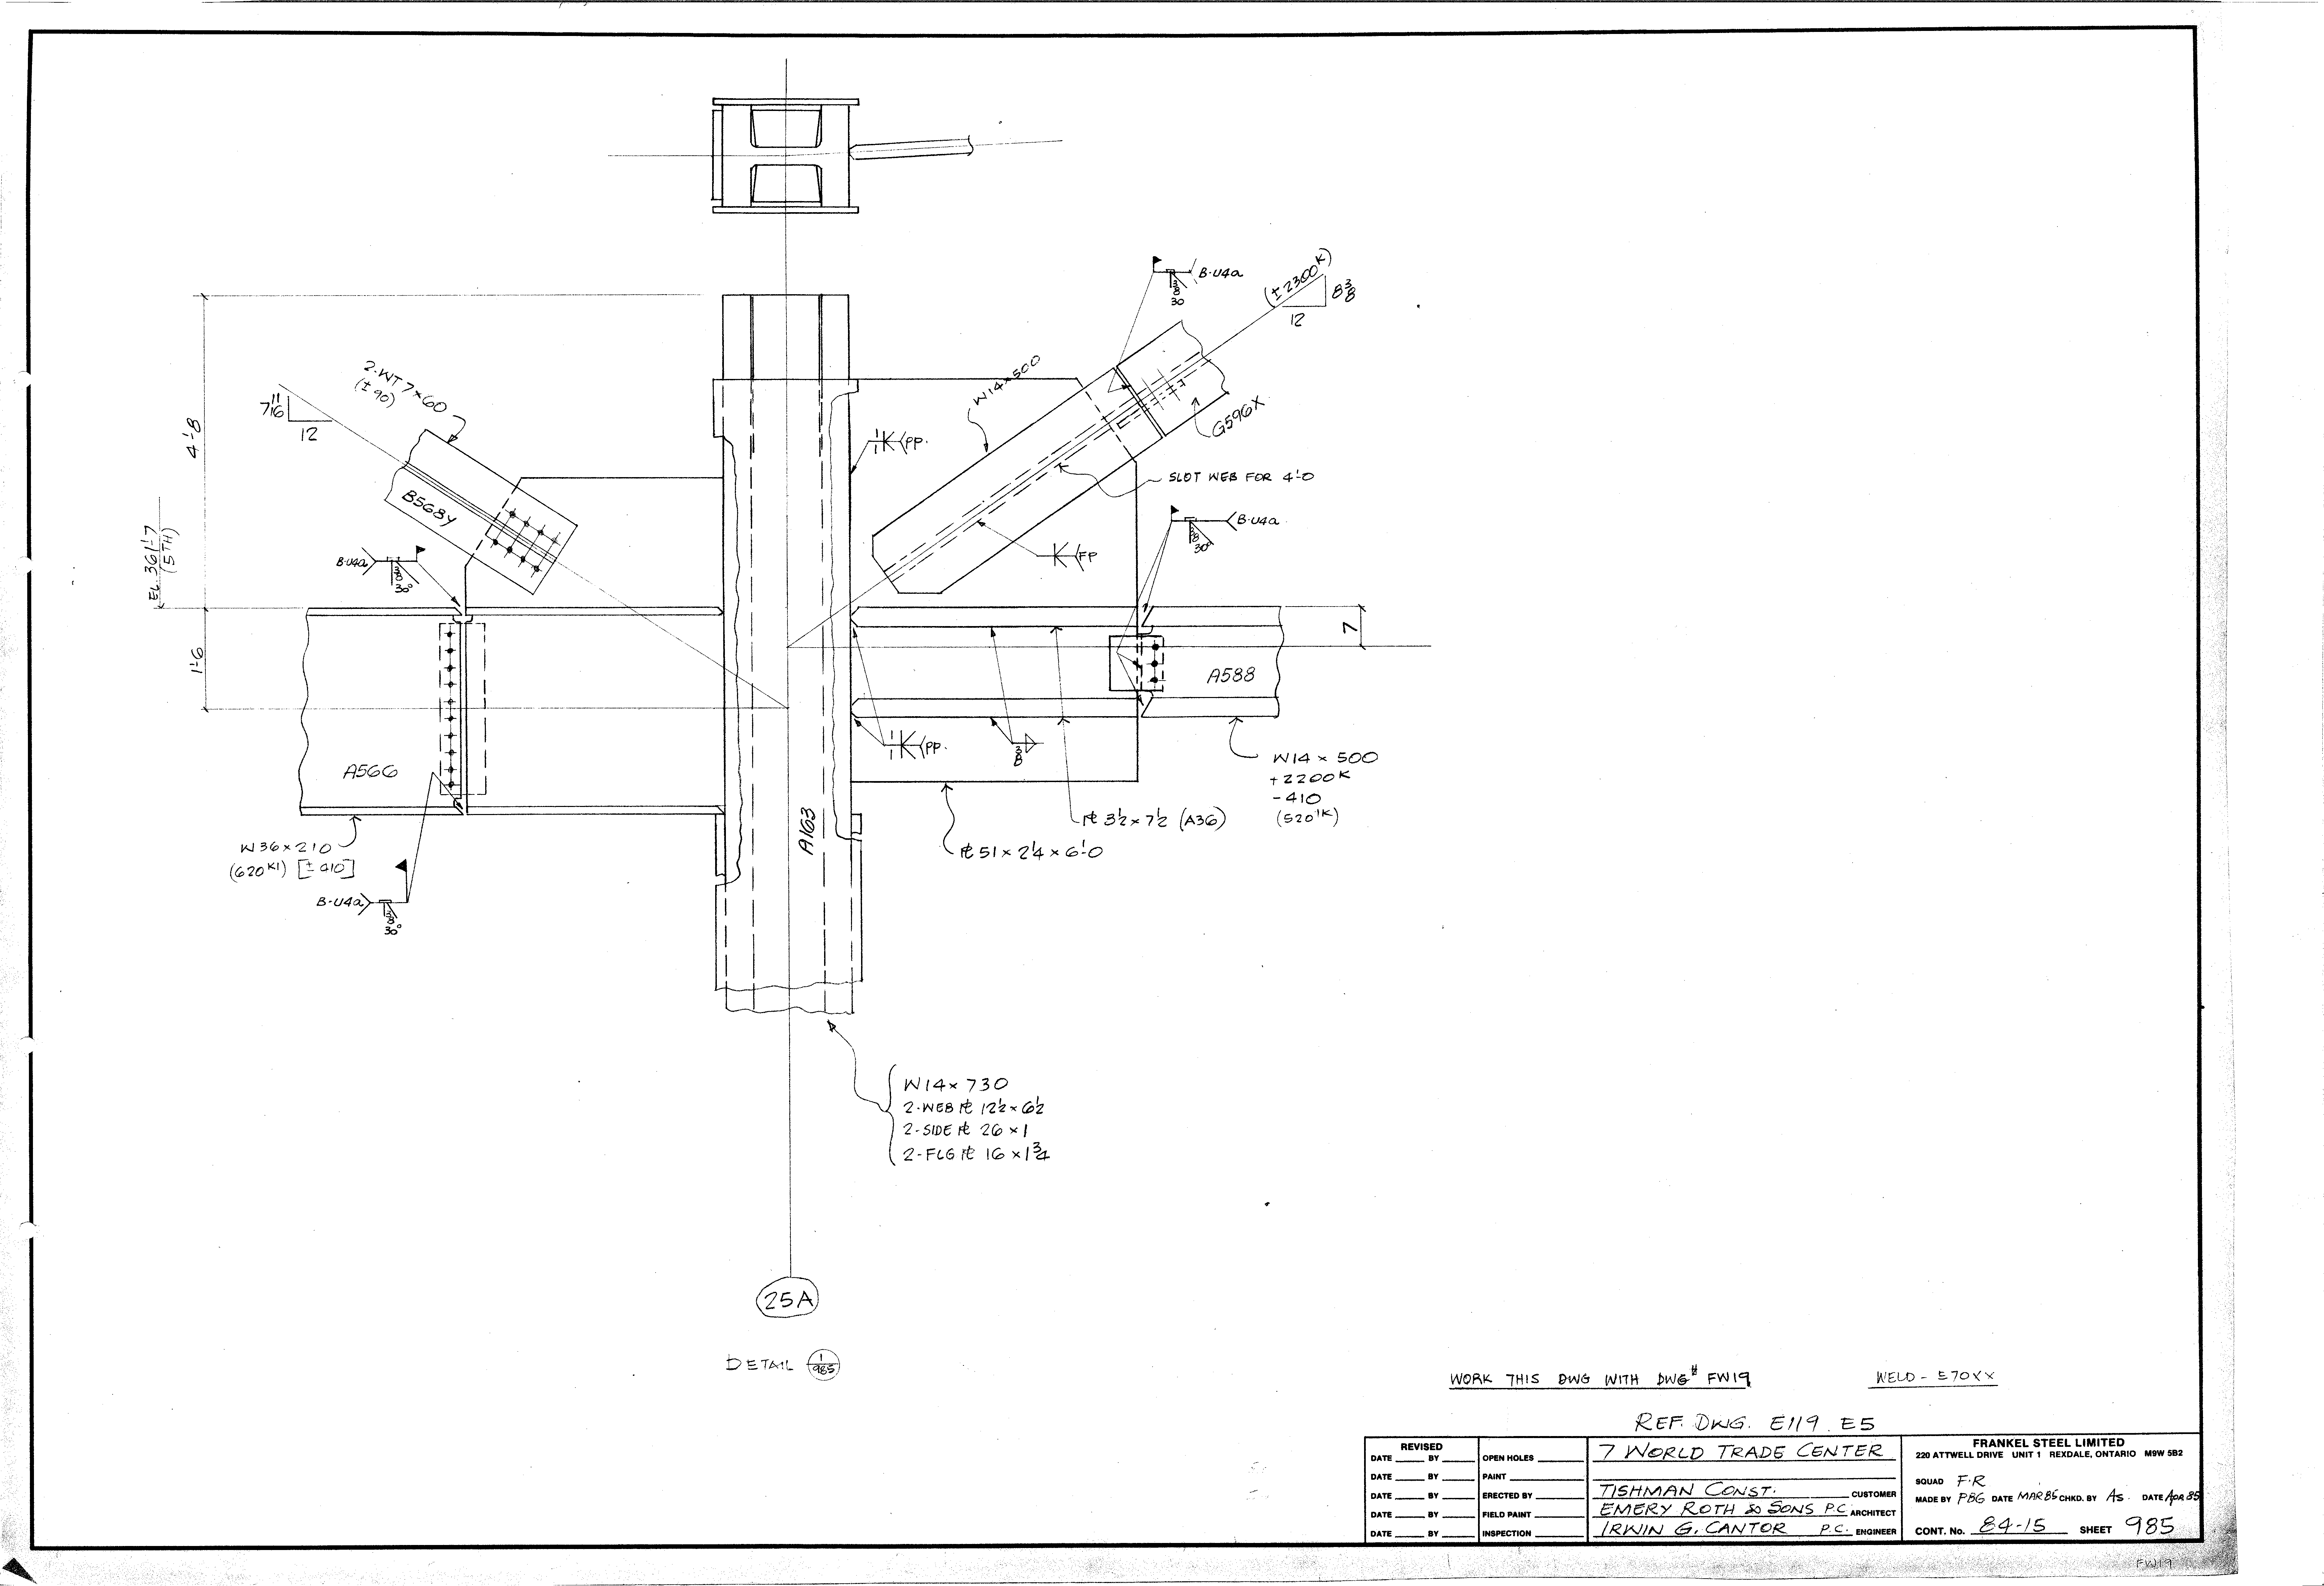
| 0985.png | 203.4 KB | 0985 | (no detail title) — ref. dwg E119, E5 | https://911warroom.com/model/files/WTC7/DRAWINGS/STRUCTURAL/DETAILS-PNG/0985.png |
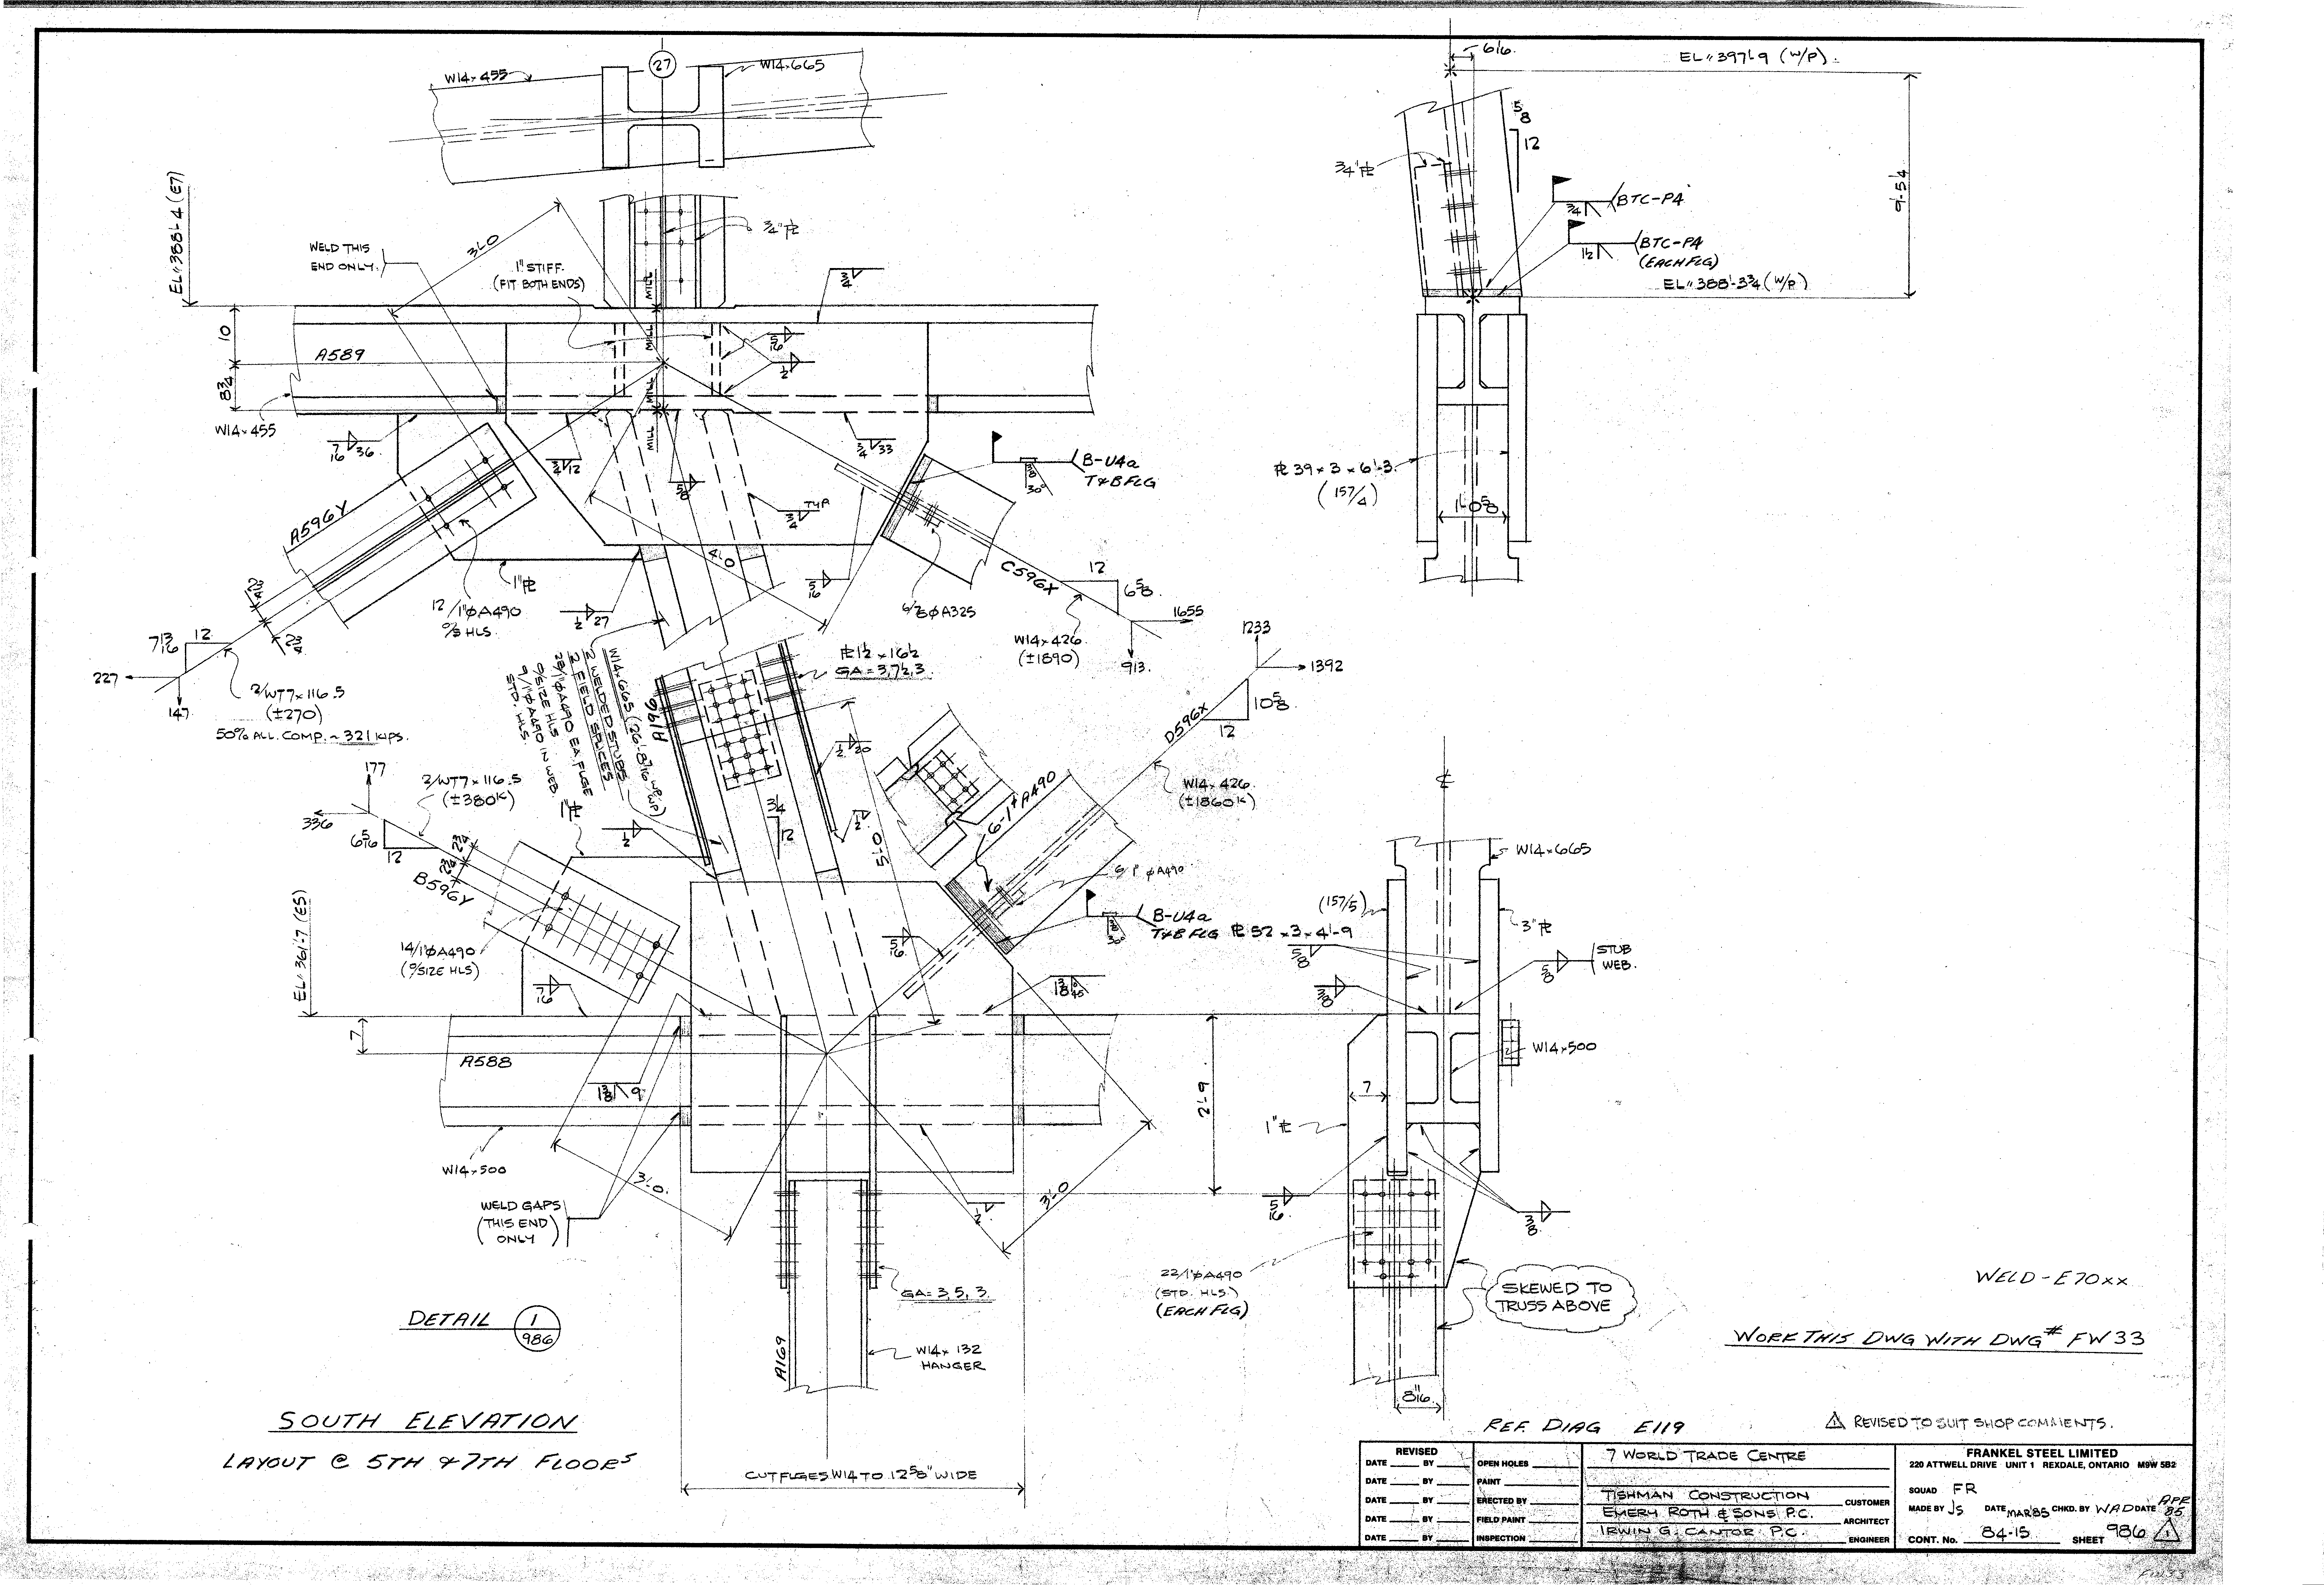
| 0986.png | 479.8 KB | 0986 | SOUTH ELEVATION - LAYOUT @ 5TH & 7TH FLOORS | https://911warroom.com/model/files/WTC7/DRAWINGS/STRUCTURAL/DETAILS-PNG/0986.png |
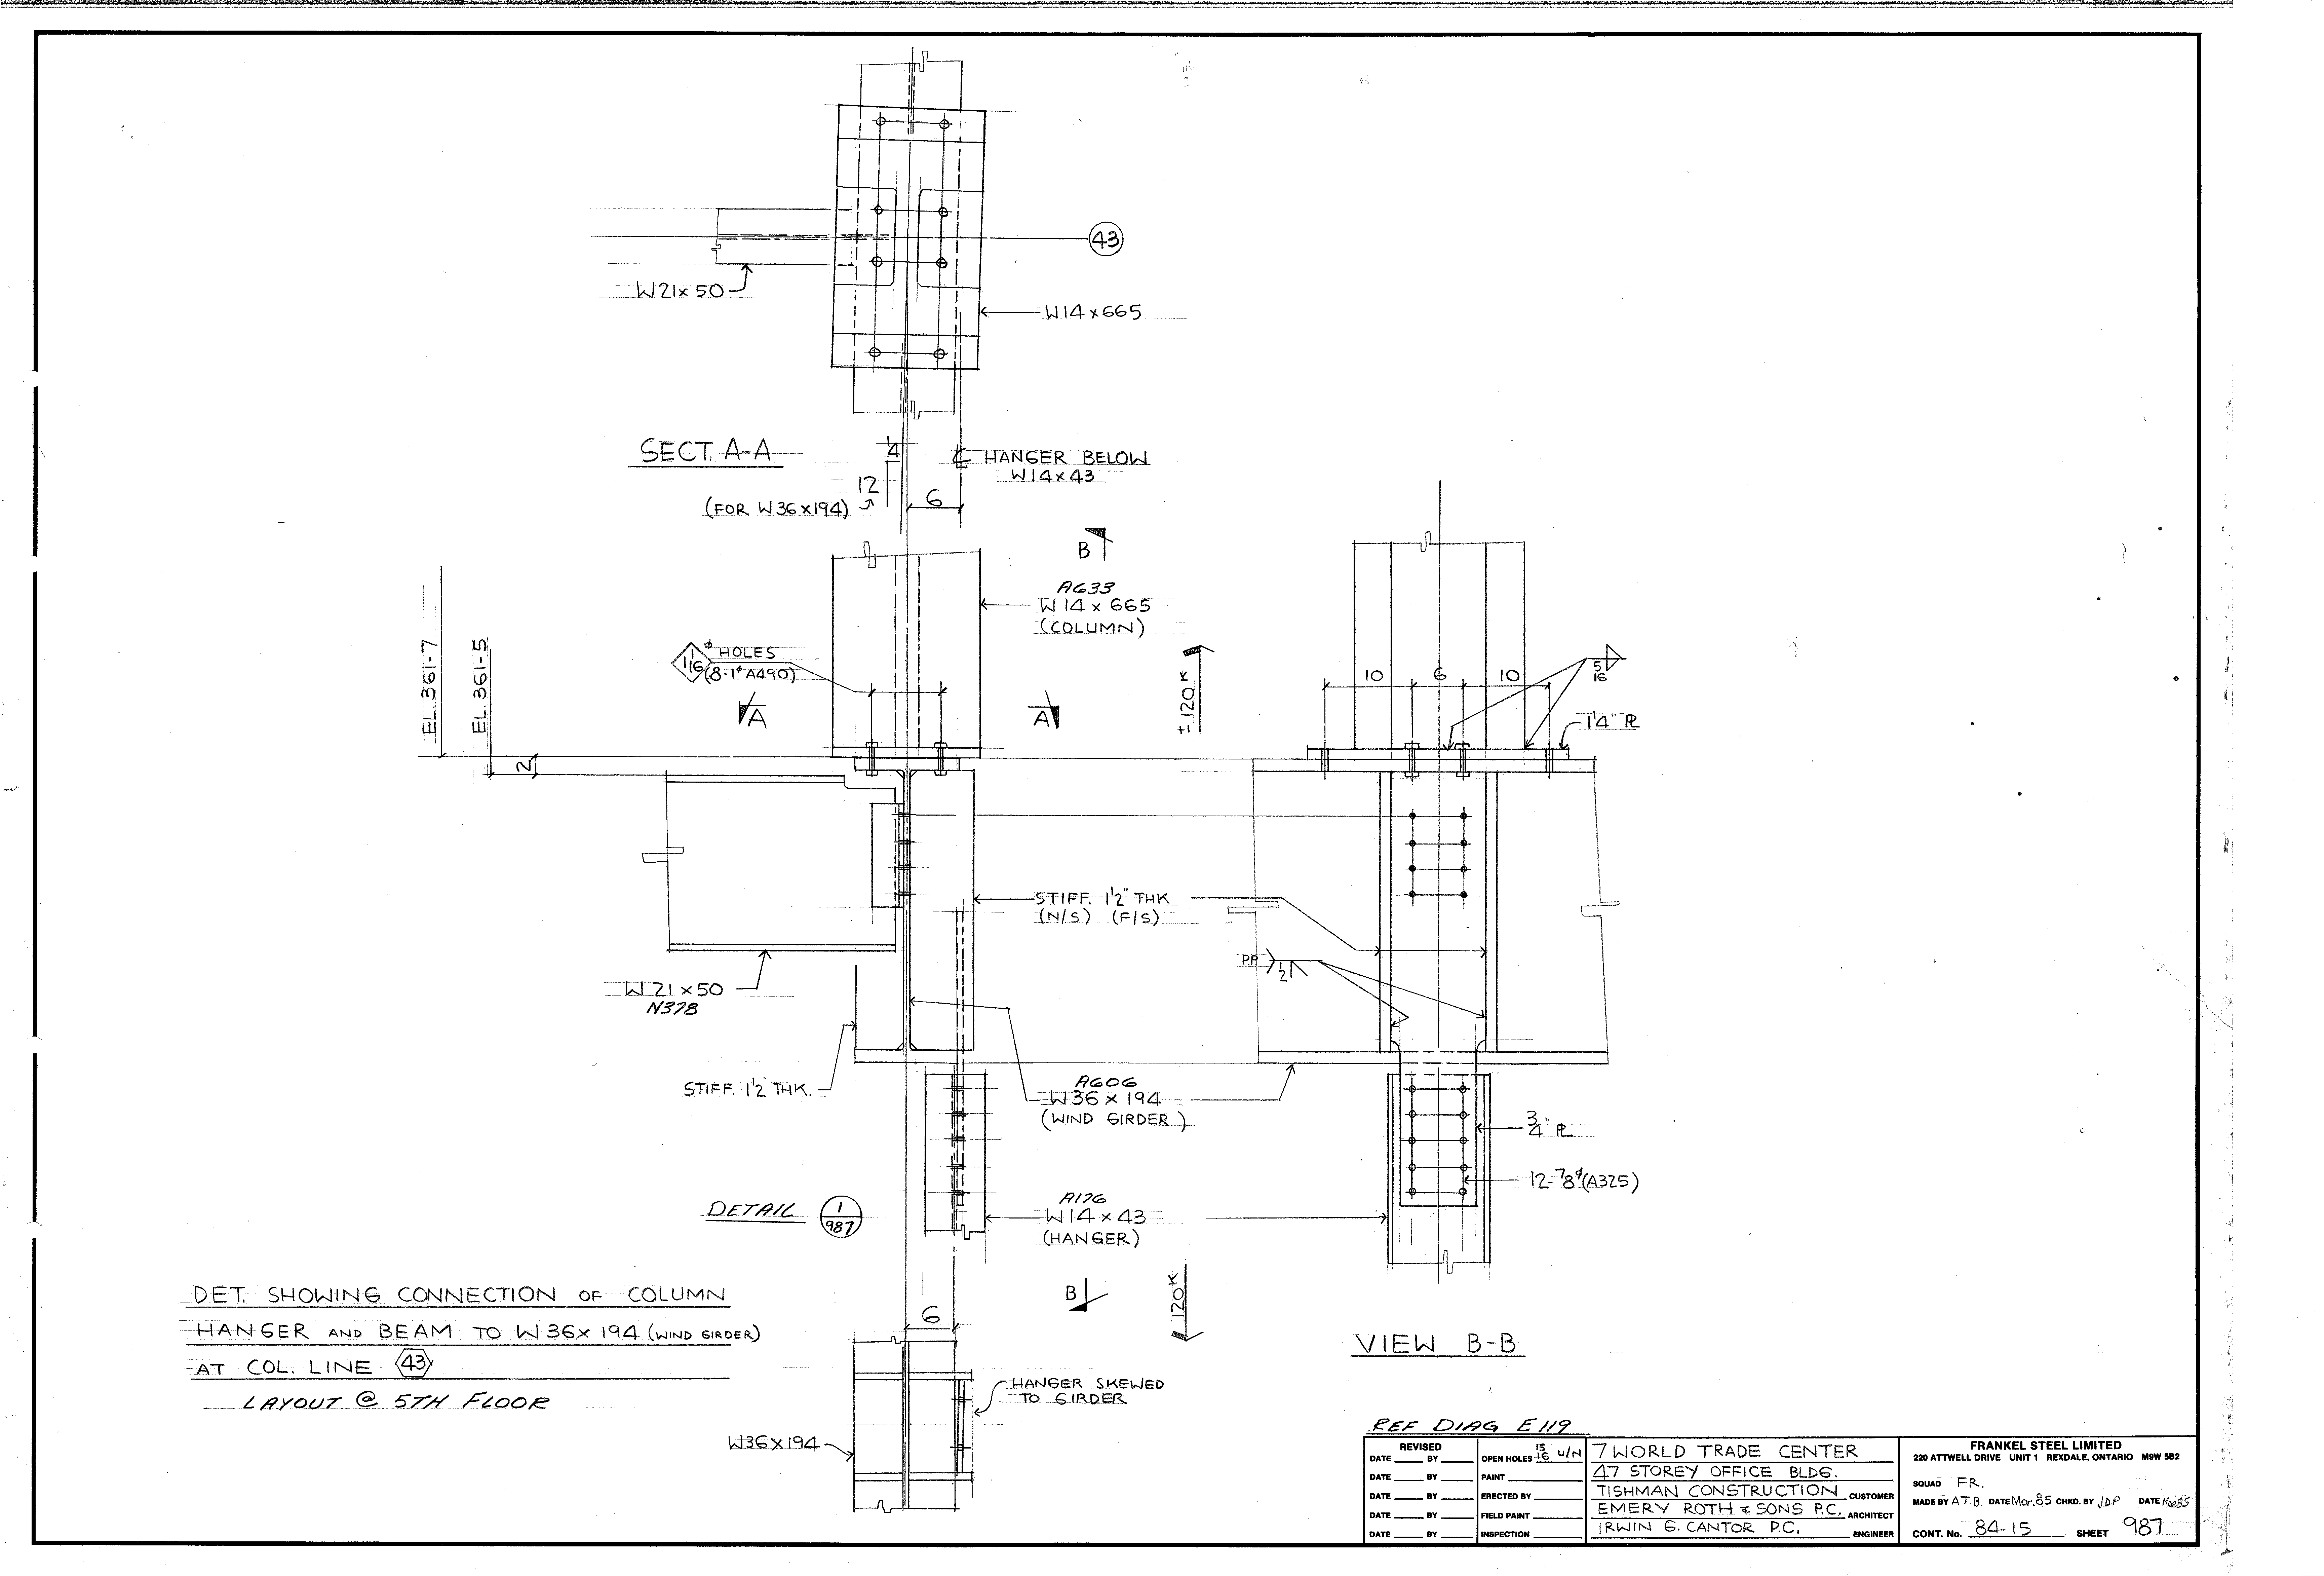
| 0987.png | 211.8 KB | 0987 | DET. SHOWING CONNECTION OF COLUMN, HANGER AND BEAM TO W36x194 (WIND GIRDER) AT COL. LINE 43 - LAYOUT @ 5TH FLOOR | https://911warroom.com/model/files/WTC7/DRAWINGS/STRUCTURAL/DETAILS-PNG/0987.png |
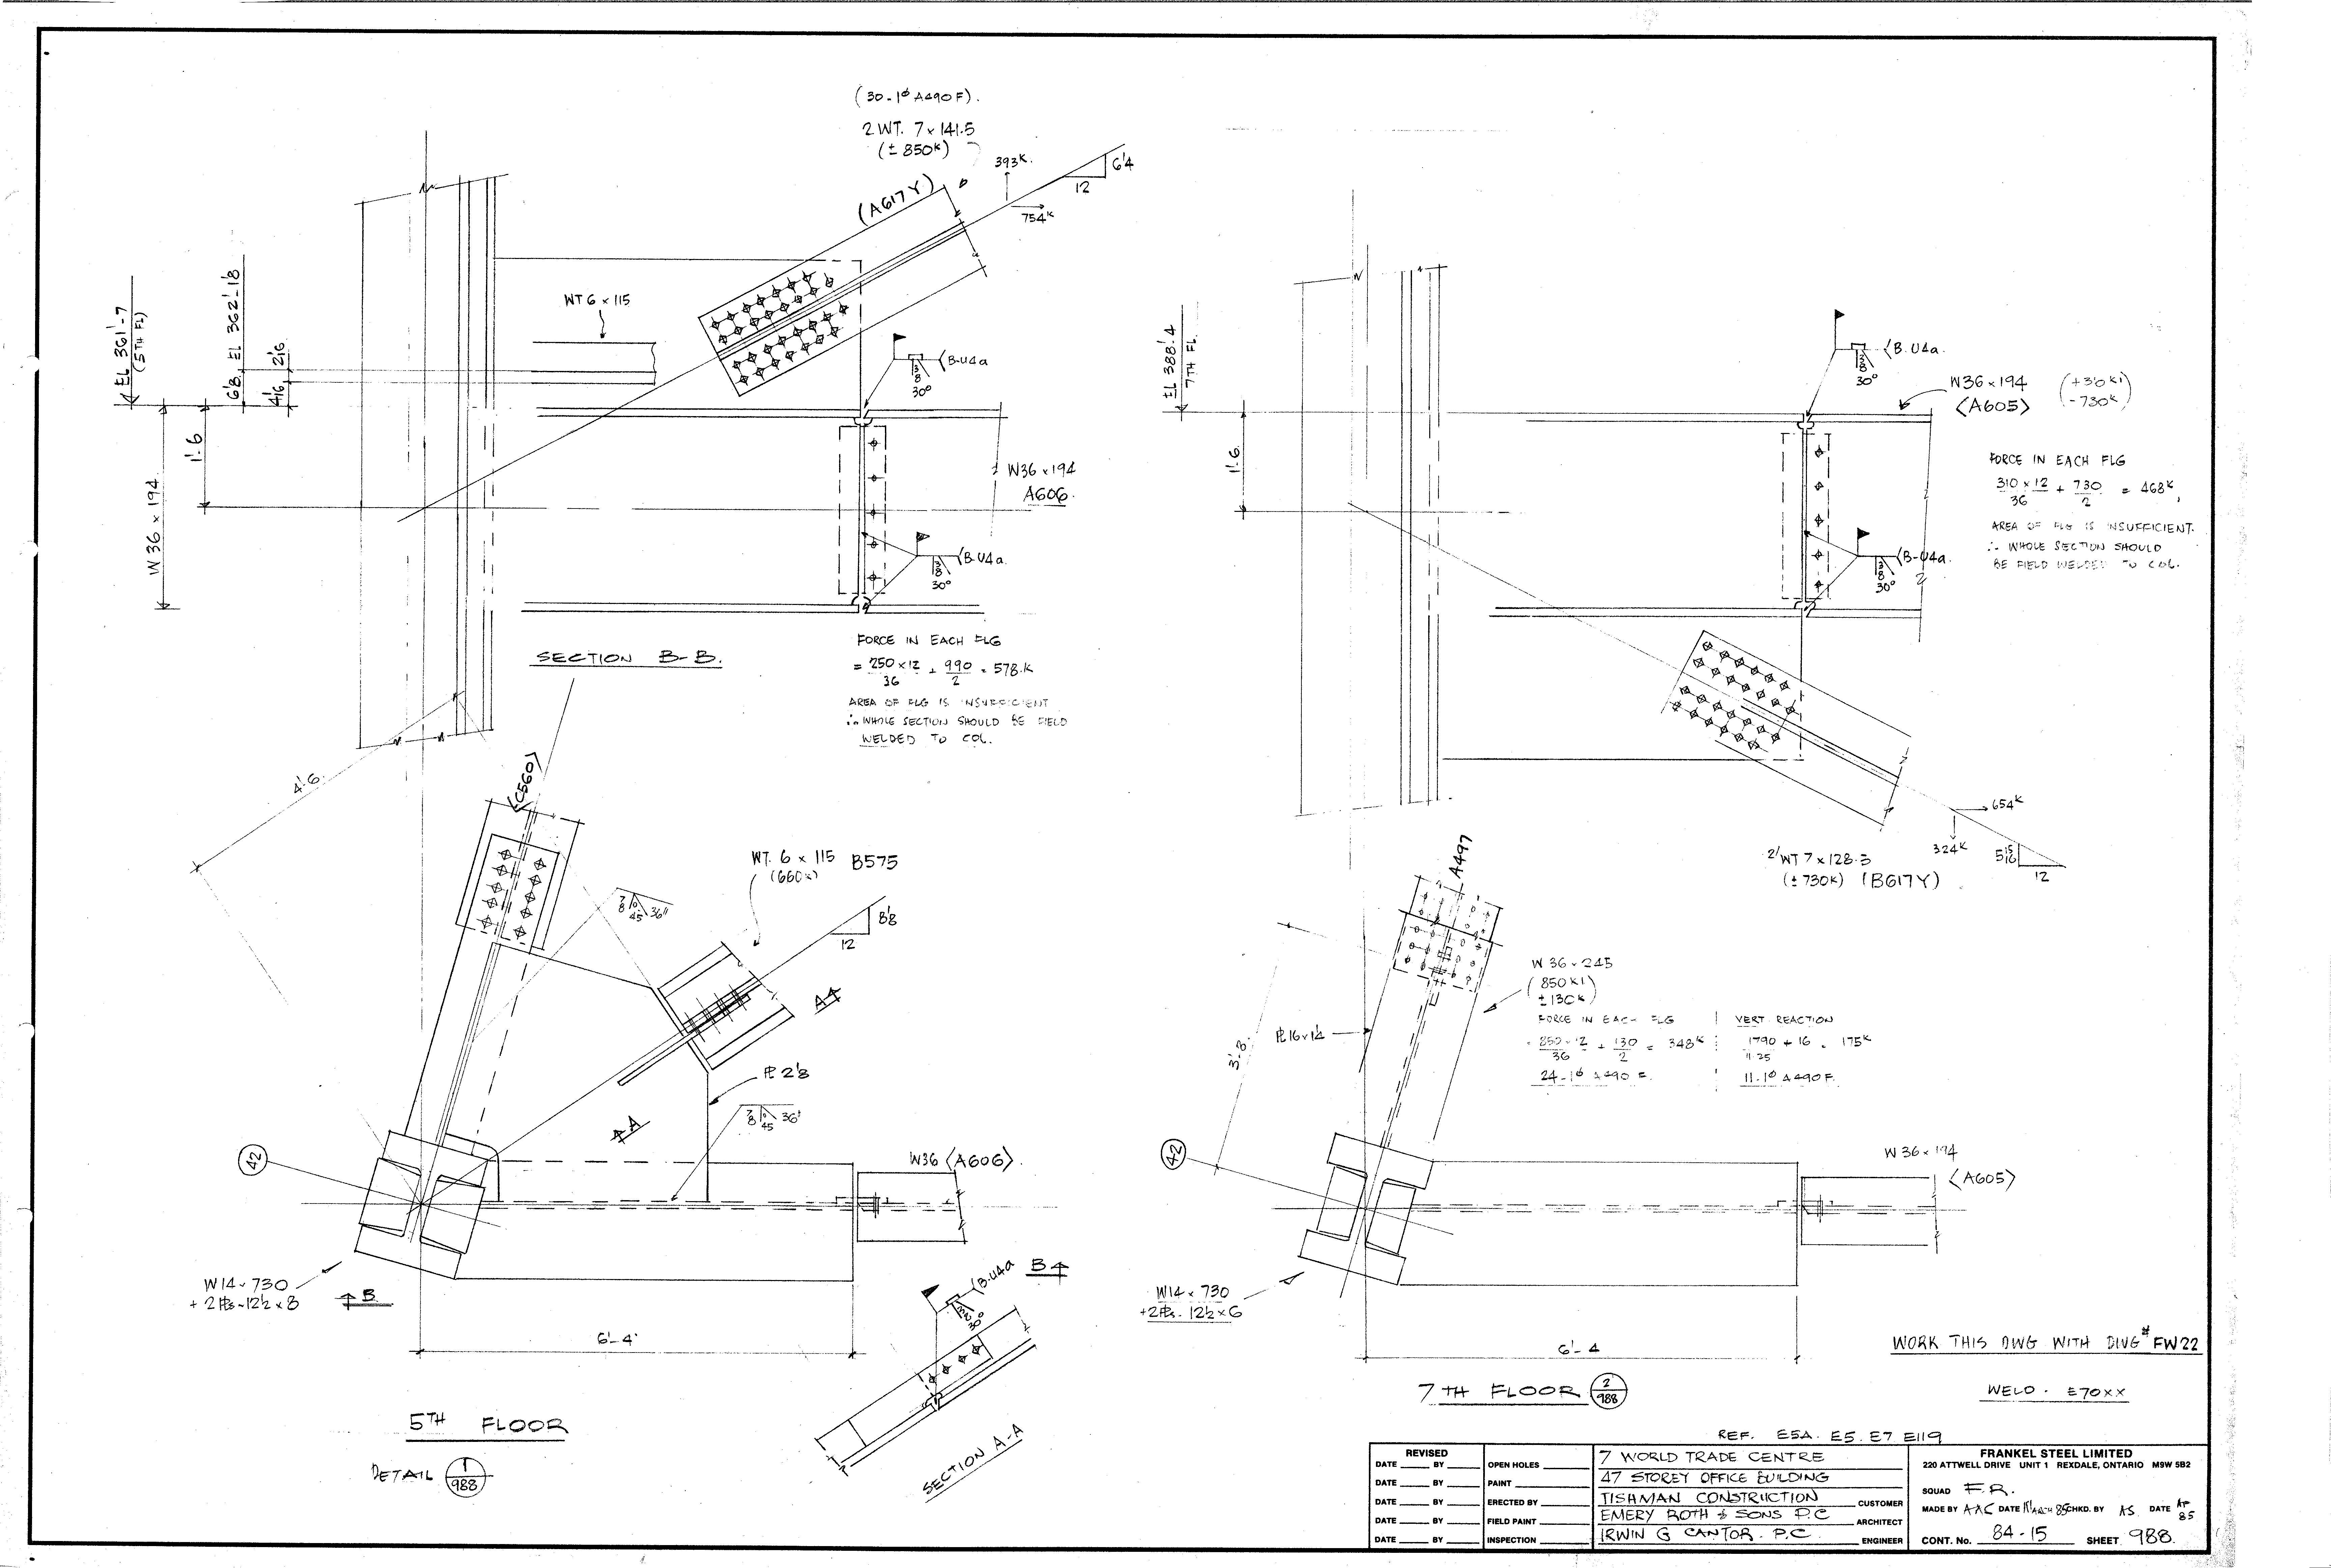
| 0988.png | 272.6 KB | 0988 | 5TH FLOOR & 7TH FLOOR | https://911warroom.com/model/files/WTC7/DRAWINGS/STRUCTURAL/DETAILS-PNG/0988.png |
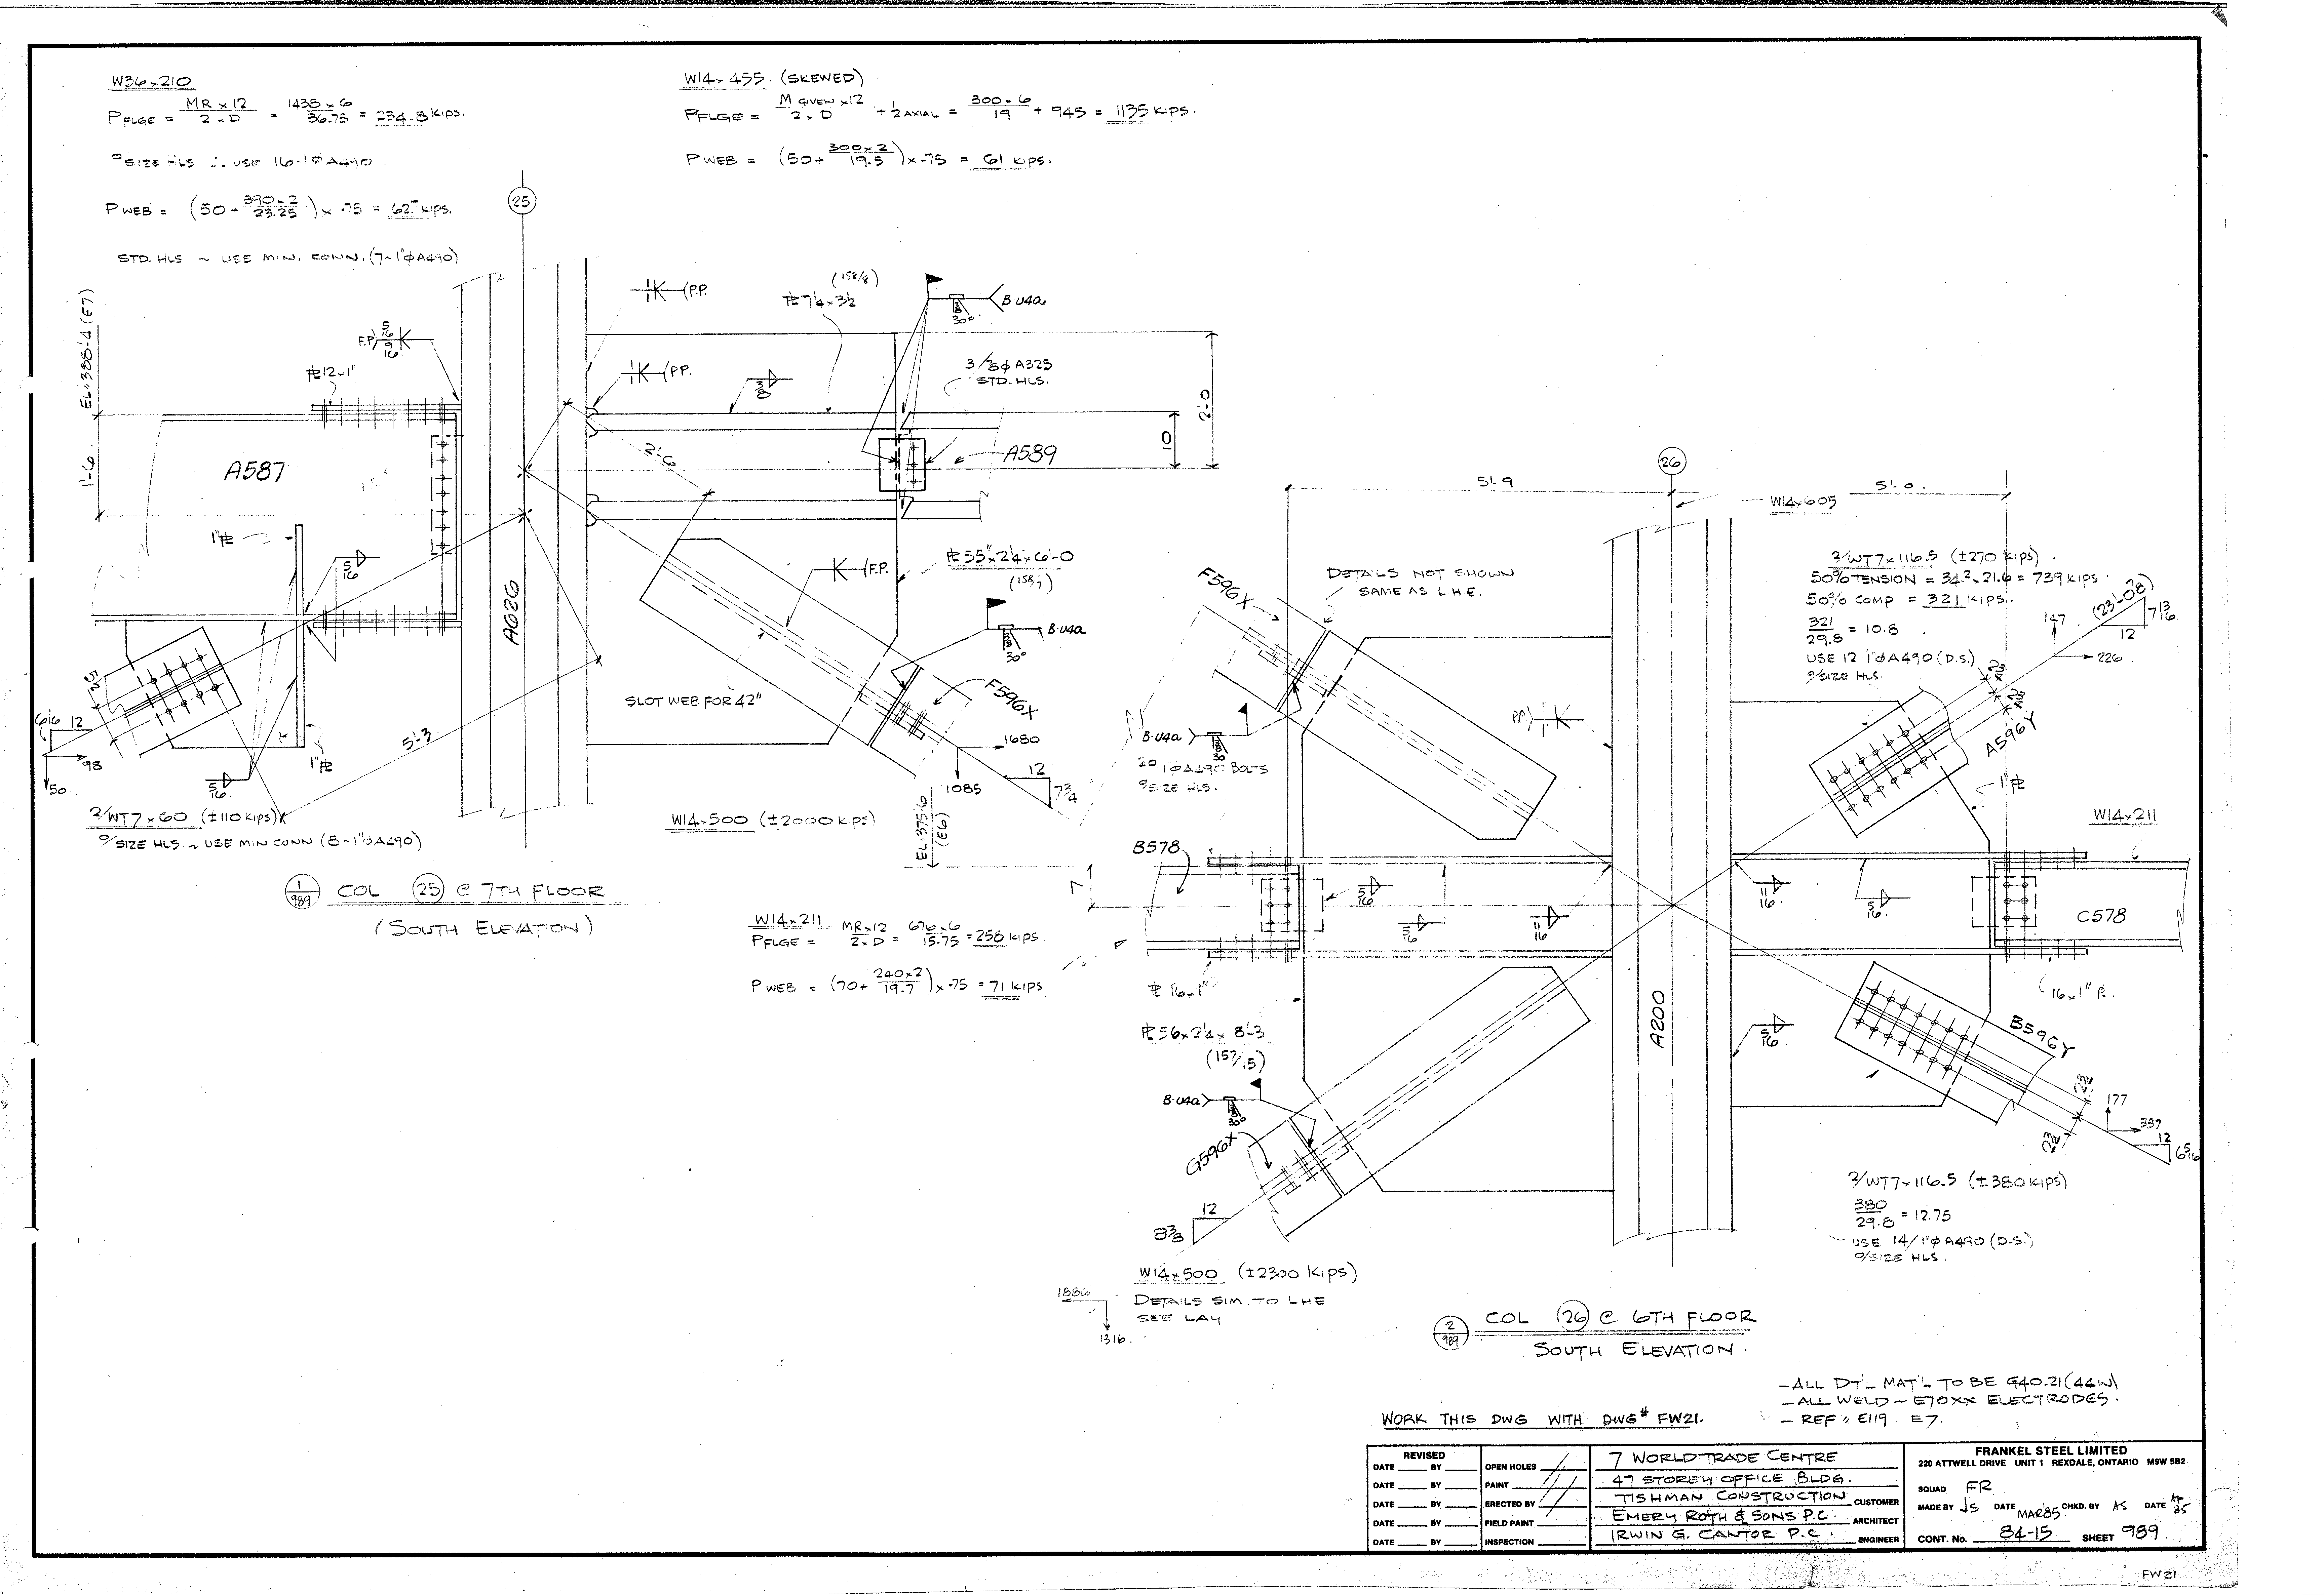
| 0989.png | 328.8 KB | 0989 | COL. 25 @ 7TH FLOOR & COL. 26 @ 6TH FLOOR (SOUTH ELEVATION) | https://911warroom.com/model/files/WTC7/DRAWINGS/STRUCTURAL/DETAILS-PNG/0989.png |
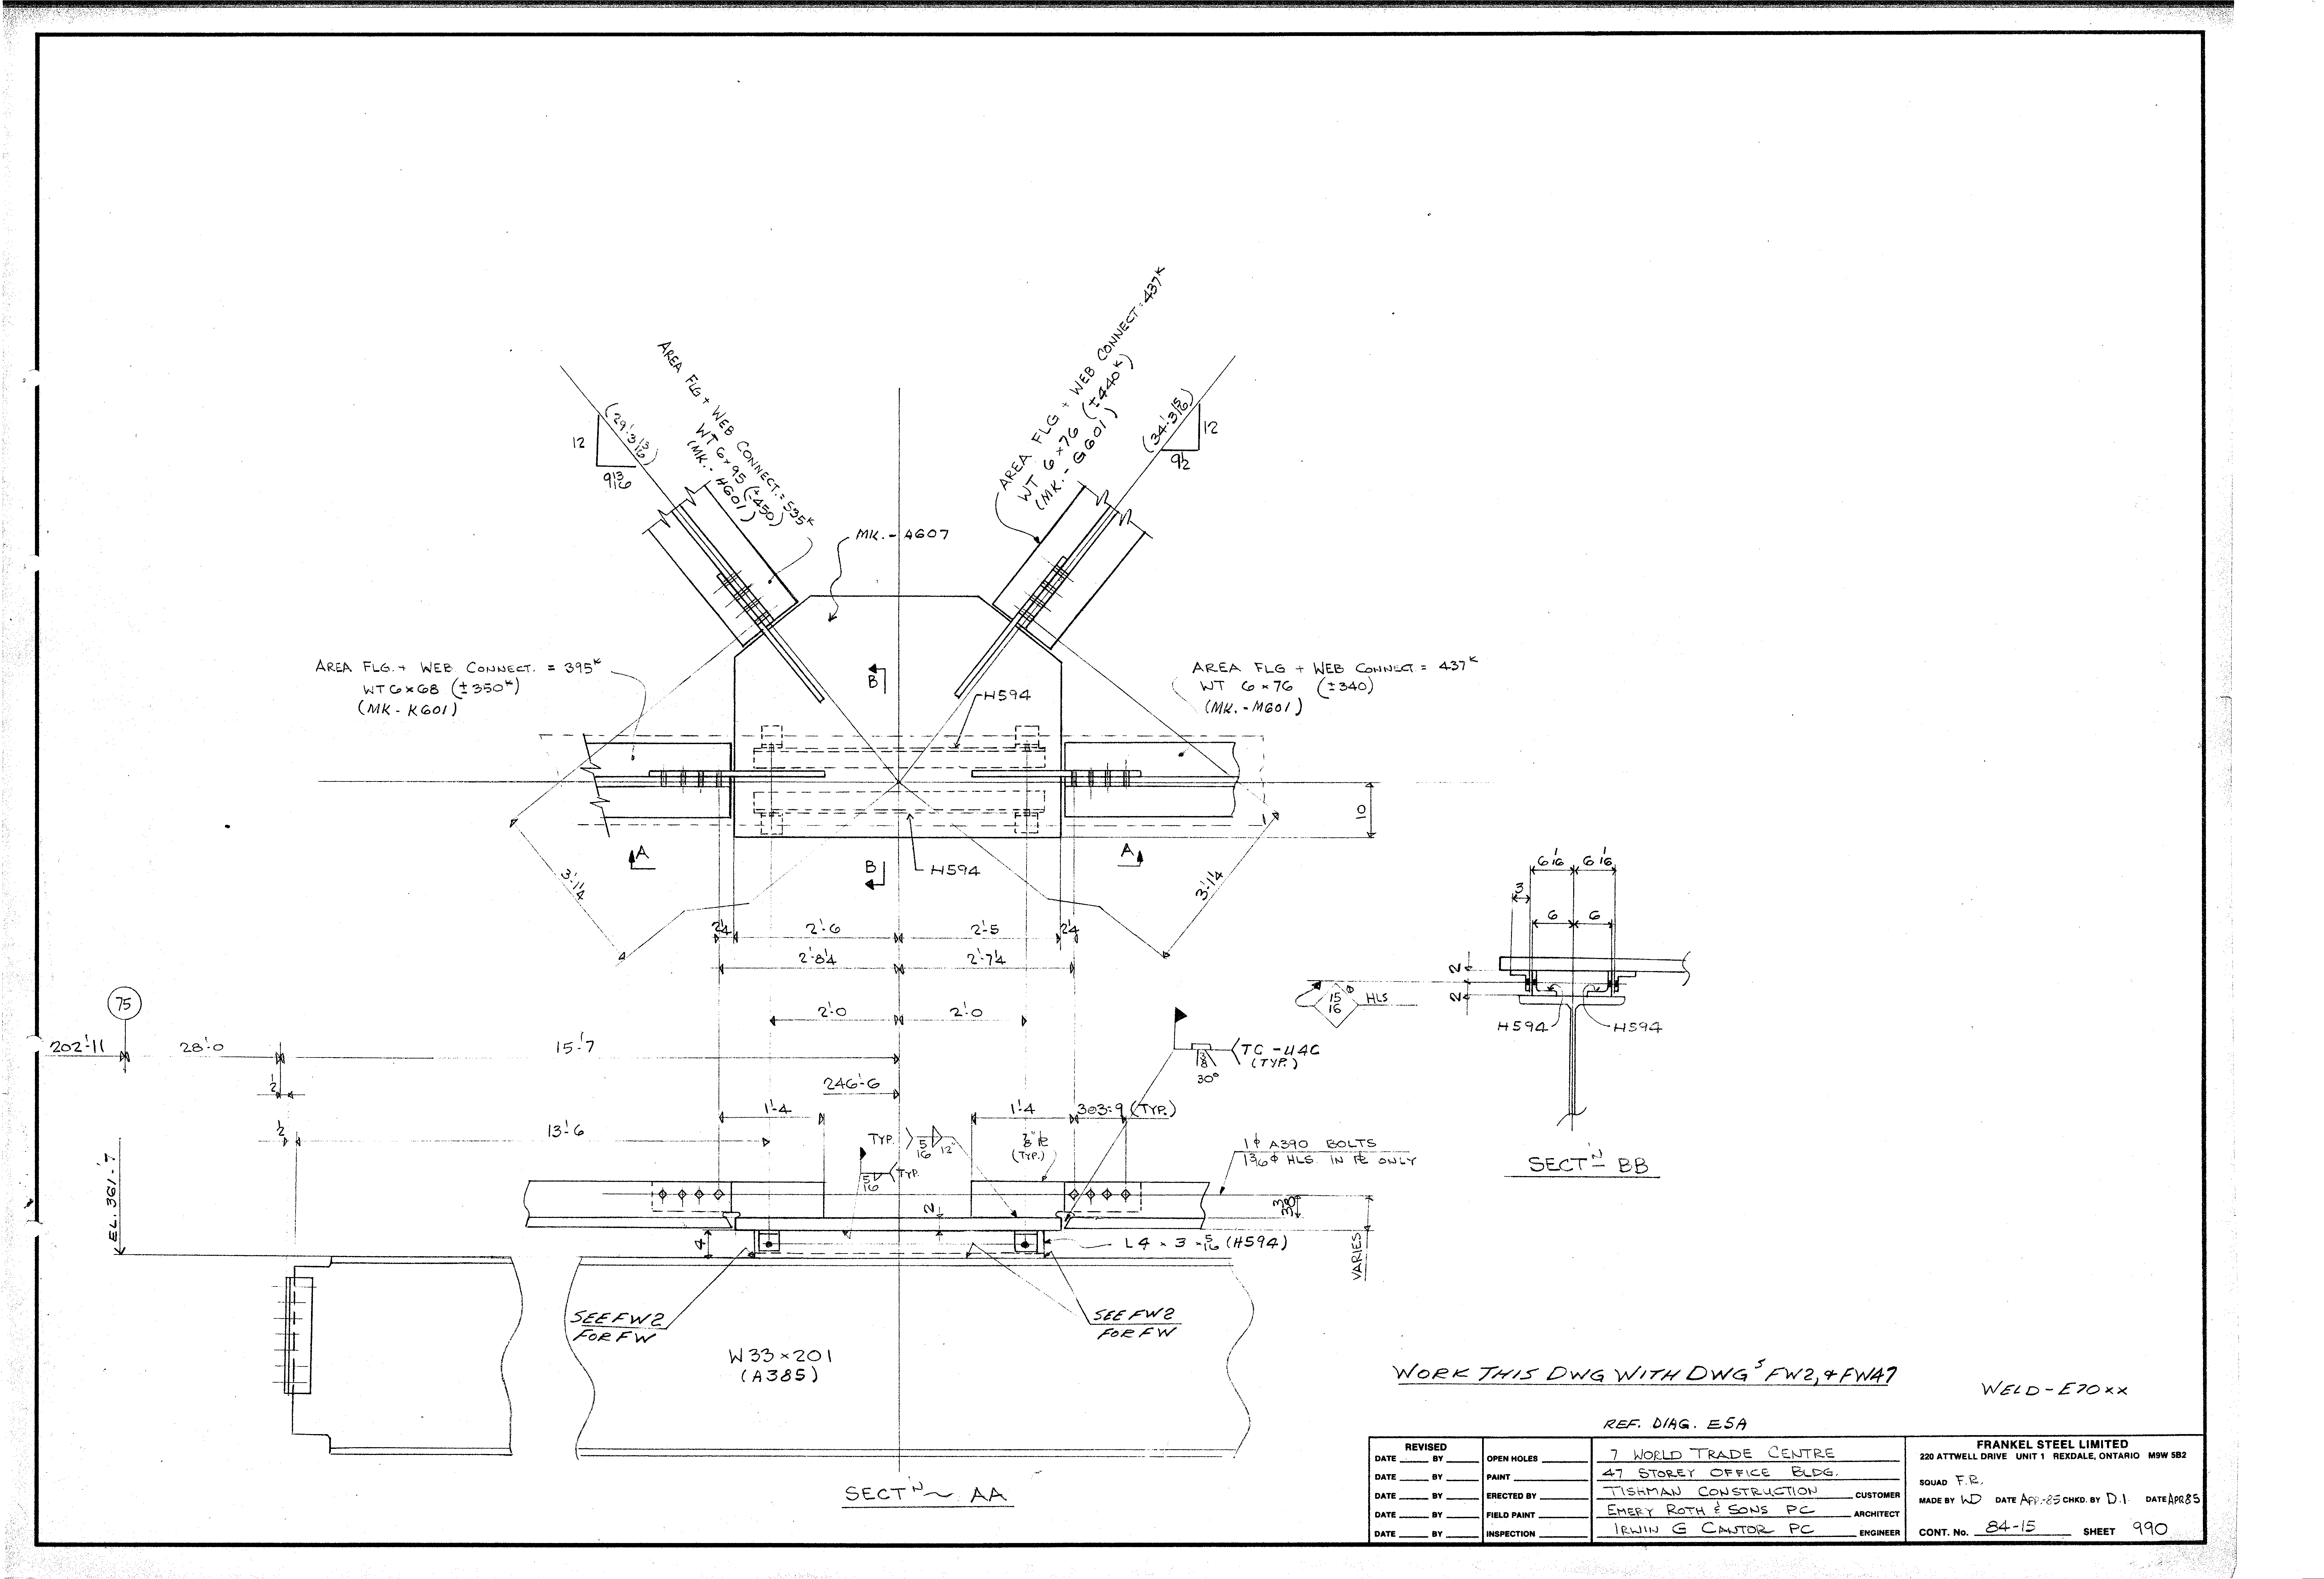
| 0990.png | 236.9 KB | 0990 | SECT'N A-A & SECT. B-B | https://911warroom.com/model/files/WTC7/DRAWINGS/STRUCTURAL/DETAILS-PNG/0990.png |
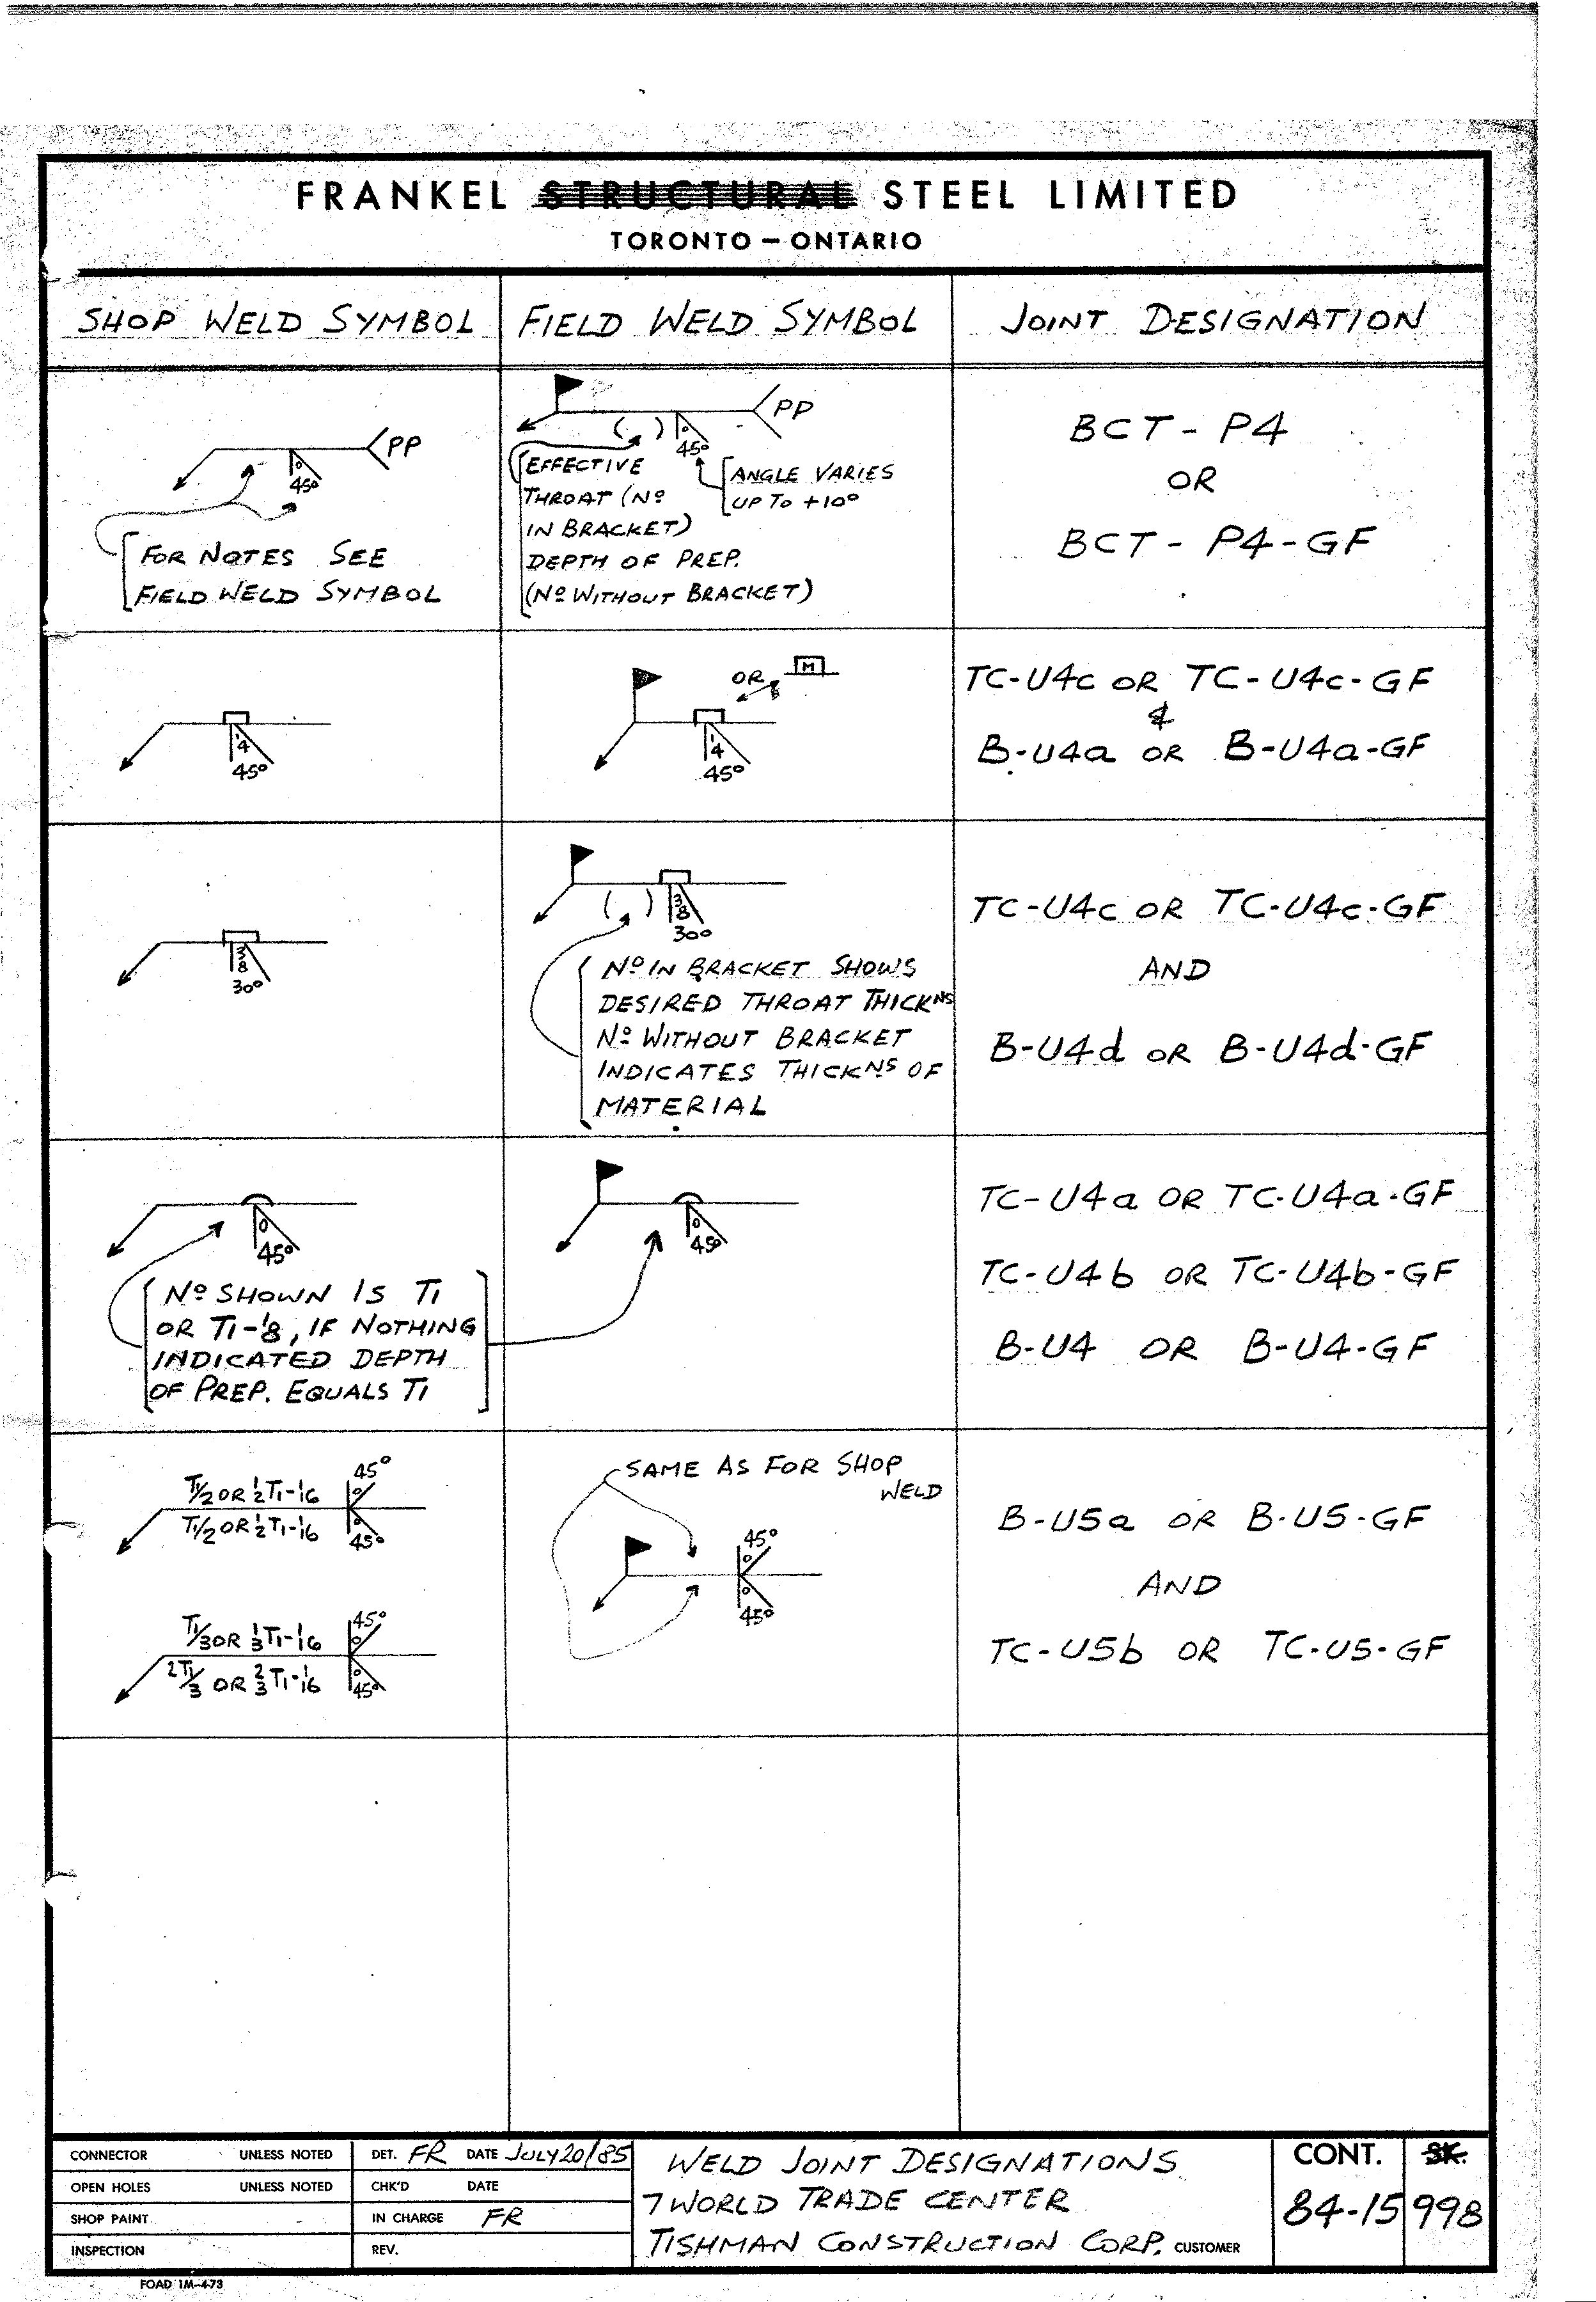
| 0998.png | 139.2 KB | 0998 | WELD JOINT DESIGNATIONS | https://911warroom.com/model/files/WTC7/DRAWINGS/STRUCTURAL/DETAILS-PNG/0998.png |
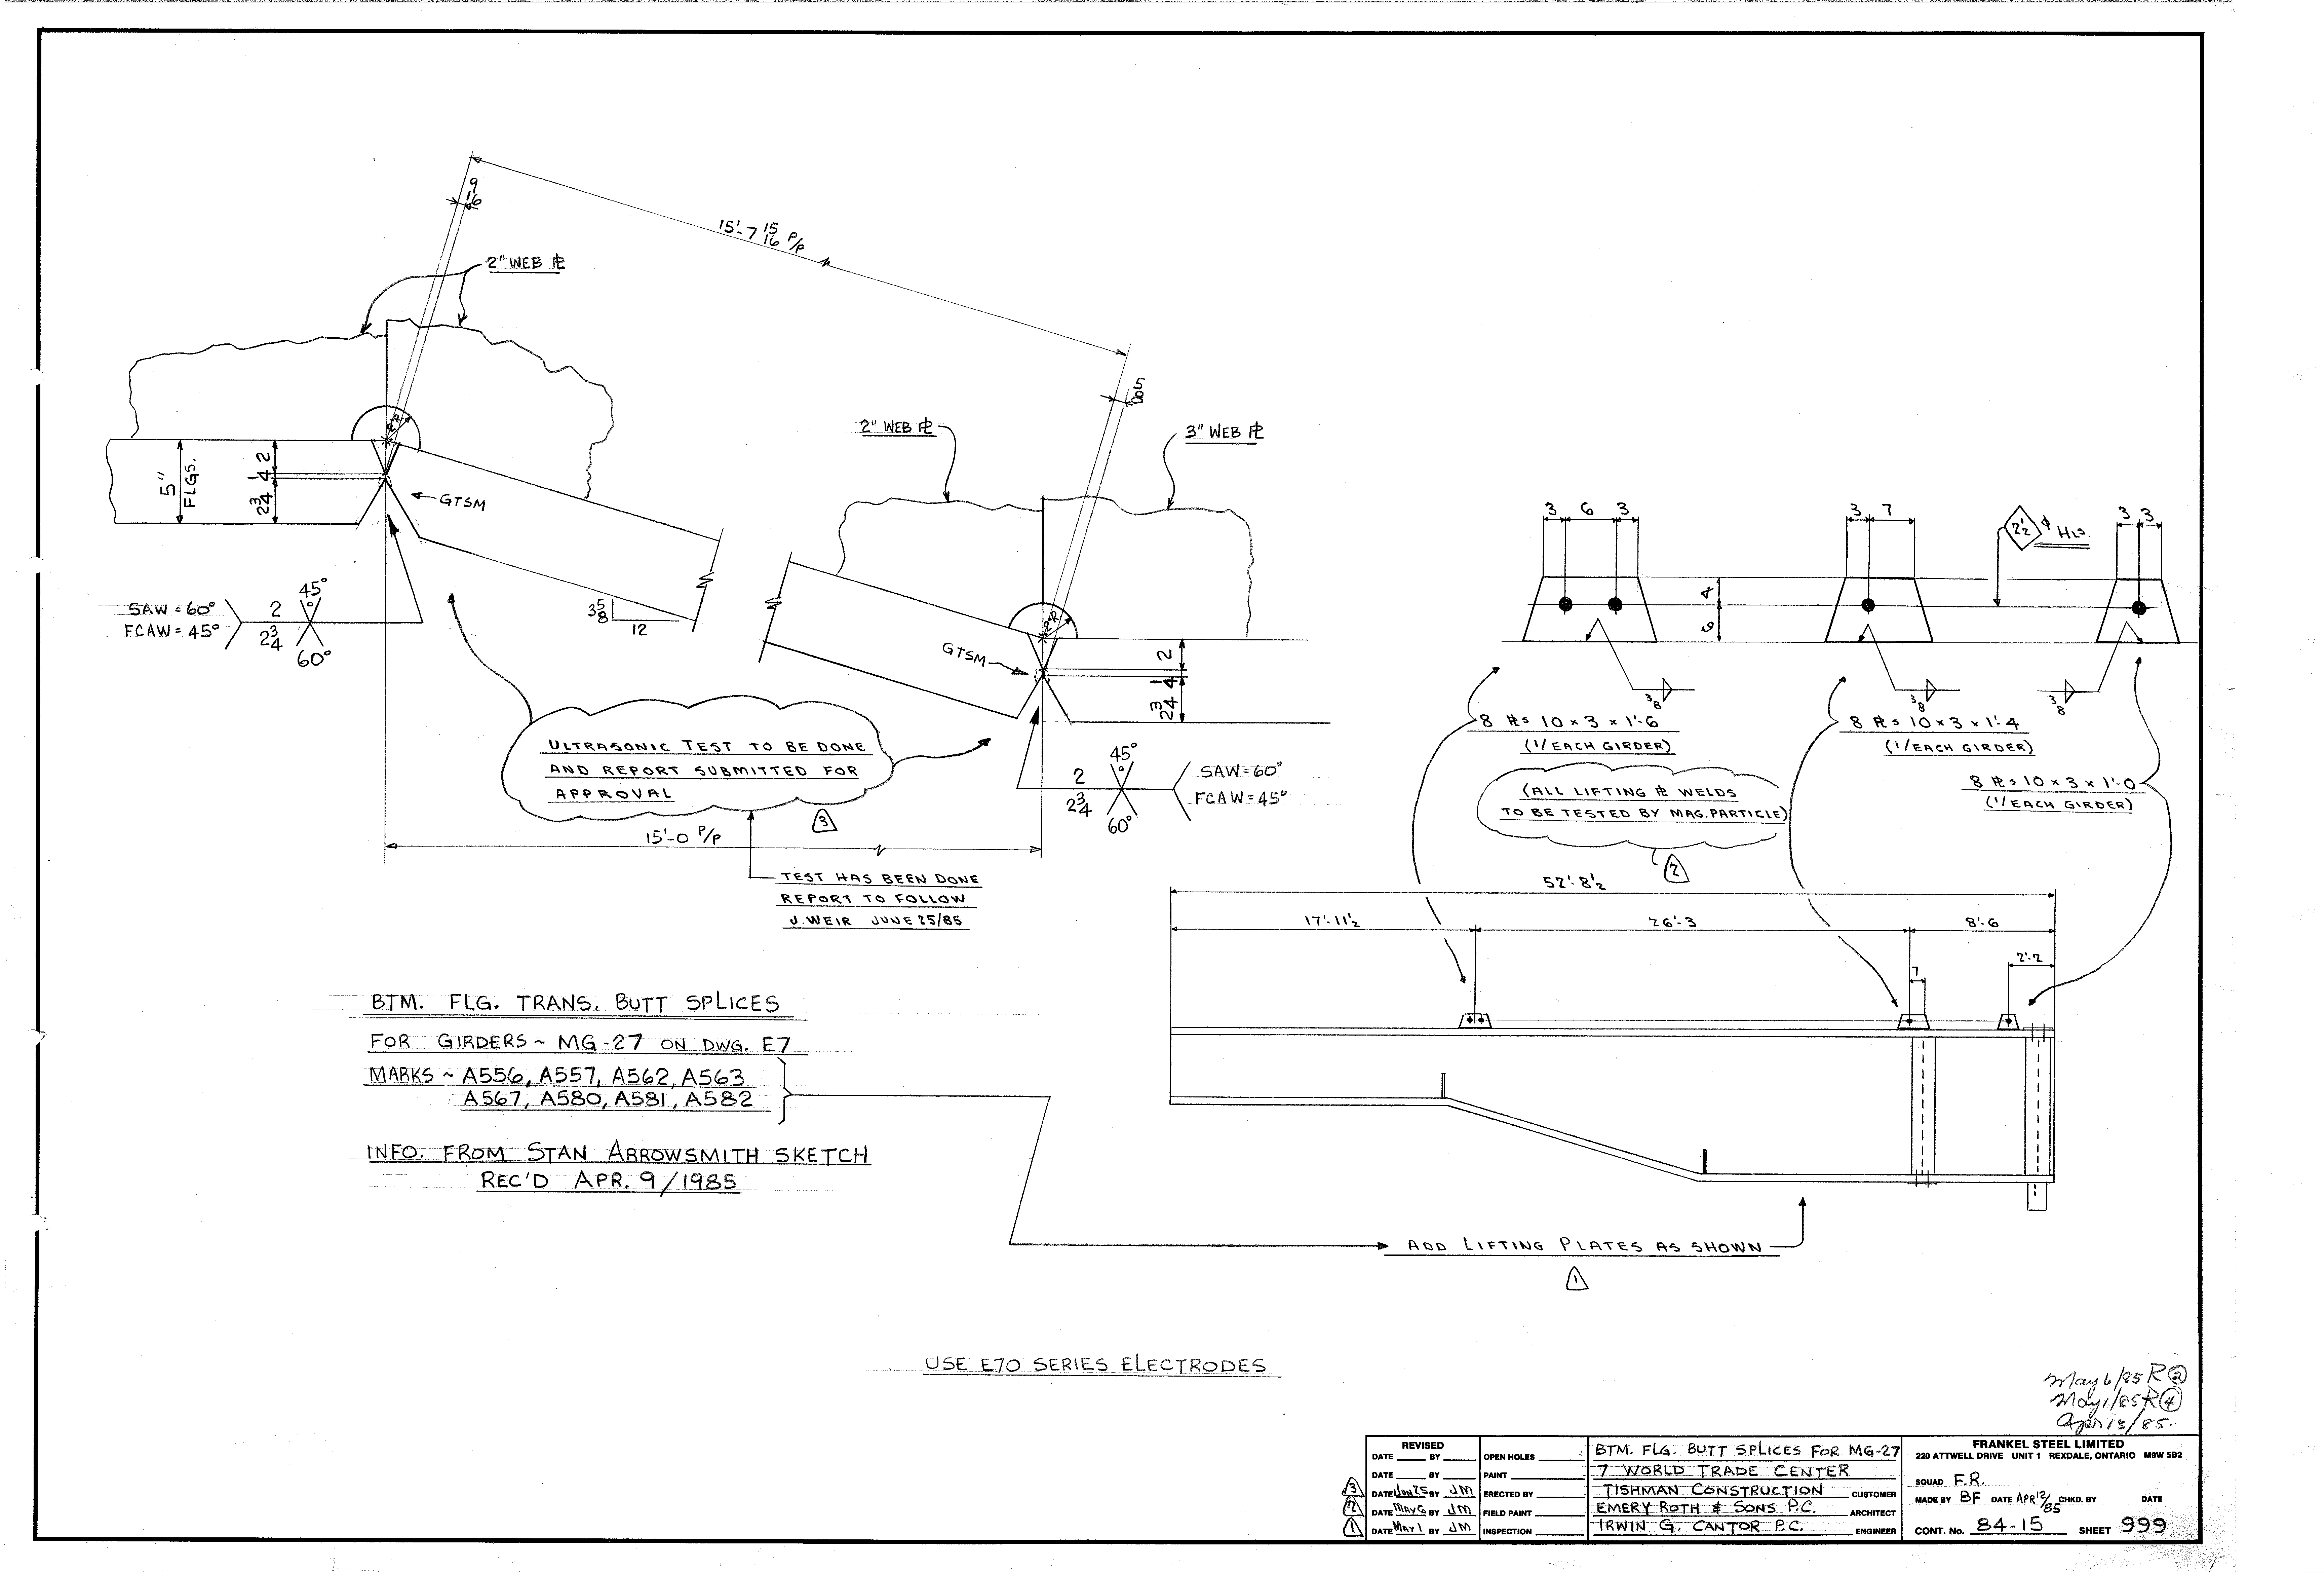
| 0999.png | 219.5 KB | 0999 | BTM. FLG. BUTT SPLICES FOR MG-27 | https://911warroom.com/model/files/WTC7/DRAWINGS/STRUCTURAL/DETAILS-PNG/0999.png |